-
Cellulite Displacement Map
Richard Haseltine said:
You can't export an HD morph, so if you need detail that goes beyond what the base shape allows then you need to bake that sculpt to normlas or displacement.
Sorry im really new to these, what do you mean bake?
Cellulite Displacement MapYou can't export an HD morph, so if you need detail that goes beyond what the base shape allows then you need to bake that sculpt to normlas or displacement.
dForce Simulation and Cloth TearingIt isn't possible to literaslly save a simulation, the best you can do is turn the current state into a morph and use that as a starting point for a new simulation - but that would almost certainly be noticeably gliitchy as it would lose all the information about energy and momentum from the earlier steps, it would just be starting from rest in the new shape.
Loading a series of pose presets as keyframes for want of converting animations between generationsHey folks,
So I've got a massive (thousands) library of animations I've made for G8. I'm trying to formulate a gameplan for converting them to G9 using the tools I currently have.
I've got a couple of good ideas to start, but there's a ??? at some point in each.
I've got Universal Pose Splitter (which doesn't handle G9 yet) and all of the Zev0 Pose/Batch Pose converters.Zev0 doesn't work on animations from what I can tell, thus UPS.
- UPS the animation to "custom list of frames" that is actually every frame so I get a G8 pose preset per frame and not a G8 animation preset.
- Batch convert this group of G8 pose presets to G9 pose presets with Zev0
- ???? Is there an easy way to load a series of pose presets as a series of keyframes other than "load 0...next frame, load 1...next frame, load 2..."
EDIT: The second option "just works" out of the box but...it's per pose with neither save nor batch functionality
- n_alexandru's fantastic free pose converters which DO convert animations, but with no save/batch and I BELIEVE no way to handle pose morphs since most authors, even if they release the same product on multiple generations, change the names of the morph per generation
- repeat until I'm old and grey
Underwater Poses G2F, G8F and now G3F, G9 and GV3I don't have any of RiverSoftArt's bone minions, but it's on my list of things to do to use my own pose transfer scripts to convert them to G8F and possibly then onto G3F & G9.
Thank you for the vote of confidence in the poses.
Regards,
Richard.
ETA 1 July 2025: I've converted five of the poses to G8F, had to tweak a couple of the poses a little, and was able to change Pose 2 so the character's arm pointed straight up, G8F rigging seems better at the shoulder than G2 and the results look more realistic. Should be able to get Underwater 07 looking as I originally wanted too, with the arms straight out front ready for a breast-stroke arm movement.
help for the artisan's masks me be not matching non human's headwell no idea if in right place but i just bought to day 3 of FPE Artisan Mask Okami for Genesis 8 and 9 and 2 an 2 other mask in same line up , my problem is i thought these were morghable in way would fit non human face if this not the case then i need get money back , as thought i could morph each of maskinto ne mask reshaping into new form but they doint seam to morgh cant see any diel mode ,if there is way to doit simple then i need help but if not then i bought pointless items , like if wanted make tengu bird warrios the mask doint fallo the shape of the charecters , or werwolf
Render your buys! Use buys from the current month and the previous month of salesFinally pulled everything together to nerd out and give my geeky character the Doctor Who fangirl cosplay she so richly deserves
New assets:TARDIS: https://www.daz3d.com/historic-police-box
backdrop: https://www.daz3d.com/back-alley (currently in Outlet for the lower tier; the gas mask graffiti was already there! Added the White Wolf off to the side as a decal node. Also hid some of the stuff on the side of the building because it was irrelevant visual clutter)
coat: https://www.daz3d.com/classic-trenchcoat-for-genesis-3-male-s (comes with a nice flare morph, had to parent to the jacket and then use geometry editor to hide some persistent pokethrough bits)suit: https://www.daz3d.com/trading-floor-outfit-for-genesis-3-male-s (works remarkably well as long as you fit the jacket to the shirt)
sneakers: (not new, but for the sake of being complete) https://www.daz3d.com/dforce-capsule-wardrobe-01-for-genesis-9 with https://www.daz3d.com/capsule-wardrobe-01-texture-addon
Sonic screwdriver: freebie from Sketchfab
 AIUTO...CHI CONOSCE L’ITALIANO? PARTE QUATTORDICI
Imago said:
Ragazzuoli, qualcuno sa dirmi quali figure sono supportate nel sistema di transfer dei morph dell'Alpha? E' solo G8 a G9 o arriva anche un pò più indietro?
Nessuno sa rispondere al quesito?
Heel height during "Daz to Unreal" BridgeThe bridge works well with the exception that it doesn't properly adjust the heel height.
While the conversion is happening, I notice that the figure gets "reset" back to a lower height. Once the transfer to UE5 is done, it sets it back up.
Sadly this results in the heels in UE5 sinking into the ground. Is there a way to "freeze" this before export?
Stuck Trying to Fit/Simulate Cloth - What would you do?Oh yeah. You should probably also save the character with the "Big Bella" morph in it to the library also.
Stuck Trying to Fit/Simulate Cloth - What would you do?This only deals with getting the clothing to fit your character in its default pose. Hermit Crab has already given tips for simulation.
For the fitting, the best thing to do is combine all those individual morphs into one single dial in V4, and then spawn that morph into the clothing. Here's a step by step:
1. Save your project before you continue. Then, with all your individual character morphs dialed in, and the figure in its DEFAULT ZERO POSE, choose Figure > Spawn Full Body Morph.
 2. Assign a name to your character. In my example I named her Big Bella.
 3. After you name the character, verify that the morph appears in the BODY actor under the name you assigned. Then choose Figure > Zero Figure. NOTE, this will set all of the individual morphs to zero (which is what you want to do). So if you haven't previously saved the project do so before you zero it out.
4. Dial the individual "Big Bella" morph to 1. It should look exactly the same as the individual morphs you had dialed in, but now it's only one morph! Easy!
5. Conform your clothing to the character. This should be the base, unmorphed version from the library that fits default V4. Just drag and drop from library to conform to your figure.
6. With the clothing selected, choose Figure > Copy Morph From. Select V4 if it isn't automatically selected.
7. Deselect ALL MORPHS in the dialog, and then make sure ONLY your "Big Bella" (or whatever you want to name it) is selected. Then choose OK to copy that morph to the clothing.
8. With the clothing selected, dial the "Big Bella" morph to 1. It SHOULD fit, for the most part.
9. If you need to touch up the morph some, go to the Parameters Palette, and click the right arrow next to your "Big Bella" morph in the clothing. Choose Edit Morph.
10. Use the Fitting Tools (not the fitting room) to touch the morphs up.
11. With the BODY actor of the clothing selected, switch to the Properties tab. There will be a section called "When conforming." Check all the options. The "include morphs" option, especially, will cause the clothing to automatically follow whatever you have your "Big Bella" morph set to.
12. Save your outfit to the library for future use. It's usually a good idea to save the clothing with all morphs turned off (set to zero).
Video link below (no sound)
dForce Archmagejksafe said:
barbult said:
@jksafe Are you creating the morph and looking at the dialed in morph, or are you simulating and then changing tools, without creating a morph before changing tools? (Sorry if it seems like we keep asking the same thing over and over. It just seems like some step might be accidently missed.)
-
Add Beach Style Long Hair to the Genesis 9 figure.
-
Select the Geometry Selection Tool
-
Run a dForce simulation using dForce Archmage.
-
Select Beach Style Long Hair Strands and run Loop Master
-
Swttch from Geometry Selection Tool to any other one
-
See Screenshots in the post above
After step 4, the morph is there. Everything looks great. Then, I switch tools, and the issue I showed in the screenshots occurs.
The screenshots show the dialed in morph on frame 1 with 2 different tools selected.
I'm confused. I may misunderstand what you are trying to achieve.
- Are you trying to create a single morph that represents the result of a hair simulation? You said "After Step 4, the morph is there." That implies to me that you created just one morph ("the morph"). I may be putting too much emphasis on the word "the" being singular.
- Or are you trying to create a whole series of hair morphs that you can animate in a loop, like I did in my YouTube Autumn Bob Style Hair animation? Edited to add: After running Loop Master, i ran dForce Animator before switching tools, to generate the morphs for my animation. Maybe that is a step you are missing????
dForce Archmagebarbult said:
@jksafe Are you creating the morph and looking at the dialed in morph, or are you simulating and then changing tools, without creating a morph before changing tools? (Sorry if it seems like we keep asking the same thing over and over. It just seems like some step might be accidently missed.)
-
Add Beach Style Long Hair to the Genesis 9 figure.
-
Select the Geometry Selection Tool
-
Run a dForce simulation using dForce Archmage.
-
Select Beach Style Long Hair Strands and run Loop Master
-
Swttch from Geometry Selection Tool to any other one
-
See Screenshots in the post above
After step 4, the morph is there. Everything looks great. Then, I switch tools, and the issue I showed in the screenshots occurs.
The screenshots show the dialed in morph on frame 1 with 2 different tools selected.
dForce Archmage@jksafe Are you creating the morph and looking at the dialed in morph, or are you simulating and then changing tools, without creating a morph before changing tools? (Sorry if it seems like we keep asking the same thing over and over. It just seems like some step might be accidently missed.)
dForce Archmagematew said:
barlupt, thank you for your testing!
I got OOT Summer Style Wavy Long Hair for testing, and it turns out everything works. I didn’t even need to switch to the Geometry Editor Tool — Archmage just worked right away.However, Beach Style Long Hair refused to work out of the box. But with your method — it actually did!
jksafe, I have no idea why this happens, but to make Beach Style Long Hair work, you need to do the following:
-
Add Beach Style Long Hair to the Genesis 9 figure.
-
Select the Geometry Selection Tool — this part is critical! The tool must be selected before starting the simulation.
-
Run a dForce simulation using dForce Archmage.
-
Select Beach Style Long Hair Strands and run Morph Extractor, Loop Master, or whatever script you need — it should work now.
-
Now you can switch from Geometry Selection Tool to any other one.
Unfortunately, this still does not work. The steps you wrote down are close to what I wrote I did last time, but after step 5, when I choose a tool other than the geometry editor tool, the simulation looks different. It does not work the way you describe. I attached two screenshots: one with the Geometry Editor Tool selected and one with the Universal Tool. Also, one where the simulation is done using the regular DAZ interface with the Universal Tool selected.
Just to make it clear, looping works. But it doesn't help me because the simulation changes when I select a different tool.
(closed) Looking for kids yellow raincoatThere's this set which fullfills some of your requirements, and the length could be adjusted I guess - you would need a morph to make it close properly though: https://www.daz3d.com/dforce-bloody-rain-outfit-for-genesis-8-and-81-females. It looks as if it moves pretty well. Might want to give it a try.
Then there's this really pretty coat which has a lot of options and could maybe be adapted as a raincoat: https://www.daz3d.com/dforce-km-duffle-coat-for-genesis-8-females. Might want to rummage around in the coats section a little anyways, there might be more with hoods.
Concerning the G8M Wet Weather gear that you already have, what are the problems precisely? Maybe they could be fixed by fiddling with the dForce settings and weight maps?
Edit: There's also this older set, it doesn't open or have the hood down option, but maybe you could use different coats for different set ups? Here: https://www.daz3d.com/h-c-raincoat-outfit-for-genesis-3-male-s.
Character SplitterIf everything went fine, the quickest way to find your morphs is by doing a search in the "Parameters" tab, as shown below :
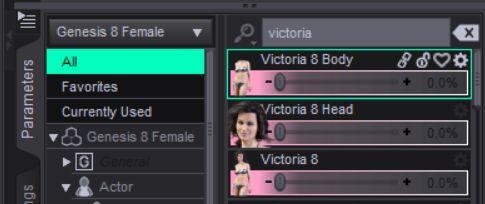
Select "All" and type the morph name ("victoria" here), and all the morphs will appear.
Alternatively you can search them manually from the "Parameters" tab by following the "Path" that you've set in Character Splitter :
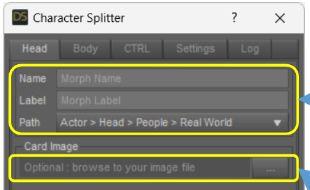 dForce Archmage
matew said:
barlupt, thank you for your testing!
I got OOT Summer Style Wavy Long Hair for testing, and it turns out everything works. I didn’t even need to switch to the Geometry Editor Tool — Archmage just worked right away.However, Beach Style Long Hair refused to work out of the box. But with your method — it actually did!
jksafe, I have no idea why this happens, but to make Beach Style Long Hair work, you need to do the following:
-
Add Beach Style Long Hair to the Genesis 9 figure.
-
Select the Geometry Selection Tool — this part is critical! The tool must be selected before starting the simulation.
-
Run a dForce simulation using dForce Archmage.
-
Select Beach Style Long Hair Strands and run Morph Extractor, Loop Master, or whatever script you need — it should work now.
-
Now you can switch from Geometry Selection Tool to any other one.
Yes, that is the basic step by step. One clarification: The necessary tool's name is Geometry Editor Tool.
@jksafe, if you still need more explicit directions, please ask. I was occupied with other tasks today.dForce Archmagebarlupt, thank you for your testing!
I got OOT Summer Style Wavy Long Hair for testing, and it turns out everything works. I didn’t even need to switch to the Geometry Editor Tool — Archmage just worked right away.However, Beach Style Long Hair refused to work out of the box. But with your method — it actually did!
jksafe, I have no idea why this happens, but to make Beach Style Long Hair work, you need to do the following:
-
Add Beach Style Long Hair to the Genesis 9 figure.
-
Select the Geometry Selection Tool — this part is critical! The tool must be selected before starting the simulation.
-
Run a dForce simulation using dForce Archmage.
-
Select Beach Style Long Hair Strands and run Morph Extractor, Loop Master, or whatever script you need — it should work now.
-
Now you can switch from Geometry Selection Tool to any other one.
Brianna 9, Here Comes the Bride to DAZ3Dfelis said:
Dareshiranu said:
If the wedding gowns came with undress morphs I'd find them more appealing. They'd make better transitions for a variety of scenarios. Undress/Dressing are pretty much the same thing after all.
To do it properly, you would need to open thr dress (where the zipper is). You cannot do that with a morph.
Actually it's really "simple" but may not be worth the effort for most of the products: The zip would be a straight cut on a line of vertices on the cloth, and illusion of a zip would be made with the textures and mask, or even with more 3D mesh. Some additive and cumulative morphs would control both sides of the dresse's zip plus a metalic part that goes up/down as the morph is dialed.
Fit Control for Genesis 9 is a product that may help you with the illusion of dressing/undressing, and works on any piece of clothing.Daz 3D is part of

Connect
DAZ Productions, Inc.
7533 S Center View Ct #4664
West Jordan, UT 84084Licensing Agreement | Terms of Service | Privacy Policy | EULA
© 2026 Daz Productions Inc. All Rights Reserved.