-
Shader Mixer Tutorial
In the recent "What Do You Want to Learn?" thread, there were quite a few requests for Iray Shader Mixer tutorials. Including one from me, wherein I remarked I'd have better luck trying to transfer my knowledge of Blender's Shader Editor over to Daz Studio and figure it out on my own.
Well, I've now done that.
And let me tell you, the Shader Mixer may sound confusing, and look confusing, but don't let that fool you.
It really is confusing.
Nonetheless, I soldiered on and figured out (roughly) how it works. My findings are documented in a thread in the Blender subforum, since it's mainly about how to recreate Blender shaders in Daz, but there's some simple illustrations and I just did a deep dive on how the Uber Shader works, so even if you're not a Blender user you can probably get something out of it.
https://www.daz3d.com/forums/discussion/505581/the-shader-mixer-deciphered-blender-to-daz-conversion
[Released] Clothing Converter from Genesis 3 Female to Genesis 8 Female [Commercial]N00b4Ever said:
Hi RiverSoft.
Hope things are well with you.
First off, let me jump the bandwagon and say your G3F to G8F conversion tool is amazing. Not only is as good or better fitting than the auto-fit from Daz, but it also retains the clothing mophs after the conversion. I noticed sometimes you lose that capability on certain products when using the Daz auto-fit. My biggest complain with your tool is that now my bank account and my wallet are taking a hit because I find myself buying G3F clothes which I didn't expect .
Having said that, I have a request. I noticed that for clothes with long sleeves or gloves, the conversion loses accuracy the farther you go from the shoulders through the arms. My guess is that the angle of rotation when transposing from T-pose to A-pose is slightly off. Is there any chance you can look into this? I know that if the glove fully covers the hand you can simply turn off the hand, but when is only partial that doesn't work.
Sadly, you are going to get errors like this. The script uses the generally accepted transformations for G3 to G8. Adding a smooth modifier can help a lot of times to fix things though.
Also, because apparently I'm a masochist and f*** my bank account and wallet, I also bought the G2F to G8F conversion tool after seeing how good G3F to G8F is. However, when using G2F to G8F so far, all my conversions end up being larger than expected and I find myself adjusting "shrinking" the clothes for a better fit. In this case, sadly, the Daz auto-fit seems to work better, at least for me. My question, if I use the G2F to G3F conversion and then use the G3F and G8F conversion on the converted product, will I get a better result or is the the same as G2F to G8F?
The G2 to G8 converters had to work differently, and thanks to Sickleyield, it is possible. It uses special morphs we called conformers to pull the clothes to the correct shape. From the manual:
Converted Items are too loose on the figure. The Clothing Converter script morphs the clothing using the clothing conversion conformers. Occasionally, the conformers make the converted clothing too loose (see Figure 9). Thankfully, this is easy to fix. When the clothing items are converted, a lot of helper morphs are added to address fit issues. The helper morphs are in the Parameters pane, below Actor->Converter Morphs (see Figure 10). Adjusting the Tighten All morph and turning on Smoothing can fix most issues. Otherwise, there a lot of additional morphs you can use to tweak the fit.
Thanks in advance.
Cheers.
duplicate key - is it proof of illegal use of morphs, if not how can i fix it?[Solved]Hi, I've bought some characters from someone via DeviantArt, they're riddled with duplicate key error which loads now with every G8M. Here's the log attached.
Do these duplicate key errors mean that they've used Daz figures to build their morphs? I've contacted him about these errors and he's refused to do anything about it. That was nearly two months ago. Inf fact he refused to accept that there were errors at first and said I was the only person to complain about it. Like it's my fault. I uninstalled the figures until this morning when I figured I'd see what I could do. He's not a very nice person it seems and I've given up trying to do anything but the decent way. If he's used Daz figures from other PA's fraudulently then who am I to interfere with the wheels of justice?
If everything is fine then how can I fix it? I've just done an ERC Bake on the first dial and nothing happened. I mean, there were no other dials linked to it other than on hidden morph which still dialled in after the bake.
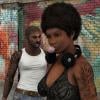
Celebrity Look-a-Likes for 3D figures part 3Another Face Transfer creation. Tyler Hoechlin and Tyler Posey
dForce Classic Long Curly Hair Initial Shape 04Thank you SO much! Attachment 1. I created the initial shape using Phatmartino’s “Parameters” tab morph recommendations (i.e., Hair Length All 100%, L Side Move Back 100%, R Side Move Back 100%, Hair Wind Left 30%, Hair Wind Right 30%) then set Self-Collide Layers 4, 3, 2 “On” with Layer 1 “Off.” Changing Self-Collide prevented the few remaining stands of hair from coming forward.
I will definitely move the arms up prior to simulation for another pose I want to use this same hair shape with.
Bests always!
G8F TO MALE MORPH ALPHA - NEED TESTERSHi
I'm making a morph for G8F to convert a Female to Male but I'm a newbe so I need people to test it.
I have decided to relese this morph here. Anyone can download and use it (for free - put me on the credits). The link for download is:
https://drive.google.com/uc?export=download&id=1dwwiM3OW9Q_gs-3B8IHUeSTEvB4On3J0
(I also added the file to post)
G8F materials (also skins), clothing, hair and poses should be fully compatible (I hope but not sure...this is why I need testers
 )
) G8M assetes are compatible only by Autofit.
The morph is called Mihai and you can find it below Actor-->Full Body.
Please post images of results or problems and tips on how edit it.
PS: Here a index of problems found and I'm going to correct in the future. I'll edit adding other problems found by you:
- imprecision in the finger poses due a different starting pose than G8F
- Nipples too big (are the G8F original size.. too big for a man)
Transferring Morphs Between Figures Tutorial - Released!JackyBrown said:
I am now the proud owner of a G8M_Darius7 Morph and feel like a sorcerer's apprentice! :) Very good tutorial I think, I just don't understand why, on page 21, we need 2 morphs and then delete one? ("Select the undesired morph and simply delete it.") Thanks again for making this tutorial! Btw, unfortunately the Darius7 textures are one of the few that do not fit perfectly onto G8M, darn... ; ) (Fortunately, the morph looks fantastic with the Isaac for G3M textures too!)
hahaha ... no you don't "need" two morphs just to delete one lol ... I make most of my tutorials as a walk-through - so everything I encounter I put in because many people as they are doing their work may encounter something similar. Maybe there was nothing wrong with their first morph - they may just want to try again and improve. Somehow as we make morphs there will be morphs we want to delete - so I illustrated how to. This is one of the reasons why it is always a good idea to read the entire tutorial before re-reading it and following along.
Congrats on the 'new' G8M_Darius7 morph.
You could try making a copy of the Darius7 textures and working them onto a G8M template [using an image editor that works with layers].
Transferring Morphs Between Figures Tutorial - Released!I am now the proud owner of a G8M_Darius7 Morph and feel like a sorcerer's apprentice! :) Very good tutorial I think, I just don't understand why, on page 21, we need 2 morphs and then delete one? ("Select the undesired morph and simply delete it.") Thanks again for making this tutorial! Btw, unfortunately the Darius7 textures are one of the few that do not fit perfectly onto G8M, darn... ; ) (Fortunately, the morph looks fantastic with the Isaac for G3M textures too!)
Quck question about "Sweet Denim Outfit Set for Genesis 8 Female(s) by Pretty3D"handel_035c4ce6 said:
The original socks textures has the same length as the original socks. How you overcome this? Also - what you use to copy the rigging on G8F and if possible the settings please:-)
When mirroring in blender the 2 meshes will use the same UV layout, i.e. both will use the UV of the remaining sock and therefore the same texture. So you can't make the socks different colour, unless you do some additional steps :-)
In DS Edit > Object > transfer utility, with G8F as source and the socks as target and rest default.
You shall be aware of that blender uses a different scale and XYZ orientation than DS, but essentially you just have to ensure that you uses same in-out settings in each program. So before you uses transfer utility, the socks must be in the right place and scale. For default G8F in A-pose it will looke like they fit her.
Quck question about "Sweet Denim Outfit Set for Genesis 8 Female(s) by Pretty3D"felis said:
My way of doing it.
Load the socks and export them as obj.
Import them in blender. Delete 1 sock, and apply mirror modifier. Export as obj.
Import into DS. Transfer rigging to G8F. And then copy materials from the original socks.
The original socks textures has the same length as the original socks. How you overcome this? Also - what you use to copy the rigging on G8F and if possible the settings please:-)
Transfer Head Genesis follow OBJ Headmargrave said:
thaicuong2909 said:
well, I'm just newbie to blender with a few basic operations, can you tell me a bit about these two tools, or some tutorials about it for me to refer to.
Retopology for Beginners in Blender 2.8 - Retopo the Correct Way - YouTube
Study this video, except instead of creating new geometry as they do, remember to only move the geometry that already exists on the Genesis mesh. If you add or delete vertices, you can't use it as a morph. For that reason, also remember to always check "Keep Vertex Order" on both import and export.
Thank you for sharing this, maybe today I have learned something more. Have a beautiful day.
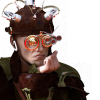
[Released! HD Face Burns for G8F + Add-On] FenixPhoenix's Commercial Products
My pleasure, glad to hear you got it working! Thanks for purchasing our products :)kiloechonov3337 said:FenixPhoenix said:
2. This is how the burn was designed, however, if you wanted to push it, you could always break the limits of the morph and dial in a higher percentage. To do that:
- Navigate to the parameters tab (window > pane > parameters) and locate the morph you want to accentuate.
- In the upper corner of the dial (above the percentage) you'll see a small gear icon. Click on it > Parameter Settings...
- That will open up a window, wherein you'll see "Use Limits" with a checkmark. Click on the box to get rid of the checkmark and that will disable the limits.
- Or, you can also increase the "Max" percentage from 100 to maybe 150-160% and hit accept.
- Now you'll be able to dial in the morph at a bigger amount. Just keep in mind that dialing it too much may result in skin pokethrough.
Notice in this promo example how I broke the limit of the ear morph to dial the burn up to 150%:
Ah. I see. I forgot about the HD morphs needing subdiv 4. Thanks! Got the effect to work nicely!
[Released! HD Face Burns for G8F + Add-On] FenixPhoenix's Commercial ProductsFenixPhoenix said:
2. This is how the burn was designed, however, if you wanted to push it, you could always break the limits of the morph and dial in a higher percentage. To do that:
- Navigate to the parameters tab (window > pane > parameters) and locate the morph you want to accentuate.
- In the upper corner of the dial (above the percentage) you'll see a small gear icon. Click on it > Parameter Settings...
- That will open up a window, wherein you'll see "Use Limits" with a checkmark. Click on the box to get rid of the checkmark and that will disable the limits.
- Or, you can also increase the "Max" percentage from 100 to maybe 150-160% and hit accept.
- Now you'll be able to dial in the morph at a bigger amount. Just keep in mind that dialing it too much may result in skin pokethrough.
Notice in this promo example how I broke the limit of the ear morph to dial the burn up to 150%:
Ah. I see. I forgot about the HD morphs needing subdiv 4. Thanks! Got the effect to work nicely!
Transfer Head Genesis follow OBJ Headthaicuong2909 said:
well, I'm just newbie to blender with a few basic operations, can you tell me a bit about these two tools, or some tutorials about it for me to refer to.
Retopology for Beginners in Blender 2.8 - Retopo the Correct Way - YouTube
Study this video, except instead of creating new geometry as they do, remember to only move the geometry that already exists on the Genesis mesh. If you add or delete vertices, you can't use it as a morph. For that reason, also remember to always check "Keep Vertex Order" on both import and export.
[Released] Randomizable Trees [Commercial]Random said:
Quesstion about the leaves. If the tree is made smaller do the leaves scale down propotionally? And can the leaves scale independently from the tree? Leaf size as well as shape is very important for "realism".
You have a choice of leaf size textures as well as a Leaf Size morph (for the Hi Res Tree only) to change the leaves.
Transfer Head Genesis follow OBJ Headmargrave said:
Export the base Genesis character to Blender and use vertex snapping and the shrinkwrap modifier to make the Genesis mesh conform to the head, then re-import the Genesis mesh as a morph.
well, I'm just newbie to blender with a few basic operations, can you tell me a bit about these two tools, or some tutorials about it for me to refer to.
Plugin exporting all facial morphs causing long Maya import times (30+ minutes)I have so much content that it takes a very long time (about 35 minutes on my decently fast laptop) to import a single figure into Maya with the plugin because there are hundreds of facial expressions that the Daz to Maya Bridge plugin force-exports from Daz Studio causing Maya to have to extract and create blendshapes for each and every one causing the long import time. Can you possibly make it where it uses the last-used morph export rules from Daz Studio's fbx exporter so these can be more easily controlled with .csv morph lists? This would also help for general morph export customization in addition to fixing the forced expression exports.
Quck question about "Sweet Denim Outfit Set for Genesis 8 Female(s) by Pretty3D"My way of doing it.
Load the socks and export them as obj.
Import them in blender. Delete 1 sock, and apply mirror modifier. Export as obj.
Import into DS. Transfer rigging to G8F. And then copy materials from the original socks.
the skimpiest skimpwear in store?WendyLuvsCatz said:
is that cybersuit actual geometry or a geoshell and HD morph?
It is geometry. I got excited for a hot minute because I found I could turn off the thong "panty" in the surfaces tab. Unfortunately, the panty seams aren't independent of other seams in the outfit. So, if I decide to remove the thong it will have to be with the Geometry Editor or maybe masking. On the plus side, it does have quite a few clothing morphs along with a lot of material zones. I also found that if one has this set of shaders https://www.daz3d.com/ultrueviolet-light-and-glowing-shaders-for-daz-studio the blue lighting effect matches the blue cyber material preset. I haven't tried any of the other light colors but I suspect these would work for the other color presets. Oh yeah, boots are it two sections...foot area "boots"; leg "legs". I kind of missed that when I read through the details but it's all good since it gives even more kit bash possibilites. :)
EDIT: This is the list of adjustments for outfit pieces and material zones for just the suit portion to give you an idea adjustments and zones. Material zones in other pieces of outfit are similar to the ones for the suit portion.
The Terracotta ArmyWhen I lived in China, I made a trip to Xi'An to see the real thing (among other cool stuff in Xi'An) - This set looks great (and as each terracotta warrior has a unique face in the real version, it's great that we can morph Genesis 8.1 to have unique warriors).
Daz 3D is part of

Connect
DAZ Productions, Inc.
7533 S Center View Ct #4664
West Jordan, UT 84084Licensing Agreement | Terms of Service | Privacy Policy | EULA
© 2026 Daz Productions Inc. All Rights Reserved.