Daz 3D is part of 
Connect
DAZ Productions, Inc.
7533 S Center View Ct #4664
West Jordan, UT 84084
Licensing Agreement | Terms of Service | Privacy Policy | EULA
© 2026 Daz Productions Inc. All Rights Reserved.
Comments
Anilip 2 looks like it has a very Mimic Pro-like system with a Ton of tools for post-processing the results of the automated lip sync.
Along with the added controls I was mentioning above, I intend to start working with Anilip 2 very soon here. I don't really do dialog in my videos, but I'm going to (finally) try Anilip 2 just to see how it all works - because it looks like they've put a lot of heart and soul into the project.
If you watch as I mess with my facial musculature controls in my videos, you'll notice that I have a set of purple viseme dials. Those came with Anilip 2 - Augmented Visemes for Genesis 8, and I love using them for helping to shape the lower section (jaw, lips, etc.,) of the face. I love that they go past the boundaries of the standard viseme set as well as separating the lip portion of the morph from the jaw control as individual dials - very handy for "individualizing" facial characteristics.
Example: I use "K - Lips Only" augmented viseme for several of Rosie's facial musculature dials because of how it shapes the lips - one dial that does a lot of what I was trying to perform using many others in the Mouth section - so it saves time and I like the results better.
AA - Jaw Only is also an excellent dial for opeing and closing the mouth.
Another note that feels important to me about Anilip 2:
Watching the demo video, I'm not overly keen on some of the results as-is. But I'm confident that those results are incredibly similar (improved even) to those of Mimic Pro, and that with additional "Attention to detail" work after the fact should produce excellent results.
(second thing he demonstrates - "Cubic Interpolation" - I wish that we had access to that for other animation interpolations!!!)
@Dartanbeck
I have Anilip 2 the default results are pretty robotic as there are no automatic eye blinks or slight head movement that we had at minimum with Mimic pro 3.
Also if you look at the MIMIC pro 3 interface image I posted you see there were also expression tracks inside the program that you could insert in the linear timeline at any point to match the emotional context of the audio.
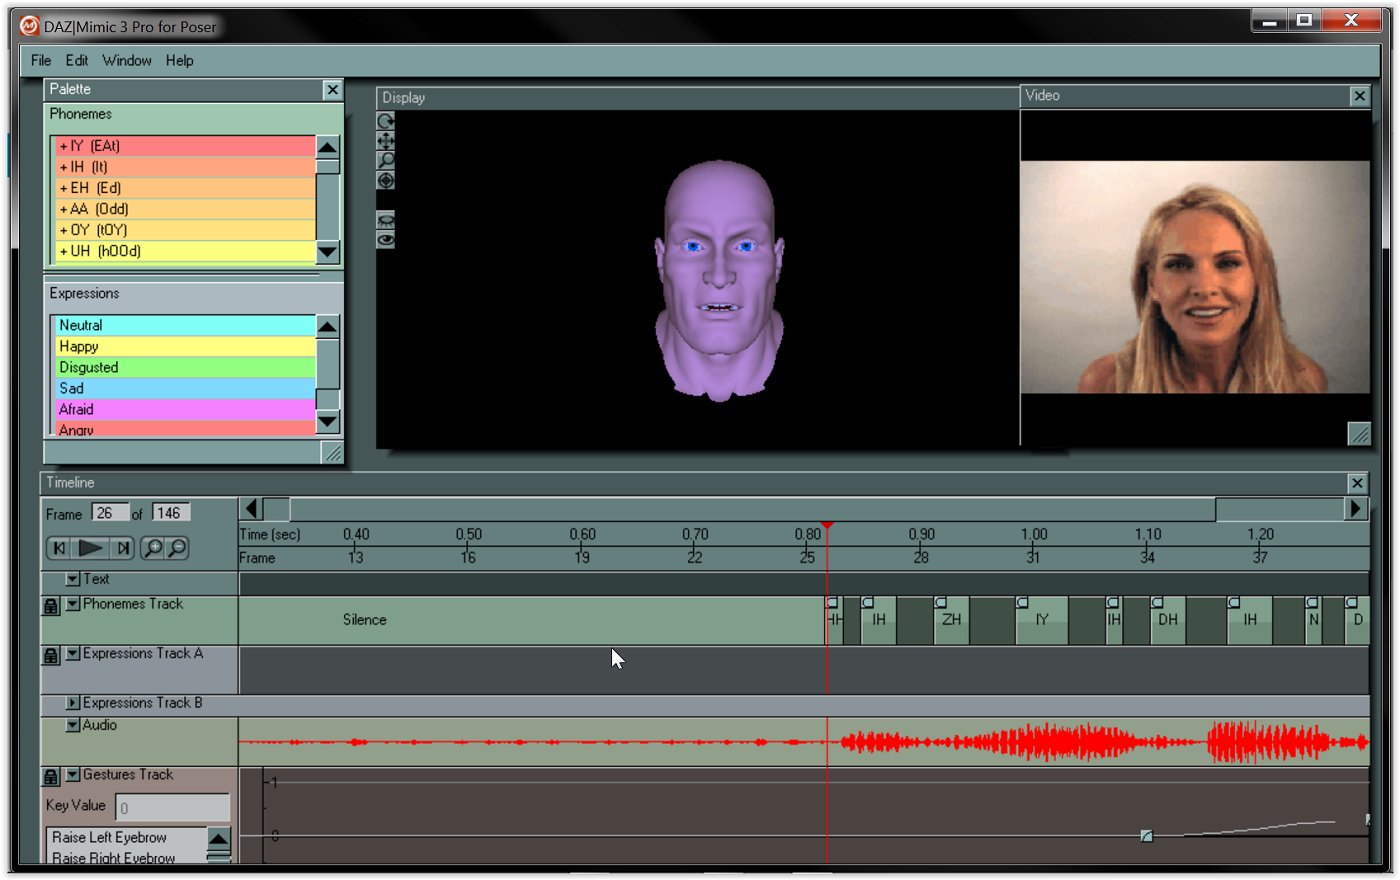
With Anilip2 any additional facial animation must be done manually with morph sliders or you could just layer on some facial expressions with facial expression aniblocks if you have them for your figure generation.
There is no “missing cubic tweener” being “unlocked” by Anilip2.
Not really sure what is being mocked up in that demo image you are showing.
Additionally that old animate video you have posted before, is showing GoFigure’s own basic spline graph editor for fine tuning aniblocks as no such feature existed in Daz studio

way back in Daz studio version 2.6 when Animate ‘basic" and "Animate + " was released.
This basic spline graph is ,of course, still available in Animate2 today and it has only ONE interpolation type.
“Cubic” to ,prevent overshoot, but
(as I explain below) you already have a superior form of “cubic” in the main Daz studio Graph Editor and Dope sheet.
The Daz studio timeline and graph editor gives you access to every animated parameter in your scene including the animation Data track created by an Anilip2 lipsinc animation.
Look at this screenshot of an Anilip 2 animation
exposed in the Daz studio graph editor& Dope sheet
Note the areas I have circled in RED
you see all of the animated visemes in the Dope sheet (top)
and their corresponding spline key frames in the spline graph editor (bottom)
These are custom visemes that install with the Anilip 2 product.
Also note the three spline interpolation types
from which you can choose (at the lower right.)
TCB ,Linear , Constant
TCB is actually the same as “cubic” interpolation in that they both clamp any key to its maximum value
(preventing spline over shoot), but with even more fine tuning controls of the curve as “TCB means “Tension Continuity & Bias”
So again nothing is “missing” from Daz studio graph editor
These are the same industry standard keyframe interpolation types we have in Maya, Max Blender, C4D, Iclone.
The main difference being we have many spline filtering effects options in the big pro apps like jitter, oscillation and key frame reduction tools to make mocap editing managable in your spline graph editor.
Cascadeure’s powerful
“unbaking mocap” feature is vital to editing spline graph animation from motion captured data
or motion clips like aniblocks
MCJ’s key reduction script serve a similar purpose for Daz studio
https://sites.google.com/site/mcasualsdazscripts/mcjdecimate-for-ds-12-3
Aslo Daz studio animators can easily add such spline filters as well with MCJ’s FREE “cycler” utility for automaticaly creating a HUGE variety of effects such as bouncing balls, auto Rotating helicopter blades or vehicle tires or animation of body morphs to create the appearance of soft body simulation (Fat Jiggles)
Other than a proper IK/FK foot/hand contact solver/switcher (like you have seen in cascaduer)
Daz studio has everything you would need to make some decent FK body animation however, IMHO, the facial animation system just needs a modern day functional equivalent of the Mimic Pro 3 for G8-9.
so if 3DU can pull that off he will make a fortune!!!
Hey Wolf359! Quick question, how did you get your TCB to not overshoot? Is that something that Daz has changed in a new version? Mine has always overshot and I could never figure out how to stop that other than adding another keyframe or two between the stop and start and setting those keys to constant.
Yeah... I messed with the T and the C and the B values enough to realize that it just isn't intuitive for me to make valuable assessments to tweaking those - and my TCB interpolation ALWAYS overshoots too. In fact, the default TCB getting added to pasted keys is bad enough to crash Studio if we don't flick the interpolation type away from TCB and back again (if back again is desired).
Also, I've never let Mimic Pro add things like expressions. Too generic. That's something that I'll Always want to perform myself, manually - or perhaps through performance capture with manual enhancements.
So that's why I was thinking that Anilip 2 might be a great solution for automated lip sync - even though lip syncing by hand is truly a wonderful thing!
Cascadeur is FANTASTIC!!!
As for the Missing Interpolation type, it was confirmed to me that there is an interpolation type which is the Cubic, but uses a different name under the hood within Daz Studio. It is supposedly accessible via script or plugin (code) but it has never been made into a user-facing option. Looking at wolf's Anilip 2 example graph peeks, even though they're marked T, it does look like they're utilizing the internal cubic method by how flat the peeks are. Standard Daz Studio TCB would show a bulge rising above what these results are clamping.
So that's why I was showing the old animate 2 video of their Cubic interpolation. It's clamped. I would use that all the time if it was accessible. Heck... I'd make it default!
I also still loathe using automated animation stripping - removing keys according to a specified number of frames, etc.,
To each their own though.
That's what I love about Cascadeur's Animation Unbaking. It actually "looks" at what it feels are the most important key points of the motion, removes what it feels could be accurately replaced via interpolation, and then applies the interpolation that it found to be the best replacement. And it also allows us to vary the strength of key removal. Win Win.
There's a Lot more to a face than speech, however. One of the techniques I was mentioning earlier, and hinting about in my Evolution of Rosie movie, is simply removing the stagnant "Hey, I may be CG, but I look like I'm made of Plastic" portions of animations whether speeking or not.
People's face muscles never sit still.
This is an example of one of the small progressions that is common for Rosie when she's not talking. She has many of them and I'm making more. Inspired by notes of how they pulled off making Alita Battle Angel look so real (by not only using the preformance capture data - but also 'looking' at Rosa's performance and editing by hand - sometimes even frame-for-frame) I started building "Rosie-Specific" facial musculature dials. Each dial fires many muscles to perform a specific facial task. Combining these together can achieve a greater whole towards a full expression, or simply a subconscious motion brought on by a change in air pressure, temperature, or smell.
This progression example only activates the muscles around the mouth up through the nasolabial fold.
What she's hearing makes her smile
More from that same test session
It's all about keeping all of her facial movements "Hers".
Automated text-to-speech can't really do that. Not truly consistently.
So when I use those tools, I like to use them in a minimalistic approach. Give me some lip sync. I'll take care of everything else.
Oh, and because of the earlier thing:
I'd just like to make it clear that I do like the Daz Studio TCB interpolation! I really do! Coming from Carrara, it's a bit different working with so few tweener options, but when it comes to character animation, these are just fine. If I had the clamped interpolation, yes. I'd be using it more than anything else for nearly everything. Other things, however, truly call for the overshoot.
In Carrara, we can alter the behavior of even the linear interpolation - adjusting an ease-in and ease-out. This, of course, makes it no longer "Linear", but it's nice to have the ability to use the linear tweener as a starting point and just give it that little difference in behavior.
Hop into the graph editor and we get handles! :)
Also, coming from Carrara to Daz Studio:
aniMate 2 "Feels" like it was GoFigure's attempt (and a very decent one at that) at bringing Carrara's NLA (non-linear animation) features into Daz Studio.
In Carrara, we can work with all of it as one big system instead of having to switch between "Timeline" and "aniMate 2", for example. It allows us to create NLA clips in various ways, and then they give us many options when using them - very much like aniMate 2.
Mimic Pro for Carrara utilizes this NLA Clip feature. So as it lays its results into the sequencer (Carrara's Timeline) it's laying down NLA clips, which is Uber Powerful.
Likewise, to "Individualize" one character from the next, we can use the NLA system along with facial morphs of the character to create our own custom results for each individual item that Mimic writes - like Expressions, Visemes, etc.,
Updating Carrara could be a real boon to Daz Studio - especially if they could develop it to be able to write animated DUF pose files!
I remember them reporting that they were getting close with allowing Carrara compatibility with the more modern versions of Daz Figure, but then... well... all fell silent. Made me cry!
@benniewoodell
Hi Bennie, Are you sure you are getting actual value changes with TCB interpolation or is the spline merely visibly “stretching” in the editor because my tests are showing actual no overshoot in value changes between key frames(clamping) despite what the spline appears to be doing.
The appearance of those spline peaks are not a 100 percent visual representation of what is actually happening
but your animated character/objects movement is.
what matters is are all key frame values being clamped to what I assigned and not being ruined because some before or after keyframe value is “warping” the spline shape.
that “warping” can only affect the animated Character/object when there are key frames
(Clamped or not), along the area being “warped. hence the importance of having as sparse a key frame population as possible.
something only possible if key framed by hand setting only necessary key frames
or if you have a truly non destructive animation layer system like I have in
Maya,C4D and Blender(via an addon),
that can impose additive keyframes on top of densely populated channels such as you get with human mocap or Daz studio aniblocks baked to studio keyframes
or via careful key frame reduction of such densely populated channels as seen in the Cascadeur video.
Look at the video I posted above ,in response to Bennie,
It clearly shows Daz studio’s TCB interpolation clamping the G8 male’s arm bending frames despite the appearance of “overshoot” in the spline AT THE PLAY BACK HEAD when I radically move other frames along the spline.
While clamping is not always part of every softwares implementation TCB spline interpolation
it can be implemented as an additional function baked into the softwares default be behaviour
whenever TCB is being used.
Call it "internal" if you wish
But the fact that it perfoms its function ,when TCB is being used, means it is not “hidden” from the users.
yes and the decimate script from Mcasual allows Daz studio users to decide how much they want to simplify their spline graphs for editing aniblocks baked to key frames

Just as the keyframe reduction filters allow user defined levels of key reduction in the aforementioned
Maya , Max C4D,Blender, Iclone
I'll have to make a video to show you what's happening on my end. When I saw yours the other day, I went to Daz and just tried to do a sphere jumping up hitting the ground and stopping, and then going up again. I had two keys saying where I wanted the sphere to be sitting on the ground that were like eight frames apart, but Daz's TCB made the sphere dip below the ground through the overshoot and back to sitting there. I can get rid of it if I have a key after the first frame it's sitting and the frame before it jumps again and turn those to linear, it doesn't go below the ground, but without those two, the sphere dips. I'll make a video later and post it, maybe there's something I'm missing. Thanks!
Sounds good, I would be interested in seeing
what is actually happening on your end.
Something to keep in mind is to learn what works for you in your primary animation program matter what the function is being called as different applications have very differently named terms to do the same task.
For example in pro like apps C4D and Maya We have tangent handle functions for more precise spline controls

so what would be called “Auto clamping” in C4D
is referred to as “flat tangents in Maya as I demonstrate in this short video.
Absolutely. Because once the keys are "Baked", interpolation means nothing anyways - unless we delete some of them.
Here is a classic example of TCB overshoot, where I'd love to have a Cubic, or Clamped option to choose from.
The light gray circles illustrate the values at the key frames. Both are "115.00" in the Y axis.
The Red circle illustrates the value at one of the frames between the two, which overshot the value of both keys to 124.20. This is just a simple example. With more drastic numerical changes the overshoot, too, becomes more drastic. The way we'd clamp this is to have to go in and set the first of the two keys to a Linear interpolation. That's fine for a simple example like this. But in a hand key-framed animation with a ton of value changes, it can become a downright time-wasting endeavor.
To solve this issue for myself, I created my own solution in the form of Animation Control Dials, like I teach in my course.
These changes that I make using these custom controls are very few, because I can leave the motion capture data intact in it's "Baked" state. When I do feel the need to delete some frames, I have learned to take the time right then and there to set the proper interpolation before taking another step - so that I don't have to work too hard to correct for interpolation issues down the road.
In this example we see my solution.
The area with the thin red outline represents the keyframes of the motion capture data, which begins on frame 30. The yellow outline on the left of that selection shows that I have set all initial interpolation to Linear - so that as I make new changes further down the timeline, the change from the value at frame 0 will remain linear. I do this because often I set the next key to the same value as what is on frame 0, so that I can hold that value without the TCB interferance. This sort of workflow is necessary no matter the software used for animation creation.
The area outlined with the thin blue line shows some of my custom control dials in action, and shows my usual method of operation with these.
The area that appears to be clamped is only so because it is at the limit and can go no higher. In that seemingly clamped portion, the second of the three keyframes controls the downard curve (more steep than otherwise) after the third key, into the next two keyframes which clearly show overshoot in the negative values of the two keyframes.
Before the seemingly clamped area we also see overshoot on the two keys that precede it.
Working in this way with motion capture or any other 'baked' animation data is what really makes animation a Blast in Daz Studio for me, because these custom controls are so easy and fast to create - and then very powerful to use. And very importantly, if I wish to remove or reduce the overshoot that's going on within them, it's very easy to do - as we can see in this example.
(The overshoot seen in the custom controls in the image above are welcome - they work very well with the motion capture. The keys shown are controlling a whole series of motions for the eyes looking up and down, with eyelid motions built into this particular control)
Also - it's truly amazing how much of an actor's nuances in a performance can be obliterated with a blanket timeline decimation of keeping every fifth frame. To each their own, but I prefer to analyze the performance and remove only the areas that are unwelcome. I mean... sometimes we might even be keeping the very frames that we'd otherwise be deleting!
It is NOT “blanket timeline decimation” also you are not limited to keeping every fifth frame with Mcasual’s decimation script you can choose any interval you wish and you decimate only the frames for single bones/nodes/channels for graph editing (with or without their children) not the entire Character.
so any other subtle animation you may have crafted on the character remains untouched.
keyframe decimation is only best used when you are unbaking base layer body mocap mostly to cleanup capture errors as we see done with Cascadeure’s key frame reduction method.
For subtle adjustments on areas like facial animtion
key frame decimation should not be used
As it is best to have a proper nondestructive animation layers system where the facial animation can be on its own discreet layer and even have additional nondestructive additive layers without any heavy key frame population from the facial mocap/lipsync.
Proper IK/FK switching with foot/hand contact solving with solid foot planting and congrats to 3DU on a great new release!!
and discreet animation layers , is why I moved on from Daz studio to Pro applications long ago
But ,as you said, to each their own.
Agreed! Congrats 3D Universe!!! Awesome new addition to Daz Studio!!! Kudos, my friend!
...and wolf, thanks! Cool stuff!
The thing I love about Cascadeur's Unbaking key frame reduction is that it actually analyzes the animation first and makes an (artificially) intelligent decision so to which keys to obliterate :)
But also, it's really nice to know that we can use Jacque's scripts to partial out specific nodes! That's really nice!