How to fix messed-up Genesis mesh?
 Jonstark
Posts: 2,738
Jonstark
Posts: 2,738
Here's a bit of nightmare fuel:
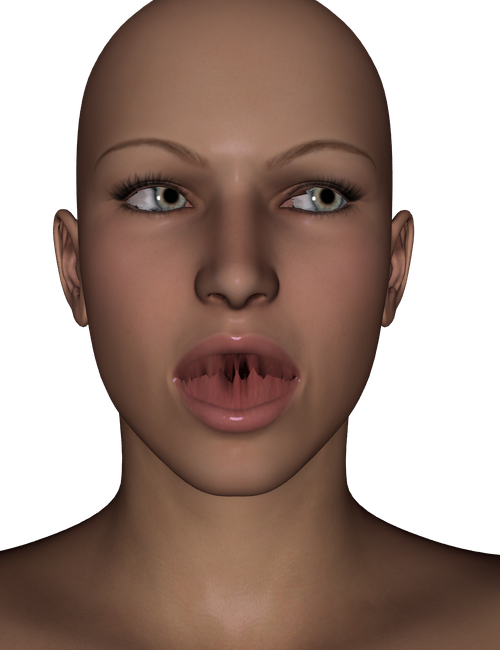
Bit of a complicated question, hopefully someone more expert than me can lead me in the right direction for a solution.
I'm trying to create my own genesis-type figure, but with all the same morphs and rigging of the original genesis. I exported a genesis mesh as an .obj, then re-imported and used the transfer utility to input all the same morphs and rigging. That part was super easy. As is apparent though, the 'openings' of Genesis (the mouth, specifically the lips, and the eyeballs) are coming back in as connected to each other, where the original mesh was not. So if I rotate/twist the eyeballs, they are 'stitched' to the surrounding eyelid mesh, which causes mesh deformation/stretching. Same with opening the mouth, I can make all the same expressions/morphs as on the original genesis, but the lips are 'stitched' together now, which causes deformation/stretching.
The problem seems apparent that the .obj is treating every part of the mesh that touches another to be merged/connected. Meanwhile an opening like the nostril, which doesn't have any polygons touching each other in the default position, works perfectly well, and I can flare the nostrils with no deformation problem at all.
I haven't a clue what to do to solve this problem. Any experts out there have an idea what the process would be for fixing this?
Daz 3D is part of 
Connect
DAZ Productions, Inc.
7533 S Center View Ct #4664
West Jordan, UT 84084
Licensing Agreement | Terms of Service | Privacy Policy | EULA
© 2026 Daz Productions Inc. All Rights Reserved.
Comments
way I do it is to just use the skin
pose the mouth open under edit rigging convert to prop
(delete everything else with the geometry editor)
on my target figure pose it also mouth open and with the bowtie rigging tool selected rightclick edit bake rotations
then use the transfer utility on the skinsuit
afterwards pose the mouth closed on the skin suit and bake rotations and save it as a support asset wardrobe fullbody
Whoa, thanks Wendy, though I admit I'm a bit of a dunderhead and not entirely sure I follow. But I'll try following that as a step-by-step. Unsure about the part where you said delete everything else with the geometry editor. I didn't even think about posing the mouth open to export the .obj I guess I assumed that if the mouth was open that it would somehow prevent/interfere the ability to use the transfer utility to accurately transfer morphs and rigging, but perhaps it's the 'bake rotations' trick that is the magic sauce that would allow me to re-pose the mouth close but not have the mesh 'stitch' itself together? Also worried about the tongue being 'stitched' to the bottom of the mouth too... maybe the first pose should also include moving the tongue so it's raised and not connected to the bottom of the mouth too... Would this bake rotations also solve the eyeballs being stitched to the eyelids? Going to give it a try, hopefully I can follow, thanks again :)
I don't even export an obj if you read
it really depends on the reasons for the mesh
my method is to use genesis skins in Carrara on 3&8 without geografts
I didn't realize there was a method that didn't involve exporting/importing an .obj version, I guess turning it into a prop in the scene kind of does the same thing I guess, without the need for export/import.
Yes, I wanted a foolproof method of solving the geograft problem by simply making a new genesis figure that included the geografts as part of the whole instead of as an add on. Been driving me nuts since forever looking for a solution, even though I hardly ever need to use geografts anyway, but it's the principle of the thing. :)
I must be losing my mind, I'm managing to go *backwards* now... I can't seem to make this work out, moreover I'm now losing the ability to recreate what I did even at first.
Originally I was able to transfer all the rigging just fine, if I changed the morph to say a different size/shape (like the Troll for example) the rigging moved with the new shape into the right place, now it doesn't move, just stays in the default genesis position and static regardless of the shape/size. And I can't figure out what I did the first time that transferred the full rigging information to be coupled with every shape/size change... I must be getting tired and missing something obvious.
If I can figure out this method, I think it will solve my mouth-stitching issue, but the eye-stitching issue would likely remain (but I can't seem to get that far as now not all the morphs are transferring to the new figure, and I can't figure out why, including the morphs to open the mouth...) I was thinking a solution to the eye-stitching would be to just to scale the eyes to 50% so they weren't touching the rest of the face mesh, therefore they wouldn't join, then I could scale them back up again. Maybe try something similar for the teeth/jaws, as I didn't want to risk the inside of the lips to get 'stitched' to the teeth (would make smiles really look strange). But since I can't seem to recreate what I did at first and actually transfer all the morphs and rigging information to the new genesis, I can't seem to get far enough to test. Sheesh, I guess I'm just getting tired and sloppy...
Greetings, Jonstark.
EDIT: Ignore Below here - rereading your posts, I misunderstood.
I'm not completely sure I am understanding what you are trying to do.
If you have made your own mesh and are trying to use Genesis rigging, then (a) use the transfer utility and convert your mesh to conforming clothing, but use independently, or (b) substitute the your obj for genesis in setup but be VERY careful not to overwrite your Genesis, then save as a new figure.
If you are trying to create a full body morph for genesis but the limb proportions, etc are distorted beyond existing genesis skeleton, remember to use use the joint editor, align, etc, and especially the ERC freeze. There is a discussion around the following post.
https://www.daz3d.com/forums/discussion/comment/2821356/#Comment_2821356
Or more likely I am misunderstanding what you are trying to do. I didn't get much sleep.
Not precisely. The transfer utility creates the rigging weights and morphs for the target figure by copying the parameters from nearby vertices on the source mesh.
As such, it is not merging or connecting the mesh, but the process of copying parameters from nearby means that in areas where the mesh intersects, it cannot correctly determine whether it should be copying the weights/morphs in these areas from say, the upper lip or the lower lip.
Unfortunately, this is difficult to sort out, as DS's weight painting tools are not the most brilliant I've come across.
Can I ask exactly why you're looking to do this, rather than just create a morph for Genesis? Is there some desperately missing feature that you need a stand-alone figure for? Ultimately, you'll end up losing all of the compatibility features of Genesis (which is, in my opinion, the main selling point of the Genesis lines in the first place).
Because geografting does not work correctly in Carrara. The geografted part will connect and work fine, but it loses all uv mapping, and there doesn't seem to be any way to restore uv mapping to the geografted part (not even manually). So geograft on wings and horns for example, they are the right shape and you can morph them or move theire bones as per usual, but they look weird and you cannot texture them correctly (unless simply going 100% procedural). The thought I had was to correct the problem at the source, create an entirely new Genesis in Studio that had the geografts turned into not-geografts but rather a character that contained all the same mesh and morphs as a geografted character, but all-in-one, then take that character for use in Carrara, where I would be able to use it without issue.
Thanks for pointing me in the direction of the weight mapping, it seems I was misunderstanding the source of the problem and was assuming that somehow the mesh itself had become connected as if the various polygons had somehow bridged to each other, which made no sense logically. It makes the source of the problem clearer at least.
Hey Diomede, thanks and good to see you (I've been in lurker mode for a while lately). I did know about the ability to resize the rigging for a new morph using the erc freeze, or rather I've done it before in the past, but I was looking for a way to preserve the already-existing rigging n the Genesis and port it over to the new Genesis-type figure all in one go, rather than going through each body shape morph and resizing/erc freezing each individual one. Somehow or another, I managed this on the first try (it took a very long time as TU did its thing for 1000s of morphs lol) and in the end no matter what shape morph, whether a Troll or an undead fiend or a 2 foot tall midget, the skeleton would automatically resize itself when I applied the morph. Before I managed to do it by accident (somehow) I had just assumed that I would have to do it by hand spending tons of hours, one morph at a time, to make sure the skeleton would behave correctly in all circumstances and morphs. While I'm willing to put in the effort, if there's an easier way... :) Somehow or another I managed to forget my 'eureka' moment and what I did or checked or unchecked to do that, and on all subsequent attempts with the newer replacement tests of making Genesis-type objects (whether I was working with it as a prop or as an exported/imported .obj) I get the standard non-adjusting skeleton. I can't figure out what I did though to recreate the magic that happened the first time...