Trying to Match Product Images for Kanako (Kayo 8 Morph)
 Exitof
Posts: 53
Exitof
Posts: 53
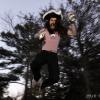
Okay, so I set out on a mission to match as closely as possible the product shot, but with different hair and choker as I didn't have the ones they used.
One thing I realized is there is no way that her skin is that white without some processing afterwards. Kanako comes with 3 different skin tones, and I selected the whitest one. Even if I blasted her with lights, she still would not have that same skin tone in the shadow areas. So either they created a lightened UV skin texture, or they did some post processing.
One of the issues I've had with Daz when I first started was you do not get what is shown in the picture. I remember the first time I bought a base character and was confused why the hair and outfit was missing. I've since come to terms with it, but wish that every product would have a final shot that should exactly what you will be getting. Some do this, and that's great. All should.
And yes, there are now lists of items used in the product shots, so you can acquire them and recreate with the same objects, so that helps too. But another nice touch would be a starter scene which will allow you to render the same thing that the product shot used. As it is, I used 100% Kanako and 50% Kayo on the head model, because the 100% Kanako just looked far too different (jawline was a slimmer).
This raises another interesting point, that the product you are buying could be mixed and not genuine 100% the character you are buying. I think that if the main product shots are going to show a mix, it should be clearly stated. If I buy a character for the face, I want that face and don't want to spend hours trying combinations that never seem quite right to get the same character the product shows.
But for me, the big takeaway is that even what you see in terms of the base model is not what you'll get. Again, there is no way that lighting can blow out her skin to make it that white in the shadow areas, so there was some yellow reduction done after the render, which you can see I did in the third image.
A final thought, I wonder how they achieved the diffused light on the left. You can see in the original image the reflection is blurry, but the center light is obviously a square light, though possibly through a cucoloris. I've seen mentioned on how to diffuse a light, but I've not yet experimented with it.
Daz 3D is part of 
Connect
DAZ Productions, Inc.
7533 S Center View Ct #4664
West Jordan, UT 84084
Licensing Agreement | Terms of Service | Privacy Policy | EULA
© 2026 Daz Productions Inc. All Rights Reserved.
Comments
This is what I got using the presets that came with the character and some headshot spots - no HDRI. I didn't buy Kako, so this is Kanako (note the spelling) with a little Mei Lin. No post work.
Note that bump and normal maps can make the skin appear darker.
Perhaps @Jessaii would like to chime in
Delicious.
The strange thing is when adding the default actor to the scene, it's preset at 100% Kanako and 50% Kayo for both head and body:
Also, the "Kako" thing went over my head. Kumusta Kayo!
We don't know what result you got, as you haven't shared it. This is what I got using the presets that came with the character and some headshot spots - no HDRI. I didn't buy Kako, so this is Kanako (note the spelling) with a little Mei Lin. No post work.
Note that bump and normal maps can make the skin appear darker.
Base character morphs aren't dialed in fully in many cases with PA characters based on them. There have even been characters X for Y 8 that don't come with any of Y dialed in.
You didn't see the attachment in the very first post? Those are my results. I detailed what I did in my first post as well, including color correction needed to match the promo image.
As for your render, are you rendering with Iray? Your render is blown out, so not really useable for comparison.
It seems awfully weird to spend all the time creating a new character model/morph, and then not use 100% that model in the promo shots. It's like the artist said, I don't know, I'm not happy entirely with my work, so I'll only use half of it.
Also, I see now that I messed up on Kanako, but not Kayo (note the spelling).
I figured it out! Sevrin was on the right path, but it was the Translucency material that was keeping her on the yellow side. My original renders above were with Translucency High, this new one was Translucency Low.
This solves the it for the most part, it's not a different skin, it's just the settings. I also raised the ISO to bring in more light. This new render is at 900, the above examples were at 600.