Anyone Recognize this Post-Render Effect?
 Fauvist
Posts: 2,290
Fauvist
Posts: 2,290
I've noticed this effect quite a few times when I've been browsing through images on Google Image Search. It's definitely not hand done, because it's always almost exactly the same no matter who the artist is - so it's probably a Photoshop filter, or action, or effect that is applied, or some specific known technique. It gives a thin white glowing line to contours - the edge of the face, around the nose, and in this image it is expecially noticable on the philtrum. It's like a light outline. I'd be very grateful if someone could tell me what it is, or how it's done. I tried Photoshop Style Inner Glow, but that isn't it.
Thanks!
Daz 3D is part of 
Connect
DAZ Productions, Inc.
7533 S Center View Ct #4664
West Jordan, UT 84084
Licensing Agreement | Terms of Service | Privacy Policy | EULA
© 2026 Daz Productions Inc. All Rights Reserved.
Comments
It looks a lot like the specular component of a material shader....
I've seen it on Photographs too. So it isn't part of the Render process at all.
I think it's something to do with Fresnel shading. Like an exaggerated Fresnel. That's where the angle between your eye and the surface is close to 90 degrees, the light hitting the object reflects into your eye. And where you're looking straight on to the surface there's much less reflection.
Try using Trace Contour and then invert. Maybe that could give that look?
Edit - Oh! I think I got it. Filter >> Stylize >> Find Edges >> Invert. Then set layer to Screen and drop the opacity to about 50%.
Oversharpening will create that halo.
I tried it. It did seem to work for me.
That didn't seem to work either.
Looks like, if you inverted after find edges, that you didn't need to do that. Try inverting again?
Off hand looking at the examples, that would be my guess for the effecct if it isn't actually part of an illustration.
The "aura" is a natural byproduct of a very strong side or back lighting, and may not require any kind of processing in a graphics program. Some of what you may be seeing could also be attributed to "ringing," a compression artifact of the transition areas that can accentuate the "aura." All of your examples are fairly poor quality small JPGs; to get a real sense of what the actual lighting really looks like, try to find examples that are large and not overly compressed.
For rendering people, I suspect you'll need to also carefully adjust the skin subsurface scattering, being sure it's well matched with the lighting you are using. I also think your lights should be directed, with good specular content. Avoid wholly diffuse sources, like planar emissive objects.
Your pursuit of perfecting this look is a lofty goal. Keep at it!
Umm You have to make a copy of the layer first. It's a layer overlay.
Also, at least a few of your examples show at least some post work, the baby especially. If this were 20 years ago, I'd say it was airbrushed. This is something you'd see regularly in glamour shots, which also tended to use rear/side lighting for added effect.
The first and third images are definitely hand retouched. I believe the second is too though it's so low resolution it's hard to tell. The thin line highlight crossing across the knuckle is extremely abnormal-looking, not normal highlight behavior. The last image is oversharpening and light on vellus hairs. EDIT: the philtrum highlights in the last one are a combination of oversharpening and the straight on-flash.
Here's my technique. This was done really fast, no real post work or anything, so you can get a lot better results if you spend more than one minute on it. lol
Just erase out where you don't want the effect to show through. And again, you can get much better results if you spend more than the minute I spent on it. lol
That works pretty well. I tried it again. It's an approximation of what I want to get. I'll try working on it some, and see if I can get it all the way there. Thanks!
Cool info Diva. Thanks hon!
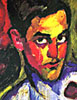
Different artists get the exact same effect. This angel picture shows the angel-wings and the rose also have lighter contour lines drawn around the shapes. A different artist's portrait shows the characteristic red nose with the pronounced glossy specular reflection, and the white contour lines around the neck and shoulders, and lips. I realize they've both colored the photographs too.
You are going to have to get your surfaces and your lighting correct to start with, then do the postwork, to get the sheen on the lips etc I would use the Dodge tool, for the outline Diva's method should work, or try Copy layer Stylize Glowing edges, set layer mode to screen and then erase where you don't want the effect. Very quick use of the glowing edges
These bright sharp specular edge highlights are hand drawn. You can't get exactly this look with a filter alone. What you need is a small hard pressure-sensitive brush at low opacity in white and then just paint.
Try taking your image and do the following: (I use photoshop - other programs may vary)
Duplicate the layer
Apply the "Filter Gallery >Styalize > Glowing Edges" filter
If you want the edges colored, change layer type to "Screen" and adjust opasity etc...
If you want more soft white edges, then first apply an Adjustment Layer > Black & White
"Merge" the adjustment layer and the Filtered layer togetheer, then change the type to "Screen" and adjust opasity as necessary.
This didn't work exactly like I wanted on all images I tested, but it was pretty close. You can then use the dodge and burn tools on the highlights you want. I also found making adjustments to the filtered layer (erasing lines, more blur etc) was easier than trying to edit the image. I will try to post some results later this weekend if needed.
This plus Diva's combined should come really close.
The first one looks like an Ambient occlusion pass/filter combined with the colors (You can lay it over your colors in multiply).
The edges (and possibly skin highlights using luminosity masks) then added with a glow layer.
Another method for colored edges is get your lines (many options to get that accomplished: edge detect, filter forge, etc), then make your line layer with transparent background, select your lines, then, while lines still selected click on your color layer and hit ctrl-J (photoshop). You should get a colored line layer separated with a transparent background.