3 point lighting question
Hi guys,
Just restarting this hobby after a period of downtime. I've been reading some wiki and general photography tips. I'm also comparing the setting of manually placed lights with products, and I noticed that generally products used settings such as:
a) Geometry - Sphere or disc, sometimes up to 200-500 (CM?). I read that using geometry gives softer light and shadows (also increasing render time).
Is this setting to simulate those umbrella thingy in real photography?
b) Distance of light seems big. Maybe 3-5 times the distance of a genesis3 figure. As compared to those actual photography guide, the distance of light is much closer.
c) Settings of lumens are all over the place. Some products uses very low setting 2000-10000 and play around with the Render Tone mapping to increase overall brightness.
What I'm trying to achieve is to a generate simple enough workflow that a newbie can perform and get consistent result, for example:
1. Add Key Spotlight (on left side), place it with following criteria: 6 feet away, 3 feet above, tilt it 45 degree to face genesis.
2. Add Fill Light (on right side): 6 feet away, same height as genesis, tilt it 45 degree to face genesis.
3. Add Backlight (well, back): 6 feet away, 3 feet above, shining down on shoulder and hair. This is difficult since none of the objects has 'fur' so getting the soft glow requires trick like adding another Hair and setting the opacity to 10% and so forth from what I read.
For lumens, I try something like 2:1, so Key has 100k and Fill has 50k lumens.
4. At this point I dont know what should I set for the geometry or the cone size of the light, etc.
Will post some results later so that you guys can pick it apart.
Daz 3D is part of 
Connect
DAZ Productions, Inc.
7533 S Center View Ct #4664
West Jordan, UT 84084
Licensing Agreement | Terms of Service | Privacy Policy | EULA
© 2026 Daz Productions Inc. All Rights Reserved.
Comments
Yes, the geometry settings can be used to mimic reflectors and softboxes.
Hi Ruri,
you may have a look at my 2 standard sets. Perhaps it is a helpful idea.
Put them under LightPresets, Iray Lights.
Suitable Render Setting is F:8, 1/60, 100ASA
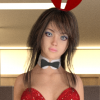
So I setup something like this:
In my earlier comment, I said 6 feet apart, but I dont really have any accurate way to measure how far is one 'square'.
My result
Key :100k lumens
Fill : 50k lumens
Back : 1.2mil (yeah, prob overdone it a bit
Hi Andy,
Will test with your setting and post in a while. Thanks.
..................
How do you guys usually position the light? Do you adjust it the same way as a camera, and point the crosshair at the face?
The problem I'm facing is, while the face and upper body get lit, the legs are pretty dark.
Anyway, I added a cove for some reflection (earlier shot has no backdrop or ground).
Dropped the backlight to 300k. A bit more decent I hope.
Note: The file name mention with geometry, but I actually set it to default 10.
Hi Andy,
Thanks for your settings. It came out nicely.
May I know the workflow for the settings?
Example: Your lights are at least 2-3 times the distance compared to mine, so obviously it needs to be brighter. Yours on 300k lumens for the left Key, and 100k on right Fill. The beam exponent is adjusted too.
Is there any formula to the distance and lumens used?
Sorry if too many questions, I know this is as much art as science. But I just want to narrow down to 3-4 parameters that a newbie should play with, instead of all of the settings which I barely understand.
Basically my understanding of beam exponent is , its fall off and it goes exponentially. 2,4, 16. So if your Beam 16 at 300k lumens, its more or less equivalent to Default Beam 2 at 900k lumens right? (looks that way when I tested it in iray preview).
Thanks for sharing.
Hi Ruri,
You're welcome.
In real physics the intensity loss goes with the square of the distance. No idea whether iRay treats it correctly.
And the rest? If you have an idea, just do it. Simply playing around.
You can adjust the "beam" of the light by looking in the Lights tab. There's a setting called "Spread Angle". Adjust the dial so that the beam covers more of the area you want lit.
Hi Feralfey,
Yes, somehow my mind was 'locked' with the understanding that the cone 'guideline' is how the light will cover a figure. But the edge of the cone is very weak, so setting it to 100 spread is much better solution.
Anyway, enough with testing. Just trying to remake a scene from the mtv Mary Jane last dance featuring the beautiful corpse of Kim Basinger (hey dont run away yet).
Need some tips from you experienced artist to make it better.
Just general description of light used.
1. A 200cm rectangular light at the wall.
2. A spotlight shining at her hair. (maybe too much?)
3. A 150cm disc light, from left, 150k lumen.
4. A 150cm disc light, from right, 50k lumen.
Her right arm is a bit dark, kind of blended with the chair. The right side light is slightly blocked by the male figure. So if I bring the R-light closer, and put the crosshair on her chest, then I would need to drop the L-light.
How would you guys do it? Any tips to make it more 'dramatic' I am more than willing to test it out.
When we light a portrait we (the human brain) acceps the appearance of the common three-point style because it ubiquitous. You're lighting a dramatic scene, and different rules can apply. In your scene, you have a realism problem because there's no notion of where the lights are coming from. Because of this, you might still feel there's "something wrong" even if the lights are technically properly situated. You might be fussing for a long time!
There's a strong back/side light coming from the left in an otherwise darkened room. That's not plausible. There's a bright light hitting the back wall, giving the scene a staged look. While the lighting is interesting, without a cue to its source, you're going to struggle with it.
When lighting dramatic sets it's better to decide on the (imaginary) light sources, then fit your lighting accordingly. You can still develop some reproducible formulas for lighting techniques -- high key, low key, sharp or diffused shadow, etc. -- and get more realistic results.
Except for the distant light, lighting in Iray observes the inverse square law. The distant light does not because it is considered to be from an infinite light source with parallel rays, similar to the sun.
Finally, consider adding some abient lighting to simulate a closed set, even if your set is open. In the real world, light bounces off walls, ceilings, floors, and so on. Unless you "shoot" in an enclosed set with properly modeled shaders for the room boundaries, light that would reflect back into the scene is being lost. You don't need to enclose the set, but you should restore the natural ambience that can come even from wood floors and brick walls.
I want to echo what Tobor has said. I have my degree in technical theater/light design so I understand your struggle with real world lighting versus digital lighting. But you have to make the leap in your head that digital lighting will behave differently than real world lights. Tobor brought up some very important points to consider. In your scene there isn't any apparent or implied light source. In the scene you want to recreate, there's a candle on the table, implying the light source (but we all know that the lighting in that picture isn't cast by that single candle). You need to have elements like that candle on the table to help ground your lighting, so that what we see can be rationally explained. (Plus, if you put a candle in your scene with a pointlight (in 3DL) or turn the flame part of the candle into a light emitter (in Iray), that should bring some light into that dark area of concern around her hidden arm that you mentioned.)
Also, as Tobor mentioned, that bright spot on the backwall is disconcerting and I agree, it makes your scene appear to be staged, but not a dramatic staging. So you'll need to angle that light in such a way that it doesn't illuminate the back wall so much (and that will also help make your scene more intimate and more dramatic - which is what I think you're trying to go for.)
Ambient lights, again, as Tobor mentioned (he's done a brilliant job pointing these things out), are crucial to changing a "staged" render into a "realistic" looking one. If you render in Iray, Iray does a great job of calculating that all out for you so you don't have to give it much of a thought. You may need to add in emitters to punch up areas that need the boost, but generally Iray does great on its own. It's in 3DL that you have work a little harder at creating things like bounce/ambient lighting. Sometimes what I do for that is create a distant light from the ground up to my figures, color it something dark and ground like, and then make that light very dim - just enough light to put a blush of color on my focus to simulate bounce light off the floor. You can also do this with ambient lighting off the walls. Just make sure that the illumination levels are low, otherwise you'll drown out your shadows and muddy your lighting.
Eventually you'll get used to the tools and will find a set up that works best for you. The one thing I'd like to emphasize here is that you're creating art. And while art often imitates life, it's not always possible to do so perfectly or accurately. Yes, it's important to try and learn the real world concepts in order to bring them into the digital realm, but the point is for you to have fun with what you are creating. Don't worry so much if light 1 is at X postion/angle, light 2 at Y position/angle, camera 12 at Z location. Do what feels right to you and you'll wind up creating art - rather than mimickry.
Hi Tobor, Feralfey,
Thanks for all the great tips and advices. I can't implement them all right now with limited skillsets, but will be keeping an eye on minor improvement I can throw in.
Really appreciate your words, as I'm just a hobbyist, so there's no one (IRL) to discuss this with. I'm just trying to create some strategy, like this week I should try this 5 lightning method/tweaks, next week, another 5 and so forth. Just keep chugging until I reach an acceptable level of result.
I think a lot of us feel this way. I know that when I attended a Daz PA summit a few years ago, one of the most striking things we all commented on, was the fact that we were in a room of other people who GET what we're saying. Lol. It is kind of hard, sometimes, talking to "regular" folk about what it is that we're doing. They just glaze over, smile and nod, then back away slowly. Lol.
So don't feel like you're alone. We all experience this. And that's why I think it's so important that we have these forums here at Daz. It's a nice way to connect with other people who don't freak out if they accidentally look over your shoulder and you're working on a "nude" (even if there is no skin on the figure!). I am sooooo very conscientioius whenever I'm working in public, because to the uninitiated they automatically assume I'm doing something "naughty", even though all I'm doing is building poses for my next set - and I don't build porn. Sigh...
I'm glad that you feel comfortable enough to come in here and post your questions. We're here to help. :) And I like to think that Daz's forums are pretty welcoming. At least I don't really see a whole lot of flame wars going on here (but then again, I only frequent a very few of the forums. So there could be something more controversial in say the Bryce forum. (I joke. I love the Brycers.))
So feel free to reach out any time. :)