Dynamic Range of Iray Renders
 Granville
Posts: 702
Granville
Posts: 702
All my iray renders have a compressed dynamic range - see the graph in photoshop attached.
I know that I can render 32-bit images in exr using canvases, but that triples my work time for each image. Not a big deal, but it can really slow down a big project. Also I wonder if this will actually give me an increased dynamic range since it doesn't even fill at 16-bit range.
Love your ideas....
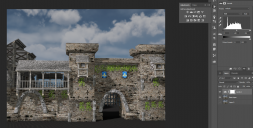
dynamic Range.PNG
1636 x 829 - 2M
Post edited by Granville on
Daz 3D is part of 
Connect
DAZ Productions, Inc.
7533 S Center View Ct #4664
West Jordan, UT 84084
Licensing Agreement | Terms of Service | Privacy Policy | EULA
© 2026 Daz Productions Inc. All Rights Reserved.
Comments
I noticed this too, but I have no idea what to do about it.
How much of the dynamic range an .exr fils will depend on your HDR Equalisation options. I would expect that your limited raneg here reflects your lighting and tone-mapping settings.
If you turn off tonemapping and render as exr you get a full 32-bit range suppsosedly, but tonemapping it in PS was a lot more difficult than 32-bit renders from other software for some reason. I gave up on trying to get canvases to behave after lots of frustration.
Based on the image you posted, your render is a bit dark as mentioned above, to increase the dynamic range response, you need to either adjust the tone mapping or the lighting. I'm guessing here, but your monitor may be set a bit bright, making it more difficult to visually adjust the lighting/tone mapping properly for the render.
Which other renderers, may I ask? Just curious
Also photoshop is crrraaaaaaaap at handling 32-bit in general. Pretty much none of its filters work, which one kind of needs for tonemapping. I mean even the paint bucket doesn't work for some godforsaken reason. Why. what possible reason is there for that.
PS was pretty slow to extend its features to work on 16 bits per channel images. I guess 32 bits per channel support is following the same path.
FWIW, GIMP handles 32 bit images quite well ;).
Laurie
I tested with another image with better lighting and the dynamic range was much broader. This means I have more information to work with in photoshop.
It would be nice if when we used the iray preview, it could also do a levels preview. It will help us adjust the tonemapping and lighting right in daz.
Before iray came out, I was using mostly mantra render engine. Fast CPU engine, could handle millions of polys and was fast. I switched to iray because it can handle skin prettymuch right out of the box, which was always my achiles heal in just about every other render engine :)
To be specific -- and forgive the oversimplification that I know you already know -- you have 8 bits of *potential* dynamic range when saving an 8-bit file, and 32-bits of potential dynamic range when saving an EXR. But even with 32-bits, you could light the scene with a flat gray HDRI, and get only a few stops worth of range. It's like one person living in a five bedroom house ... kinda wasteful.
Many HDRi's are really not made that well, and lack a lot of range. You can look at it range in Photoshop or other graphics program that canopen a 32-bit file and display a histogram. Since extended range is often equated with at least one right contained light source, and that source invariably casts a shadow, you can also test by placing a primitive in the scene, and looking at the shadow, if any, that's produced.
Well after watching a video from Blender Guru about photoreal stuff it would seem that the dynamic range problem with DAZ is also the same problem with every other rendering program .. including ALL the good ones (Maya, 3DS etc). The problem stems from the colour management system being under the sRGB protocol. A protocol designed for CRT screens, it's dynamic range is roughly 8 F-stops .. whcih is CRAP!!!
Blender solved this problem by providing a new colour management system called Filmic Blender .. which replaces the traditional sRGB system and allows for more than 20 F-stops of range. So basically light behave way closer to reality. So it's less to do with bit depth and more to do with this sRGB crap that the software developers seriouslly need to stop using.
It's like using an ARRI alexa camera and capturing to VHS video tape. (not an exact comparison I'll admit but sRGB is old and doesn't cut it for photoreal rendering.
@scott_5a61529b50
I'll have to disagree. As a long time photographer, my opinion is that "the dynamic range problem with Daz" is that a lot of the folks doing renders don't understand lighting very well.
A large part of this could well be that few ever calibrate their monitors. Stock settings on monitors are typically way too bright. I would use the OP's example, that render probably looked fine to them, but on my calibrated monitors, it's dark and flat (as Dustrider commented.)
See attached, uses the full dynamic range.
D|S doesn't color manage anything, regardless of the bit-depth of the output file. There are tone mapping controls in Iray where you can adjust whites, blacks, and gamma, but this is not color management, and you can turn it off -- a common technique when rendering out to 32-bit EXRs.
But unless we can see the histogram in DAZ before render time, we are adjusting the lighting "in the dark". (Sorry for the mixed metaphor)
Edit: Same thing Sparky Shock was talking about, only with a possibility of converting it to Iray.
------------------------------------------
Funny to me to see this today...
I have been trying to get caught up with all the new Daz Studio coolness like Iray as well as trying to learn Blender.
And I came across something interesting discussing the limits of Dynamic Range within many different rendering engines. Blenders render engine is called Cycles and someone made a thing to extend the dynamic range within Blender called Filmic Blender... Then this other guy made a thing to make Filmic work in other stuff. I don't know anything about code or scripting, but it would be awesome if someone could figure out how to use it with Iray within Daz Studio. I'll leave links to the video and the pages that talk about it for someone who is more tech savvy than me! LOL.
Info on the script conversion:
http://blog.michelanders.nl/2017/06/converting-blender-filmic-luts-for-use-in-substance-painter.html
Video on Dynamic range in Blender and other Render engines:
Indeed, as Andy says in the video, using sRGB is a deathtrap for any (photo) realistic rendering since it's dynamic range is far to shallow, this leads to either crushed blacks or bleached out whites. Especially when you make light enter a room the light spreads naturally through a room using Filmic Blender instead of the using the standard render engine. When I render I tend to open up the blacks and whites as far as possible using the Tone Mapping page. But in fact tone mapping itself should not be needed in order to get a correct render.....IMHO.
Greets, ArtisanS
I have been trying to figure this out in Daz3d for iRay for awhile now and believe that the answer is in this daz document in particular concerning the values for "Crush Blacks" and "Burn Highlights":
"
Burn Highlights Per Component -
On -
Off -
Burn Highlights - Adjusts the upper part of the “tone mapping” of the image; how much “over exposure” is allowed. This setting controls exactly how the high dynamic range imagery is adapted to fit into the white-to-black range of a display device. As the value is decreased from 1 towards 0, high intensities will become more and more “compressed” into lower intensities. When the value is 0, an infinite input value maps to white output value; i.e., over-exposure is no longer possible. A good default value is 0.5.
Crush Blacks - Adjusts the lower part of the “tone mapping” of the image. When the upper part of the dynamic range becomes compressed, it naturally loses some of its contrast. This often results in a desire to regain some “punch” in the image by increasing the intensity of the lower range values. When this value is 0, the lower intensity range is linear. When raised towards 1, a strong “toe” region is added to the transfer curve so that low intensities get (softly) pushed more towards black."
It states that setting a value of 0 for each with leave you with a linear workflow, basically unlimited Dynamic range. You still would need to work with canvases to get the full benefit, I think. I have been rendering using canvases since I found out about them but have resorted to setting up the scene how I like and previewing in iRay then simply turning off Tone Mapping altogether to get a linear output, at least that was only way I could figure out how to do this for the dynamic range, but this leaves the render window filled with white since it is not yet exposure fixed like you need to do after the render. So seeing this setting in the documentation gives me hope that I can now light my scene using 0 values much like the video Andrew made with filmic Blender. Excited to try this tonight!
If anyone sees any flaw in my understanding please advise!
DOC LINK: http://docs.daz3d.com/doku.php/public/software/dazstudio/4/referenceguide/interface/panes/render_settings/engine/nvidia_iray/tone_mapping/start
Setting both the "Burn Highlights" and "Crush Blacks" to 0 and gamma to 1.0 made all the difference! I was able to crank lights up in the scene without blowing out details and my shadows retained details. This allowed me to see the image clearly in iRay preview and in render window with the Beauty pass canvas selected. I was able to easily set my environment dial down to darken for more of an evening outside. I have 2 lamps in the scene that I kept cranking up and they didn't blow details out and provided more light in the scene (I didn't go insane with the value but was able to achieve very pleasant lighting without oversaturation). As a test I turned the "Burn Highlights" to 1 and immediately it was badly saturated lighting so 0 is definately where you want it for both those settings to keep from clamping dynamic range and to achieve our version of filmic blender. I use gamma 1.0 so that the workflow is linear.
I certainly recommend adopting canvases in your workflow so that you can achieve the maximum quality for working with, but this will benefit anyone with their scene who wants to be able to light without crushing the dynamic range.
I was going to post a render that I left running last night but I set it to run too few iterations and came out noisy (can't wait for Daz to implement the AI denoising feature in iRay's OptiX!). I will post the image this evening.
You know there are values between 0 and 1 right ?
Yes. I was testing whether the aforementioned daz document material meant that 0 made it so that no clamping occured, or whether it meant 1 meant no clamping. If you select anything other than 0 you will be clamping either highlights or shadows. I was trying to ascertain what settings to use so that dynamic range is not clamped so that I could mimic/use a lighting environment similar to what filmic blender does for blender.
This is much later uploading than I intended but every time I tried to upload it would not attach. Tried again just now and its working.
These are using the above method to allow for full dynamic range even in dark scenes. I used canvases so I have the ability to change any of the lighting and will showcase a few versions. It makes all the difference being able to use a huge range of color values when lighting the scene!
The third one below is tone mapped in Photoshop to bring back in the richness, whereas the above 2 are more washed out due to the dynamic range still in place and no tone mapping performed in PS yet.
I've watched the same video as JasmineSkunk. Does anyone at Daz3D know what the unfiltered dynamic range for the Iray renders, shutting off the tone mapping for just the raw render? Dynamic range for Cycles renders is 8 f-stops. After they add the Filmic Blender addon, it jumps to 25. I do most of my rendering in Daz and I think it has to be higher than 8. Just curious if someone's done a benchmark over there.
I wonder the same thing. I have no clue with the initial scene before render but when the options in tone mapping are setup for linear I can certainly say that I can turn lighting up extremely high and maintain detail as well as alot of details in darkness. The documentation says that there will be no clipping/limit so not sure how that translates to the dynamic range of filmic.
After rendering to a canvas (.exr) I took it into photoshop, after first discovering about this a couple months ago, and tried to see where details start to become visible with an exposure filter on top of the raw .exr within photoshop and then how many from that until it was either black or as far as photoshop slider allows. I will have to double check again when I am home but think it was between 12-15 stops of exposure.
Also, I just thought a good way to test before rendering is with iRay view mode on and a scene properly lit at a middle of the road exposure value, mayb 10, and then change the exposure one direction until details are lost and then in the other until details are lost. I am going to try that tonight.
Thanks for the tip! There was another post (can't find it now) about setting Gamma = 1 on all of your textures in Image Editor, and if I do this along with linear tone mapping, then I get great results without having to use canvasses.
I did that at first, changing all the mats to gamma 1 but then, quite by accident, had simply left gamma at 2.2 in tone mapping with the highlights and blacks at 0 and had not set any values on the mats for the character and it rendered perfectly. I still prefer to use canvases but have really not used them often now since I mainly render from the Beta and canvases do not work with denoiser.
For these I set Burn Highlights = 0.02 and Crush Blacks = 0.05 for a more contrast-y look. I'm still using Gamma = 1.0 in the tone mapper and for all textures though.
Hmm, I thought you set gamma to 1 too? I tried leaving it at 2.2 before without changing the image gammas, and just setting Burn/Crush to 0, and still got the flattened cartoony color space of a typical Iray render. (Although at least the highlights weren't blown out, so it was a little easier to light the scene)
Make sure you have not set the textures to 1 if you leave it at 2.2 in tone mapper. Its a bit tricky when dealing with going from Daz to your image editor, if you do so. I make sure that my textures remain as they were from stock. Once the image is rendered I will change any contrast etc in post with PS.
You have to be careful which images to change the Gamma on. If the Gamma on the original is '0' or '2.2' leave it alone, if it is '1' then change it to '0' or '2.2'. The reasoning behind that is that Studio wont touch the gamma on the '0' or the '2.2' but adds Gamma at 2.2 to any image set to anything other than these settings. If you then have the Gamma set in Tone Mapping to 2.2 it then removes the 2.2 from the images in the render, unless they are already set at that, and then adds the Tone Mapping Gamma to the final render image, unless the image is already at '0' or '2.2' which it leaves alone, so an image at '1' will end up with a 3.2 gamma then reduced to '1' in the final render.
I think the first part of this explains it. Although for Mental ray it is also for Iray.
http://aucache.autodesk.com/au2013/sessionsFiles/3038/1396/handout_3038_AV3038 - Whats New in mental ray and iray.pdf
very interesting video. how does one accomplish this is Daz Studio?