-
Celebrity Look-a-Likes for 3D figures part 3
Hylas said:
charles said:
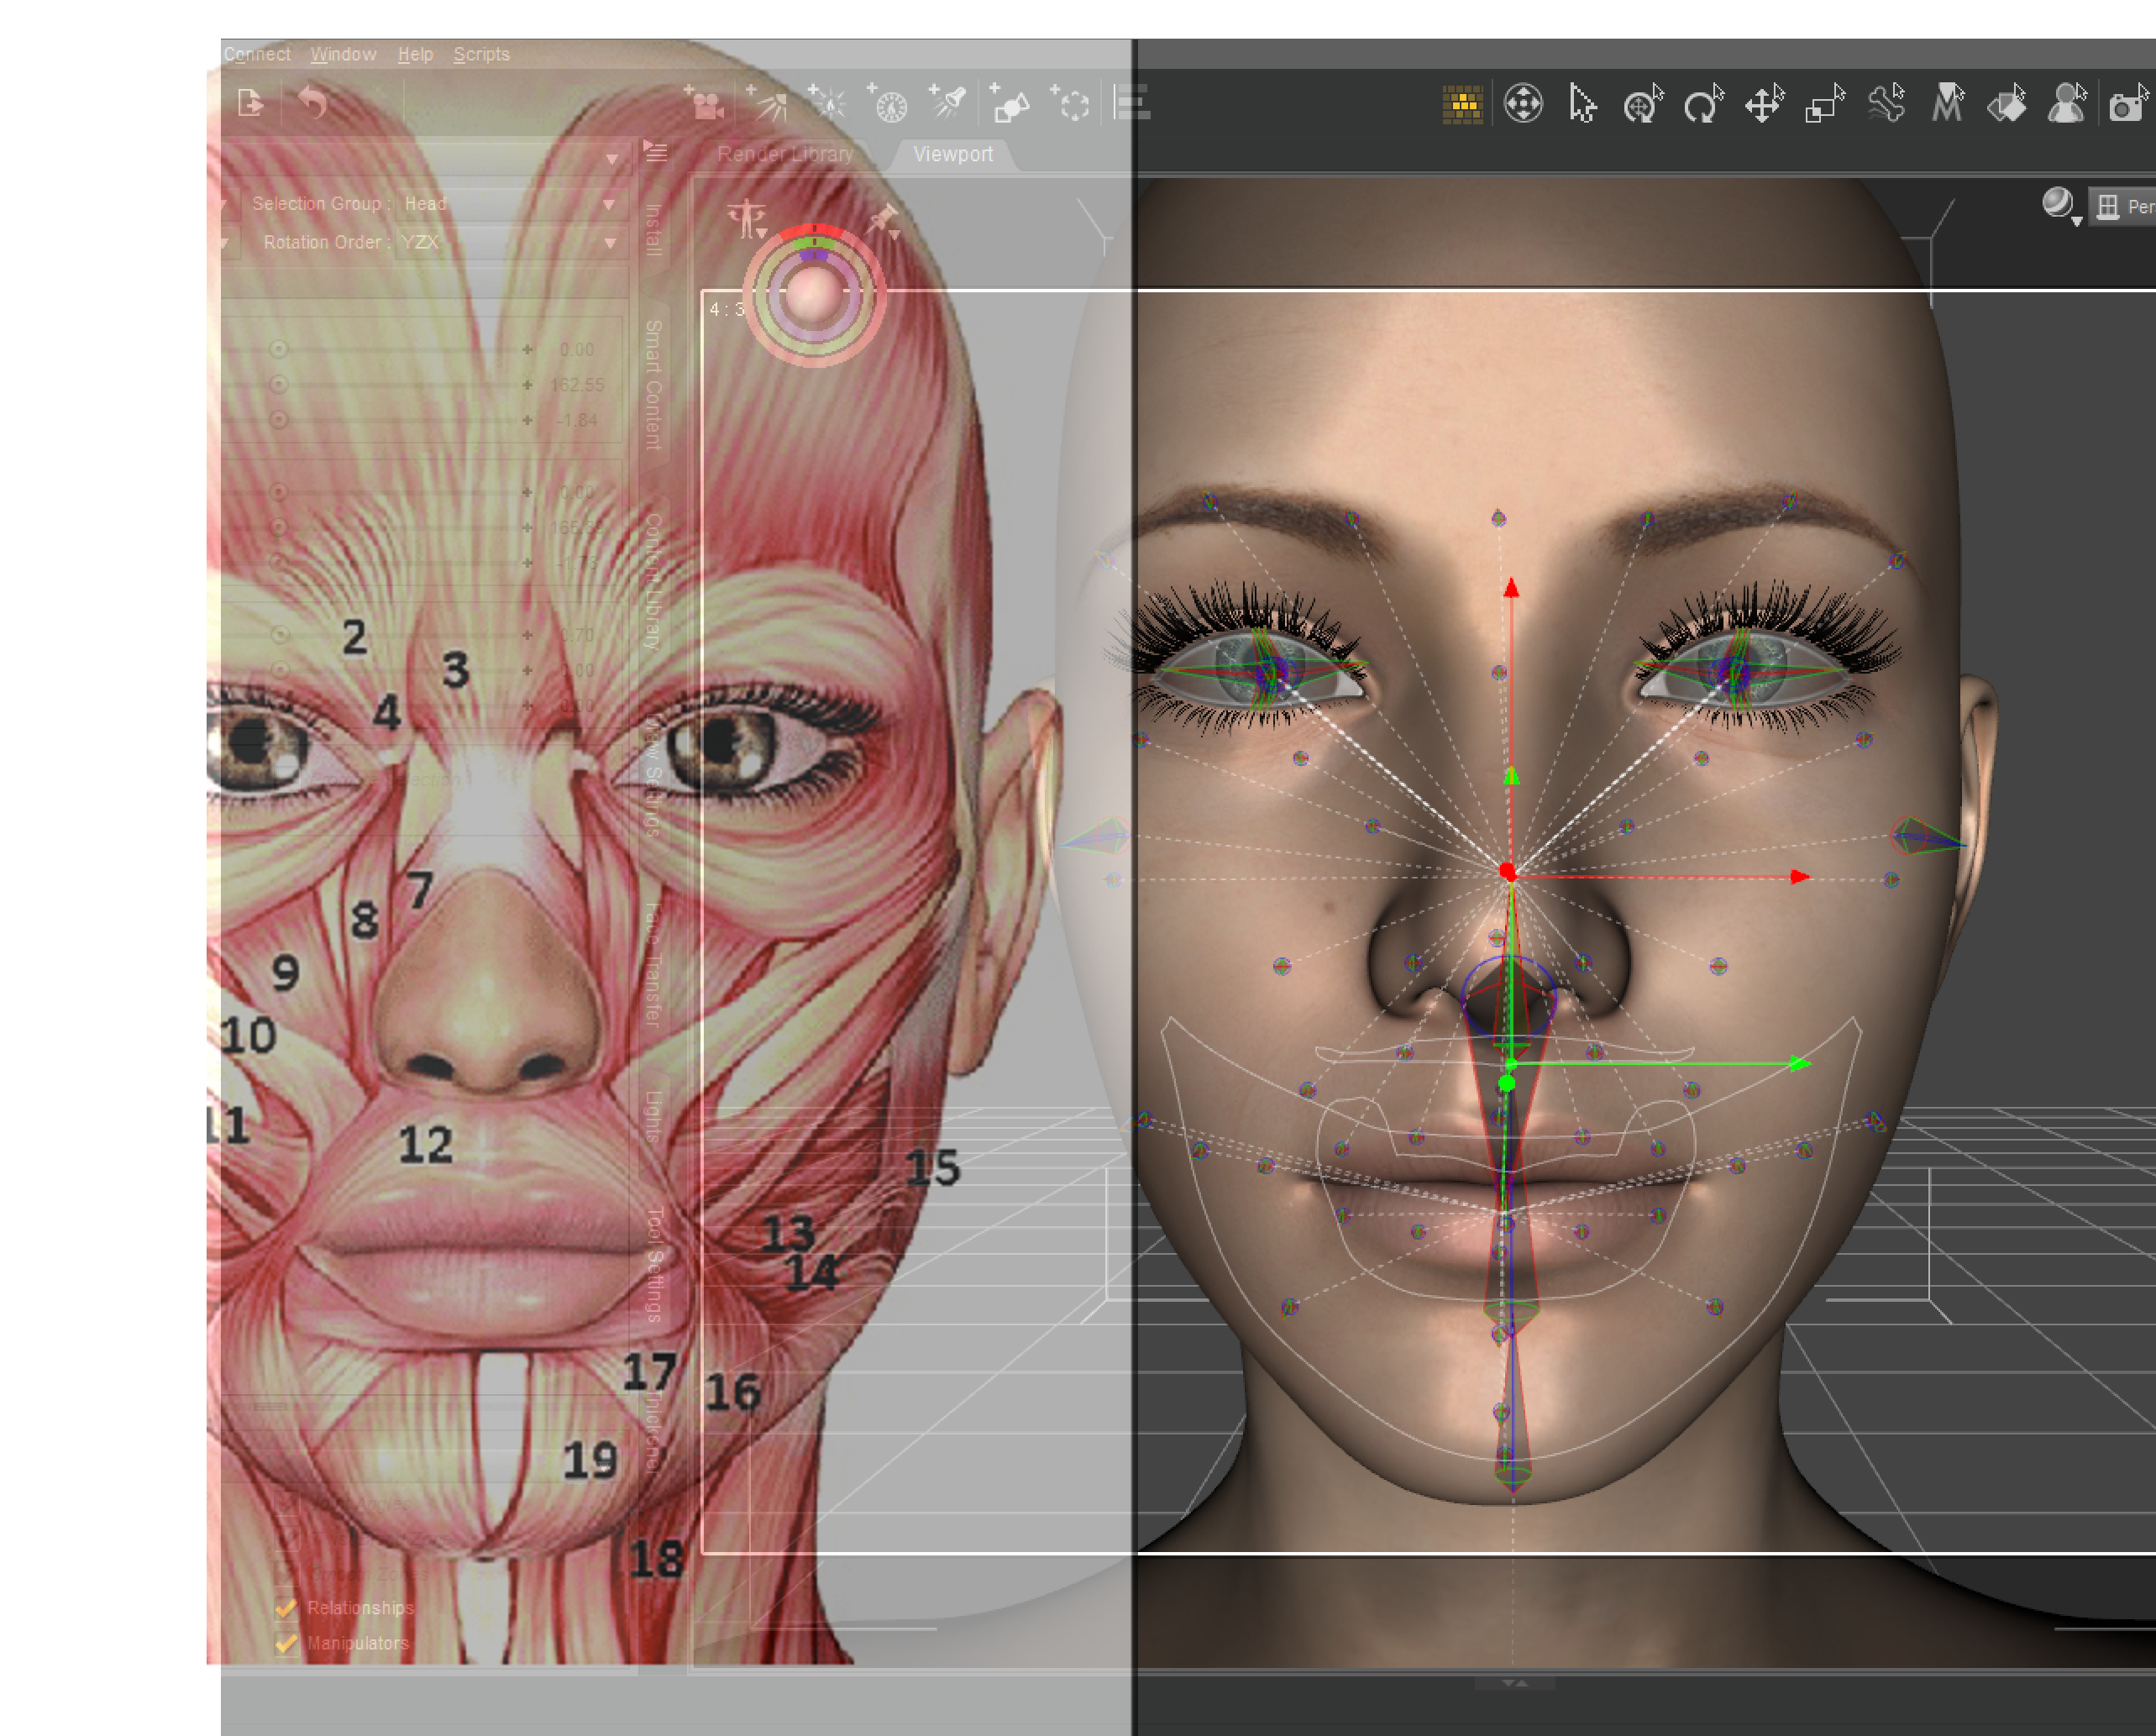
One thing I've come to realize while dabbling with facial transfers, is that getting a persons features is only HALF...no...maybe 10% of the work. Unless the character can also reproduce the same facial quirks through emossions it will still never look correct.
This is something I'm also starting to realise.
Magnus' sculpts of Brad Pitt and Channing Tatum look pretty accurate to my eyes, but the moment I try to make them smile (or have any facial expression, really) the resemblance is mostly gone again.
Right, because even say you get the cheeks and jaws correct, that isn't actually real muscles but just a shell controlled by an underlying rig. The way that rig operates is completely unlke how real anatomy works. But to give Daz credit they did do a pretty good job with the rigs control points. But as you can see we're missing several key controls, especially on the cheeks and chin.
Now this might be fixable with morph control groups, and I'm sure others hae tackled this, I wouldn't doubt if some PAs have. But adding in a better muscle emulation system of some kind to go hand in hand with the rig, might actually be what would be the key to a G9.
 Fully functional DAZ3D Characters in Unreal Engine
Hello out there,
I am new to this new to this wonderful world of daz to unreal. So far I have been able to get character and content from daz to unreal. I have not be able to get the maniquinn to transfer full animation to my character. I can not get the compatible character to automactically alppear in the retargetting window. When delect show compatible models then I see my daz models. As mentioned by others here, the character appears in Unreal it just wont fully articulate.
I am not a coder, so I am greatful to have gotten this far.
Good luck and cheers!
Auto Muscle Enhancer HD [Commercial]terry_duquette said:
So if you have followed this thread for awhile, I have always been trying to get the details of the muscle, without the bulk (think fitness competitors). But to get to that Split Bicep that RenderPretender and I both like to see, I have had to overdrive the AME flex size. This can cause some unwanted distortions by lengthening upper arms, and messing up proportions. I tried d-formers, and manipulating the bones Hidden parameters, all with limited success. So upon discovering how to access the Hidden properties, I found DMasters major Bicep and Bicep Pose morphs. From there I created inverse or negative morphs of the Bicep morphs, then ERC (Enhanced Remote Control) linked them to the appropriate Bicep and Bicep Pose parameters. Next was linking the new inverse parameters to the Hand and Forearm bends and twists. Finally creating a master controller allowing me to "blend" in the desired extra amount of Biceps, without overdriving the rest of the body. I also developed an additional Tricep Flex morph, and did the same thing for DMasters Calf Flexing parameters, all controlled with the Master controller. If there is interest, I can put out a step by step, but it is basically a rehash of the PDF classes I have allready posted, just with different Parameters. The only draw back here is the files and master controller are optimized for the amount of AME Body that you want to start with. I have tried this with as low as 1% AME, but have found that 10-30% of AME body seems to work best, you can keep the original body shape mostly intact (especially if you inverse the AME body also).
I can't say how many trials and errors I have performed to get to this point, but am pretty happy with the results. TD
The Render is of a G3F imported model (Tamara) with only 10% of AME dialed in at 100% Flex
The other two screen shots are the same G8M with just the Left enhanced, and then G8F cloned with just the Right enhanced
These look amazing!! I would definitely be interested in a step by step instruction guide to be able to do this.
Why is my clothing getting horizontally flipped when I use transfer utility? Driving me insane!!!kirihunter_8b4ed2f9b5 said:
This is all so infuriating. Nothing I do works. I've tried every suggestion. I can not get the bloody model to import in both the correct position and WITH UV mapping intact. I can get it to import into the correct position or move it into position, but then I loose UV mapping an my materials go to hell. Or when I use the transfer utility to parent the uniform to the Genesis 8 female the bloody uniform flips back again or glues out of position. It's unreal. No matter what position I put the model in within sketchup prior to export as an obj when it gets imported into Daz it's in the wrong orientation. Is anyone willing to take a crack at this and see if you can get it to import into the proper position? I'll send you the uniform .obj. Why is it so hard to import with UVs then get the clothing item to transfer onto the Genesis 8 figure in the same fracking position it was in before you started the transfer utility??????????????????????????????
How the hell can you lock the coordinates so when you execute an asset transfer Daz doesn't change the position?
Please post a screen shot of the import option dialogue in the version that gets the shape right but loses the UVs - I suspect all you need to do there is enable the relevant checkboxes in the lower part of the dialogue (certainly those on the left but you would usually want Read Surfaces too).
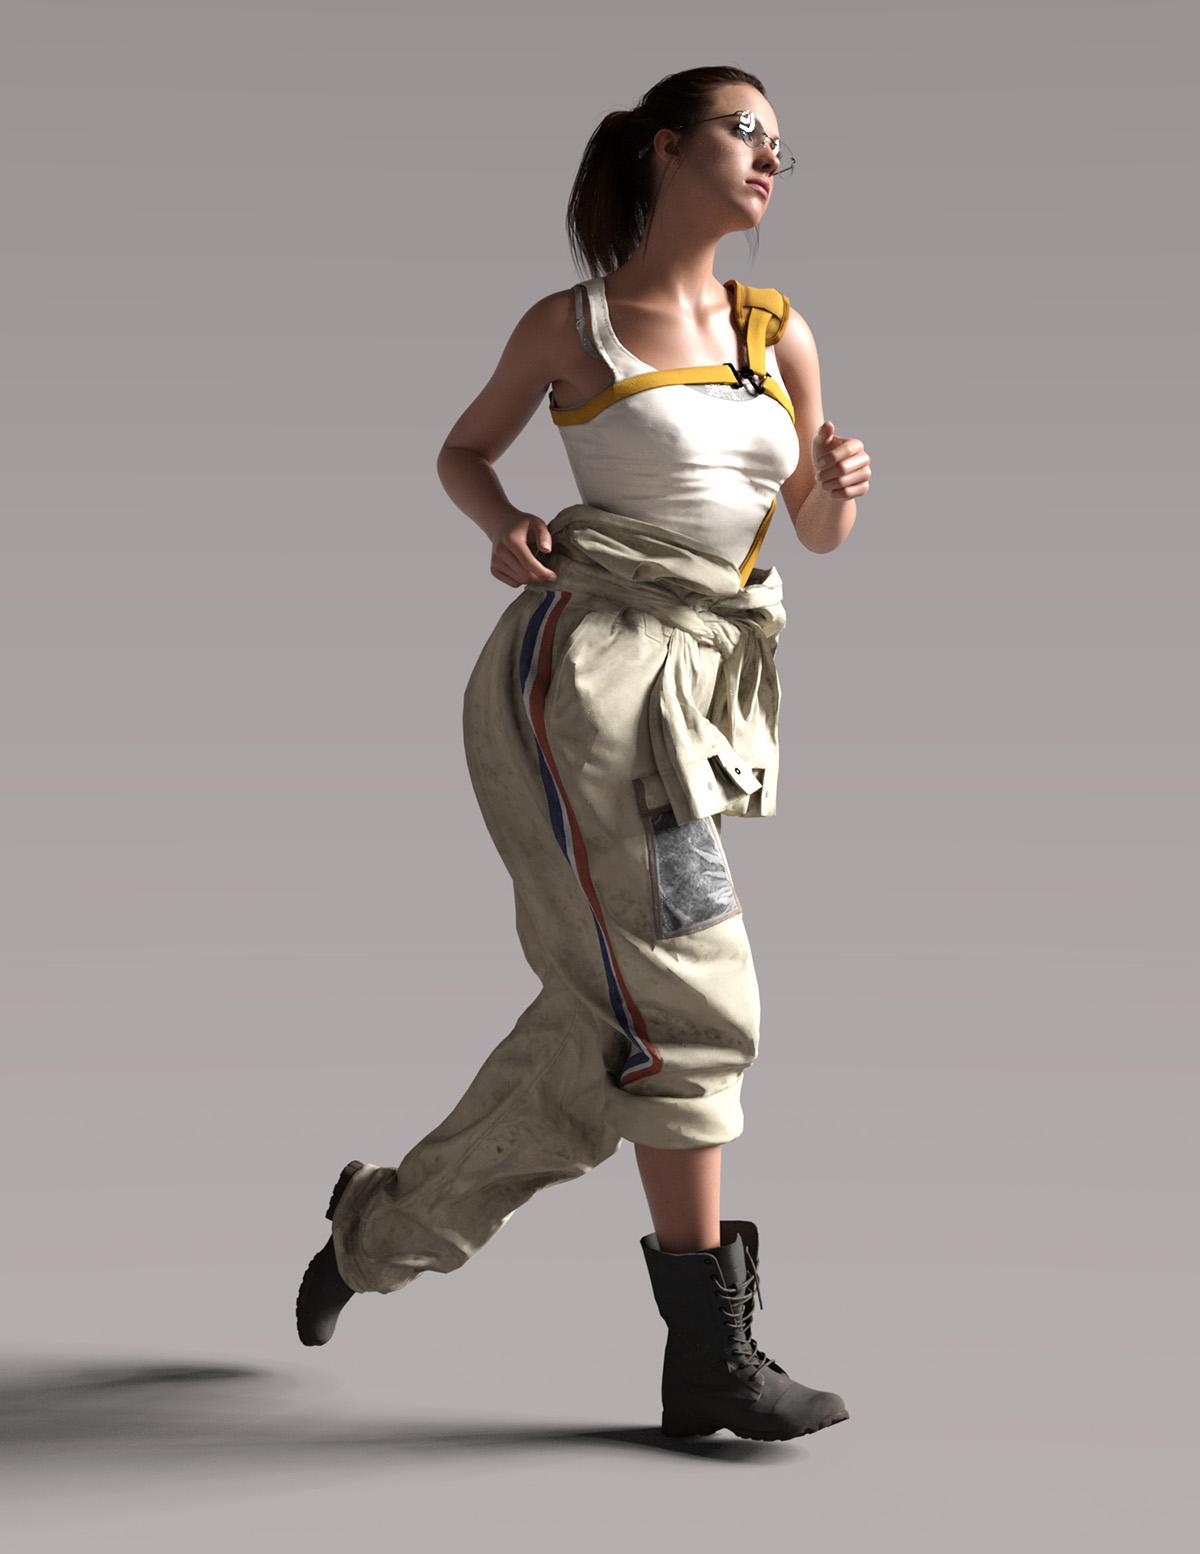
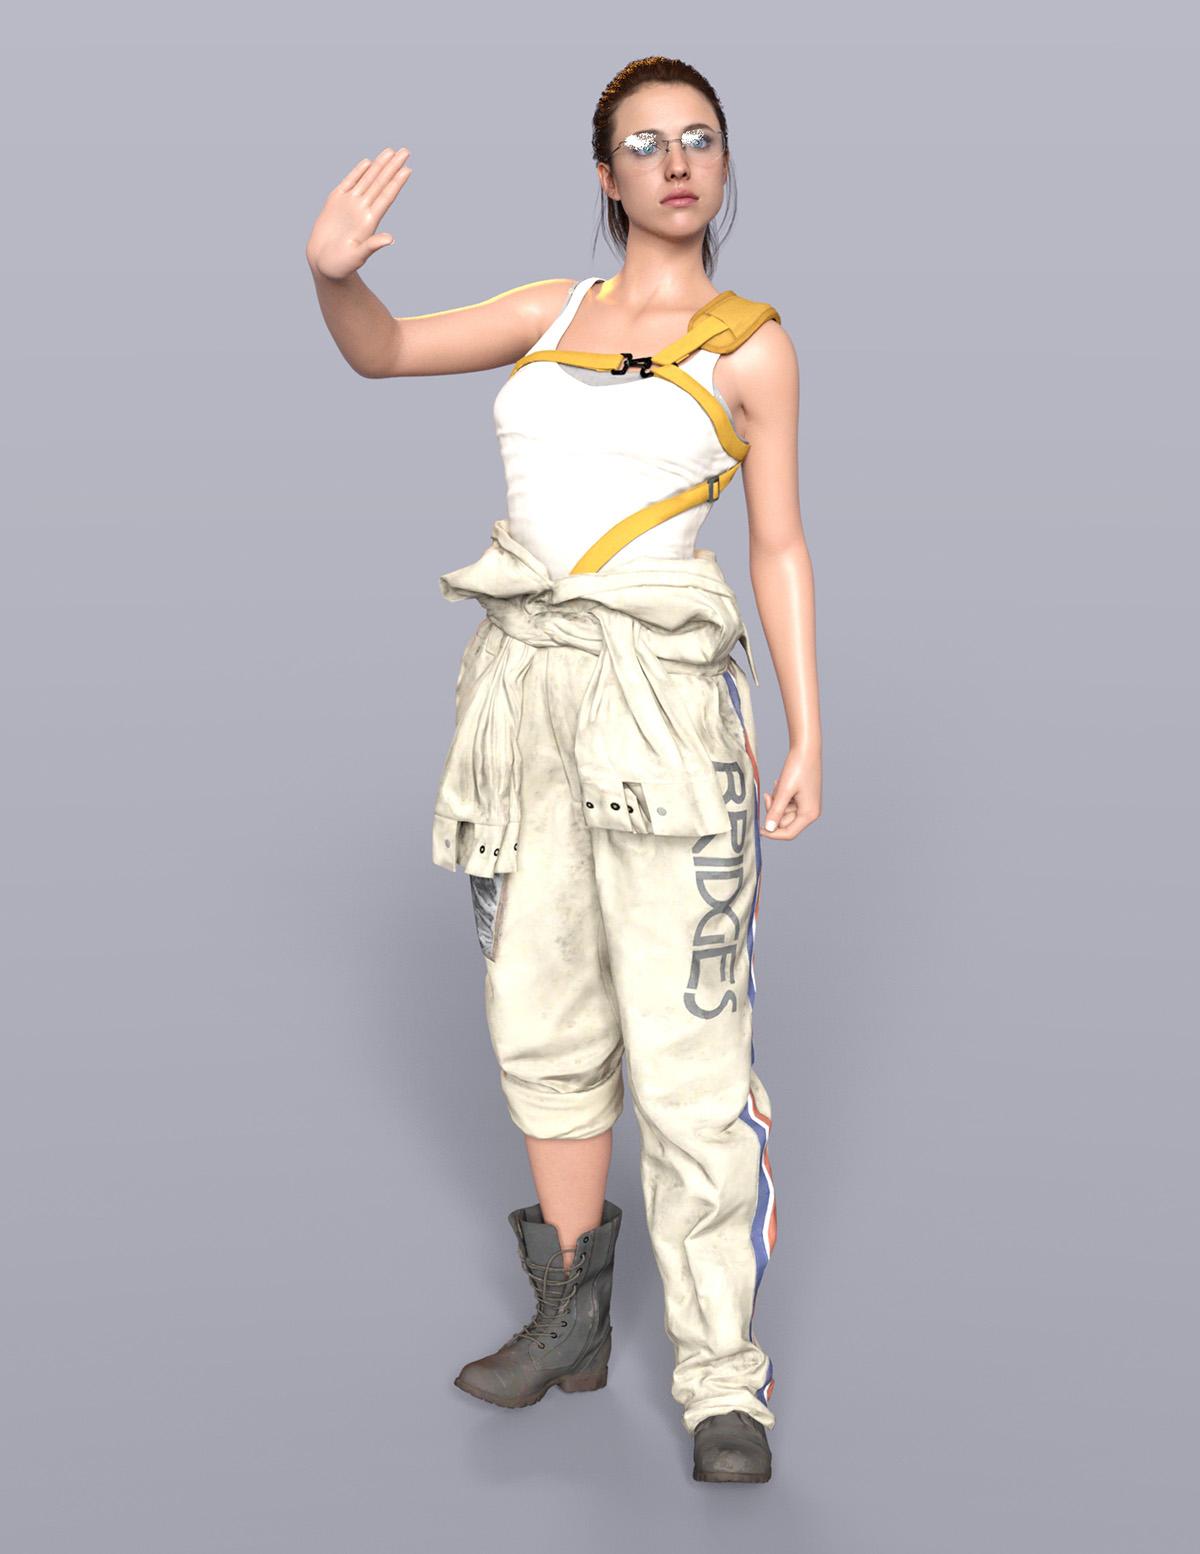
Celebrity Look-a-Likes for 3D figures part 3PAM!
This is the results of a new test method for transfering topology from a few images onto face mask and transfering it through projecting onto a G81 head. It's still far from perfect.
One thing I've come to realize while dabbling with facial transfers, is that getting a persons features is only HALF...no...maybe 10% of the work. Unless the character can also reproduce the same facial quirks through emossions it will still never look correct. So also looking for a way to tweak the code to create expressions to fit the character morph as well by feeding it more images.

 Have Michael 4 Base - cannot load Navarre Clothing on Model
The pants and/or knees probably have an adjustment morph for that case.
Why is my clothing getting horizontally flipped when I use transfer utility? Driving me insane!!!This is all so infuriating. Nothing I do works. I've tried every suggestion. I can not get the bloody model to import in both the correct position and WITH UV mapping intact. I can get it to import into the correct position or move it into position, but then I loose UV mapping an my materials go to hell. Or when I use the transfer utility to parent the uniform to the Genesis 8 female the bloody uniform flips back again or glues out of position. It's unreal. No matter what position I put the model in within sketchup prior to export as an obj when it gets imported into Daz it's in the wrong orientation. Is anyone willing to take a crack at this and see if you can get it to import into the proper position? I'll send you the uniform .obj. Why is it so hard to import with UVs then get the clothing item to transfer onto the Genesis 8 figure in the same fracking position it was in before you started the transfer utility??????????????????????????????
How the hell can you lock the coordinates so when you execute an asset transfer Daz doesn't change the position?
Auto Muscle Enhancer HD [Commercial]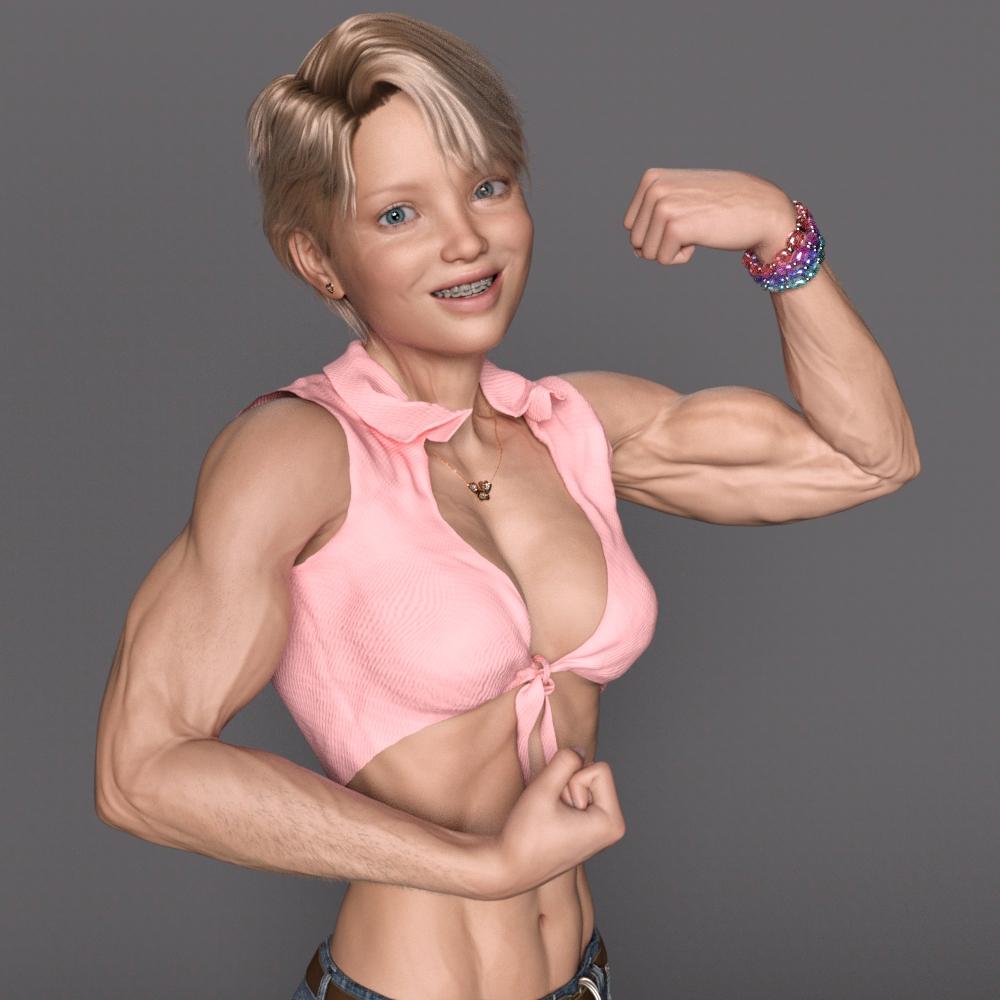 So if you have followed this thread for awhile, I have always been trying to get the details of the muscle, without the bulk (think fitness competitors). But to get to that Split Bicep that RenderPretender and I both like to see, I have had to overdrive the AME flex size. This can cause some unwanted distortions by lengthening upper arms, and messing up proportions. I tried d-formers, and manipulating the bones Hidden parameters, all with limited success. So upon discovering how to access the Hidden properties, I found DMasters major Bicep and Bicep Pose morphs. From there I created inverse or negative morphs of the Bicep morphs, then ERC (Enhanced Remote Control) linked them to the appropriate Bicep and Bicep Pose parameters. Next was linking the new inverse parameters to the Hand and Forearm bends and twists. Finally creating a master controller allowing me to "blend" in the desired extra amount of Biceps, without overdriving the rest of the body. I also developed an additional Tricep Flex morph, and did the same thing for DMasters Calf Flexing parameters, all controlled with the Master controller. If there is interest, I can put out a step by step, but it is basically a rehash of the PDF classes I have allready posted, just with different Parameters. The only draw back here is the files and master controller are optimized for the amount of AME Body that you want to start with. I have tried this with as low as 1% AME, but have found that 10-30% of AME body seems to work best, you can keep the original body shape mostly intact (especially if you inverse the AME body also).
I can't say how many trials and errors I have performed to get to this point, but am pretty happy with the results. TD
The Render is of a G3F imported model (Tamara) with only 10% of AME dialed in at 100% Flex
The other two screen shots are the same G8M with just the Left enhanced, and then G8F cloned with just the Right enhanced
Why is my clothing getting horizontally flipped when I use transfer utility? Driving me insane!!!When using Transfer Utility the base model (without morphs or other seettings) is adapted.. so the clothing is adapted with a positive X scale of 100.
You can:
- edit the impot settings for obj file
- import, correct the clothing, re-export from DAZ to OBJ and reimport it
When Importing you must set how axes are placed in Sketchup:
- Vertical Z
- Lateral X
- Depth Y
If the model looks inverted, under the Lateral X activate INVERT POSITIVE DIRECTION to flip the model
Why is my clothing getting horizontally flipped when I use transfer utility? Driving me insane!!!So I modeled a uniform in sketchup. Exported as an .obj. Imoorted it into Daz. This is where the problem starts. The Blue axis on the original sketchup model which is the vertical axis in literally every modeling and rendering program in the universe except Daz, in Daz becomes the front back axis and the model imports as if it was laying flat, face down on a floor instead of standing up. In the import dialog I tried every differnt combination of switiching, Z,Y and X axis but the closest I can get it to normal has the uniform aligned correctly with the Genesis 8 figure, but the Daz red axis is flipped. The only way I seem to be able to fix this is to select the uniform, then set the X Scale to -100 to then everything is aligned correctly.
However, once I use the transfer utility to morph the uniform to the Genesis 8 figure the fracking uniform flips back to an inverted red axis!!!! WHAT THE HECK!!!!!
Two questions...
How the heck do I import a model made in Sketchup, saved as an .obj to Daz starting off in the proper alignment?
Two how do I stop the uniform from flipping horizontally when using the transfer utility?
Help with external GPU for macintoshbarrieM said:
@bytescapes I tried Jack Tomlins server and DS crashed. Jack updated his server but itcrashed again. Did you use his service on a Mac? See attached Crash report. Jack asked me to get Daz tech support to sort it out.
Yes, I used Jack's service successfully from a Mac: a 2019 MacBook Pro running OS X 10 (Catalina). I don't remember exactly which DAZ Studio version I used -- maybe 4.12? It looks like you're on Big Sur; I wouldn't expect that to cause problems connecting to Jack's Iray Server, but I haven't tested that personally, so it might.
Sorry not to be more helpful.
On the other hand, I may be able to help you with the email issue. In answer to your question, no, Iray Server doesn't use the same port as email (can't remember what port it does use, but the GUI is on 9090, so I'd expect it to be somewhere in the same range; it's unlikely that your ISP is blocking a port that high).
The reason you're having trouble with iCloud email is presumably -- based on what your ISP said -- because your email client is trying to connect to port 25, which was the original standard port for Simple Mail Transfer Protocol (SMTP). Spammers started hijacking people's PCs and pumping out spam emails targeting port 25 on badly-configured mailservers that would accept mail from anywhere and send it anywhere. So ISPs gradually adopted a blanket ban on port 25: they simply wouldn't allow any client on their network to talk to port 25 on anything.
Instead, they encouraged people to use port 587, which supports authenticated SMTP. In other words, your computer can't just go "Yo, I gotta mail I wanna send," and have the remote mailserver go "Sure, whatever you say, boss." Instead, your mail program has to say "I'd like to send this mail, and I am this authorized user and here's my password." And then the mailserver goes "OK, I know who you are, send away." (Or, alternatively, "Never heard of you. Get lost.") Because servers on port 587 support proper authentication, ISPs are happy to let you connect to that port.
OK, that's more technical detail than you needed.
The odd thing is that an iCloud mail account ought to be set up by default to use port 587. If you went through the usual setup procedure, you'll just have added your iCloud account in the 'Internet Accounts' preference, and the OS will have applied all the standard settings for iCloud, which should include connection on port 587 (port 25 blocking has been around for years). All I can imagine is that, if your ISP is right about your mail client trying to send on port 25, that you're somehow working with an old setup that has been migrated forward from a previous machine or OS.
Anyway, this is off-topic for DAZ Studio. If you'd like to DM me, we can talk about it and I can try to figure out what's going on.
The Knight Series - Thoughts?I know that mechanically, the way that auto-following morphs works makes 'painted on everything' more feasible. I have spent a lot of time correcting auto-follow morphs on gear that looked decent until it got fit to a character with a more extreme morph. But why start that way? Why would someone wear a metal bra? As a breast-haver, I can assure you that looks really uncomfortable, plus, the breasts sticking out of the armor basically act as a guide for a blade towards what will both be a weak spot in the armor, given that construction (unless, I guess, the metal's just been hammered out thinner for the boob-plate, in which case the entire torso is a weak spot) and is a spot I really don't want to get a sword in me.
Anyhow, that all said, I'd still USE that for someone's character portrait, because fantasy RPGs are, definitionally, not particularly good at hewing to realism, but it's not my preference, and given the quality issues on the first one...
Wishlist and wait.
Character used on dForce Classic Blowout Hair by Linday promosI would like to know which character (face morph dials, texture) is used in the ninth promo image (09) for the product Yacht String Bikini for Genesis 8 and 8.1 Females by Linday ( female character from the right side with dark blonde hair ).I think that the same character ( dials) is used in the main promo image for Yacht String Bikini for Genesis 8 and 8.1 Females.
Thank you very much.
Why doesn't enabling both CPU & GPU increase rendering speed by a significant amount? (DAZ)Rendering on GPU and CPU are two totally different beasts. The GPU consists of a LOT of matrix cores. The can do matrix operations extremely fast, but that's basically it. Ray tracing is, mathematically, a set of matrix operations, that can also be parallelized a lot (each light ray is one "process", so e.g. a RTX3090 can process 10496 rays in parallel). A typical desktop CPU has about six to eight cores, that are also not optimized for the mathematics behind ray tracing.
In addition, the light rays interact, with materials and the geometry having that materials. Geometry, lights, materials all have to be loaded into memory. On an NVidia card, all is loaded into the VRAM of the card. With CPU renders, these informations have to be kept in main memory. So if you run CPU plus GPU renders, you would then need to keep those data twice. Plus, CPU and GPU will have to talk to each other who is doing what. An additional speed limit is the memory bandwidth. On a typical 64bit CPU, the memory connection is 64bit or 128bit (on some boards and chipsets). On a typical GPU, the memory is connected with a lot more parallel "lanes". A RTX3090 is connected with 384 bits in parallel, so transfer from/to memory is 3 to 6 times faster.
All the CPU is usually contributing is the preparation of the scene for the GPU, i.e. sorting out the geometry, lights, materials, ambient occlusions etc. It kind of does a rough optimization, then sends the data to the GPU and stays idle until receiving the result.
What would really be a nice feature is an IRay mode where the rendering process is not limited to the GPU VRAM, but can also utilize the main memory (at a price, because of the different speed limits). But I suppose that is not in the (commercial) interest of NVidia.
DAZ Install Manager failing.... [RESOLVED]I used time machine (mac) to transfer my old laptop to a new laptop. Daz central wont work with Monterey. Daz Install Manager was able to download all of the files I own but it is failing to install them. What the heck is going on?? It "fails" all installs all the way down the list. Any suggestions or ideas?
Daz software opens with no problem and even loaded assests that dont exist in my smart content which is empty...as it should be I guess until I figure out why Install is failing... Cheers!
Metamixer GrayClayThank you Faux2D. I will try this. I thought its maybe possible to export as obj and reimport as Morph with morphloader. Or resetting the texture.
But your tip is a good solution.
My Projects in 3D Digital RenderingA characher from a game I know little of called Death Standing. Not into the game or the fandom. but several characters I bought have good interchangeable costume bits.Plus, this character has a good quality head morph and hair included.
Mixed it up with another character's outfit.
 Alternative to Mysty's Presets for g3?
Vyusur, thanks for the answers!
Vyusur said:
As for Genesis items for fitting, they require clones which I don't sell. But there is a whole bunch of recipes for making them on the forum. Usually it's enough to scale the figure to the source figure size, fit the fingertips and toes to the closest position, export to obj, import as a morph in D/S and save it as a clone.For me, that is a bit too much of a shamantic dance.
I provide normal maps only where it is required. I don't care about all these divisions on pbr or non-pbr. Usually it's enough for Carrara to use diffuse and bump maps, and anything procedural for specular. Personally, I use normals for veins or micro muscles, or some extreme reliefs like scars.
I use normals in both pbr and non pbr style renders. And I have found that IRAY materials in general are very useful in Carrara, even without Philemo's plugin.
The only question you missed was, are your characters compatible with one another? For example, can one share the other's clothing?
Editing .duf and .dsf for Custom Folder StructureGenerally Assets (figure, props, clothing, etc..) and Materials can be saved in every directory.
Morphs no because they must stay into DATA directory (so DAZ knows where to look if you load a prop). When you load into the scene a figure/prop, DAZ every time scans all Data Directory looking for morphs (and UVs) compatible with loading item. This is why if you have many morph, loading a figure could be very time expensive.I also don't suggest to change file structure, every user can find the item only because DAZ suggest this file structure for authors. Changing it could be a problem if you are going to share your work with other users.
Spawning multiple deformer morphs separatelyRenderPretender,
You could try individually setting the Scale Property of each Morph to 0, and export the remaining Morph with the appropriate name. Alternatively, save it as a scene preset, then individually delete each arm D-former and export. You could undo the delete, and then delete the other one. Or just reload the scene and repeat as required. TD
Daz 3D is part of

Connect
DAZ Productions, Inc.
7533 S Center View Ct #4664
West Jordan, UT 84084Licensing Agreement | Terms of Service | Privacy Policy | EULA
© 2026 Daz Productions Inc. All Rights Reserved.