-
Stuck Trying to Fit/Simulate Cloth - What would you do?
This only deals with getting the clothing to fit your character in its default pose. Hermit Crab has already given tips for simulation.
For the fitting, the best thing to do is combine all those individual morphs into one single dial in V4, and then spawn that morph into the clothing. Here's a step by step:
1. Save your project before you continue. Then, with all your individual character morphs dialed in, and the figure in its DEFAULT ZERO POSE, choose Figure > Spawn Full Body Morph.
 2. Assign a name to your character. In my example I named her Big Bella.
 3. After you name the character, verify that the morph appears in the BODY actor under the name you assigned. Then choose Figure > Zero Figure. NOTE, this will set all of the individual morphs to zero (which is what you want to do). So if you haven't previously saved the project do so before you zero it out.
4. Dial the individual "Big Bella" morph to 1. It should look exactly the same as the individual morphs you had dialed in, but now it's only one morph! Easy!
5. Conform your clothing to the character. This should be the base, unmorphed version from the library that fits default V4. Just drag and drop from library to conform to your figure.
6. With the clothing selected, choose Figure > Copy Morph From. Select V4 if it isn't automatically selected.
7. Deselect ALL MORPHS in the dialog, and then make sure ONLY your "Big Bella" (or whatever you want to name it) is selected. Then choose OK to copy that morph to the clothing.
8. With the clothing selected, dial the "Big Bella" morph to 1. It SHOULD fit, for the most part.
9. If you need to touch up the morph some, go to the Parameters Palette, and click the right arrow next to your "Big Bella" morph in the clothing. Choose Edit Morph.
10. Use the Fitting Tools (not the fitting room) to touch the morphs up.
11. With the BODY actor of the clothing selected, switch to the Properties tab. There will be a section called "When conforming." Check all the options. The "include morphs" option, especially, will cause the clothing to automatically follow whatever you have your "Big Bella" morph set to.
12. Save your outfit to the library for future use. It's usually a good idea to save the clothing with all morphs turned off (set to zero).
Video link below (no sound)
dForce Archmagejksafe said:
barbult said:
@jksafe Are you creating the morph and looking at the dialed in morph, or are you simulating and then changing tools, without creating a morph before changing tools? (Sorry if it seems like we keep asking the same thing over and over. It just seems like some step might be accidently missed.)
-
Add Beach Style Long Hair to the Genesis 9 figure.
-
Select the Geometry Selection Tool
-
Run a dForce simulation using dForce Archmage.
-
Select Beach Style Long Hair Strands and run Loop Master
-
Swttch from Geometry Selection Tool to any other one
-
See Screenshots in the post above
After step 4, the morph is there. Everything looks great. Then, I switch tools, and the issue I showed in the screenshots occurs.
The screenshots show the dialed in morph on frame 1 with 2 different tools selected.
I'm confused. I may misunderstand what you are trying to achieve.
- Are you trying to create a single morph that represents the result of a hair simulation? You said "After Step 4, the morph is there." That implies to me that you created just one morph ("the morph"). I may be putting too much emphasis on the word "the" being singular.
- Or are you trying to create a whole series of hair morphs that you can animate in a loop, like I did in my YouTube Autumn Bob Style Hair animation? Edited to add: After running Loop Master, i ran dForce Animator before switching tools, to generate the morphs for my animation. Maybe that is a step you are missing????
dForce Archmagebarbult said:
@jksafe Are you creating the morph and looking at the dialed in morph, or are you simulating and then changing tools, without creating a morph before changing tools? (Sorry if it seems like we keep asking the same thing over and over. It just seems like some step might be accidently missed.)
-
Add Beach Style Long Hair to the Genesis 9 figure.
-
Select the Geometry Selection Tool
-
Run a dForce simulation using dForce Archmage.
-
Select Beach Style Long Hair Strands and run Loop Master
-
Swttch from Geometry Selection Tool to any other one
-
See Screenshots in the post above
After step 4, the morph is there. Everything looks great. Then, I switch tools, and the issue I showed in the screenshots occurs.
The screenshots show the dialed in morph on frame 1 with 2 different tools selected.
dForce Archmage@jksafe Are you creating the morph and looking at the dialed in morph, or are you simulating and then changing tools, without creating a morph before changing tools? (Sorry if it seems like we keep asking the same thing over and over. It just seems like some step might be accidently missed.)
dForce Archmagematew said:
barlupt, thank you for your testing!
I got OOT Summer Style Wavy Long Hair for testing, and it turns out everything works. I didn’t even need to switch to the Geometry Editor Tool — Archmage just worked right away.However, Beach Style Long Hair refused to work out of the box. But with your method — it actually did!
jksafe, I have no idea why this happens, but to make Beach Style Long Hair work, you need to do the following:
-
Add Beach Style Long Hair to the Genesis 9 figure.
-
Select the Geometry Selection Tool — this part is critical! The tool must be selected before starting the simulation.
-
Run a dForce simulation using dForce Archmage.
-
Select Beach Style Long Hair Strands and run Morph Extractor, Loop Master, or whatever script you need — it should work now.
-
Now you can switch from Geometry Selection Tool to any other one.
Unfortunately, this still does not work. The steps you wrote down are close to what I wrote I did last time, but after step 5, when I choose a tool other than the geometry editor tool, the simulation looks different. It does not work the way you describe. I attached two screenshots: one with the Geometry Editor Tool selected and one with the Universal Tool. Also, one where the simulation is done using the regular DAZ interface with the Universal Tool selected.
Just to make it clear, looping works. But it doesn't help me because the simulation changes when I select a different tool.
(closed) Looking for kids yellow raincoatThere's this set which fullfills some of your requirements, and the length could be adjusted I guess - you would need a morph to make it close properly though: https://www.daz3d.com/dforce-bloody-rain-outfit-for-genesis-8-and-81-females. It looks as if it moves pretty well. Might want to give it a try.
Then there's this really pretty coat which has a lot of options and could maybe be adapted as a raincoat: https://www.daz3d.com/dforce-km-duffle-coat-for-genesis-8-females. Might want to rummage around in the coats section a little anyways, there might be more with hoods.
Concerning the G8M Wet Weather gear that you already have, what are the problems precisely? Maybe they could be fixed by fiddling with the dForce settings and weight maps?
Edit: There's also this older set, it doesn't open or have the hood down option, but maybe you could use different coats for different set ups? Here: https://www.daz3d.com/h-c-raincoat-outfit-for-genesis-3-male-s.
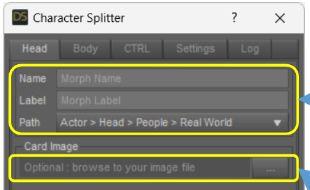
Character SplitterIf everything went fine, the quickest way to find your morphs is by doing a search in the "Parameters" tab, as shown below :
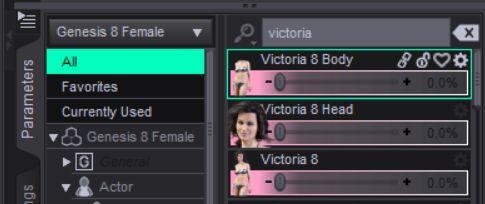
Select "All" and type the morph name ("victoria" here), and all the morphs will appear.
Alternatively you can search them manually from the "Parameters" tab by following the "Path" that you've set in Character Splitter :
 dForce Archmage
matew said:
barlupt, thank you for your testing!
I got OOT Summer Style Wavy Long Hair for testing, and it turns out everything works. I didn’t even need to switch to the Geometry Editor Tool — Archmage just worked right away.However, Beach Style Long Hair refused to work out of the box. But with your method — it actually did!
jksafe, I have no idea why this happens, but to make Beach Style Long Hair work, you need to do the following:
-
Add Beach Style Long Hair to the Genesis 9 figure.
-
Select the Geometry Selection Tool — this part is critical! The tool must be selected before starting the simulation.
-
Run a dForce simulation using dForce Archmage.
-
Select Beach Style Long Hair Strands and run Morph Extractor, Loop Master, or whatever script you need — it should work now.
-
Now you can switch from Geometry Selection Tool to any other one.
Yes, that is the basic step by step. One clarification: The necessary tool's name is Geometry Editor Tool.
@jksafe, if you still need more explicit directions, please ask. I was occupied with other tasks today.dForce Archmagebarlupt, thank you for your testing!
I got OOT Summer Style Wavy Long Hair for testing, and it turns out everything works. I didn’t even need to switch to the Geometry Editor Tool — Archmage just worked right away.However, Beach Style Long Hair refused to work out of the box. But with your method — it actually did!
jksafe, I have no idea why this happens, but to make Beach Style Long Hair work, you need to do the following:
-
Add Beach Style Long Hair to the Genesis 9 figure.
-
Select the Geometry Selection Tool — this part is critical! The tool must be selected before starting the simulation.
-
Run a dForce simulation using dForce Archmage.
-
Select Beach Style Long Hair Strands and run Morph Extractor, Loop Master, or whatever script you need — it should work now.
-
Now you can switch from Geometry Selection Tool to any other one.
Brianna 9, Here Comes the Bride to DAZ3Dfelis said:
Dareshiranu said:
If the wedding gowns came with undress morphs I'd find them more appealing. They'd make better transitions for a variety of scenarios. Undress/Dressing are pretty much the same thing after all.
To do it properly, you would need to open thr dress (where the zipper is). You cannot do that with a morph.
Actually it's really "simple" but may not be worth the effort for most of the products: The zip would be a straight cut on a line of vertices on the cloth, and illusion of a zip would be made with the textures and mask, or even with more 3D mesh. Some additive and cumulative morphs would control both sides of the dresse's zip plus a metalic part that goes up/down as the morph is dialed.
Fit Control for Genesis 9 is a product that may help you with the illusion of dressing/undressing, and works on any piece of clothing.Looking for specific bob hairstyleI have Matilda Hair, and it would be perfect for my needs, but some of the morphs and hide functions won't work on a Genesis 9 character (I forgot to mention this, my apologies.)
Matt_Castle said:
Matilda Hair is quite the multi-tool for bob hair, with a lot of different morphs and some hide controls: https://www.daz3d.com/matilda-hair-for-genesis-8-females
And although it may not be that useful for what you want here (although maybe it could be dialled in backwards if you want to turn the limits off), I've also added a morph to straighten the base to add more utility (attached below).
Looking for specific bob hairstyleMatilda Hair is quite the multi-tool for bob hair, with a lot of different morphs and some hide controls: https://www.daz3d.com/matilda-hair-for-genesis-8-females
And although it may not be that useful for what you want here (although maybe it could be dialled in backwards if you want to turn the limits off), I've also added a morph to straighten the base to add more utility (attached below).
dForce Archmagejksafe said:
barbult said:
I own four OOT dForce strand-based hair products. I am able to morph all of them with the standard Daz tools and even with Archmage. I don't own any of the ones that jksafe referenced, but it would be surprising if they differed in structure from the ones I own. It took me some time and some hints from jksafe to figure out how to morph them in Archmage. I select the geometry editor tool. I fit and parent the hair product to G9. I select G9 and launch the simulation. I select the hair strands object and extract the morph. That can be slow, so I just wait while DS is not responding. When it is finished, I save the morph as a Modifier Asset, if I plan to use it in the future. Here are examples of the four OOT strand-based hairs I own and the morphs I created in Archmage. The unmorphed hair is on the left and the morphed hair is on the right in each render. (That last one is Messy Low Ponytail Hair. I have a typo in the render file name.)
Did you try looping it and get it to work by any chance?
No, I only did a current frame simulation, not a timeline or loop.
Brianna 9, Here Comes the Bride to DAZ3DDareshiranu said:
If the wedding gowns came with undress morphs I'd find them more appealing. They'd make better transitions for a variety of scenarios. Undress/Dressing are pretty much the same thing after all.
To do it properly, you would need to open thr dress (where the zipper is). You cannot do that with a morph.
They could have left the verteces in a line be unwelded, but then you cannot simulate that area as it would split. So you would have to have a dForce add-on to hold it together when closed.
It is doable, but more tricky than just doing it.
dForce ArchmageOkay, so... I tried what you said with the looping script, and it actually works. HOWEVER, as soon as I select a tool other than the geometry editor tool, the simulation on the hair disappears again. This is still unusable, since selecting the Geometry Editor Tool destroys all the Geoshells I have placed on the figure.
I can't extract the morph and apply it later because the morph only works when I select the Geometry Editor tool. As soon as I select a different tool, the dforce simulation disappears.
My exact steps were as follows:
Load figure -> load hair on figure -> select geometry editor tool -> left click hair -> right click hair "fit to" and parent to figure -> left click figure -> run animated timeline simulation with archmage -> left click hair ONLY strands -> run loop script
It runs for a bit and does everything it should. However, as soon as I deselect the geometry editor tool, the dforce simulation disappears.
dForce Archmagebarbult said:
I own four OOT dForce strand-based hair products. I am able to morph all of them with the standard Daz tools and even with Archmage. I don't own any of the ones that jksafe referenced, but it would be surprising if they differed in structure from the ones I own. It took me some time and some hints from jksafe to figure out how to morph them in Archmage. I select the geometry editor tool. I fit and parent the hair product to G9. I select G9 and launch the simulation. I select the hair strands object and extract the morph. That can be slow, so I just wait while DS is not responding. When it is finished, I save the morph as a Modifier Asset, if I plan to use it in the future. Here are examples of the four OOT strand-based hairs I own and the morphs I created in Archmage. The unmorphed hair is on the left and the morphed hair is on the right in each render. (That last one is Messy Low Ponytail Hair. I have a typo in the render file name.)
Did you try looping it and get it to work by any chance?
Limited Time Freebies Discussion ThreadI'm sure they can be applied to G3F with a substitute for the originally required character. On occsions where the original is needed at 100% I tend to see if there is a similar character in my library and use their morph to fill in the missing bits. It can lead to differences from how the character was intended, but if the substitute is close, it should lead to a decent character anyway.
Regards,
Richard
Leg holster identificationrichardandtracy said:
Then use the transfer utility to copy across the original harness rigging to the modified harness. The way to do this is use menu option Edit| Figure| Transfer Utility . Here you select the old harness as the source figure, the new harness as the destination figure and set it running.
On these settings, you won't transfer any corrective morphs, which are an important part of the rigging.
Even with the right settings, you won't transfer any custom control links (and quite a lot of clothes have custom control links, I find).
If you want to edit clothes to hide parts of them, the magic you want is conditional grafts.
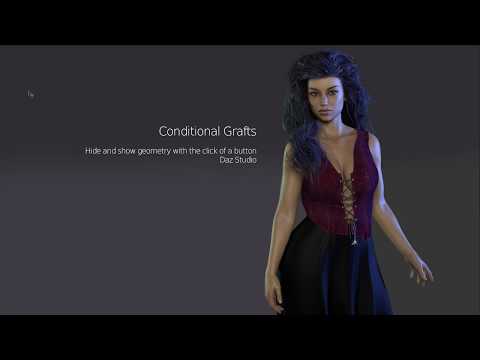
These will retain all correctives, compatibilities, HD morphs, etc.
You shouldn't need to take it to an external editor if all you want to do is hide faces.
(And I really wish conditional grafts could be applied to props as well as figures so that I didn't need to save edited standalone copies of them to hide some parts).
dForce ArchmageI own four OOT dForce strand-based hair products. I am able to morph all of them with the standard Daz tools and even with Archmage. I don't own any of the ones that jksafe referenced, but it would be surprising if they differed in structure from the ones I own. It took me some time and some hints from jksafe to figure out how to morph them in Archmage. I select the geometry editor tool. I fit and parent the hair product to G9. I select G9 and launch the simulation. I select the hair strands object and extract the morph. That can be slow, so I just wait while DS is not responding. When it is finished, I save the morph as a Modifier Asset, if I plan to use it in the future. Here are examples of the four OOT strand-based hairs I own and the morphs I created in Archmage. The unmorphed hair is on the left and the morphed hair is on the right in each render. (That last one is Messy Low Ponytail Hair. I have a typo in the render file name.)
Eye blink problemanders869 said:
Richard Haseltine said:
That looks as if a shape is applied that does not have a corrective morph or a corrective morph is aplying when it should not. Do you have The Age installed?
yep, i have
Until there is a fix you probably want to uninstall it.
Daz 3D is part of

Connect
DAZ Productions, Inc.
7533 S Center View Ct #4664
West Jordan, UT 84084Licensing Agreement | Terms of Service | Privacy Policy | EULA
© 2026 Daz Productions Inc. All Rights Reserved.