-
Daz Bridge Support Is Here!
I just spent several hours trying to get even a simple Daz figure (Victoria as per a tutorial video I saw.
The problem is Autodesk Maya 2024 or 2023 require something called pymel which I tried to get installed, but it requires a high level of expertise.. I worked with get-pip etc.
So, I am looking for some 3d modeling software that I can get Daz figures into.
I have Maya and Lightwave.
I've had some success in Lightwave with props. But no success anywhere with figures.
I'm stumped. It's very disappointing.
Any suggestions?
Getting on the 9 train, or notnonesuch00 said:
Serene Night said:
Genesis 9 male is a disappointment for me. The figure shape is pretty undefined, and traces of female presenting breasts, as well as oddly long necks, and the absence of details in most purchased figures in the chest region makes it tough to get a comparative figure to G8M.
I do think the heads are really good, but really hard to get really cut, and detailed male figures that I prefer and the normals and HD seem very undetailed in most characters I buy for the guys. I'm used to better HD on Genesis 8.
Have you bought & tried the Victor for Victoria 9 and the Michelle for Michael 9? Maybe those help?
I bought the Victor to Victoria morph and it was....not a great. I like the idea of Victor, but to use the morph you must dial in Victoria 9 fully, then the Victor morph. I found that these two morphs don't play well with other male morphs, making Victor essentially useless if you want to mix him with other males. The Victor body was largely rather basic to begin with anyway.
Also the lack of hd comparative to genesis 8 is a real visual stumbling block to me. There is just a rather strongg lack of detail to the male genesis 9 line's bodies that seeems wasted opportunity even with characters like Mike 9, Lawrence erc.
Suggestions on keeping track of assets?
Sounds interesting, thank you for sharing your procedure.Valiska said:
...
Multiple Content Directories
Anybody who's been hanging around long enough to accumulate a typical large library with several thousand installation files, and probably thrice as many user-facing files within Daz Studio, has found out that it's hard to keep track of the results, even with a Smart Content database.
So I have multiple content directories. Exactly what you want for content directories will vary, depending on what products you have, and what's important to you. Every possible organization has some disadvantages.
My method is to break up content into libraries based on subject matter first, and -- for poseable figures -- generation. It means I have a lot of libraries: I have 16 Daz Studio libraries. 11 of those are also Poser libraries. (There is no point in adding libraries of later Daz poseable figures to Poser, since they don't load. There will end up being some Poser-only libraries if I buy an updated Poser.)
They are:
- Main (General utilities, scripts, shaders, manmade buildings and manmade props)
- My Projects (Stuff I'm working on I don't want cluttering up the other libraries)
- Nature (Environments without human artifacts and lots and lots of plants)
- Vehicles (If it fits _in_ a set. If it _is_ a set, I probably put it in Main.)
- Animals 1 (Old animals, like Millennium Cat.)
- Animals 2 (Newer animals, like Horse 2, Dragon 2, and Dog 8).
- Hivewire (Dawn, Dusk, Luna, Harry the Hivewire Horse and descendants, Big Dog, lots of CWRW textures.)
- Hair (See below)
- Cloaks and Morphing Fantasy Dresses (See below)
- Millennium 3 (Before my time, but I have some.)
- Millennium 4 (A fair amount of stuff for Victoria 4 and Michael 4)
- Genesis 5 (Current when I started. Morphs, skins, characters, clothing)
- Genesis 6
- Genesis 7
- Genesis 8
- Genesis 9
Hair gets its own library because it's usually relatively easy to fit to figures of different generations, so I want it all handy to look at, for any character.
Cloaks and Morphing Fantasy Dresses get their own library because, for several generations, even though they fit different figures, they were using the same UV maps. A texture for a cloak for Michael 3 could easily be used on a cloak for Victoria 6. So I want these all available for inspection together too.
Humans figures get split up by generations because they have numerous add-ons and which generation they belong to isn't always clearly labelled. -- This is where the major disadvantage of my organization comes in. Products often can be used with characters of the same sex in multiple generations. If they don't have separate installers for each generation, then I have to pull them apart and install at least partly manually. So, for example, if it fits Genesis 3(7) Female and Genesis 8 Female, I have to duplicate some files and directories and install them by hand. This is a nuisance and I wish they all had separate installers for each generation. It's not enough of a nuisance to make me stop.
Animals are split into older and newer mostly on rendering considerations. Older animals might lack resolution in mesh, particularly, for closer renders. (Lyne's animals were wonderfully inspired, but they were built for ~Poser 4.)
In Main:
- I have old and new buildings, too. But I didn't split those, because some of the old buildings have plenty of model resolution and later add-on textures, and look perfectly good today. The ones that didn't get later boosts are obvious at a glance, or memorized.
- There is no particular point in trying to distinguish environments, architecture, and props on installation to a Daz library, since they are often in the same product, and may be installed in any of 5-6 places besides.
Main (Human Stuff)/Nature: the primary reason I have two different libraries for these settings and props is to reduce the number of items in each, so I have some hope of finding stray product parts, which are legion with respect to older products.
For the product collections that were made over years and comprise more than a dozen products, made for different programs, different rendering engines, sold now at different vendors, with add-on textures that apply to different parts of the entire model collection because not all of it existed when the first ones were made ... it still takes an evening or three to figure out how they interrelate, so I can export them. I have 13 products related to the Victorian Reflections Room, and figuring that out took an entire evening. The GIS environments took three. I doubt I'd have found all the parts for either, if I had all my content in one library. Just too much to scan when I start out only vaguely remember whether some part of the collection existed, and what exactly it was for.
Is this an old version of dforce or in addition to dforce?SimonJM said:
That is for a much earlier form of dynamic clothing and is pretty much redundant - unless you were to be using Victoria or Micahel 4
Excellent! Thansk for the info!
Is this an old version of dforce or in addition to dforce?That is for a much earlier form of dynamic clothing and is pretty much redundant - unless you were to be using Victoria or Micahel 4
Getting on the 9 train, or notSerene Night said:
Genesis 9 male is a disappointment for me. The figure shape is pretty undefined, and traces of female presenting breasts, as well as oddly long necks, and the absence of details in most purchased figures in the chest region makes it tough to get a comparative figure to G8M.
I do think the heads are really good, but really hard to get really cut, and detailed male figures that I prefer and the normals and HD seem very undetailed in most characters I buy for the guys. I'm used to better HD on Genesis 8.
Have you bought & tried the Victor for Victoria 9 and the Michelle for Michael 9? Maybe those help?
Suggestions on keeping track of assets?...
Multiple Content Directories
Anybody who's been hanging around long enough to accumulate a typical large library with several thousand installation files, and probably thrice as many user-facing files within Daz Studio, has found out that it's hard to keep track of the results, even with a Smart Content database.
So I have multiple content directories. Exactly what you want for content directories will vary, depending on what products you have, and what's important to you. Every possible organization has some disadvantages.
My method is to break up content into libraries based on subject matter first, and -- for poseable figures -- generation. It means I have a lot of libraries: I have 16 Daz Studio libraries. 11 of those are also Poser libraries. (There is no point in adding libraries of later Daz poseable figures to Poser, since they don't load. There will end up being some Poser-only libraries if I buy an updated Poser.)
They are:
- Main (General utilities, scripts, shaders, manmade buildings and manmade props)
- My Projects (Stuff I'm working on I don't want cluttering up the other libraries)
- Nature (Environments without human artifacts and lots and lots of plants)
- Vehicles (If it fits _in_ a set. If it _is_ a set, I probably put it in Main.)
- Animals 1 (Old animals, like Millennium Cat.)
- Animals 2 (Newer animals, like Horse 2, Dragon 2, and Dog 8).
- Hivewire (Dawn, Dusk, Luna, Harry the Hivewire Horse and descendants, Big Dog, lots of CWRW textures.)
- Hair (See below)
- Cloaks and Morphing Fantasy Dresses (See below)
- Millennium 3 (Before my time, but I have some.)
- Millennium 4 (A fair amount of stuff for Victoria 4 and Michael 4)
- Genesis 5 (Current when I started. Morphs, skins, characters, clothing)
- Genesis 6
- Genesis 7
- Genesis 8
- Genesis 9
Hair gets its own library because it's usually relatively easy to fit to figures of different generations, so I want it all handy to look at, for any character.
Cloaks and Morphing Fantasy Dresses get their own library because, for several generations, even though they fit different figures, they were using the same UV maps. A texture for a cloak for Michael 3 could easily be used on a cloak for Victoria 6. So I want these all available for inspection together too.
Humans figures get split up by generations because they have numerous add-ons and which generation they belong to isn't always clearly labelled. -- This is where the major disadvantage of my organization comes in. Products often can be used with characters of the same sex in multiple generations. If they don't have separate installers for each generation, then I have to pull them apart and install at least partly manually. So, for example, if it fits Genesis 3(7) Female and Genesis 8 Female, I have to duplicate some files and directories and install them by hand. This is a nuisance and I wish they all had separate installers for each generation. It's not enough of a nuisance to make me stop.
Animals are split into older and newer mostly on rendering considerations. Older animals might lack resolution in mesh, particularly, for closer renders. (Lyne's animals were wonderfully inspired, but they were built for ~Poser 4.)
In Main:
- I have old and new buildings, too. But I didn't split those, because some of the old buildings have plenty of model resolution and later add-on textures, and look perfectly good today. The ones that didn't get later boosts are obvious at a glance, or memorized.
- There is no particular point in trying to distinguish environments, architecture, and props on installation to a Daz library, since they are often in the same product, and may be installed in any of 5-6 places besides.
Main (Human Stuff)/Nature: the primary reason I have two different libraries for these settings and props is to reduce the number of items in each, so I have some hope of finding stray product parts, which are legion with respect to older products.
For the product collections that were made over years and comprise more than a dozen products, made for different programs, different rendering engines, sold now at different vendors, with add-on textures that apply to different parts of the entire model collection because not all of it existed when the first ones were made ... it still takes an evening or three to figure out how they interrelate, so I can export them. I have 13 14 products related to the Victorian Reflections Room, and figuring that out took an entire evening. The GIS environments took three. I doubt I'd have found all the parts for either, if I had all my content in one library. Just too much to scan when I start out only vaguely remember whether some part of the collection existed, and what exactly it was for.
*CLOSED* RRRR "That went well" Render Contesttag:luci45#10
Lana's Helpers
Lana's helpful robo helper invited its friends to help Lana move. She was uneasy at first and did not like the rudely jovial oversized kewpi doll (who would make something like that?) But once everyone got their instructions and settled down thing went well.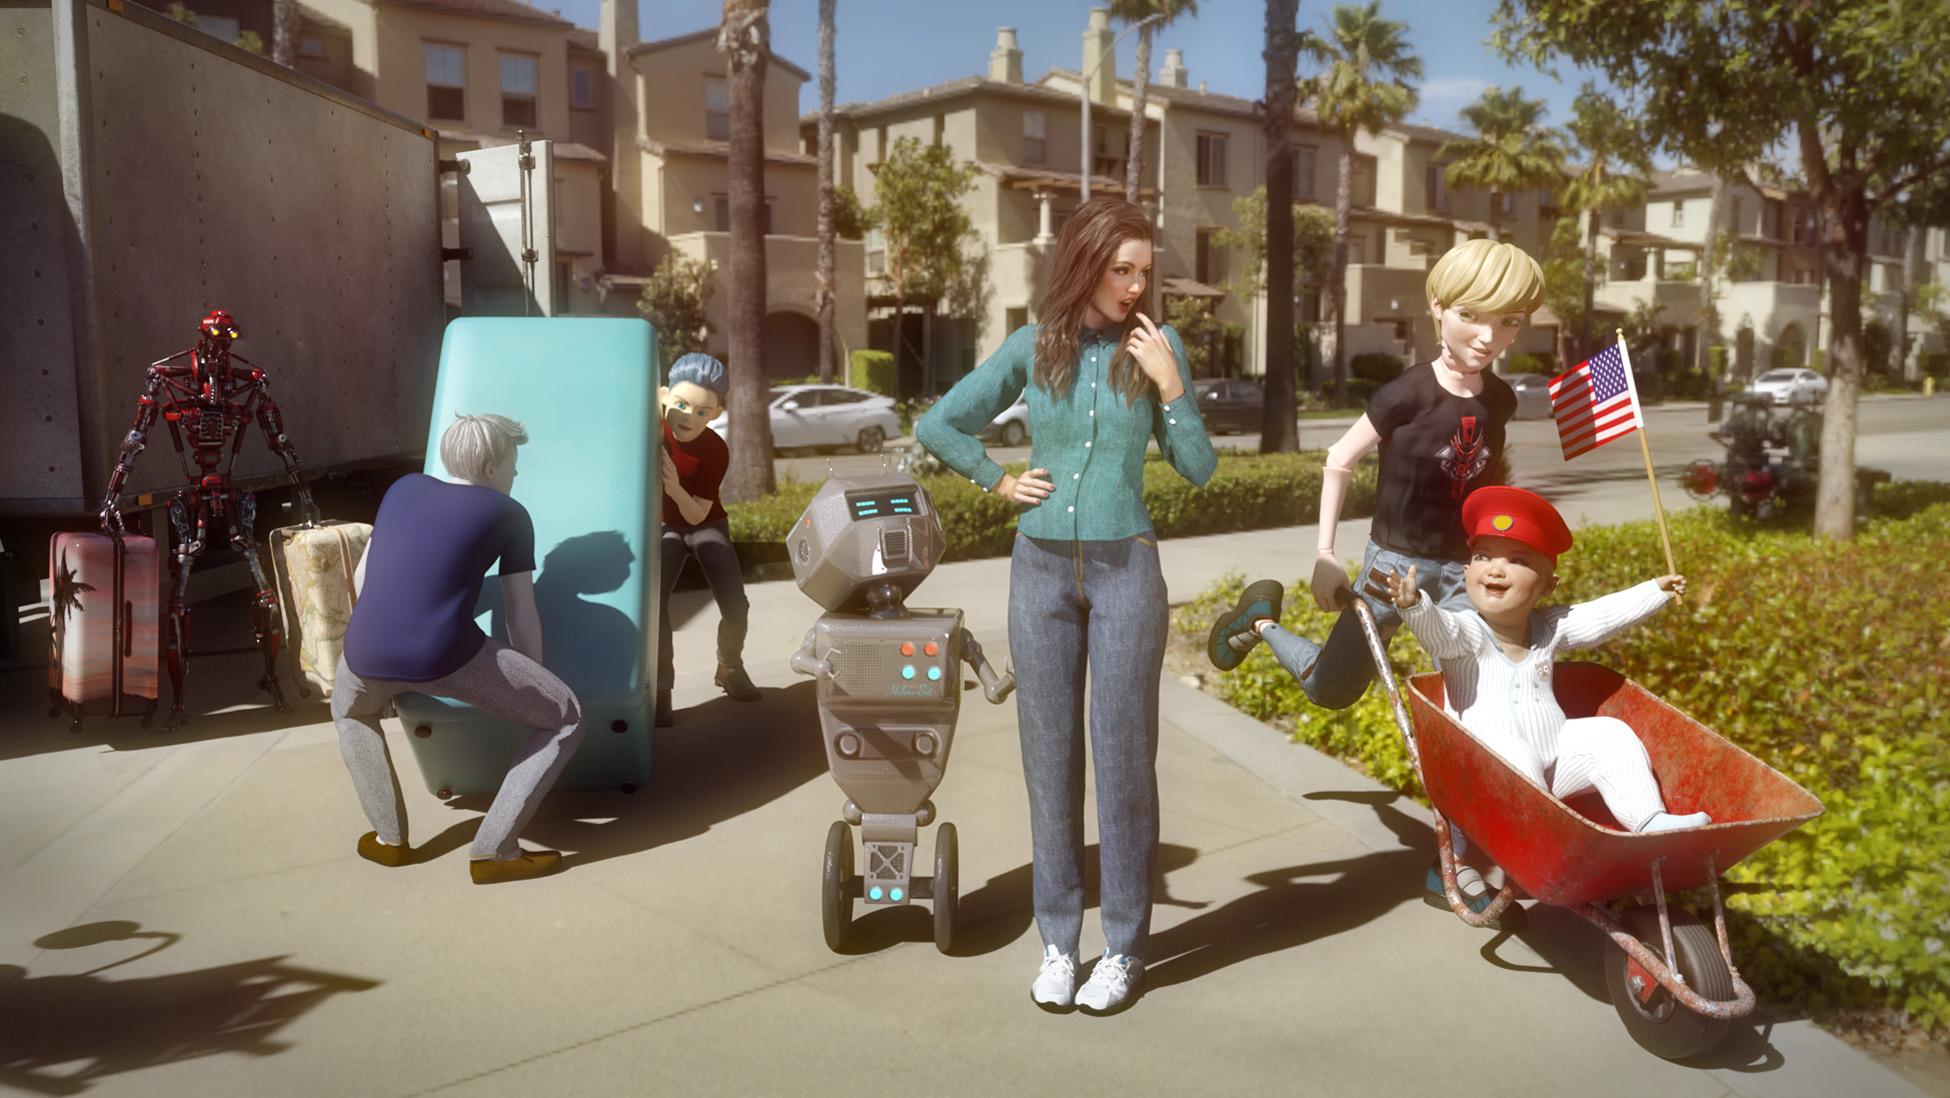
3298 Lana Elite Texture
4800 Removing Again for Genesis 8 Male
1475 dForce Cozy Knit Outfit for Genesis 8
3368 Leyton Hair for Genesis 3 Female(s) and Genesis 2 Female(s)
1895 Dynamic American FlagAlso Used
Travel Baggage
Cyborg Generation 8
Everyday Wardrobe for Genesis 2 Female(s) Jeans and Shirt
Basic Wear
50's Fab for Genesis 8 Male(s)
Toon Generations 4 Hair for Genesis 8 Male(s)
Short Anime Hair for Genesis 3 and 8 Male(s)
StreetWear : Sneakers For V6
Helper Bot
Victoria 6
dForce Cyber Decker Outfit for Genesis 8 Males
SF Ball Jointed Dolls for Genesis 8 and 8.1
Uniforms for Michael 6 hatMichael 9 HD Feminine Shape Add-On NOT freeIt's cheaper than what I paid for the Victoria 9 equivalent, thankfully.
The Rotate Tool-"rings" don't moveHey there,
for a long time now the three colored rings of the Rotate Tool have not worked for me. I can click them and move the eyes, but the rings don't change accordingly. Same thing when I change values using the Parameters tab, the rings stay frozen.
So far I've used the Universal Tool instead, assuming I had some conflict with another product, but now I got tired of it and did a completely clean install - besides the absolutely necessary elements DAZ installs in the beginning only Victoria 9 is installed - and the problem persists.
What could cause this, does anybody know?
 Face Transfer 2 (and materials)
Before trying out Face Transfer 2, can someone please explain some of its features?
Can I apply a different skin material (including eyes colors etc) on the generated figure. For example can I apply Victoria 9's or Olympia 9's skin MATs on the generated face, keeping just the new morph?
Also after generating a face, does it create a "morph" that I can then further edit with other morph sliders?
How To Achieve Genesis 9 Skin on Genesis 8 or 8.1 Figureoutrider42 said:
Comparing Zelara's normals to the 8k normal details is not really apples to apples. The normal maps for Zelara (and most all characters) serve a purpose for creating the illusion of extra geometry, and they tend to use it for "larger" features, if that makes any sense. Essentially, the normal maps for Zelara replace the HD morph. If you render her with her HD morph, she will come out pretty similar to what she looks like with her normal maps applied. Take notice that most Daz core G8 characters do NOT load any normal map when you load the HD character preset. So normal maps tend be a replacement for HD morphs in this way. No this may not apply to non core characters, as PAs are free to do it any way they wish. This is just the way Daz cores handle it.
Rather, the 8k normal maps I am talking about provide the micro skin detail, a much finer detail than what Zelara's is intended for They can be used across multiple characters because in a way they are kind of universal. Though of course it would be great if they made unique detail normals for different characters. You could use both of these maps at the same time, if you use PBR Skin. PBR Skin has some extra slots for 'detail' maps. So you can have Zelara's regular normal maps plus these 8k detail maps at the same time.
Now to be clear, all normal maps are meant to be a replacement for pure geometry. That is their purpose, normal maps exist because using pure geometry for realism means a lot of geometry, and that is computationally heavy on resources. Until we have hardware and software that can handle billions of polygons without grinding to a halt, we will still need normal maps.
Why these maps work is not just because they are 8k, but because they are high quality PNGs. Just take a look for yourself. You have these maps for G9 in your starter essentials, and almost any G9 core and many 3rd party characters use them. Open the maps in a pic viewer and take a look at how detailed they are, with no compression artifacts.
That detail is key. The closet anybody came on G8 is bluejaunte, but they made their 8k detail maps for specularity. Either process can work, and you can find many threads praising bluejaunte characters for their realism. Those 8k spec maps played a big role in why they look so good. On the flip side, I came to realise their normal maps were too highly compressed. In a closeup render I was perplexed by some odd looking jagged edge like artifacts on a character in large renders. The cause turned out to be the compression in the normal map, if you see compression in the normal, that can end up in your render. In lower resolution renders these artifacts are not visible. Anyway, the micro details cause the light to bounce around the skin. With a good material setup the small cracks of skin absorb light in a way that makes it look soft. This technique also does a good job of reflecting light in a way that people tend to like. The skin is not universally shiny, rather the parts that are in direct light shine more, while parts of skin out of the light look correct, and soft. But the SSS has to work with it, too. It needs enough translucency for the skin to absorb the light just right. You don't need anything exotic here, at least I don't think so. You don't need any wild colors in the SSS channels. You can even use textures in the SSS channels if you wish.
A cheap and dirty way to make characters look good is to simply apply a material preset from a bluejaunte character to your character, and work off that. Then replace the base color and translucency maps with your prefered character. You can also replace the normal maps (particularly for the reason I mention above). You can use whatever normal maps you like, using the ones the character came with would probably be fine, but you don't have to. Or, you can even skip the normal maps, that would work for a youthful character. This might look great immediately. If not, you can tweak the trans values and sss settings slightly until you get there.
Don't be afraid to experiment. Sometimes the best results (at least for me) come from using 2 seemingly different skins with each other. I think I used bluejaunte Misumi base colors as the trans maps for the first pic with Zelara. Again, I altered them to have more Zelara features, like the moles on her face.
This is the same Victoria with Zelara's material preset applied. This includes Zel's normal maps. She doesn't look bad, but she could look better.
I also made another version of her tweaked differently. This time I removed the bluejaunte spec maps, but kept the 8k normal details. In the dual lobe settings, I used another converted G9 texture. This time it is the "R" texture, I assume the Reflection/Roughness texture as that is where it is used. But I kept the Zelara base color along with the Misumi trans maps. But that's it, 4 textures per surface, nothing more. No bump maps or multiple spec maps. Just a color, trans, spec and normal. It is a pretty simplistic setup. In this pic, all the skin micro detail you see is coming from the 8k normal map. The detail under her eyes, the pores on her cheeks, those are all from this normal map. Some pores are baked into her base texture, but if you zoom in, you can see how they pop more here than the default skin. On the default skin they look flat. Here they look more 3 dimensional. Then look at her arm. On the default you see some really bumpy skin. This comes from the bump map, and they are not as clean and crisp as the 8k normals in the other pics. Even here the 8k can be limiting if you zoom in enough. There just aren't enough pixels in this area. Still, the result is improved IMO. Also, this last pic is using PBR Skin, but it doesn't have to. This last pic isn't meant to be better or worse than the first pic I posted in the thread, just a different take.
Thank you for the detailed explanation.
I knew bump maps added "fake geometry". I remember bow that I knew about normal maps as well at some point, since they are details about how light would be reflected from different angles but I guess I kind of took it for granted and didn't think about it in detail anymore.
I makes sense that not just the resolution but the quality of the texture map itself is the reason for the added realism.
I am trying to convert an older G3 model to G8.1 or G9. (G9 I've had trouble with the textures fitting because of the UV mapping)
I think using better and more up to date normal maps will increase the quality of this conversion considerably.
Any idea how I could increase the quality for the diffuse/base color texture as well?
How To Achieve Genesis 9 Skin on Genesis 8 or 8.1 FigureComparing Zelara's normals to the 8k normal details is not really apples to apples. The normal maps for Zelara (and most all characters) serve a purpose for creating the illusion of extra geometry, and they tend to use it for "larger" features, if that makes any sense. Essentially, the normal maps for Zelara replace the HD morph. If you render her with her HD morph, she will come out pretty similar to what she looks like with her normal maps applied. Take notice that most Daz core G8 characters do NOT load any normal map when you load the HD character preset. So normal maps tend be a replacement for HD morphs in this way. No this may not apply to non core characters, as PAs are free to do it any way they wish. This is just the way Daz cores handle it.
Rather, the 8k normal maps I am talking about provide the micro skin detail, a much finer detail than what Zelara's is intended for They can be used across multiple characters because in a way they are kind of universal. Though of course it would be great if they made unique detail normals for different characters. You could use both of these maps at the same time, if you use PBR Skin. PBR Skin has some extra slots for 'detail' maps. So you can have Zelara's regular normal maps plus these 8k detail maps at the same time.
Now to be clear, all normal maps are meant to be a replacement for pure geometry. That is their purpose, normal maps exist because using pure geometry for realism means a lot of geometry, and that is computationally heavy on resources. Until we have hardware and software that can handle billions of polygons without grinding to a halt, we will still need normal maps.
Why these maps work is not just because they are 8k, but because they are high quality PNGs. Just take a look for yourself. You have these maps for G9 in your starter essentials, and almost any G9 core and many 3rd party characters use them. Open the maps in a pic viewer and take a look at how detailed they are, with no compression artifacts.
That detail is key. The closet anybody came on G8 is bluejaunte, but they made their 8k detail maps for specularity. Either process can work, and you can find many threads praising bluejaunte characters for their realism. Those 8k spec maps played a big role in why they look so good. On the flip side, I came to realise their normal maps were too highly compressed. In a closeup render I was perplexed by some odd looking jagged edge like artifacts on a character in large renders. The cause turned out to be the compression in the normal map, if you see compression in the normal, that can end up in your render. In lower resolution renders these artifacts are not visible. Anyway, the micro details cause the light to bounce around the skin. With a good material setup the small cracks of skin absorb light in a way that makes it look soft. This technique also does a good job of reflecting light in a way that people tend to like. The skin is not universally shiny, rather the parts that are in direct light shine more, while parts of skin out of the light look correct, and soft. But the SSS has to work with it, too. It needs enough translucency for the skin to absorb the light just right. You don't need anything exotic here, at least I don't think so. You don't need any wild colors in the SSS channels. You can even use textures in the SSS channels if you wish.
A cheap and dirty way to make characters look good is to simply apply a material preset from a bluejaunte character to your character, and work off that. Then replace the base color and translucency maps with your prefered character. You can also replace the normal maps (particularly for the reason I mention above). You can use whatever normal maps you like, using the ones the character came with would probably be fine, but you don't have to. Or, you can even skip the normal maps, that would work for a youthful character. This might look great immediately. If not, you can tweak the trans values and sss settings slightly until you get there.
Don't be afraid to experiment. Sometimes the best results (at least for me) come from using 2 seemingly different skins with each other. I think I used bluejaunte Misumi base colors as the trans maps for the first pic with Zelara. Again, I altered them to have more Zelara features, like the moles on her face.
This is the same Victoria with Zelara's material preset applied. This includes Zel's normal maps. She doesn't look bad, but she could look better.

I also made another version of her tweaked differently. This time I removed the bluejaunte spec maps, but kept the 8k normal details. In the dual lobe settings, I used another converted G9 texture. This time it is the "R" texture, I assume the Reflection/Roughness texture as that is where it is used. But I kept the Zelara base color along with the Misumi trans maps. But that's it, 4 textures per surface, nothing more. No bump maps or multiple spec maps. Just a color, trans, spec and normal. It is a pretty simplistic setup. In this pic, all the skin micro detail you see is coming from the 8k normal map. The detail under her eyes, the pores on her cheeks, those are all from this normal map. Some pores are baked into her base texture, but if you zoom in, you can see how they pop more here than the default skin. On the default skin they look flat. Here they look more 3 dimensional. Then look at her arm. On the default you see some really bumpy skin. This comes from the bump map, and they are not as clean and crisp as the 8k normals in the other pics. Even here the 8k can be limiting if you zoom in enough. There just aren't enough pixels in this area. Still, the result is improved IMO. Also, this last pic is using PBR Skin, but it doesn't have to. This last pic isn't meant to be better or worse than the first pic I posted in the thread, just a different take.
 Michelle for Michael 9, the new musketeer
I'm not super fond of these mixed figures. Bought the Victoria one and it required Vicky to be dialed in at 100 percent and it caused a problem every time I wanted to mix and match other male figures with him because it caused problems with whatever morph was used to flatten the chest. They should have just made a breastless male body. The body itself wasn't that different from the base male figure anyway.
Michelle for Michael 9, the new musketeerdaveso said:
Elor said:
daveso said:
I dont get why the shape ifs for Michael 9? Why not just for G9 and be done with it just like the other G9 characters for sale.
If it's like Vick for Victoria 9, the shape was made with Michael 9's shape as a base (loading Vick will automatically dialed in Victoria 9's head and body morphs according to test done by @columbine).
why though ... it doesn;t make sense to me, other than getting us to buy G9 Vic or Mike if you hadn't previously. I guess its easier just to develop a shape vs. a character, but why reverse gender even? I'm not getting this.
I am not buying them either but I guess people rendering families may want brothers and sisters parents and adult offspring that look very similar as some do
Michelle for Michael 9, the new musketeerAn extremely quick preliminary test on Michael 9 Feminine.
Like Victoria 9 Masculine, if you really want to genderswap these two characters then the customized shapes are likely to improve upon, or at least be a better starting point than, anything you're going to get by trying to work slider magic on the original figures--in particular, they do a much better job than just tweaking Base Masculine and Base Feminine.
On the other hand, if you didn't particularly want to Rule 63 either Michael or Victoria, you can be excused for wondering what the point of either kit is.
A more serious thing about Michael 9 Feminine, though--buyer beware!--is that if you own Karmen, you basically already own Michael 9 Feminine.
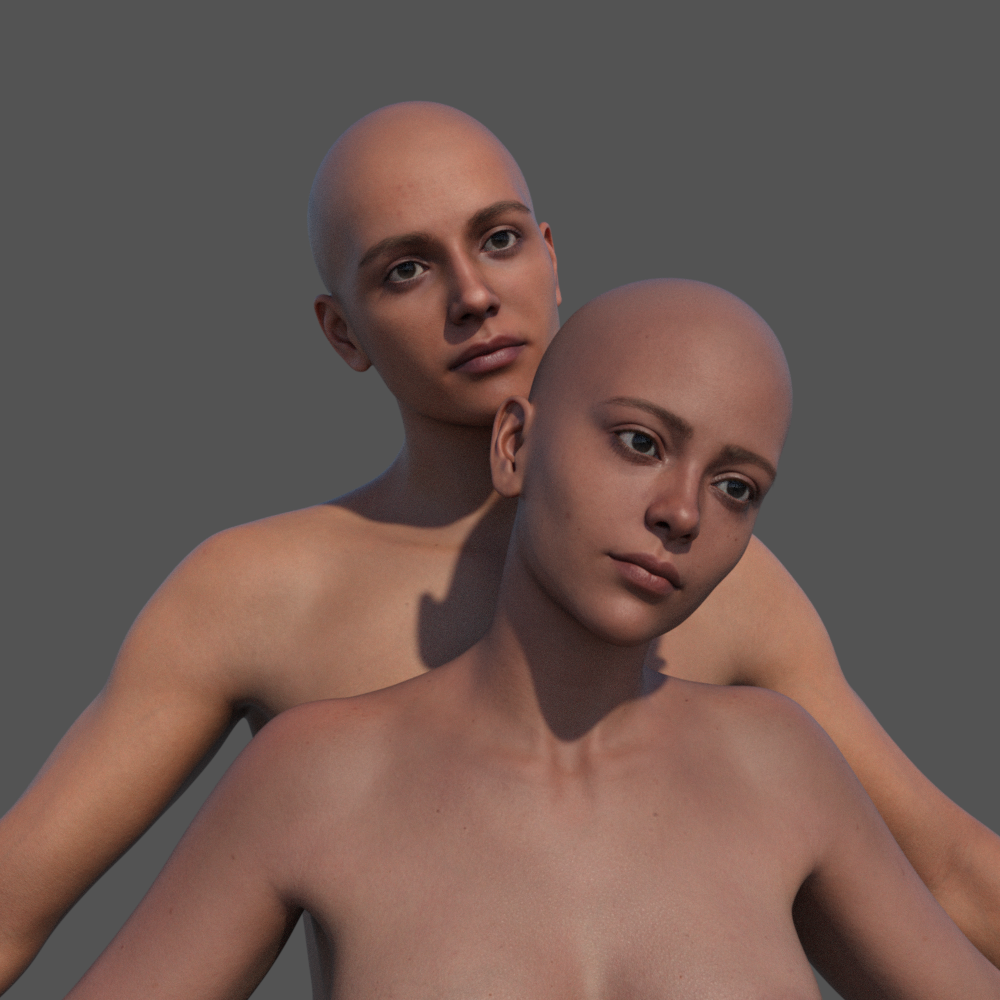
Karmen's the one in the front.
Michelle for Michael 9, the new musketeerElor said:
daveso said:
I dont get why the shape ifs for Michael 9? Why not just for G9 and be done with it just like the other G9 characters for sale.
If it's like Vick for Victoria 9, the shape was made with Michael 9's shape as a base (loading Vick will automatically dialed in Victoria 9's head and body morphs according to test done by @columbine).
why though ... it doesn;t make sense to me, other than getting us to buy G9 Vic or Mike if you hadn't previously. I guess its easier just to develop a shape vs. a character, but why reverse gender even? I'm not getting this.
Michelle for Michael 9, the new musketeerdaveso said:
I dont get why the shape ifs for Michael 9? Why not just for G9 and be done with it just like the other G9 characters for sale.
If it's like Vick for Victoria 9, the shape was made with Michael 9's shape as a base (loading Vick will automatically dialed in Victoria 9's head and body morphs according to test done by @columbine).
How To Achieve Genesis 9 Skin on Genesis 8 or 8.1 Figureoutrider42 said:
Pretty much all Iray shaders are PBR by design.
Many Genesis 9 characters use a 8k normal map that come from the starter essentials. This texture is a big part of the look these characters have. If you can convert this to Genesis 8/8.1 then you can create similar skins. There may be some textures in the 8/8.1 line that produce similar results. There is nothing stopping anyone from producing such a texture. But it takes more than that, it takes coming up with a material setup that works. One thing you can try is just mimic the material settings of whatever you favorite 9 character is on a G8 that has some similar looking textures, then tweaking them the settings hone it in.
I have converted the 8k normal maps I speak of to G8. I sometimes also use the G9 eye textures on G8. That can be done since the 8.1 eye UV is similar. So the eyes are pretty straight forward. Here I just made a test setup. I took Victoria 8, with no HD morphs, and replaced her skin base color with Zelara 8. I used a totally different light skinned character's skin textures for the translucency maps. I blended some of Zelara's face texture in this other texture. I took some specularity maps from a bluejaunte character in the dual lobe specularity settings. I used no bump map in this one, but one could. I used the 8k normal detail maps I converted. I used the 8.1 tear prop and 8.1 eyelash prop. But the model is Genesis 8. I did that...simply because I could. For me, it is easier than trying to convert everything I have to a different Genesis. Rather, I can use the few things from newer Genesis that I care for. This is also using the regular old Iray Uber, NOT the PBR Skin shader. You can use either one. I chose not to here as demonstration. PBR Skin can be useful if you wish to use both a regular normal map like perhaps the ones Zelara has, along with the detail 8k normal maps for the skin micro details. But you cannot use the exact same settings with PBR Skin, they are different. Actually, what drives me nuts about most PBR Skin setups is that the edges of skin look way darker than they should. It is very unnatural.
This pic is not perfect, and it was a rush job to serve as proof of concept. I converted these things some time ago, and use them in other character models. But here, I just through them onto Victoria.
Under the right lighting, I think they can look better than most of the G9 models we've seen so far. However this lighting was a quick preset.

If you cannot convert the G9 normals, you can try using one of the later bluejaunte G8 character textures as substitutes. The specularity maps on these are produced in 8k quality, and do a good job of creating the skin micro detail. With the right setup you might not even need the 8k normal maps to accomplish it.
No one single setup will work for all characters. You'll have to play around with it. But you can get close.
Interesting process. Could you please post a render with the the default normal maps from Zelara or something (4k, or whatever they are) so we can see what is the improvement the 8k version brings.
Michelle for Michael 9, the new musketeerElor said:
After Vick for Victoria, Michelle for Michael 9:
The bundle: https://www.daz3d.com/michelle-for-michael-9-bundle
The shapes and the feminine textures: https://www.daz3d.com/michael-9-hd-feminine-shape-add-on
I like the hairs with the hat and the victorian outfit. The musketeer outfit would be great without the missing half leg (and really great with an option for a flat footed boot, but it should not be too hard to replace the boots with other options in my library), but still look good overall.
It really is a nice outfit, but the missing trouser leg and the heels bothered me too. However, men also wore higher heels at the time of the musketeers. The height is almost correct; they were just thicker back then.
The trouser leg should have been more torn, then it would have been more believable. As it is, you have to use a different pair of tight trousers that fit into the boots.
Daz 3D is part of

Connect
DAZ Productions, Inc.
7533 S Center View Ct #4664
West Jordan, UT 84084Licensing Agreement | Terms of Service | Privacy Policy | EULA
© 2026 Daz Productions Inc. All Rights Reserved.