-
[OUT NOW] Celebrity Red Carpet Environment [Commercial]
Out NOW! Celebrity Red Carpet: https://www.daz3d.com/celebrity-red-carpet
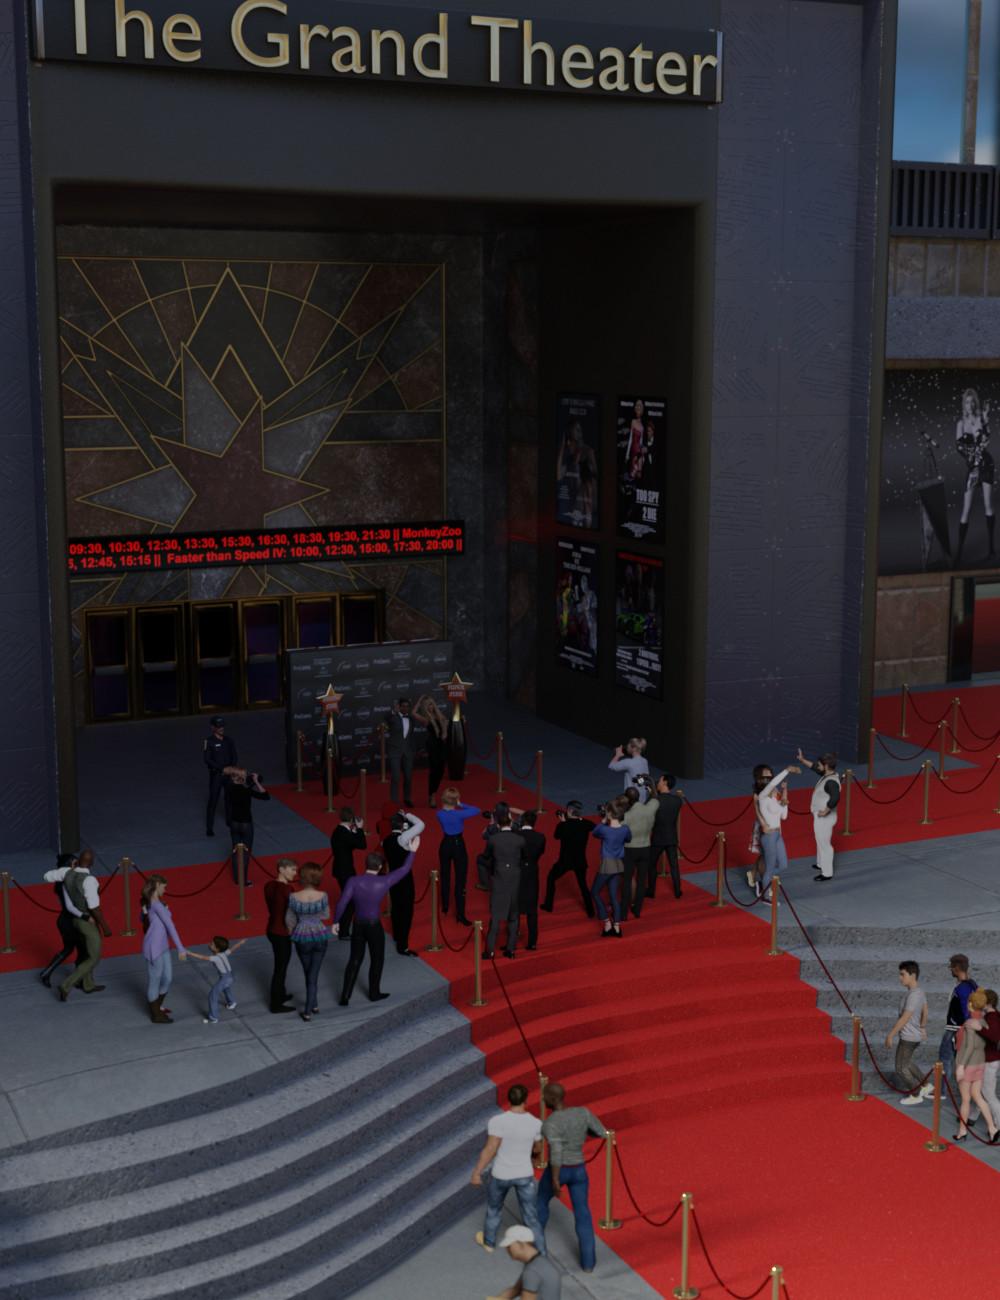
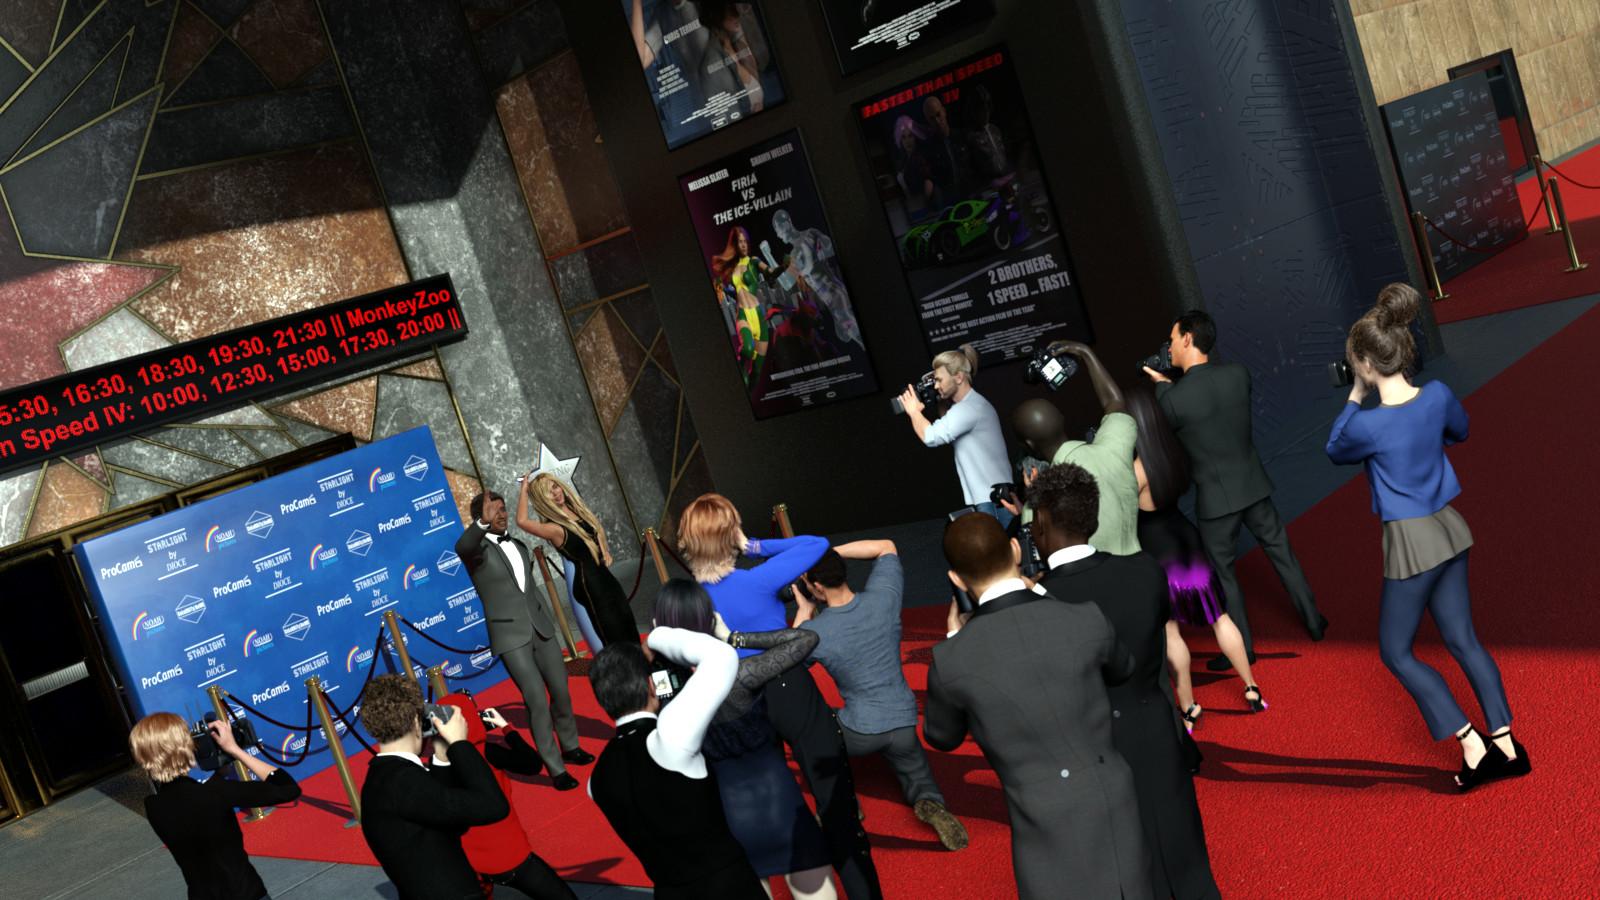
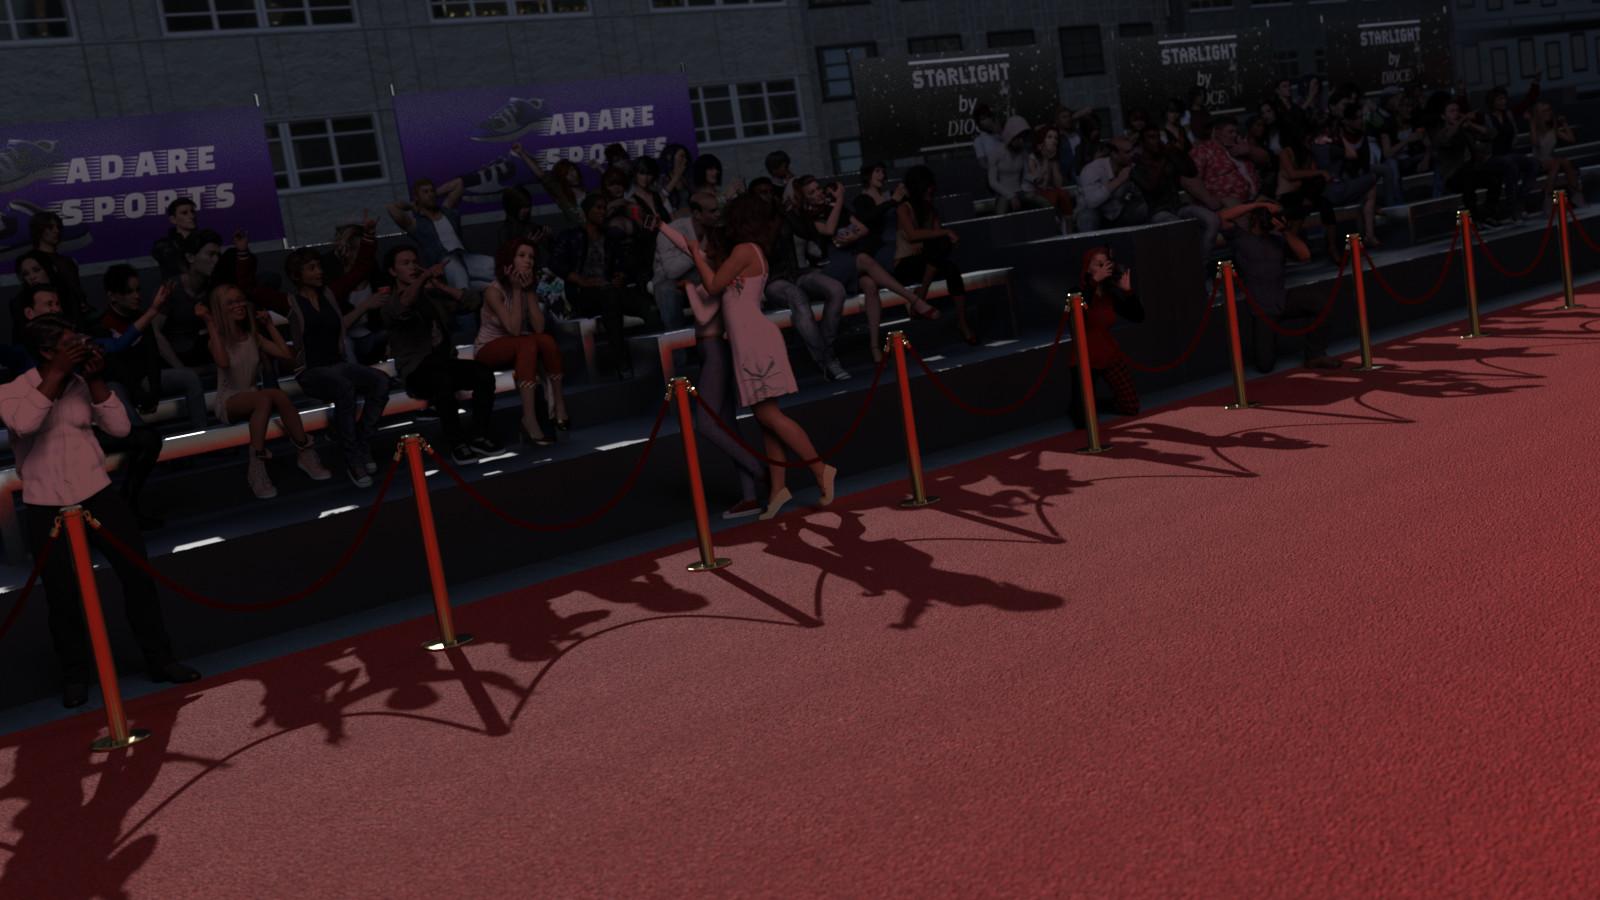
It's 'awards season' with the Golden Globes, Oscars, etc around this part of the year. As the movie stars, fashion models and music icons step out onto the red carpet, the flashes from the cameras and the cheers from the fans fill the scene with the glitz and glamour of celebrity. Celebrity Red Carpet is a complete exterior environment for Daz Studio.
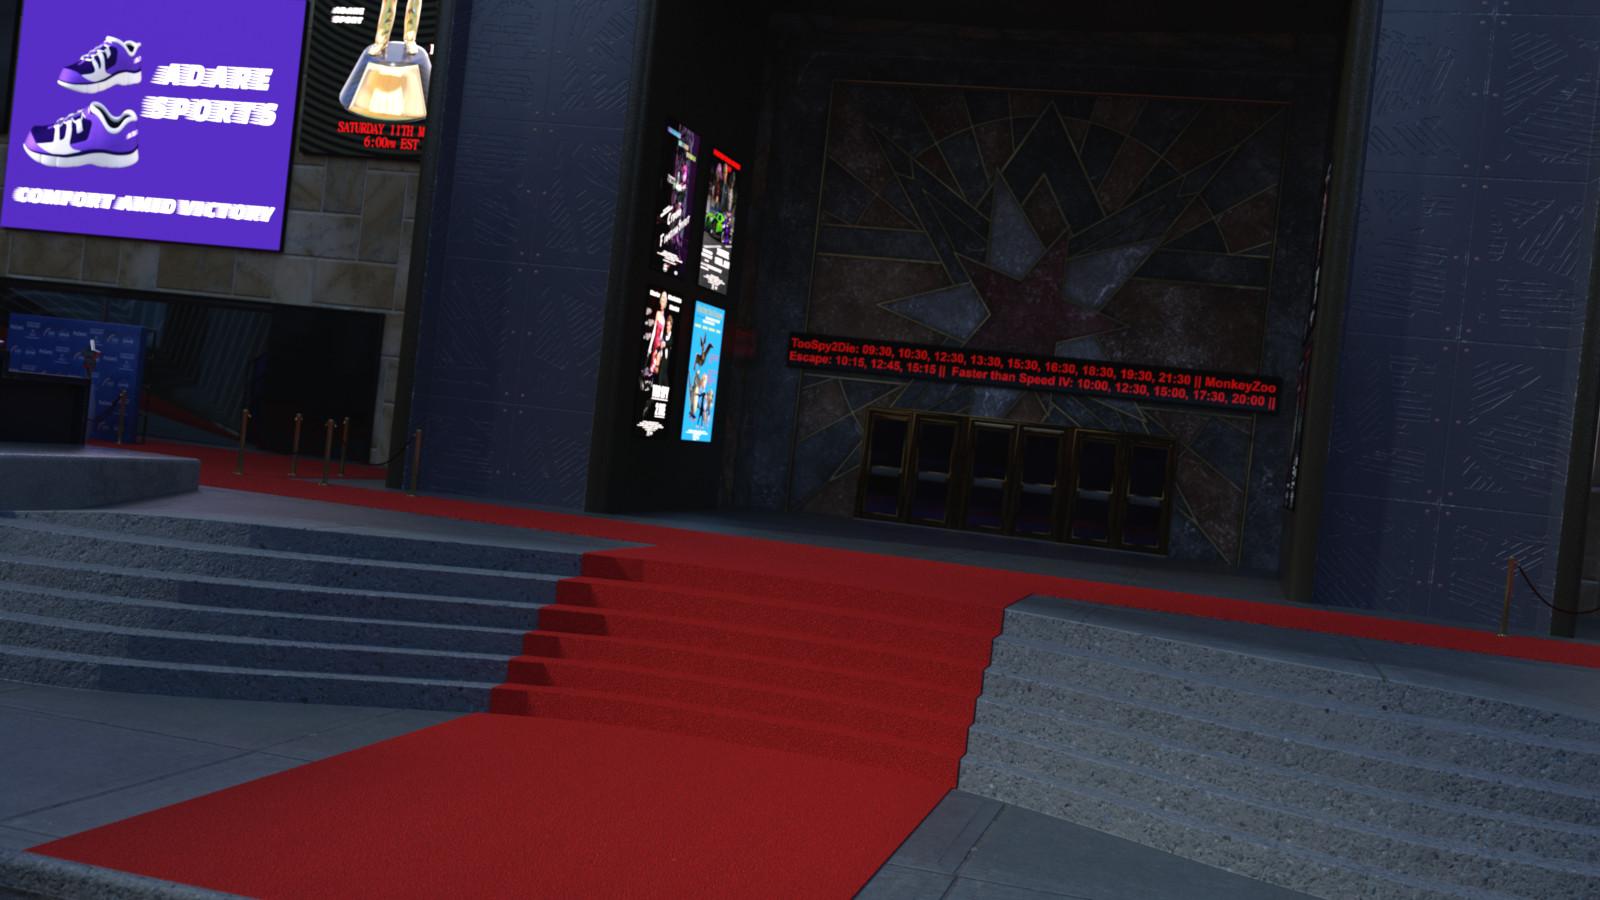
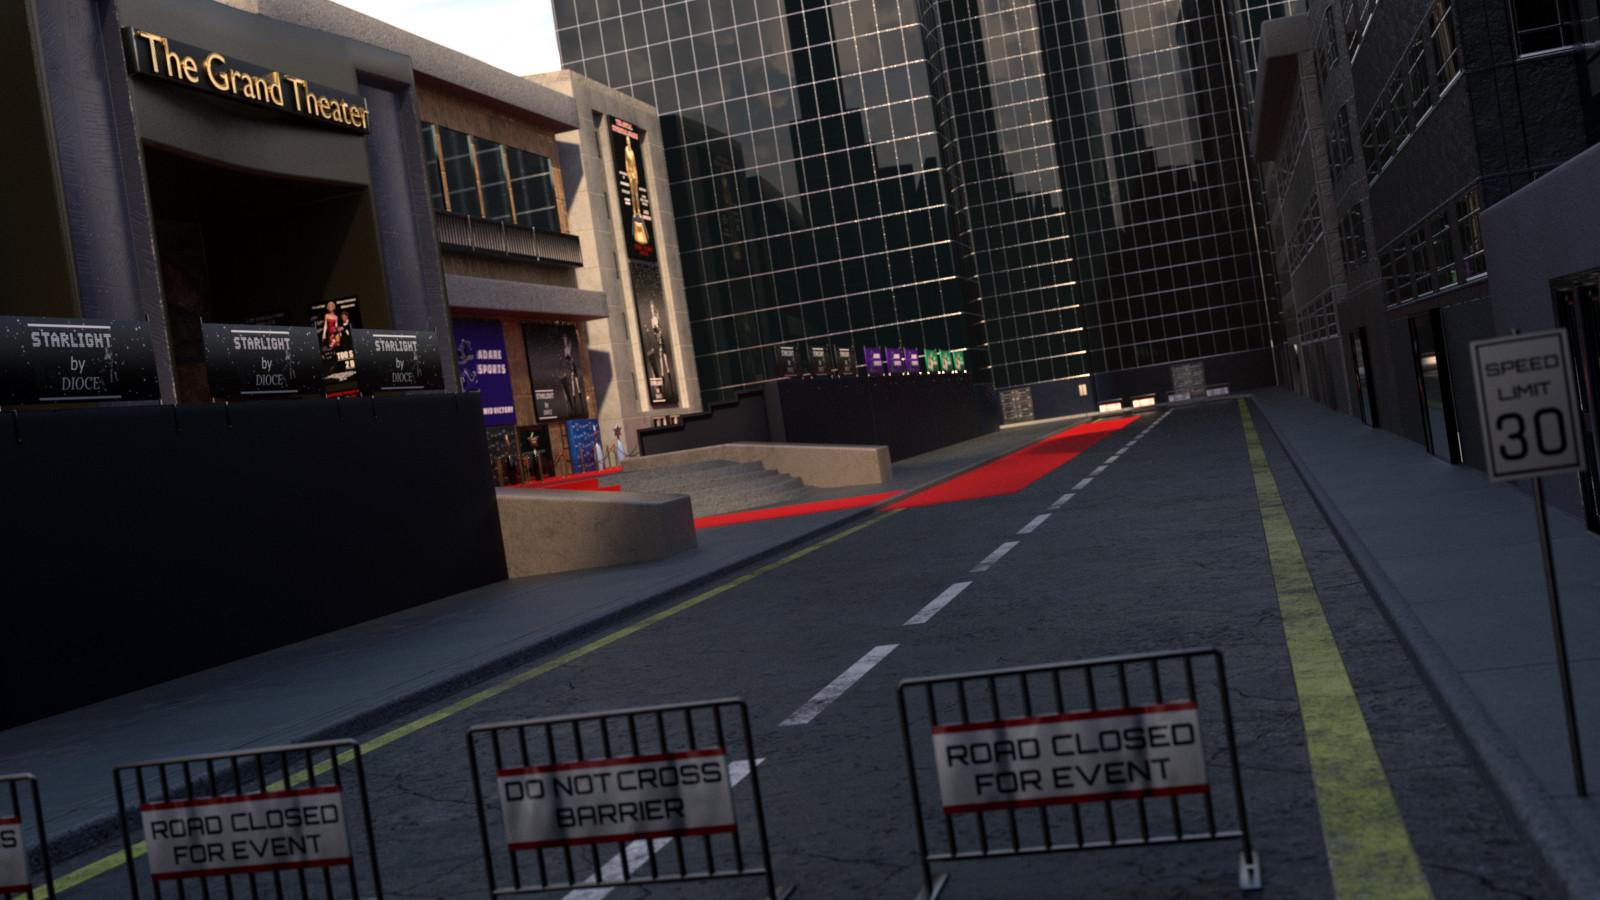
Celebrity Red Carpet comes with a street scene, centered around the steps to The Grand Theater. The carpet sections that run the length of the road, the steps and the pedestrian area can be removed if needed. The set comes with a variety of decorative props, including a backdrop for the stars to pose against with 'Star Pot' prop (2 texture options each), a movie poster (6 texture options), Billboard ad (5 texture options and a 'dimensions' morph), Seating banner ad (3 texture options), seating area with bench (bench has height morph) - See promo pictures for examples.
There is a pole with a static rope for normal use and also a rigged rope for special circumstances (3 poses for the rigged rope are included). There are a variety of 'Carpet Pieces' in different shapes and sizes so you can use them to expand this set or use with other sets. See promos for illustration. The carpet pieces have preloads with or without the poles and ropes.
The full set preload has 2 versions. One makes use of Daz Studio instances (so is lighter on resources in Studio), whereas the other does not (making it easier to customize individual parts).
Some promo pics below :)
 [Misconception] DAZ Studio: Lazy morph loading (built-in) ->?
Richard Haseltine said:
If this is because of the slow loading of heavily laden figures then what you ask is what it does - the actual morph data (the deltas, chnages in shape) is not loaded uintil needed - it's building the list of properties that is taking time, because of the ay they interconnect.
Ah, so for a part, some parts of the suggestion are already implemented. Though if a plugin can make loading faster, it means that in theory even the gathering of the properties could as well be made faster.
E.g. if it had to interpret whole files instead of just headers or metadata files, just for checking and creating the properties list. In any case, results could in theory be cached, though. Not recommending more random things, which don't apply anyway here...
Filtering morphs by selected products could make sense, though i assume that's actually possible with a script, buttons for scripts are possible too. I guess detecting morphs is possible, also for animations, and across multiple scenes. So in the end i could battle stuff with meta data linking between studio and whatever application on the other side, using script/plugin (partly to be written), in case too many morphs get exported. At least the interlinking question towards export has been a (quick) misconception of mine then.
So perhaps, i should gather more experience and we assume this to be resolved in terms of what makes sense to ask.
*** SOLVED*** Genesis 9 Open Mouth Morph???I must be completely missing something, but I can't figure out how to open the mouth on Genesis 9 figures. In the previous generations, there was an "open mouth" morph, but I can't find anything like that for Genesis 9. I found a "close mouth" morph, but nothing to open the mouth. I've been using DAZ for years and never had a problem figuring out how to do things like this, but this one is stumping me. I'm sure everyone else has already figured this out and here I am, scratching my head over it.
Texture editing and MAT Zone questionRichard Haseltine said:
felis said:
Proportional editing is a move tool, so you do not change number of verteces with that. That is why you can use it as a morph.
The only disadvantage of doing it that way is the texture will be more compressed in the lower part of the skirt than in the top, so if you use a pattern it might look odd.
You could split it inmto two surfaces and reduce the vertical tiling in the lower section, or you could redo the UVs as a new, short skirt set..
Are you talking about splitting surfaces in Blender or with the DAZ Studio Geometry Editor?
Again, this is getting into areas that I'm not really comfortable with - UV mapping and Material Zone creation. In fact I've never created a UV map for anything and it is the one thing that puts me off making clothing (or props) from scratch. I know there are applications (including Blender) that create the maps but I get lost quickly when I try to follow tutorials.
Texture editing and MAT Zone questionfelis said:
Proportional editing is a move tool, so you do not change number of verteces with that. That is why you can use it as a morph.
The only disadvantage of doing it that way is the texture will be more compressed in the lower part of the skirt than in the top, so if you use a pattern it might look odd.
You could split it inmto two surfaces and reduce the vertical tiling in the lower section, or you could redo the UVs as a new, short skirt set..
A similar way of scaling, is to select the top row of verteces, and place the 3d cursor at selected. And then set pivot point to 3d cursor. Then select all and scale in Z-direction. That will although make your hem a little smaller.
Missing content, textures, and geometriesI took a break from daz3d for a while, when I recently returned after downloading 2 third party morphs i tried to load a scene. Every figure I've ever worked on now has missing textures, geometry, clothes, everything. I'm also missing certain things in my content library for example all my stuff under poser formats are gone, as well as all of my 3rd party downloaded morph dials which are now missing from the parameter pane with the exception of a few custom morphs. Basically Daz cant find anything whatsoever, even though everything is in the correct places. All of my data is in the data folder within my library, same for the runtime folder and the people folders for mydaz3d library. Everything was working fine, I haven't messed with anything, moved anything, or deleted anything, only downloaded those 2 morphs and that was it. I've downloaded 3rd party content before with no trouble so idk what could be causing daz to be in this unusable state. Any and all help will be very much appreciated!Texture editing and MAT Zone questionfelis said:
Proportional editing is a move tool, so you do not change number of verteces with that. That is why you can use it as a morph.
The only disadvantage of doing it that way is the texture will be more compressed in the lower part of the skirt than in the top, so if you use a pattern it might look odd.
A similar way of scaling, is to select the top row of verteces, and place the 3d cursor at selected. And then set pivot point to 3d cursor. Then select all and scale in Z-direction. That will although make your hem a little smaller.
You clearly use the edit tools in Blender wheras I tend to use the sculpt tools. I should really play with editing as well though because there are some things that might be easier to achieve by mesh edits.
I have adjusted cloth length using the sculpt tools but this time I started with the opacity map but the trim made it tricky. Maybe I should just ignore that and go with Blender.
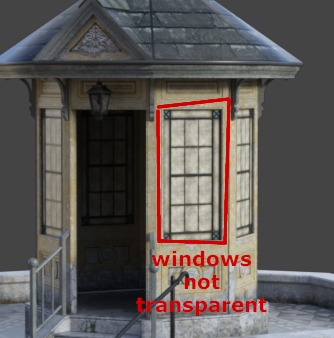
Tutorial: How to Fix OneirosOneiros is a beautiful and versatile product but for whatever reason geometry has been lost at 2 places.
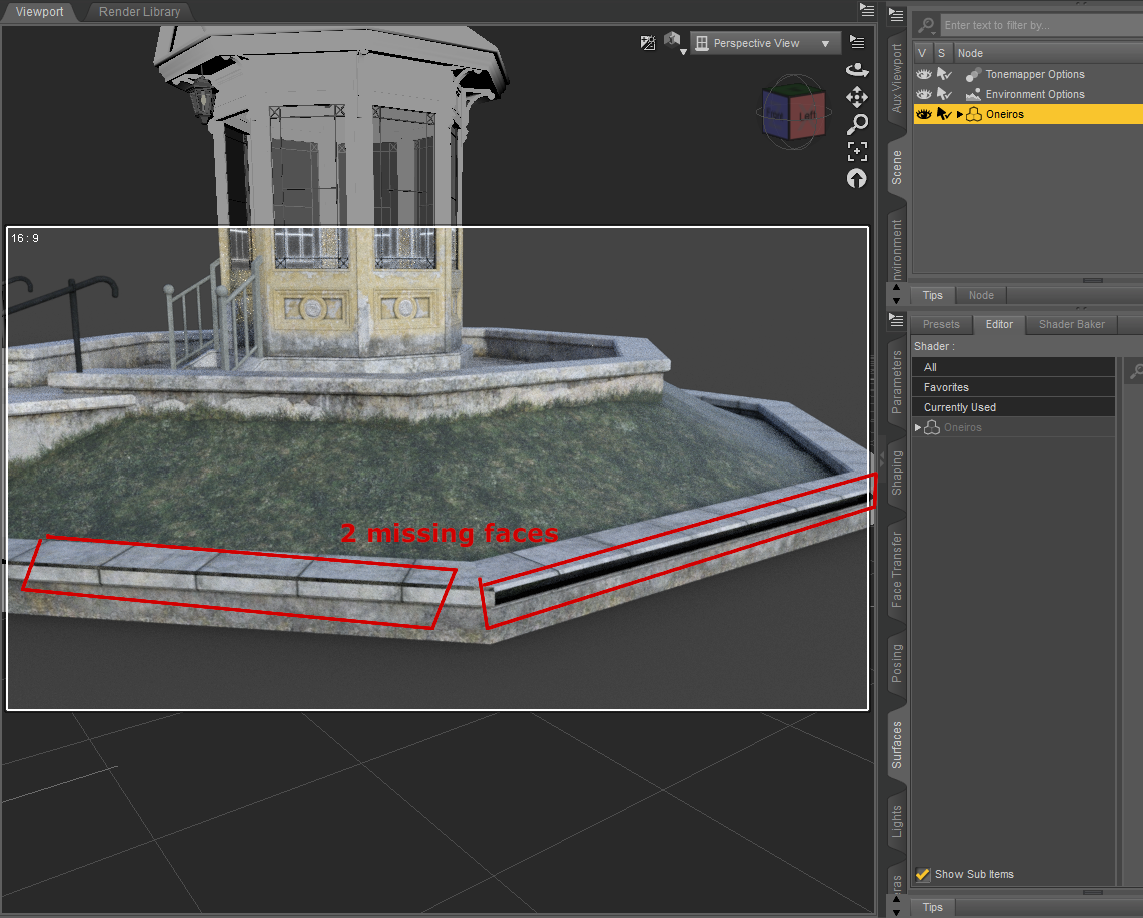
If you can’t wait until it gets fixed by DAZ and lack the knowledge to do it yourself, here is a step by step solution for those who may need it:
You need Hexagon installed on your computer which is free in DAZ, but you don’t need any further knowledge.
In DAZ Studio:
1. Load the Prop Oneiros in DAZ.
2. Click on Oneiros in the Scene Tab to select it (yellow)
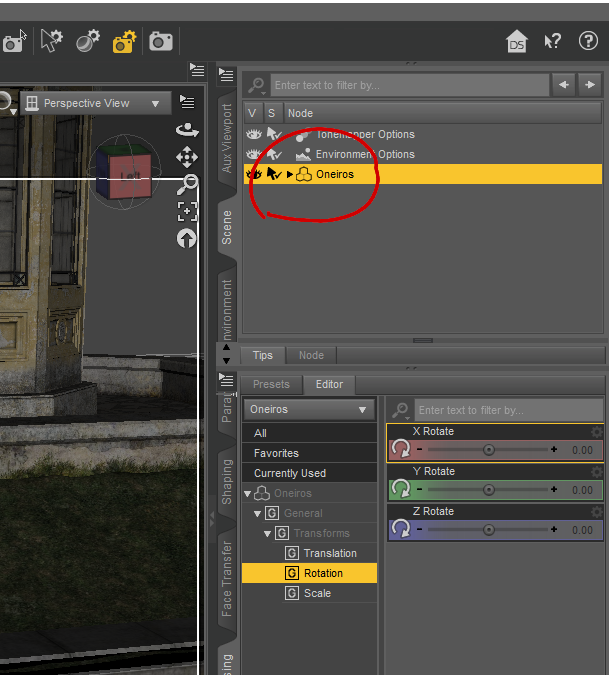
3. Click „Send to Hexagon“
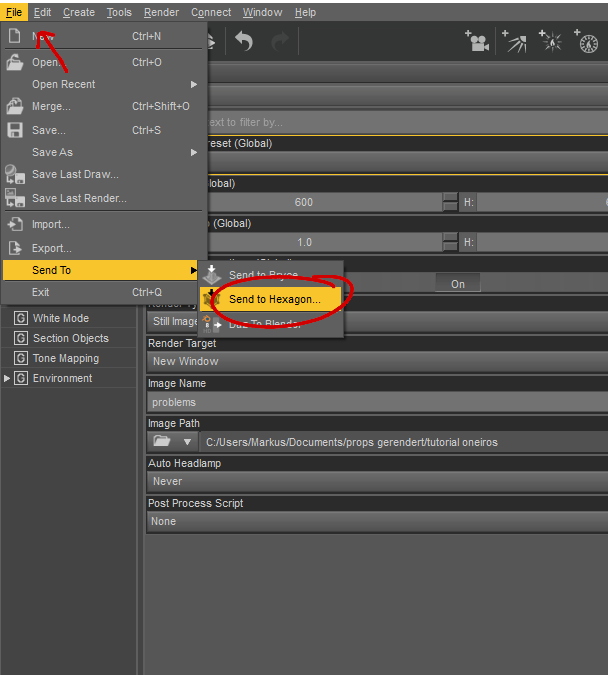
In Hexagon:
4. Click „ok“ on the Hexagon News Window
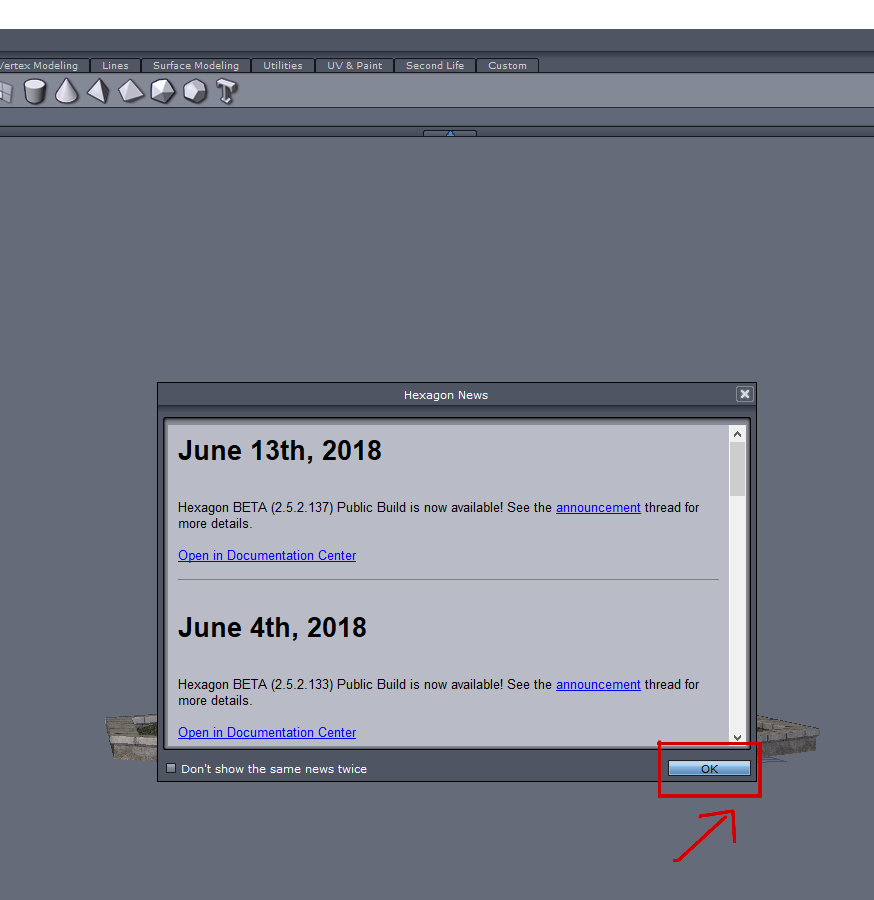
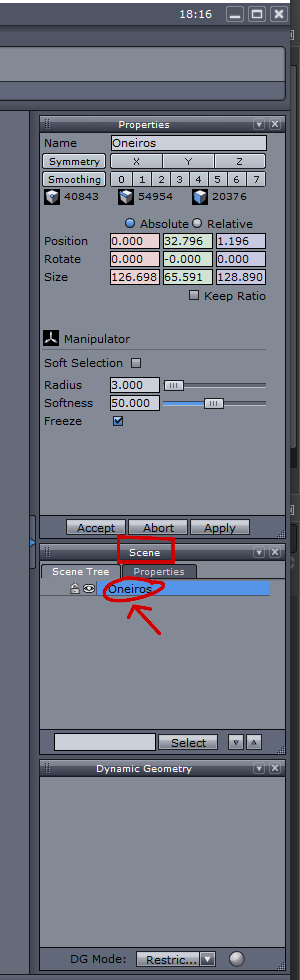
5. Click on „Oneiros“ in the Scene Tab (it turns blue)
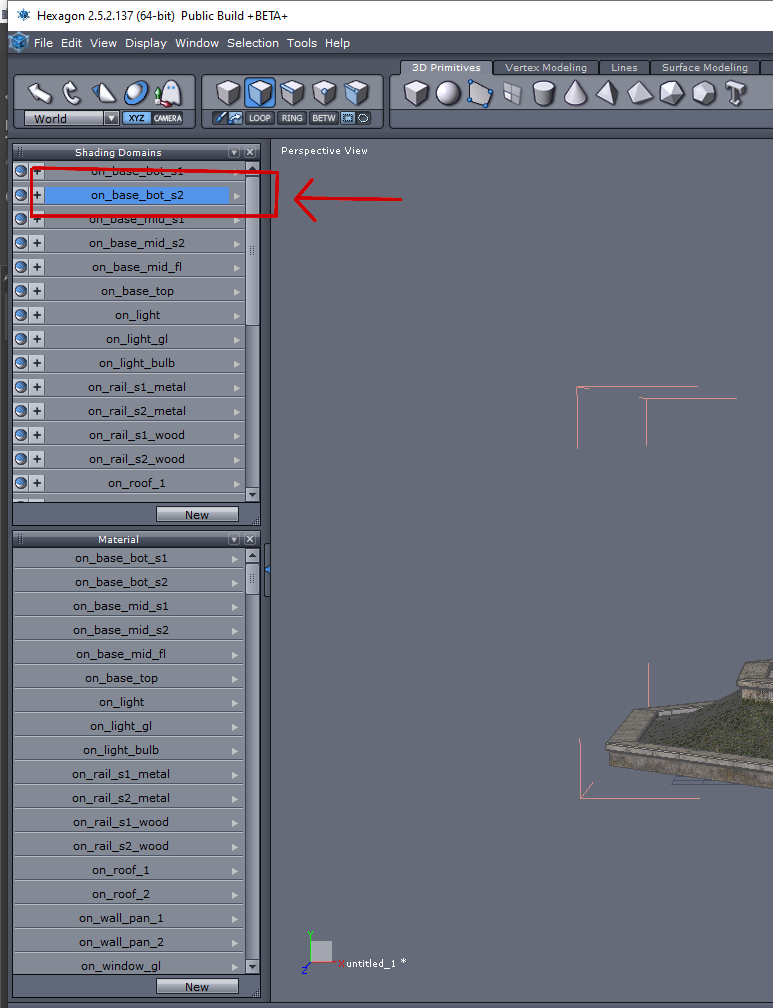
6. Click on „on_base_bot_s2“, that is the second entry in the Shading Domains Tab (it also turns blue).
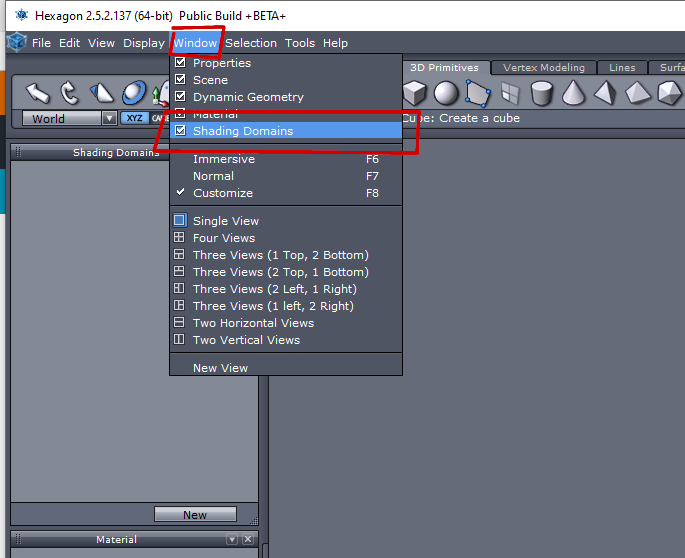
If you can't find the shading domains tab you can activate it in the WINDOWS menu:
7. Now Click „Cut“ (ctrl+x) and after that „Paste“ (ctrl+v) in the EDIT Menu.
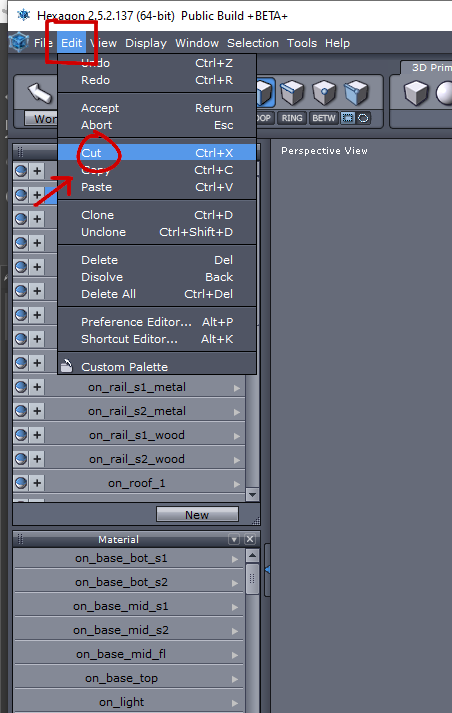
In the Scene Tab appears now the second entry „Form1“ and it has turned blue (which means „selected“)
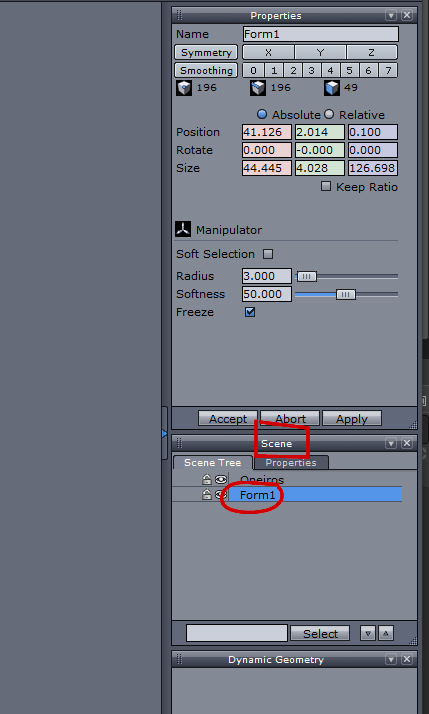
8. Now in the „scene tab“, to the left of the first entry „oneiros“ click on the eye symbol
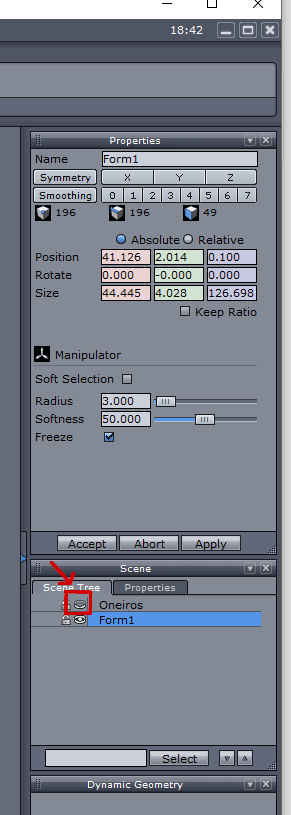
the main part of the prop is now invisible:
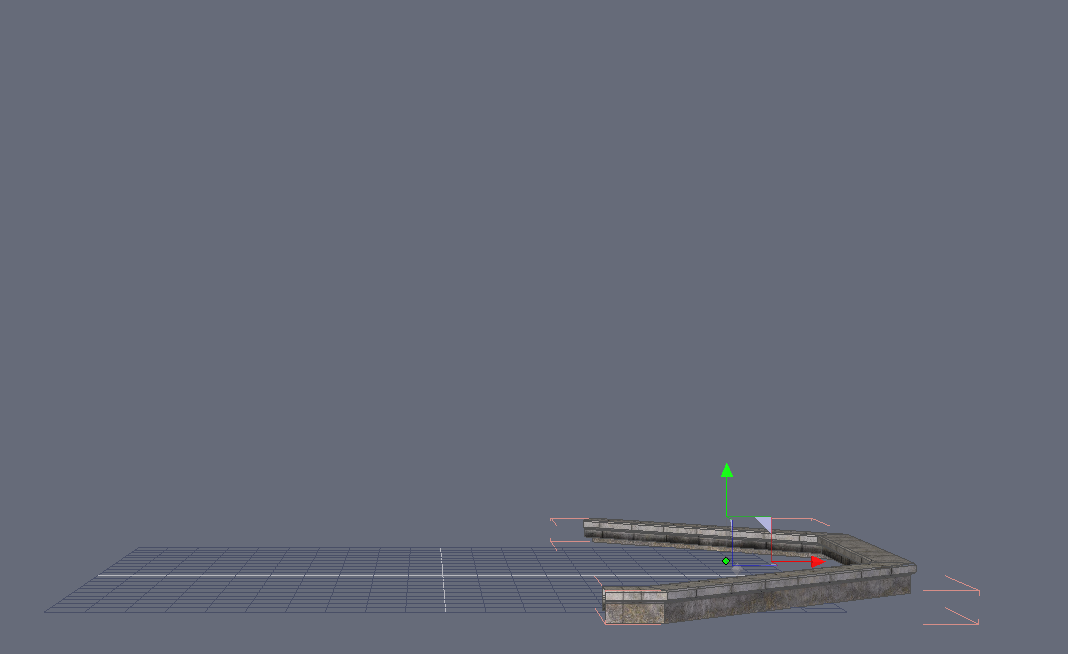
9. In the Viewport click on „Perspective View“ and then choose „Top View“
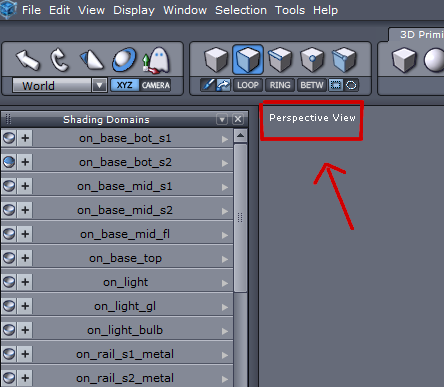
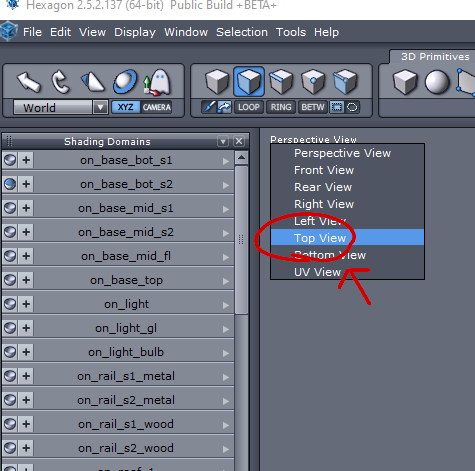
You see the Prop now from above:
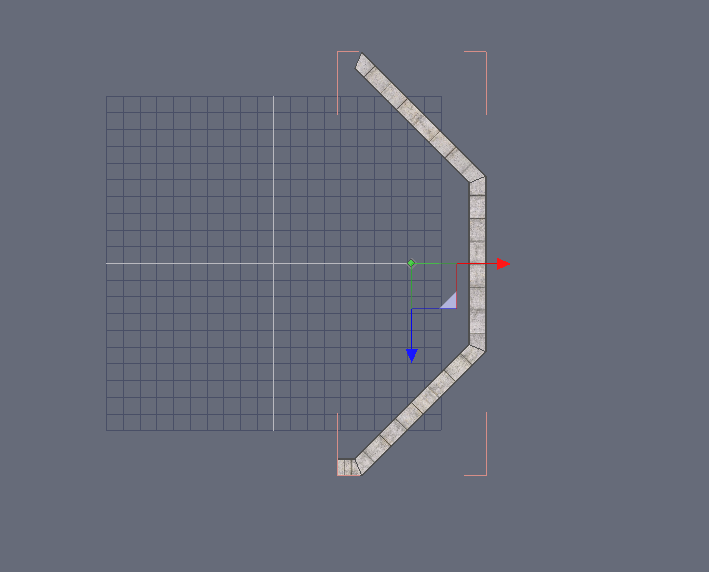
10.In the Viewport Utility Bar click on „Wireframe“

The prop looks like this now:

11. Press F2 (OR click on „Select Faces“ in the "Selection Type Bar")
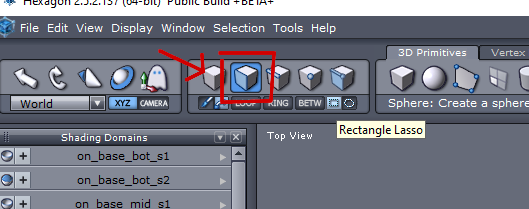
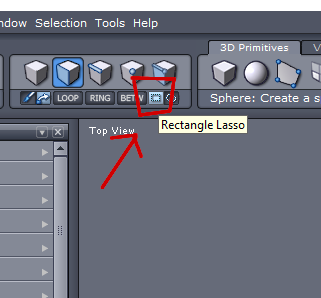
12. Click on „Rectangle Lasso“: This Lasso selects only the parts which are completely inside of its‘ borders.
13. The Prop consists of 4 parts, a tiny one and 3 long ones:
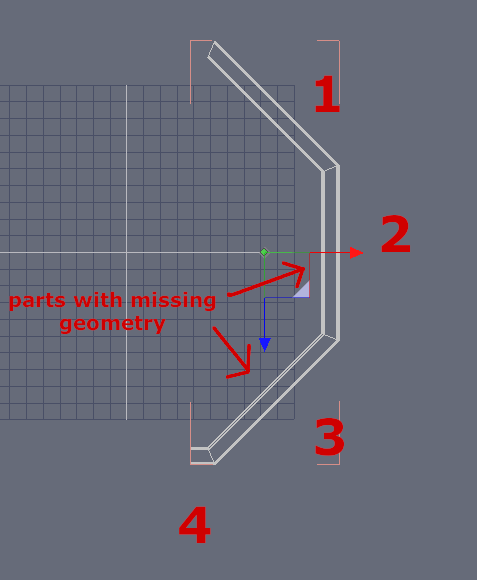
With the scroll wheel of your mouse you can zoom in and out.
With the right mouse button you start the selection.
You have to select the first two long parts with the missing geometry ("3" and "2" in the screenshot above) by placing the rectangle around them and avoiding to place the other two parts completely inside that rectangle. Start from the bottom like so:
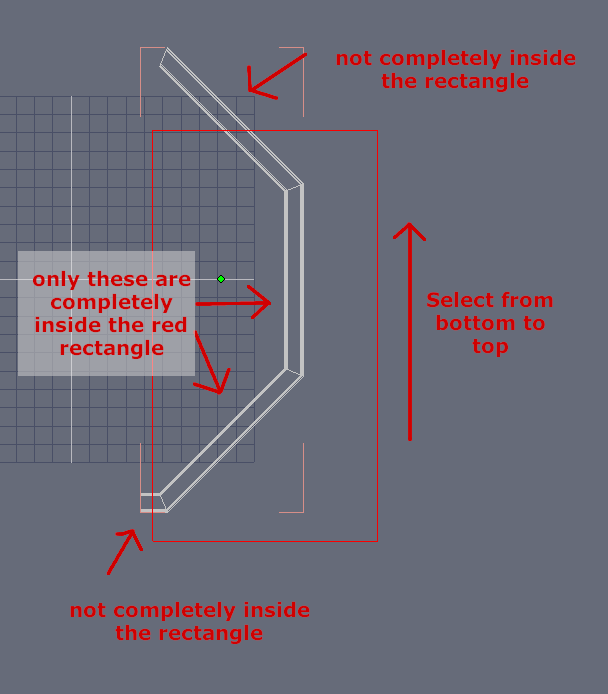
14. Now both broken parts are selected.
15. Hit Delete (NOT Backspace) .The selected parts have been deleted
16. In the same way select the tiny part, choose cut and then paste in the Edit Menu.
17. EDIT: forgot to delete this step before posting, so please ignore.
18. In the Scene Tab you can see now
„oneiros“ = invisible rest of the prop,
„Form1“ = larger part and
„Form2“= tiny part
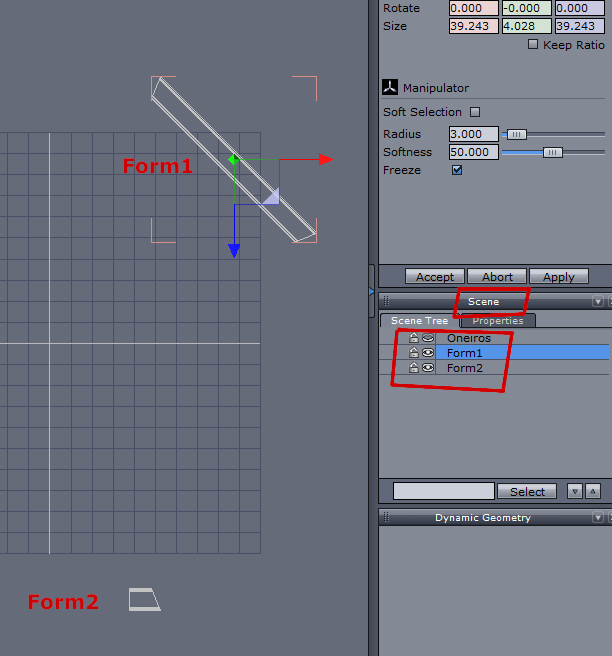
19. With „Form1“ selected, type ctrl+c (copy) and ctrl+v (paste). A new „Form1“ has been created and selected.
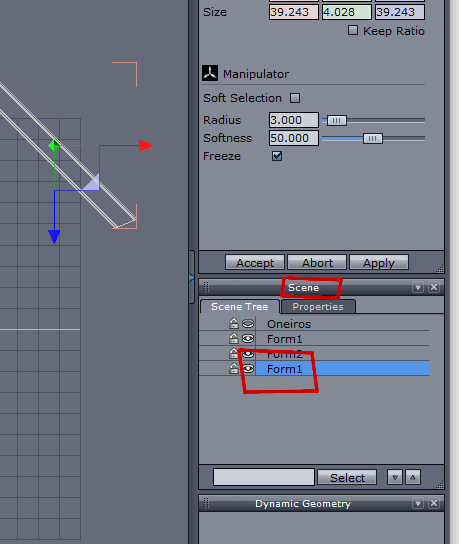
20. Inside the „Properties“ Tab, in the green column, in the „rotate“ row enter „–45“.
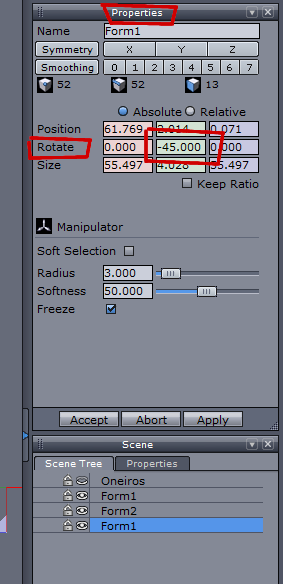
Your scene looks now like so:
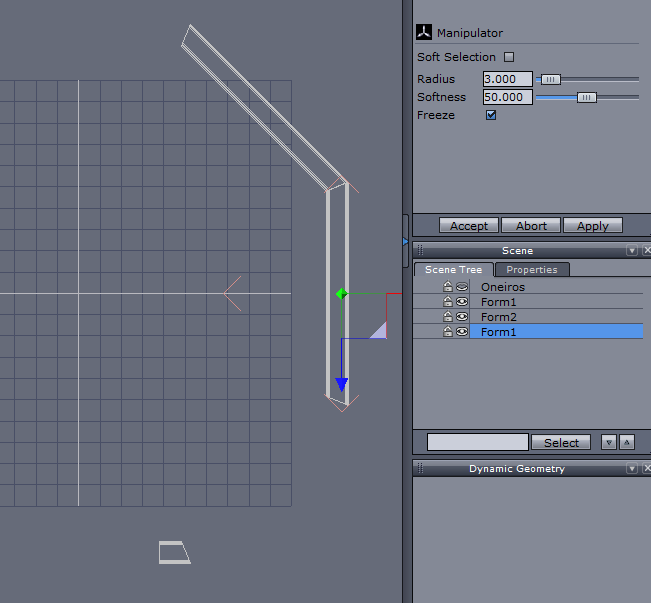
21. With the new „Form1“ still selected copy and paste again (like in step 19) and enter into the same place like in step 20 the value „-90“. Your scene looks now like so:
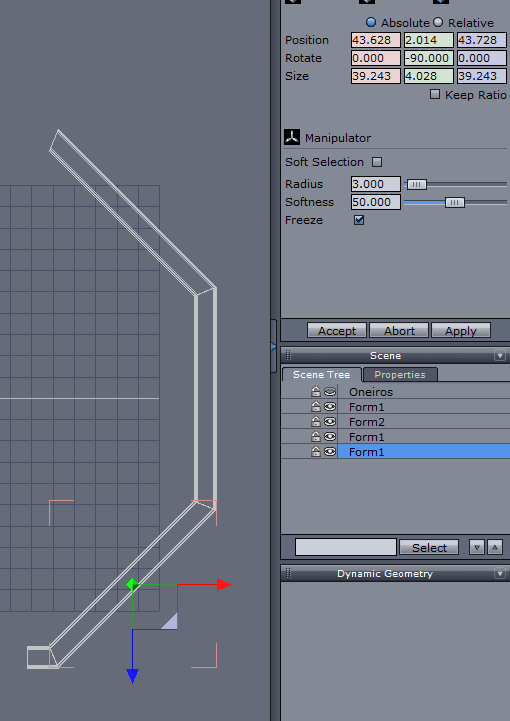
22. Select the second "Form1"…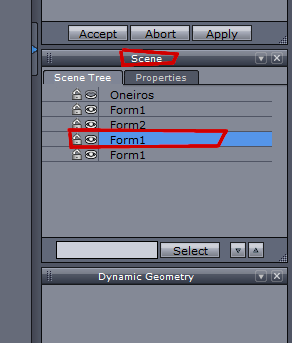
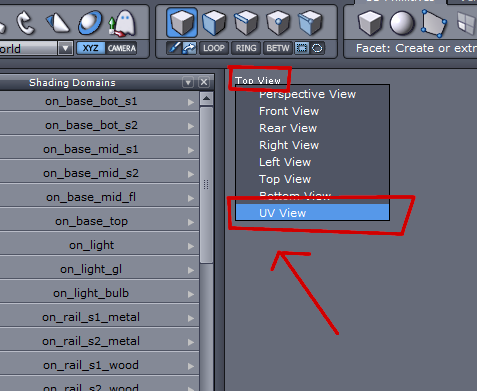
23. ...and change from "Top View" to "UV View":
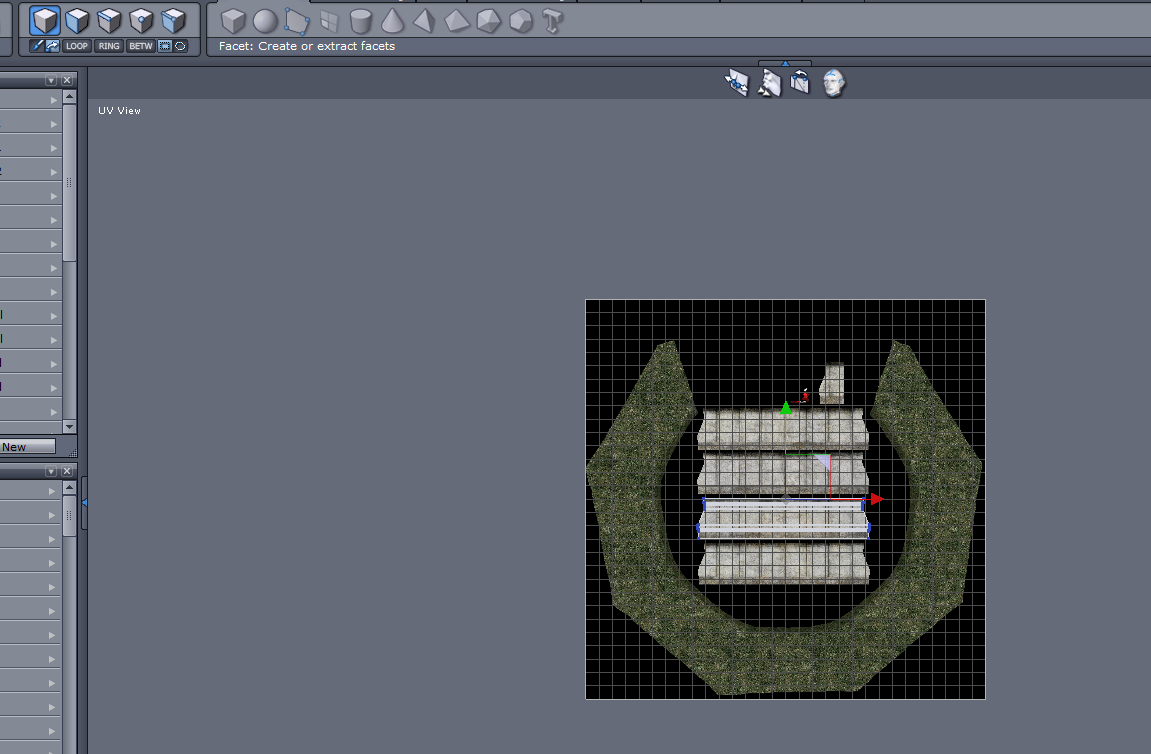
24. With the scroll wheel of you mouse zoom in a bit to better recognize the selected area („uv island“)
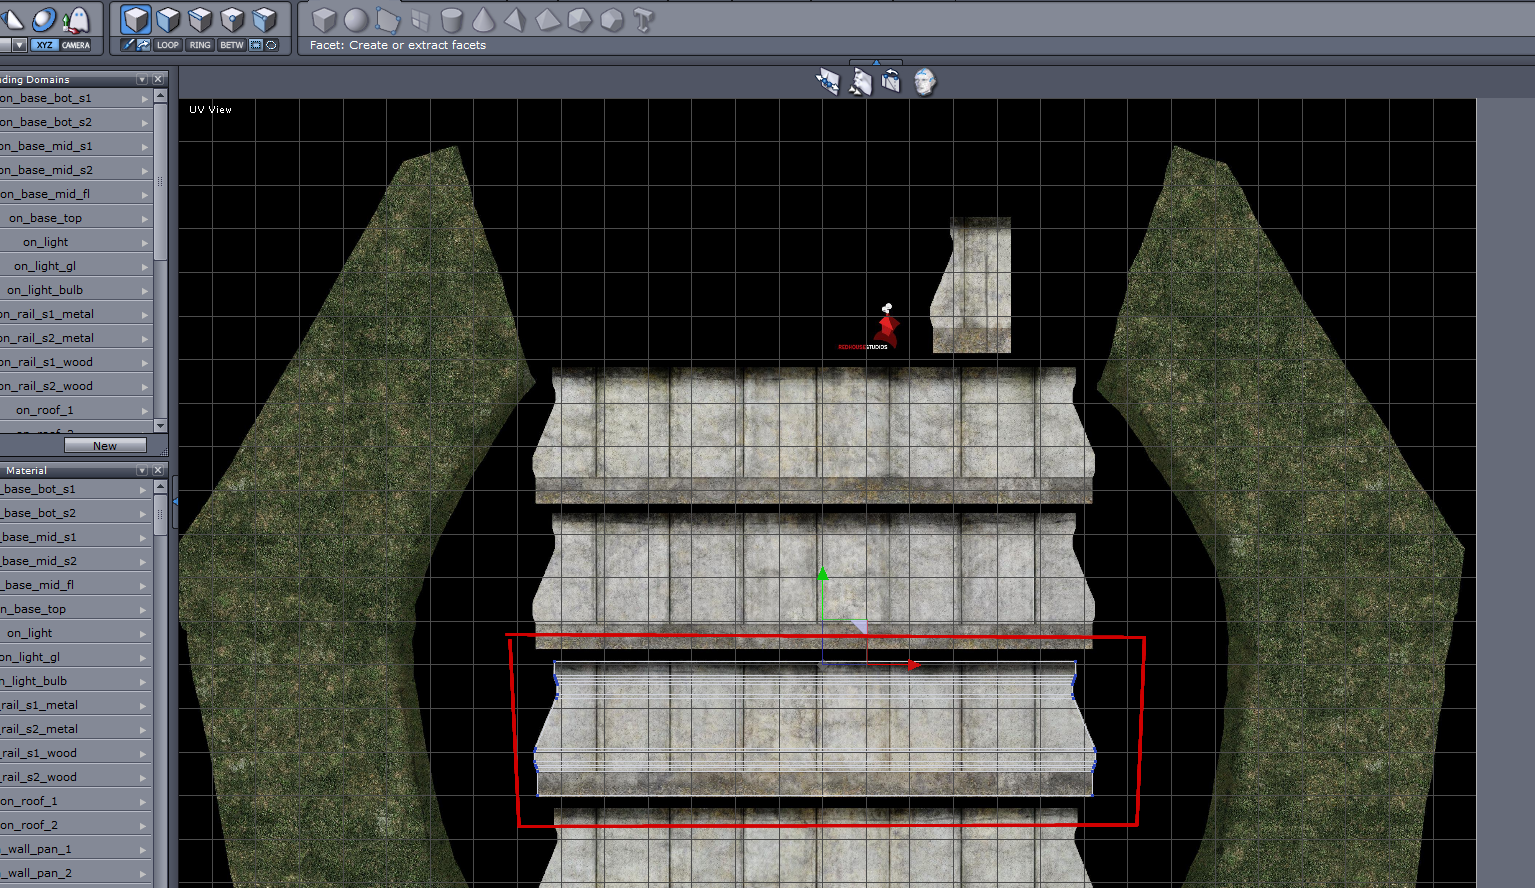
25. Hit F2 to choose Face Selection…
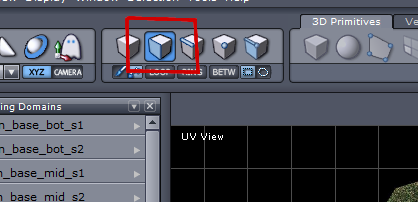
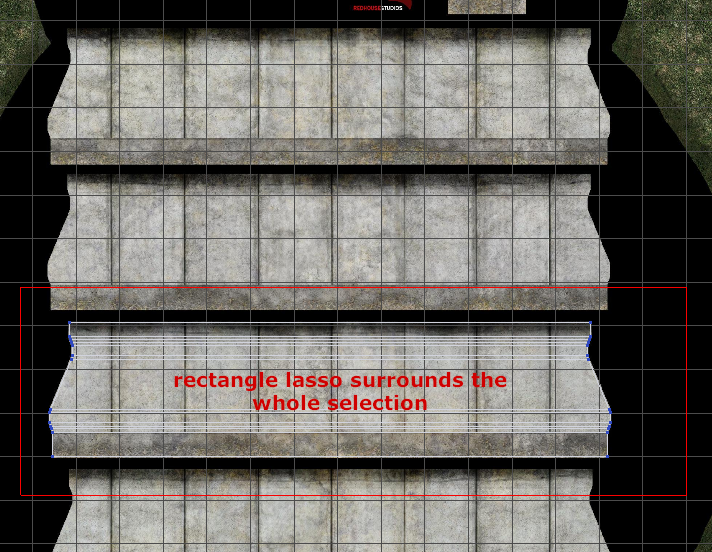
26. …and with right click (holding) select the selection (uv island) completely
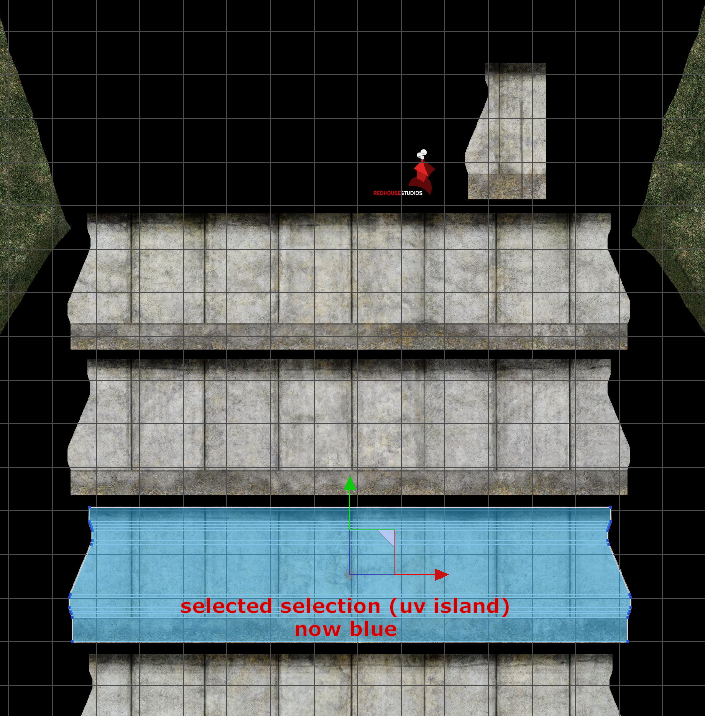
27. Hold ctrl, then left - click (hold) on the green arrowhead and with the mouse move the selected area onto the texture part right above the previous one
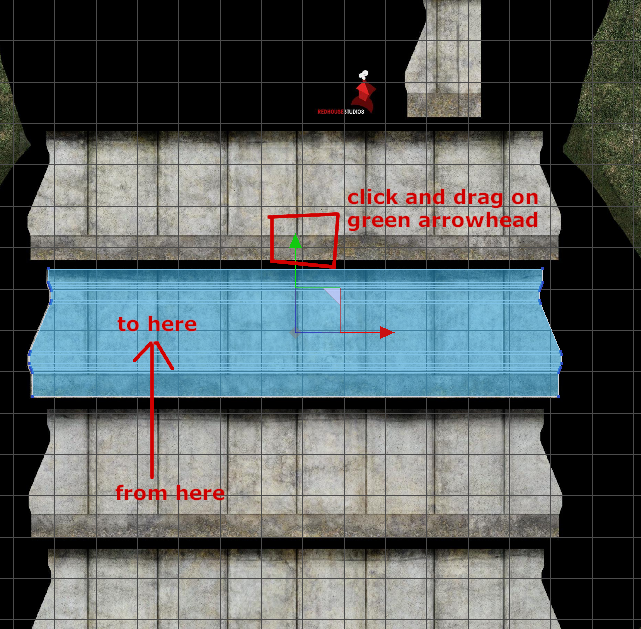
28. Click on the last „Form1“ in the Scene Tab
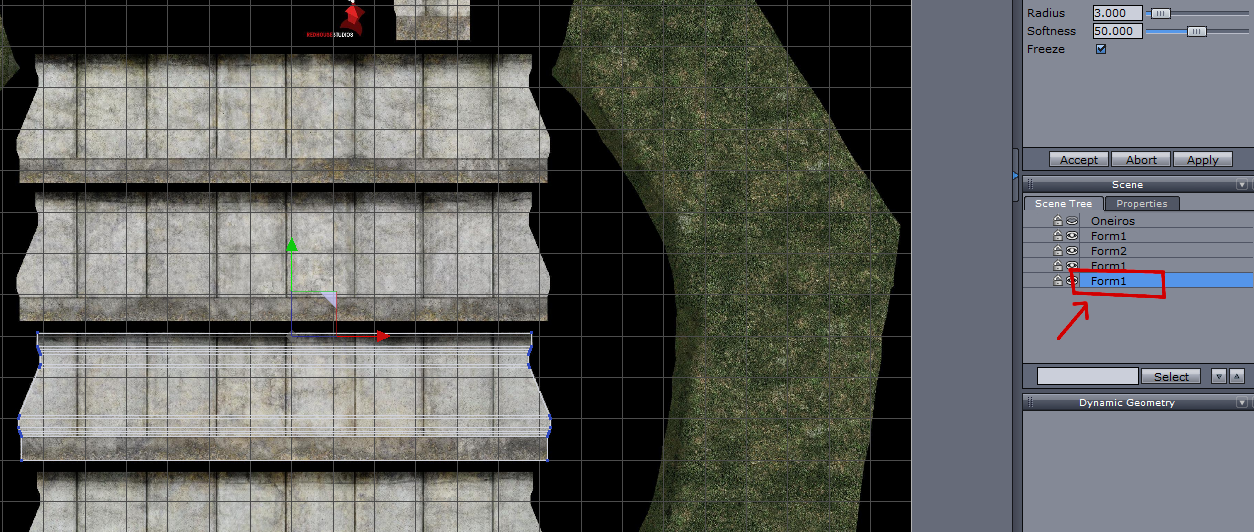
29. Select the „uv island“ as in step 26 and move it this time to the texture above the one chosen in step 27
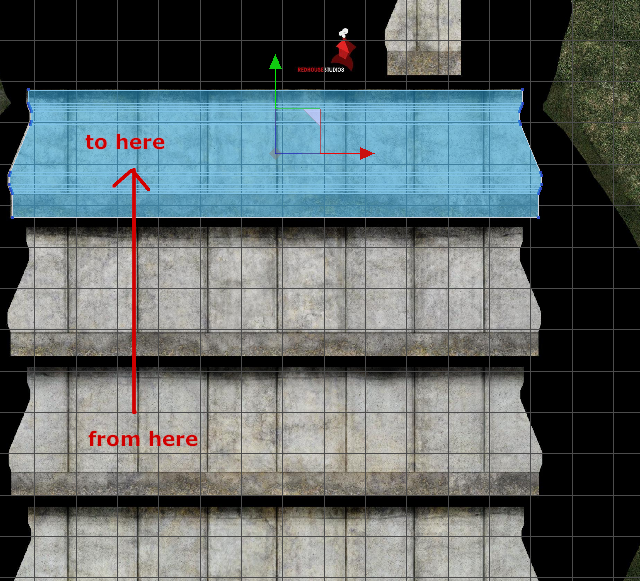
30. Choose again the „Top View“
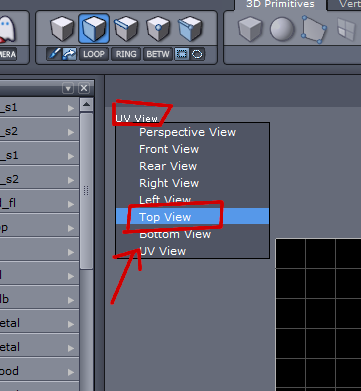
31. Click on the eye symbol of oneiros
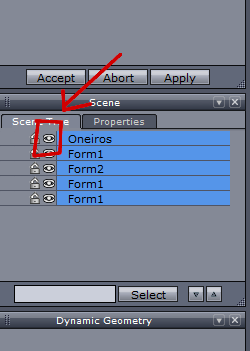
32. Select all nodes in the scene tab
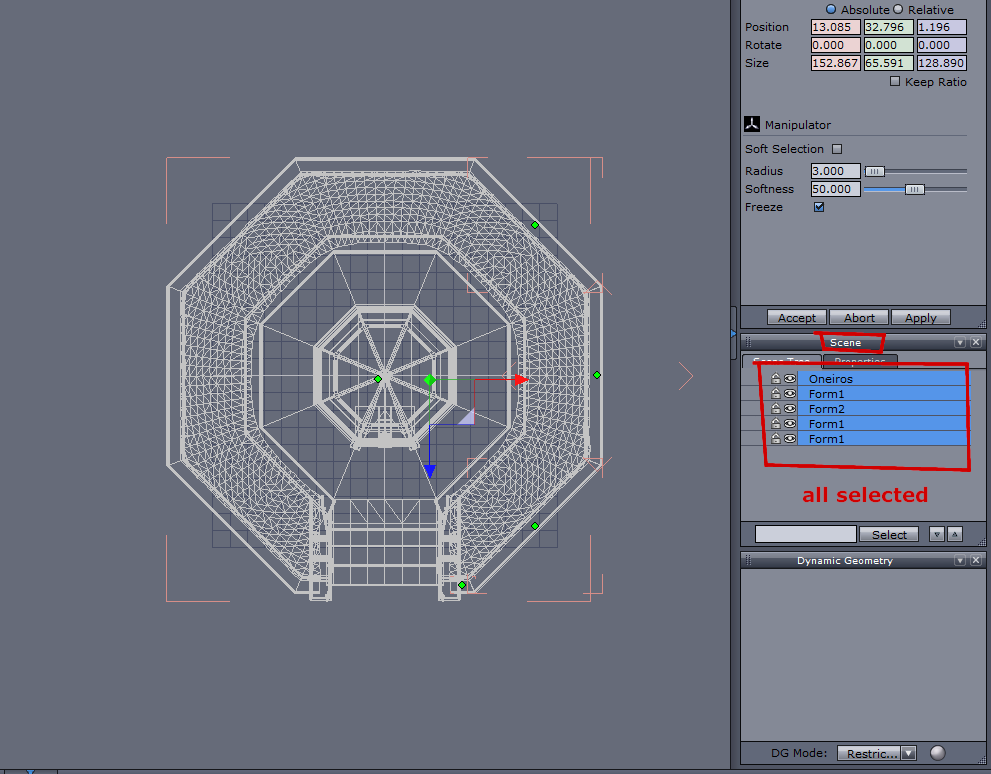
33. Click „Send to DAZ Studio“
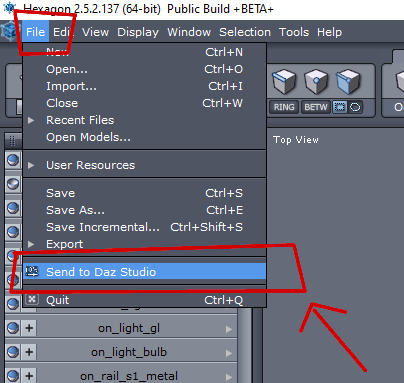
Back in DAZ Studio:
34. Click on „Create a morph“ and choose „Create a prop“ in the forthcoming menu and hit „Accept“
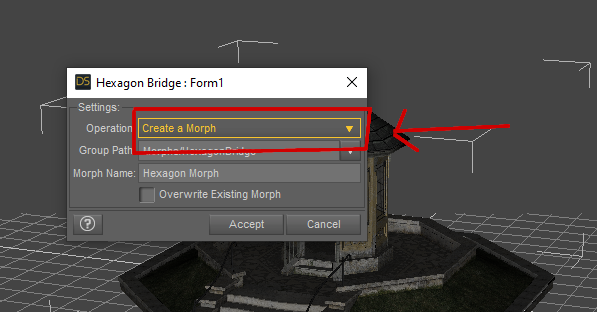
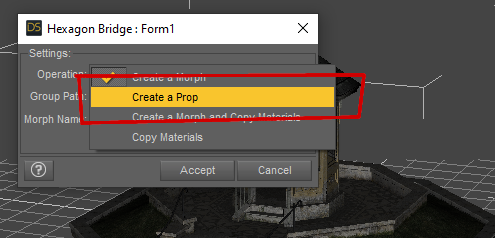
35. Repeat with the next dialogboxes until all parts have been processed
36. Delete the original oneiros prop in the scene tab
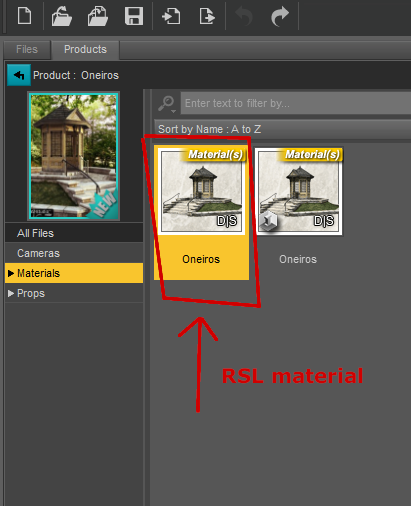
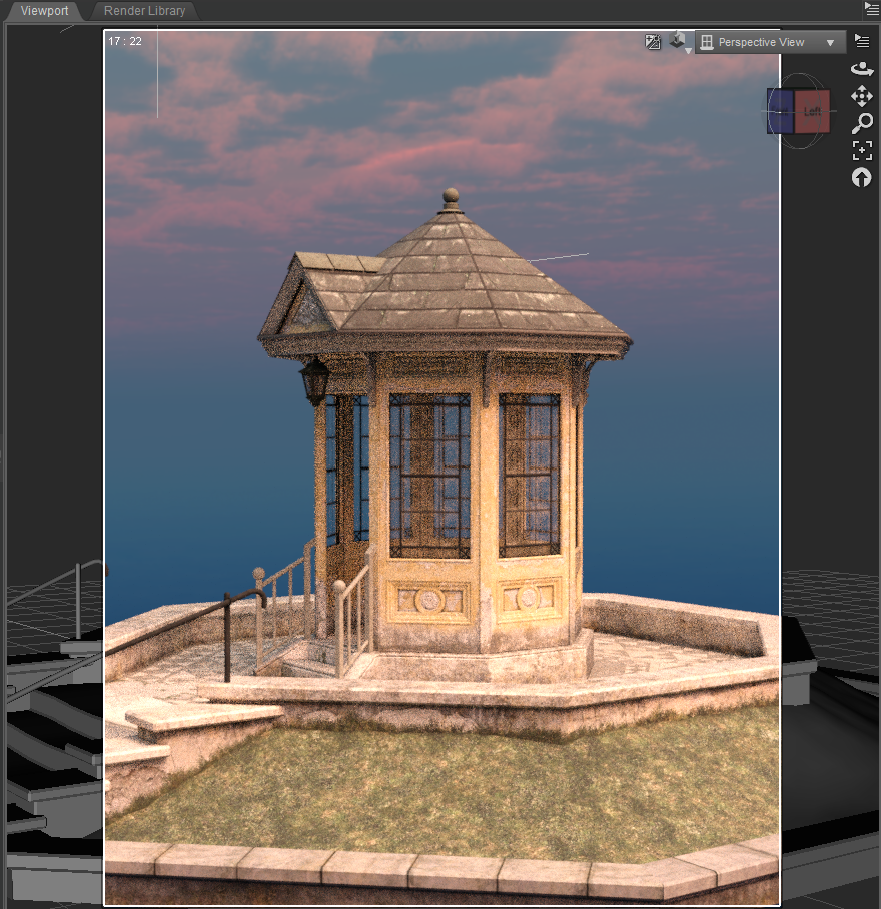
37. Select „oneiros (2)“ in the scene tab and load the RSL material onto it. This is necessary, as the IRAY material is broken concerning the windows.
38. Oneiros now ready to be further adapted to your scene.
 KuJ dForce Medieval Dress for Genesis 9
There didn't seem much point me giving this ago seeing as someone with much more experience has already found not one but two fixes. However, I thought I would look anyway and can atleast confirm that the dress does behave incredibly oddly - I have never seen clothing implode due to a pose before, nor a dress shrink-wrap itself under default dforce conditions.
Not managed to figure out how to "unlock" the Projection Template drop-down in the Transfer Utility yet but the first solution that barbult posted did greatly improve the behaviour.
Texture editing and MAT Zone questionProportional editing is a move tool, so you do not change number of verteces with that. That is why you can use it as a morph.
The only disadvantage of doing it that way is the texture will be more compressed in the lower part of the skirt than in the top, so if you use a pattern it might look odd.
A similar way of scaling, is to select the top row of verteces, and place the 3d cursor at selected. And then set pivot point to 3d cursor. Then select all and scale in Z-direction. That will although make your hem a little smaller.
Texture editing and MAT Zone questionfelis said:
If you want to make it shorter but keep the hem, you could make the lower part one material zone you can remove with cut-out oppacity.
And above that make a new hem surface.
But your old hem texture would not fit that, as it is on another place in the UV map. That could be adjusted in an image editor.
I think my suggestion instead is to make a morph. If you in blender select the bottom row (the hem) of polygons, enable proportional editing, and adjust the influence size. Then move it upwards, and maybe scale in a bit if to your liking.
Yes, I'd like to do that in Blender but I don't want to mess with the vertex count (by shortening the length) otherwise I end up with a whole new prop instead of the original skirt. Then it gets into areas that I know nothing about like rigging and UV Mapping - I may as well make a new skirt from scratch.
Texture editing and MAT Zone questionIf you want to make it shorter but keep the hem, you could make the lower part one material zone you can remove with cut-out oppacity.
And above that make a new hem surface.
But your old hem texture would not fit that, as it is on another place in the UV map. That could be adjusted in an image editor.
I think my suggestion instead is to make a morph. If you in blender select the bottom row (the hem) of polygons, enable proportional editing, and adjust the influence size. Then move it upwards, and maybe scale in a bit if to your liking.
[Misconception] DAZ Studio: Lazy morph loading (built-in) ->?If this is because of the slow loading of heavily laden figures then what you ask is what it does - the actual morph data (the deltas, chnages in shape) is not loaded uintil needed - it's building the list of properties that is taking time, because of the ay they interconnect.
Genesis 9morrisonmp said:
von Hobo said:
morrisonmp said:
Wonderland said:
morrisonmp said:
I have been experimenting with Genesis 9 characters (Michael, Minerva, Victoria, and a couple others) and while the textures are good and the facial improvements are excellent... I still hate the bodies. Gen9 is weirdly doughy and roundy and the proportions just "feel" wrong. I have not been able to make a G9 character yet (and I bought several of the morph sets as well) that I actually like having in a scene. And to me, YMMV, they don't fit well in scenes with G8/G8.1 models because the entire approach to making them just feels so very different.
I'd love to see some new sculpts using the G9 innovations that are not so odd-bodied.
Sorry for the rant... but the G9s just feel super weird to me.
I agree. G9/V9 is a bit too pudgy and short for my taste and the arms seem too long and legs too short. Some characters seem to have the head too small for the body. I know I can change all that but if I want to use stock poses it's extra work to make them work with proportions I use. I already make most G8 characters taller with longer legs and G9 needs even a bigger stretch. The only advantage I see now are the eyes and quick load time because I have very few G9 characters. It is kind of fun creating more characters from scratch though with G9 because I often get lazy mixing several G8 characters together rather than work on individual morphs. G9 will take longer to morph/pose but I'll probably be more creative doing it.
That's something I hadn't quite been able to put my finger on yet... The legs. I can't unsee it now. The legs are too short. I was just looking at the new muscle morphs pack images (on the store today) and I was like... yep, the legs feel wrong.
DAZ says on their Genesis 9 promo page that the proportions for G9 are "realistic human measurements".
-
"Genesis 9 figure measurements have been meticulously crafted to match real-world averages."
I have noticed the same thing, but is it possible that we are so used to G8 (and older generation) proportions, that when we see more accurate, real-world proportions on G9 we tend to think it looks unnatural? Could it be that G9 is indeed more accurate than older generations and we just need to adjust our expectations from what we have been used to seeing?
In my opinion, the approach DAZ is taking to real-world averages is a good one. The figures that the PA's produce can then diverge from this to create a model with longer legs, etc. if that is what appeals to a purchaser.
It's kind of like Instagram is not really what most people look like in everyday life, but that's what people are drawn to on Instagram (airbrushed models).
I find them oddly doughy and off-putting with all the attention on creating wonderful faces and the bodies looking like odd.
Given that Daz's direction with G9 is to present us with a more realistically proportioned base kit, this statement can be taken to mean that poeple in the real world are are also seen to be oddly doughy and off-putting as well. Le'sigh.
I've embraced G9 and am enjoying working with it. As others have already said, you can easily adjust the length of the legs or the arms or the size of the head.
And as an afterthought...I've always thought the legs on G8 were ridiculously too long out of the box...probably because the majority of characters were borrowed from V8...who was obviously an Amazon.
DAZ Studio quality - pet peevesSofaCitizen said:
I would also like to see something like that added to the QA process - it would be quite simple to set up an automated validation process on submission where it does some of the simple checks such as:
- Reject submission if any duf files contain "//Runtime" in the relative URL values
- Reject submission if any files linked to in the DSX file do not exist in the package
- Reject submission if any files have a double-period in the filename
- Reject submission if any stupid "Unique ID" values are used - this one would be a bit more open to interpretation but at the very least make sure that they are of a certain length to provide a good chance that they would not clash with other products. For example a unique ID of "03" should absolutely be rejected and not be allowed through the QA process.
That's far from perfect but would be so very easy to automate and sort out some of the more obvious product bugs I have seen recently.
Unfortunately, I am not sure that is likely to happen :(
I would add to this script checking for:
- poses that change character facial expressions
- poses that transform the character *ZAP* across the room!
- poses that change character scale
- character definition files that are saved with non-zero default values for the morph that override base character shaping. this one's been causing pain for years
All this stuff should be caught when a PA submits to DAZ, and summarily rejected on day one of acceptance testing. Perhaps the script could be made available to PAs, as well, so they wouldn't submit cr** like this.
[Misconception] DAZ Studio: Lazy morph loading (built-in) ->?I know there is at least one product for confining the morphs to load, but AFAIK, it needs manual tweaking and might not load all morphs needed under certain circumstances. Maybe this has been asked before.
So not only to speed up loading, but also to simplify exporting, i'd like to suggest "lazy morph loading" as a feature of DAZ Stuido. I can imagine two main routes that could lead there:
- Scripting/plugin API provide hooks to enable the feature, so scripts/plugins get called when it's relevant.
- It gets built into Studio (preferred).
So basically this should be a switch for a project, or a Studio session, or just global, to only load morphs, if they are actually used, but still be able to load on demand, if used/desired. I also envision options to still show the sliders and the names greyed out, even when not in use, so you could click on it to load it, but maybe also deactivate it. Upon deactivation i don't expect the morph to be unloaded, though, it would be enough, if it doesn't get exported (auto exclude) and for instance after saving a scene, won't load the next time. (Going complicated, you could still remember the last set value, or allow to save/load all unused values in an extra file or with a scene.)
If this was so simple, it probably would be there already. Of course both loading time would improve, as well as efficiency on exporting.
Cool features would then still be..
- Always load certain morphs (incdividual, from a product, from a saved favorite list, ...). It probably would be best to have them still be deactivated in terms of greyed out, but loaded into memory then. This would mean three meta states (used and loaded as is now, deactivated and not loaded, deactivated and loaded, the latter probably being possible to express better by another word than 'deactivated').
- Dynamic switch to deactivate all unused morphs. E.g. for saving/exporting, and having more efficiency for next load or further use.
- (Deactivating a used morph would mean dialing it back, if it's reversible.)
Does this make sense? Will it be in Studio 5?
Monster Silhouette 01 and the Ravager Parasite [Commercial]If you do/would make the head morph possible to be dialed in seperately, using the different bodies with each of the different heads are/would be a great benefit for Your customers
 Genesis 9
von Hobo said:
morrisonmp said:
Wonderland said:
morrisonmp said:
I have been experimenting with Genesis 9 characters (Michael, Minerva, Victoria, and a couple others) and while the textures are good and the facial improvements are excellent... I still hate the bodies. Gen9 is weirdly doughy and roundy and the proportions just "feel" wrong. I have not been able to make a G9 character yet (and I bought several of the morph sets as well) that I actually like having in a scene. And to me, YMMV, they don't fit well in scenes with G8/G8.1 models because the entire approach to making them just feels so very different.
I'd love to see some new sculpts using the G9 innovations that are not so odd-bodied.
Sorry for the rant... but the G9s just feel super weird to me.
I agree. G9/V9 is a bit too pudgy and short for my taste and the arms seem too long and legs too short. Some characters seem to have the head too small for the body. I know I can change all that but if I want to use stock poses it's extra work to make them work with proportions I use. I already make most G8 characters taller with longer legs and G9 needs even a bigger stretch. The only advantage I see now are the eyes and quick load time because I have very few G9 characters. It is kind of fun creating more characters from scratch though with G9 because I often get lazy mixing several G8 characters together rather than work on individual morphs. G9 will take longer to morph/pose but I'll probably be more creative doing it.
That's something I hadn't quite been able to put my finger on yet... The legs. I can't unsee it now. The legs are too short. I was just looking at the new muscle morphs pack images (on the store today) and I was like... yep, the legs feel wrong.
DAZ says on their Genesis 9 promo page that the proportions for G9 are "realistic human measurements".
-
"Genesis 9 figure measurements have been meticulously crafted to match real-world averages."
I have noticed the same thing, but is it possible that we are so used to G8 (and older generation) proportions, that when we see more accurate, real-world proportions on G9 we tend to think it looks unnatural? Could it be that G9 is indeed more accurate than older generations and we just need to adjust our expectations from what we have been used to seeing?
In my opinion, the approach DAZ is taking to real-world averages is a good one. The figures that the PA's produce can then diverge from this to create a model with longer legs, etc. if that is what appeals to a purchaser.
It's kind of like Instagram is not really what most people look like in everyday life, but that's what people are drawn to on Instagram (airbrushed models).
I don't think it's about adjusting out perceptions. I think it's about what we like. I fell in love with the G8/G8.1 style of models and I think they look great. The G9's whether they are more real-to-life than older generations is not really the issue. I find them oddly doughy and off-putting with all the attention on creating wonderful faces and the bodies looking like odd. It's really a preference thing. And I'll keep using G8/8.1 for a long time, I'm sure. As has been pointed out in the past, there is no shortage of options for G8. I would like to see a utility for converting the new g9 clothes and hairs back to g8. That would be a nice item. But other than that... yeah, I think it just comes down to preference. I'm sure as G9 evolves, we'll see more variety in the creations.
Genesis 9morrisonmp said:
Wonderland said:
morrisonmp said:
I have been experimenting with Genesis 9 characters (Michael, Minerva, Victoria, and a couple others) and while the textures are good and the facial improvements are excellent... I still hate the bodies. Gen9 is weirdly doughy and roundy and the proportions just "feel" wrong. I have not been able to make a G9 character yet (and I bought several of the morph sets as well) that I actually like having in a scene. And to me, YMMV, they don't fit well in scenes with G8/G8.1 models because the entire approach to making them just feels so very different.
I'd love to see some new sculpts using the G9 innovations that are not so odd-bodied.
Sorry for the rant... but the G9s just feel super weird to me.
I agree. G9/V9 is a bit too pudgy and short for my taste and the arms seem too long and legs too short. Some characters seem to have the head too small for the body. I know I can change all that but if I want to use stock poses it's extra work to make them work with proportions I use. I already make most G8 characters taller with longer legs and G9 needs even a bigger stretch. The only advantage I see now are the eyes and quick load time because I have very few G9 characters. It is kind of fun creating more characters from scratch though with G9 because I often get lazy mixing several G8 characters together rather than work on individual morphs. G9 will take longer to morph/pose but I'll probably be more creative doing it.
That's something I hadn't quite been able to put my finger on yet... The legs. I can't unsee it now. The legs are too short. I was just looking at the new muscle morphs pack images (on the store today) and I was like... yep, the legs feel wrong.
DAZ says on their Genesis 9 promo page that the proportions for G9 are "realistic human measurements".
-
"Genesis 9 figure measurements have been meticulously crafted to match real-world averages."
I have noticed the same thing, but is it possible that we are so used to G8 (and older generation) proportions, that when we see more accurate, real-world proportions on G9 we tend to think it looks unnatural? Could it be that G9 is indeed more accurate than older generations and we just need to adjust our expectations from what we have been used to seeing?
In my opinion, the approach DAZ is taking to real-world averages is a good one. The figures that the PA's produce can then diverge from this to create a model with longer legs, etc. if that is what appeals to a purchaser.
It's kind of like Instagram is not really what most people look like in everyday life, but that's what people are drawn to on Instagram (airbrushed models).
Transfer Utility and Load Morph don't work After Upgrading to DAZ 4.21 (64 Bit)Morph "destroying" the body could also be a case of vertex order not beeing kept when creating the morph. That would result in a mess when importing the morph.
Daz 3D is part of

Connect
DAZ Productions, Inc.
7533 S Center View Ct #4664
West Jordan, UT 84084Licensing Agreement | Terms of Service | Privacy Policy | EULA
© 2026 Daz Productions Inc. All Rights Reserved.