-
[Released] Blender to Daz Studio Plugin released!!! Official support thread [Commercial]
dragotx said:
How do we set up characters for G9 when they are transferred in with this utility? I haven't been able to get them rigged at all yet
Transfer a G9 character from Blender to DS ? G9 is already in DS ~~ what do you want to be exactly ?
[Released] Blender to Daz Studio Plugin released!!! Official support thread [Commercial]savagestug said:
On my phone so I can't reply to above post, but I ran into issues being unable to export all. I was trying to export one of the smaller kitbash3d Shogun buildings (has a back yard area with pond, bridge, and vegetation) and could only export partial elements at a time. Nothing happened but map transfer with export all
You just right-click on the parent node to Select Hierarchy, then click Export > Selected button. It'll work.
MimicMolly's Renders & WIPsG9 is easily becoming my favorite figure because my rule of judging DAZ figures is how easy it is to recreate my OCs and G9 stays winning.
In this WIP, I'm trying to make Ernest's best friend/right-hand man, and didn't really need to try that hard and got close-enough in one sitting. (He's the big guy.) Unfortunately, he uses some unavailable morphs by AOBB, but he mostly uses M3D Mauro HD as a base. I need to redo Ernest's body and it seems like Wagner 9 + SY's "Tortilla Chip" body can work but I have to figure out how to zero out Wagner's feet/create a foot neutralizing morph because they look "innaccurate" for my OC.
 [Released] Blender to Daz Studio Plugin released!!! Official support thread [Commercial]
On my phone so I can't reply to above post, but I ran into issues being unable to export all. I was trying to export one of the smaller kitbash3d Shogun buildings (has a back yard area with pond, bridge, and vegetation) and could only export partial elements at a time. Nothing happened but map transfer with export all
Smooth Out Imperfections in Clothing When Posed?Masterstroke said:
n.aspros123 said:
crosswind said:
n.aspros123 said:
crosswind said:
Okay, but they're different in terms of design ~ It's tight under figure's breasts on the one you're using while that Rendo's one is obviously with a looser design. If the figure has larger breasts, you won't get the expected result with that Shrug Style Top... no matter you simulate in whatever way.
I suggest another way around since I ever mentioned that the initial shape of the cloting is important before simulation. You can make a morph with Blender to give the top a "looser style". (screenshot 1)
Then you'll get the expected result afer simulation and you won't have to tweak it each time after simulation. (screenshot 2)
Which tools did you use in Blender to make the morph?
As usual, Draw brush and Smooth brush in Sculpt mode.
I don't know what's going on with Blender. When scuplting the top using the draw and smooth brushes, it looks okay. See Top Blender 1 and Top Blender 2. When I change back to Object mode the top doesn't look as smooth while in sculpt mode. Top Blender 3. I've tried more smoothing and drawing sculpting. Best I can without someone having a look for me.
Did I have the Draw and Smooth brushes Radius and Strength set correctly?
When I dForce the top with the Blender Morph, it doesn't look smooth under the breasts. See Top After Blender 1 and Top Blender 4 p. I also have the use Mesh Grabber to pull the bottom of the top out as it clips with the skirt.
I can share any files if needed to be troubleshooted.
Can I try your top morph.obj ? @crosswind . I think the mesh in yours might be better than mine possibly. When the silk shader is applied, the imperfections standout more possibly?
Is your figure the base figure or a character morph?
There is one big annoying issue in DS, that is a downer.
When you make changes in body proportions of your character, as part of a full body morph, you will get those ugly creases all the time.
It happens on clothes and also on hair.
I have not yet found a solution to avoid this. I have fixed it in zbrush and saved it as a character morph on the cloth set, but when loading the clothing the next time the same ugly creases are back.
It might go away with a dforce simulation, but not permanently.
Morph projection issue is long lasting there... The more tighter the cloting is, the more distortion you'll get. Some fixing job has to be always necessary loh ~
Problems with geograft morph mergingThat's almost the SOP as Masterstroke said above.
Only: as for Export BOTH as obj at base resolution... actually just selecting G8F to export it as OBJ will do.
The final step needs to be Adjust Rigging to Shape with G8F selected and the single morph dialed, ERC Freeze the single morph on G8F. Save two morphs on G8F & geo-graft as Modifier Assets (morph assets). Then delete those 17 + 4 morphs as needed.
Edit: You may further need to check the morphs' behaviors by posing the figure, see if there's any corrective morphs need to be made.
[Released] Blender to Daz Studio Plugin released!!! Official support thread [Commercial]reitaku said:
UncannyValet said:
It will probably be a consequence of vertex order not being preserved, as i did mention above.
If vertex order gets mixed up on a standard mesh, the results will be a mess of polygons, and it's easy to diagnose as a vert order issue. But for polyline hair, you noted that the final shape isnt a mess and still looks ok. The reason it still looks ok at 100% is probably only because the mesh is made of continuous strands, so will still be sequentially numbered correctly relative to the 1st index vert, but they will neverless be mixed up. I did explain the correct process in post above.
Thank you, I finally did it!
I checked the steps and tried the following in order.
1. Create hair in Blender.
2. Use the “Blender to Daz Studio Plugin” to import the hair into DAZ.
3. Sculpt the hair and import it into DAZ using the “Blender to Daz Studio Plugin.” After importing, export this hair as an OBJ file.
4. Import the exported OBJ file into Morph Loader Pro and create the morphs.That's the right way ~ DO NOT convert but just export to polylines with BTD and create morphs.
[Released] Blender to Daz Studio Plugin released!!! Official support thread [Commercial]UncannyValet said:
It will probably be a consequence of vertex order not being preserved, as i did mention above.
If vertex order gets mixed up on a standard mesh, the results will be a mess of polygons, and it's easy to diagnose as a vert order issue. But for polyline hair, you noted that the final shape isnt a mess and still looks ok. The reason it still looks ok at 100% is probably only because the mesh is made of continuous strands, so will still be sequentially numbered correctly relative to the 1st index vert, but they will neverless be mixed up. I did explain the correct process in post above.
Thank you, I finally did it!
I checked the steps and tried the following in order.
1. Create hair in Blender.
2. Use the “Blender to Daz Studio Plugin” to import the hair into DAZ.
3. Sculpt the hair and import it into DAZ using the “Blender to Daz Studio Plugin.” After importing, export this hair as an OBJ file.
4. Import the exported OBJ file into Morph Loader Pro and create the morphs. MJCelevate script not working
Open the script DSA file with Notepad++, select the coding block from line 472 to 491, then Ctrl + H to Relace All: objMorph with obj. Ctrl + S to Save. (screenshot 1)
Then run the script to create the morph, the error message will be gone.
[Released] Blender to Daz Studio Plugin released!!! Official support thread [Commercial]reitaku said:
UncannyValet said:
reitaku said:
However, the issue is that editing the hair (curves?) exported in OBJ format is difficult, and I'm stuck.
As you have discovered, your order of operations might not be the best workflow as you cannot easily re-style the curves in Blender once they are like this.
I am not at a computer right now so cannot refresh my mind as to a good workflow, but I believe you can right click on imported polyline mesh in Blender and go to Convert to -> Curve then right click and Convert to -> Curves, which makes the hair into Blender's new Geometry Node hair. Then you need to update Hair's surface to be your Genesis Figure or haircap. At this point, I beleive you can use the Sculpt mode to style the hair curves in Blender's Hair Curves system. But I am doubtful that is going to preserve the vertex order. If vertex order is not preserved, morph loader will not work.
To ensure vertex index is preserved, it is probably best to go back a few steps and make all the morphs for the hair before doing the conversion/export. I believe I might have mentioned that in the link you posted, but I also cannot access deviantart on my current ISP so cannot remind myself what I wrote.
Thank you very much!
Following the steps, I was able to convert the object into a curve and then sculpt the Hair. After sculpting, I converted the curve back into a mesh and loaded it into Morph.
Morph works fine when set to 100%, but the appearance becomes poor when set between 0 and 100%. What could be causing this?
It will probably be a consequence of vertex order not being preserved, as i did mention above.
If vertex order gets mixed up on a standard mesh, the results will be a mess of polygons, and it's easy to diagnose as a vert order issue. But for polyline hair, you noted that the final shape isnt a mess and still looks ok. The reason it still looks ok at 100% is probably only because the mesh is made of continuous strands, so will still be sequentially numbered correctly relative to the 1st index vert, but they will neverless be mixed up. I did explain the correct process in post above.
MJCelevate script not workingI just tried. I got the same message, but the message is from Daz Studio,
And it still generated a morph. So I think there is something DS 4.24 don't like, but not effecting the result.
MJCelevate script not workingI followed the instructions on the website, click on create elevation morph, then when I come out of the script it says "an error occured while reading the file...".
[Released] Blender to Daz Studio Plugin released!!! Official support thread [Commercial]UncannyValet said:
reitaku said:
However, the issue is that editing the hair (curves?) exported in OBJ format is difficult, and I'm stuck.
As you have discovered, your order of operations might not be the best workflow as you cannot easily re-style the curves in Blender once they are like this.
I am not at a computer right now so cannot refresh my mind as to a good workflow, but I believe you can right click on imported polyline mesh in Blender and go to Convert to -> Curve then right click and Convert to -> Curves, which makes the hair into Blender's new Geometry Node hair. Then you need to update Hair's surface to be your Genesis Figure or haircap. At this point, I beleive you can use the Sculpt mode to style the hair curves in Blender's Hair Curves system. But I am doubtful that is going to preserve the vertex order. If vertex order is not preserved, morph loader will not work.
To ensure vertex index is preserved, it is probably best to go back a few steps and make all the morphs for the hair before doing the conversion/export. I believe I might have mentioned that in the link you posted, but I also cannot access deviantart on my current ISP so cannot remind myself what I wrote.
Thank you very much!
Following the steps, I was able to convert the object into a curve and then sculpt the Hair. After sculpting, I converted the curve back into a mesh and loaded it into Morph.
Morph works fine when set to 100%, but the appearance becomes poor when set between 0 and 100%. What could be causing this?


 G9 Woes
Transfer your G8 shape to G9 (manually*). Add any native G9 content to the G9. Hide the G9 but not the G9 content you added. Render your G8 with the G9 content.
I do it all the time in both directions. I personally prefer G9, but I use that technique all in the time all manner of directions.
Only a chore when first setting up. I spent time setting up scene subsets for conversions between various bases. Now I can use those with a quick export and morph import whenever I change a shape or pose. Takes me 30 seconds. This post took me a few minutes to write.
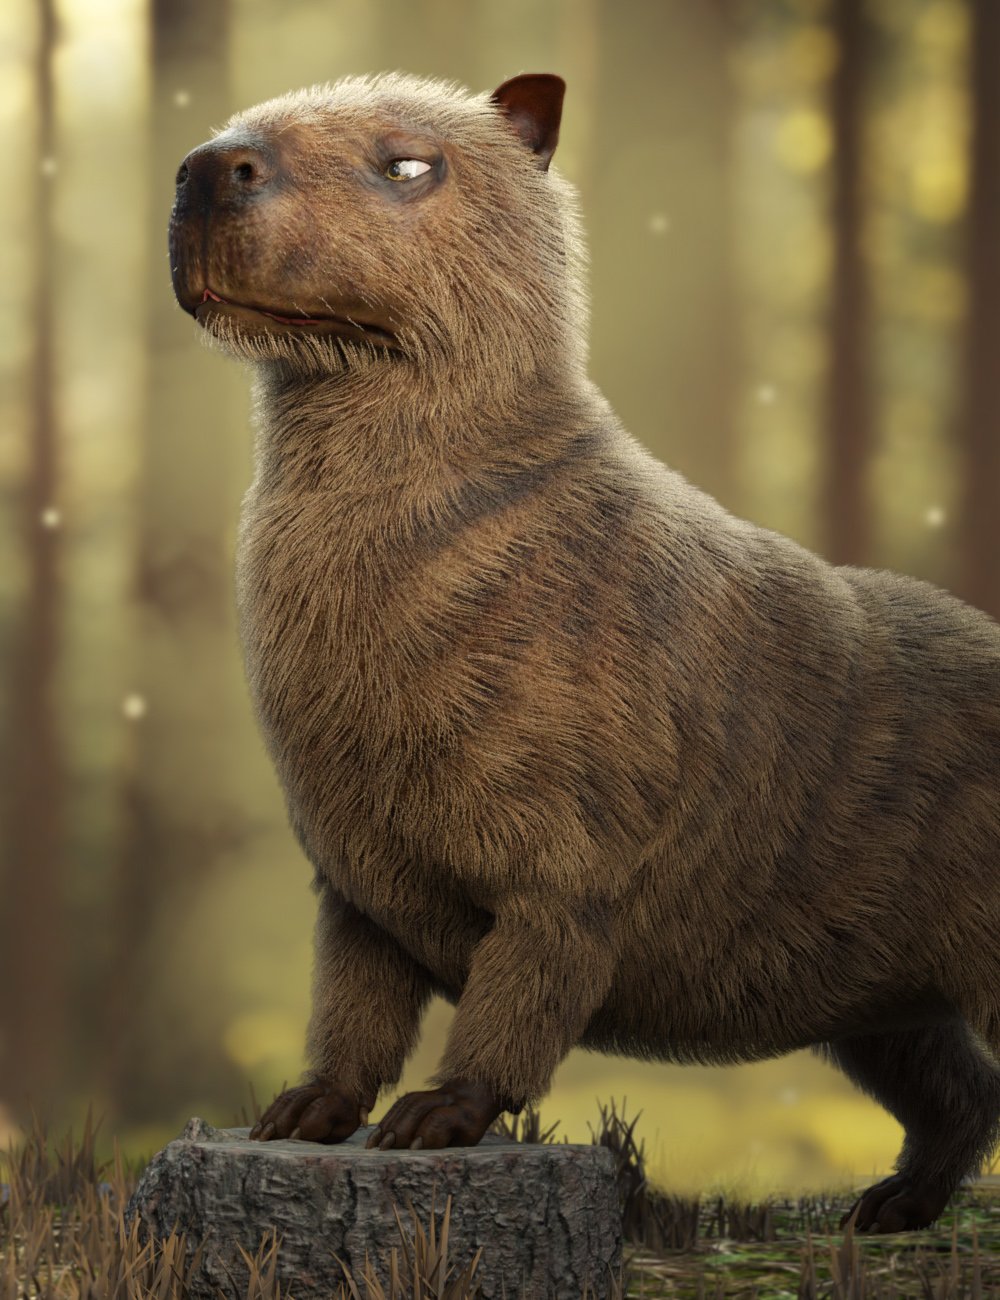
Capybara for Daz Dog 8 [commercial]Raw Capybara for Daz Dog 8
https://www.daz3d.com/raw-capybara-for-daz-dog-8
Turn your DAZ Dog 8 into the world’s chillest and most majestic rodent with this detailed Capybara morph and texture set.
Native to the wetlands of South America, the Capybara is known for its calm demeanor and social charm, and now it can take center stage in your renders, whether it's lounging by the riverbank or leading an animal council deep in the forest.
This set includes five unique fur styles: natural Classic Brown and Black, wild Fantasy Striped and Spotted, and a surreal Green Alien variant for sci-fi or whimsical scenes. Mix and match with five expressive eye color options to create your perfect capy companion.
High Definition morphs, Ultra Realistic textures, and dForce fur included to enhance the reality of this character.What's Included and Features
- Raw Capybara for Dog 8 : (.DUF)
- One CapybaraCharacter Preset
- One CapybaraShaping Preset
- Material Options:
- Five CapybaraFull Skin Material Presets
- Five Eye Material Presets
- Textures Include:
- 15 Textures for Diffuse, Transparency, Normal, Specular, and Transparency Maps
- Addons:
- One dHair Fur Attachment

 Smooth Out Imperfections in Clothing When Posed?
n.aspros123 said:
crosswind said:
n.aspros123 said:
crosswind said:
Okay, but they're different in terms of design ~ It's tight under figure's breasts on the one you're using while that Rendo's one is obviously with a looser design. If the figure has larger breasts, you won't get the expected result with that Shrug Style Top... no matter you simulate in whatever way.
I suggest another way around since I ever mentioned that the initial shape of the cloting is important before simulation. You can make a morph with Blender to give the top a "looser style". (screenshot 1)
Then you'll get the expected result afer simulation and you won't have to tweak it each time after simulation. (screenshot 2)
Which tools did you use in Blender to make the morph?
As usual, Draw brush and Smooth brush in Sculpt mode.
I don't know what's going on with Blender. When scuplting the top using the draw and smooth brushes, it looks okay. See Top Blender 1 and Top Blender 2. When I change back to Object mode the top doesn't look as smooth while in sculpt mode. Top Blender 3. I've tried more smoothing and drawing sculpting. Best I can without someone having a look for me.
Did I have the Draw and Smooth brushes Radius and Strength set correctly?
When I dForce the top with the Blender Morph, it doesn't look smooth under the breasts. See Top After Blender 1 and Top Blender 4 p. I also have the use Mesh Grabber to pull the bottom of the top out as it clips with the skirt.
I can share any files if needed to be troubleshooted.
Can I try your top morph.obj ? @crosswind . I think the mesh in yours might be better than mine possibly. When the silk shader is applied, the imperfections standout more possibly?
Is your figure the base figure or a character morph?
There is one big annoying issue in DS, that is a downer.
When you make changes in body proportions of your character, as part of a full body morph, you will get those ugly creases all the time.
It happens on clothes and also on hair.
I have not yet found a solution to avoid this. I have fixed it in zbrush and saved it as a character morph on the cloth set, but when loading the clothing the next time the same ugly creases are back.
It might go away with a dforce simulation, but not permanently.
Problems with geograft morph mergingI think crosswind is right, as far as I can tell.
Morph your character with its geograft as you like it.
Export BOTH as obj at base resolution
Set those morphs in question (Character AND geograft) to Zero now.
Use Morph loader Pro and have "Primary figure from Graft" in the top down menue activated on your MAIN character.
Just in case have "Reverse Deformation" set to "YES"
If you are happy with the resulting morph, place it in your prefered parameter hirachy.
Do not forget to save your new morph asset.
Now repeat the process, but THIS TIME, you have the geograft selected.
Now place your morph for the geograft in the same hirachy order as your main character morph before.
Example:
Main Character:
Actor:
My morphs:
coolmorph
Geograft:
Actor
My morphs:
coolmorph
Don't get confused, if you don't see your "coolmorph" on your geograft, because it is hidden.
Save your morph, if you are happy with it as a morph asset.
You can see this morph, if you check "Show hidden Properties" in your Parameter tab.
For using your "coolmorph", you will only need to use the "coolmorph" dial on your main character, the morph on the geograft with the same name and position will automaticly follow.
Close your project, but DON'T save the scene, in order to avoid the risk of dublicate formulas.
Reopen your character with its geograft and it should work fine. You can save the scene from now on.
Is that model comes from a product ?Fabiana said:
Hello @sioc :)
The morph is a mix, I am positive that Chrryt Shara is there, maybe 50 or 60% and a bit of Tauriel. Skin is full Tauriel as I can remember.Hope this helps!
I am always happy to give more info!
Thanks a lot!
here my try render
Smooth Out Imperfections in Clothing When Posed?n.aspros123 said:
crosswind said:
Oh, you just didn't draw / smooth the top enough... Suggest you turn on symmetry on X axis as well as Wireframe to checking the mesh change while sculpting.
You can try with the morph of initial shape I made but since you shaped your figure with different body morph, my morph may not really work well on it ~~
(extract the data folder in the attached ZIP to the root directory of your Daz Library. Reload the top and dial the morph: Initial Shape)
I'll try again with sculpting the top. @crosswind
When sculpting with Draw and Smoothing brushes:
- What do you set your Radius and Strength at?
There's no absolute rule... Setting Radius depends on the size of target mesh, if using symmetry, about 1/2 of this Top's width. Strength can be both set as 0.3 ~ 0.4 in this case if without a tablet.
- Do you Draw first then Smooth the areas?
Smooth the crease first (esp. on the area of cleavage and under breasts...) so that you can Draw, then Draw and Smooth.
- What areas of the top do you concentrate on?
Upper line, cleavage, under breasts and ribs... just with an aim to make it looser.
- How much do you Draw out and Smooth in, this top by?
Make 0.5 ~ 1 cm in between figure's body and Top so as to assure a better simulation result in DS.
If I cannot succeed with it, maybe Hot Coffee time if you know what I mean?
And there's no other special tricks.... Don't expect you can make perfect result at the beginning, you just need more practice. The more you practice, the more you'll be proficient in it.
 G9 Woes
Gordig said:
Masterstroke said:
BTW:
What are the significant G9 advantages of G8 again?
Why has there been a need for G9? I just can't see any reason.You say that as if many, many people haven't explained it to you already. You can find the argument unpersuasive, but you don't get to act like nobody is making the argument.
I am just not convinced. Everything, that as been introduced with G9, is possible with G8 as well. So why again, please?
8k texture - check
better expressions G8.1 started it. - check
(BTW: Standard expressions doesn't really work on heavy customized characters anyway)
Unisex, for better vendors' support. Give a male base morph to G8F - check
Renaming groups for industrial standards - just call it G8.2 - well kinda check
So, what do we need G9 for?
(Just on a side note:
To answer the elephant in the room, why I am so upset with the G9 release:
Improvements on assets are focussing on G9 and cut me off from benefitting from those.
I see the DAZ marketplace sailing away without me, being potentially left with outdated content.
Most annoying example is Strand base dforce Hair for G9 only, unsuable with previous G8.)
Daz 3D is part of

Connect
DAZ Productions, Inc.
7533 S Center View Ct #4664
West Jordan, UT 84084Licensing Agreement | Terms of Service | Privacy Policy | EULA
© 2026 Daz Productions Inc. All Rights Reserved.