-
[Released] dForce2Morph [Commercial]
I posted here because I couldn't find this thread but now here it is

https://www.daz3d.com/forums/discussion/comment/8277551/#Comment_8277551
to recap
sigh
if only we could bake Dforce to keyframes along the timeline like Optitex
I used compare on saved uncompressed scenes in Notepad++ and the vertex information is there after simulation
Dforce2morph can only destructively do one frame, what's needed is a way to queue up reloading the scene in one frame increments and saving a morph each frame, preferably in the scene NOT the data folder for the clothing
or alternatively a cache of obj exports (Sagan can do this) that can be loaded into morphloader and keyframed along the timeline
vertex animation
there is a script for Marvellous Designer that does this but it doesn't work on other obj series
yes I can load all the obj's into morphloader but that's a lot of morphs to manually keyframe 100% then 0 each preceding and subsequent frames
also the issue of just exporting the base resolution clothing so vertex order matches
BTW like Optitex freeze an obj with a series of morphs is wanted not a fitted figure with saved morphs
dForce is Awesome!sigh
if only we could bake Dforce to keyframes along the timeline like Optitex
I used compare on saved uncompressed scenes in Notepad++ and the vertex information is there after simulation
Dforce2morph can only destructively do one frame, what's needed is a way to queue up reloading the scene in one frame increments and saving a morph each frame, preferably in the scene NOT the data folder for the clothing
or alternatively a cache of obj exports (Sagan can do this) that can be loaded into morphloader and keyframed along the timeline
vertex animation
there is a script for Marvellous Designer that does this but it doesn't work on other obj series
yes I can load all the obj's into morphloader but that's a lot of morphs to manually keyframe 100% then 0 each preceding and subsequent frames
also the issue of just exporting the base resolution clothing so vertex order matches
Where is Julia 9 HD's teen morph as shown in the promo images?How can Julia 9 HD be made to look like this? Does she come with a teen morph?

https://www.daz3d.com/julia-9-hdThere's the following skin texture, but it doesn't include the teen morph, or maybe it does?

https://www.daz3d.com/julia-9-hd-teen-skin-add-on[Released] ManFriday’s Figure Converter for Genesis 9 [Commercial]If it's helpful for anyone's troubleshooting, I have now done several G8.1 -> G9 conversions and I've found that I had to do the Adjust Rigging step for the female figures while the male figures did not appear to need any additional steps. After the Adjust Rigging, the female characters seemed OK. I have not put these newly converted G9 characters through any deep and thorough testing yet, but I've made sure that nothing was obviously amiss with the face and that I didn't see any weirdness when I tried a few poses with them. All of my characters are Face Transfer characters, maybe with a few light morphs - so nothing with extreme shapes.
Saving a character morph as a dial presetLyrra Madril said:
Okay I've helped three differrent people untangle their G8 installion after they followed this tutorial and made a couple innocuous changes which set off landslides.
Richard, you left out two important notes, things that new users stumble over.
Revised version:
- Make sure that everything but your moprh is zeroed - that includes the navel and mouth realism morphs
- Right-click on the Parameters pane and select Edit Mode, assuming it isn't already selected
- Right-click on the Parameters pane and select Create New Property - name it as you want your morph dial, set its path to where you want it to appear, change limits if desired
- Set your new property to 1 (or 100%, depending on display settings)
- Right-click on your new property and select ERC Freeze. Your new property shold be listed as the controller in the dialogue that opens, all th shapes you used to make the morph (and nothing else) should be listed as Sub Components. Assuming that is so, click Accept.
- Make sure the new morph is working. Then set it and all other morphs to 0
- Then File>Save as>Support Assets>Morph Asset to save it. Save ONLY the controller dial and NOTHING else should be checked.
If you do not set it to 0 before saved it will load every single time turned on. This can be annoying and in commercial products it is not allowed.
If you save over other morph assets, especially if they are not set to 0, you can reset the start position for those morphs and make a giant mess of your G8 installtion. Avoid doing this.
Also if you have two copies of the genesis8 figure morphs installed in content folders hooked up to your DS, it can lead to weird results (doubledialing, dials not deactivating when set to 0) Don't do this. One copy, thats it.
Lyrra
I've tried following this, and it makes sense, except for when I apply the ERC Freeze to the morph dial. When I try setting it to zero, the figure changes pose from the base pose to another pose. Any clues why it might be doing this?
Daz JCM in UE5Does the Daz to Unreal Bridge hook up the JCM morphs in Unreal, and if so, what are the ideal morph export settings when sending to Unreal?
How to apply head morphs correctly?I would apply them to a base model if I want it to look like the promo pics or apply it to someone like Zerlara if I want it to add to the character's morph. One thing that no one mentions is that promos use very specific folcal lengths which greatly affect how the character looks. here is an example of the difference that focal length makes:
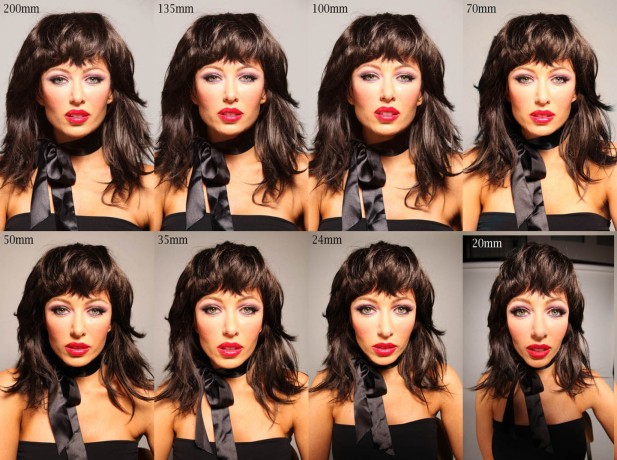
and
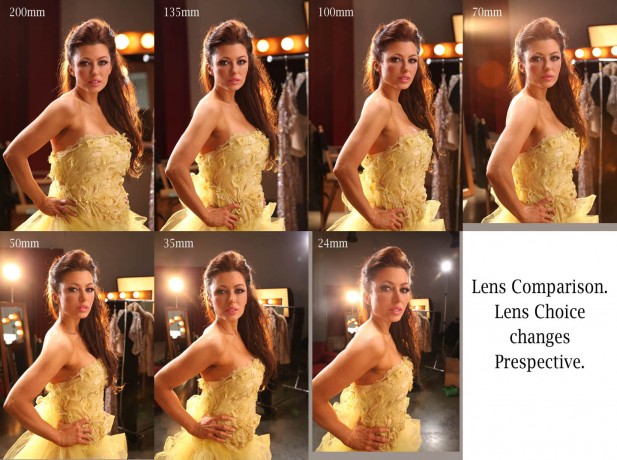 HS dForce Hip and Breast V2
Matt_Castle said:
korb said:
However, I am having the same experience that another of the posters on this thread noted - that he is ending up with 4 breasts. In response to that, you said this:
2.BTW,if you are using Weight map brush tool or Geomertry editing tools, you will also see 4 boobs
I am using Breastacular from Meipe. I assume based on your comment that this is not compatible with your module?
The geometry/weight map editor is a slightly different issue to trying to use this with Breastacular.
While in both cases the problem is two sets of geometry in the same place, the geometry editor (while active) is unhiding the portions of the base G8F geometry that Hamster's breast geograft is replacing. In your case, the problem is that two geografts are trying to hide and replace the same geometry.
While the two products do similar things, they are not directly compatible as they both rely on hiding and replacing the default geometry in that area. However, I find they are somewhat complementary, as they do different things better than each other. Hamster's product can handle more complicated collisions (involving several objects or odd objects, and can be quite useful under clothes), Meipe's handles detailed collisions better.
(In theory, one *can* make them work together by baking in the dForce transformation to a morph and then using the Transfer Utility to move across that morph, but this is probably somewhat excessive in many cases).Good information, thanks. I can see where this one might be useful for other things, but that's not what I'm trying to address at the moment, so I guess I'll try to find some usable alternative.
Genesis 8 Female Head morphs installed BUTDo other morphs (e.g. from characters, even if you don't have other morph sets) show correctly?
mouth gets distorted when trying to convert from g8m to g3mRichard Haseltine said:
But is it happening with posing? If so the bones for the jaw probably need adjusting to shape.
i did adjust the posing of g3 to g8 but that's it then i use the transfer utility like i always do never had a problem until now
even if i do need to adjust the jaw how do i do that?Is there a way to transfer cc3 figures to Daz Genesis 8, at least for the mesh/morph?PerttiA said:
I hear people are using Wrap3D/4D to convert figures from miscellaneous sources to genesis figures.
Thanks! I guess you meant R3DS Wrap? I found a one-hour long tutorial Let's Turn a 3D Body Scan into a Daz Character! (R3DS Wrap Tutorial) - YouTube
So it seems to me it would be sooner for me to morph directly in Daz 3D...
Blender HD morphs for DAZ StudioYou could in theory export a hi-res Base figure from DS into Blender and then re-import the .obj and transfer the rigging from the original figure, essentially giving you a higher res version of your DS figure that you could try to import the morph target within DS
Or you could try to export the High Res figure into Blender, add subdivision or anything else you might need then sculpt your morphs and export the whole thing as a Collada file or an FBX file along with the created shapekeys (morphs) which means if you re-import the DAE or FBX into Daz Studio you will get a figure shaped prop with morphs included which you could then try to rig using the Transfer Utility (at least as a starting point)
Another option (the non free approach) is exporting to Blender, adding subdivisions and sculpting, then exporting the end result and use a software like Wrap3DS (not free) and project your HD morph to the Genesis (or any figure you're working with) from the High Resolution mesh so you can use Morph Loader normally
Who is the character used in HS Stella Twintails HairSue Yee's Xiao Meng and Shiina also come to mind when I look at the image but they don't have the freckles across the nose. Possibly a different skin over a character morph?
Elli
Non DForce Hair items Conversion from Genesis 9 to Genesis 8Catherine3678ab said:
felipe.a.v.lopes said:
Catherine3678ab said:
Might sound like a jolly silly question, but why not just tell the hair that it's for G9 in the auto-fit options that appear when trying to fit it to G8? The clones for G9 for all the generations back one can either make oneself or purchase in the Daz3D store.
Because if you Auto-fit the Hair, The Transfer Utility will replace the Hair's original rigging with the one from the Autofitting Templates, basically giving it a duplicate of Genesis 8's rigging and destroying the Hair's "special" Posing bones
I see. That's if it had posing bones to start with. Can't say as I've had any major issues using the autofit methods.
If it's a longer hair or a Pontytail style hair the chances of it having posing bones are greater. If you autofit a hair like OOT Long Unisex Hair for Genesis 9 to Genesis 8, you might think everything on the Hair is working until you go into the movement morphs section in the Shaping Tab and try to use those dials. The advantage of converting is the functionality remains intact
[Released] RSSY Character And Material Conversion Bundle Genesis 8 to Genesis 9 [Commercial]starboysf said:
RiverSoftArt said:
starboysf said:
RiverSoftArt said:
starboysf said:
I have not been able to successfully convert any G8 or G8.1 characters to G9, despite multiple attempts. I keep receiving a pop-up message stating:
"Failed to save Morph Asset(s). See the log for more details."
When checking the log, I see:
[WARNING] :: /src/sdksource/fileoutput/dzassetoutfile.cpp(650): Failed to create file path.
[WARNING] :: /src/pluginsource/DzAssetIOFilters/dzmorphsupportassetfilter.cpp(936): Failed to write Morph Asset(s).I am using a Mac laptop with MacOS Ventura 13.4.1. I've attempted to set my output path to both a folder on my network drive as well as one on my local desktop, with the same results.
Happy to provide any additional information or run some more test conversions.
Thanks for any help!
Strange. Are you using the latest version?
I'm on Daz Studio 4.21.0.5. I don't see a version number listed for the character converter when the setup screen pops up, but I installed it using DIM and am current on all available product updates through DIM.
What are the Content directory manager settings for you? Here are mine:
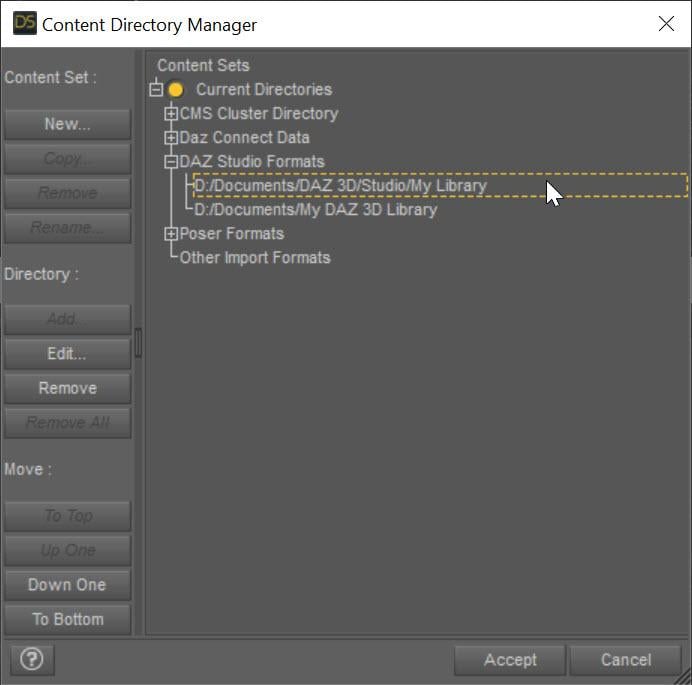
This specifies the directory the character morphs will go in. Also, can I see more of the log when running the conversion? There must be other messages.
Problem solved! I double-checked my settings in the Content Directory Manager and realized that I had an old directory path still showing at the top of the 'DAZ Studio Formats' section. I thought I cleaned that all up after migrating everything to a new drive, but apparently not! Once removed, I was able to convert a default 8/8.1 character as well as one that had been customized a bit.
Thanks for the help!
Awesome! I am glad you got it working.
HS dForce Hip and Breast V2korb said:
However, I am having the same experience that another of the posters on this thread noted - that he is ending up with 4 breasts. In response to that, you said this:
2.BTW,if you are using Weight map brush tool or Geomertry editing tools, you will also see 4 boobs
I am using Breastacular from Meipe. I assume based on your comment that this is not compatible with your module?
The geometry/weight map editor is a slightly different issue to trying to use this with Breastacular.
While in both cases the problem is two sets of geometry in the same place, the geometry editor (while active) is unhiding the portions of the base G8F geometry that Hamster's breast geograft is replacing. In your case, the problem is that two geografts are trying to hide and replace the same geometry.
While the two products do similar things, they are not directly compatible as they both rely on hiding and replacing the default geometry in that area. However, I find they are somewhat complementary, as they do different things better than each other. Hamster's product can handle more complicated collisions (involving several objects or odd objects, and can be quite useful under clothes), Meipe's handles detailed collisions better.
(In theory, one *can* make them work together by baking in the dForce transformation to a morph and then using the Transfer Utility to move across that morph, but this is probably somewhat excessive in many cases).Rigging and Weight Map TroubleshootingHello All,
I've managed to kind of figure out how to get the bones to 'stick' to an object, so a little progress has been made. But now I have run into a new problem (for me), in that when I bend a bone in the middle of the item, it does what the (hopefully) attached image shows. I want it to bend like a tail should, not see-saw for some currently unknown (to me) reason. I just don't know how to ask the right questions either. I did the following things iirc:
- Basically, I used figure setup tool to add extra ghost bones so that the tail will (to my thinking) follow G9 scales, shapes and whatnot, including l-thightwist1 and such.
- I created the figure without G9 in the scene initially, and the hip was initially located in the centre of the object.
- I set weight maps to fill at 100% on selected polygons following SickleYield's message in https://www.daz3d.com/forums/discussion/53538/way-for-smoothing-weight-map-about-many-bones-snake-at-once-solved .
- I memorised figure rigging.
- After some tests I thought maybe the hip location was the issue, so I used Transfer Rigging Figure Space (initially backwards), then memorised again.
- Then this happened
So, I want to know: Why is this happening like it has? What is going on? What could have caused this? What did I do wrong? How do I fix this?
And if it's weightmapping issues: what is the general standard for a 'tube' shape, regarding 'Smoothing' and 'Iterations' in weight mapping? If Gradient Fill is the best way, how could you sort out the 'Gradient Fill' spheres to make nice bends instead of having, say on the X Rotation, what is displayed in extreme in my image?
I will most likely run into more hiccups along the way, so hopefully I can puzzle this out over time. So, hold please for more questions!
Non DForce Hair items Conversion from Genesis 9 to Genesis 8felipe.a.v.lopes said:
Catherine3678ab said:
Might sound like a jolly silly question, but why not just tell the hair that it's for G9 in the auto-fit options that appear when trying to fit it to G8? The clones for G9 for all the generations back one can either make oneself or purchase in the Daz3D store.
Because if you Auto-fit the Hair, The Transfer Utility will replace the Hair's original rigging with the one from the Autofitting Templates, basically giving it a duplicate of Genesis 8's rigging and destroying the Hair's "special" Posing bones
I see. That's if it had posing bones to start with. Can't say as I've had any major issues using the autofit methods.
[Released] ManFriday’s Figure Converter for Genesis 9 [Commercial]FSMCDesigns said:
necroscension said:
FSMCDesigns said:
necroscension said:
DoctorJellybean said:
MelonArts3D said:
Hello,
I allways get this error when I try to use the product.
What am I doing wwrong or is something with my G9 not wright?
That error is a bit confusing. Please make sure that you have both Genesis 3 and Genesis 8 installed.
Also hold off on converting Genesis 3 items. The dev needs to address a problem with the arms after conversion (please check older posts). Just trying to keep another person from posting the same issue again.
I actually installed the latest version and redid the G3 body morph I had issues with earlier and it converted fine this time, so maybe it was updated
Nope, not fixed. Made sure my files were updated and just tried Elijah 7. It's almost like the more different the proportions are from the base G3, the more the arms distort. I believe my previous showed that. Maybe your morphs don't change the skeletal proportions?
I can wait.
I guess you are correct. I just tried Elijah 7 myself and it was a mess. makes me wonder why my custim G3 body didn't work the first time, but did the second time, odd.
I'm thinking the more the proportions vary from the base G3, the more we see this distortion. I've only tried four figures, all Daz #s - Michael 7, Lucian 7, Elijah 7, and Guy 7. Lucian 7 has the least amount of distortion, Elijah 7 has the most.
Non DForce Hair items Conversion from Genesis 9 to Genesis 8Catherine3678ab said:
Might sound like a jolly silly question, but why not just tell the hair that it's for G9 in the auto-fit options that appear when trying to fit it to G8? The clones for G9 for all the generations back one can either make oneself or purchase in the Daz3D store.
Because if you Auto-fit the Hair, The Transfer Utility will replace the Hair's original rigging with the one from the Autofitting Templates, basically giving it a duplicate of Genesis 8's rigging and destroying the Hair's "special" Posing bones
Daz 3D is part of

Connect
DAZ Productions, Inc.
7533 S Center View Ct #4664
West Jordan, UT 84084Licensing Agreement | Terms of Service | Privacy Policy | EULA
© 2026 Daz Productions Inc. All Rights Reserved.