-
The September Carrara Challenge : Just Say NO to Flat 3D - Spinning a Popular Themediomede64 said:Bunyip02 said:Title:- Vicki6 in Provence with Nightstorm (ConceptCar)
Not quite mud-splatters.
I have tried to redo Vicki6 with another pose and a change of colours for her clothes.
Is there another way to get the correct fit other than updating via the Model room ?Seems the more I do the worse it gets.
Have followed the Learning Carrara tutorials but not having much joy on this part.Footpath shader worked out well once I resized it.
Aaaargh. I feel for you. If you don't have poke-away as Dustrider suggests, I have a couple of other suggestions.
- Parent clothes and G2F to a supergroup, not to each other. Then use "fit to" for the clothes to G2F. If you have closed the file and reopened it, try ungrouping everything and unfitting everything, then create a new supergroup with the figure and clothes and then use fit to again. Silly, but has worked for from time to time.
- Judging by the screenshots, it appears your character has long sleeves and long pants. You really only need the G2F head, neck, hands, and feet. You could create a new shading domain on the G2F and make it invisible. In the attached screenshots, I highlighted the actor level of G2F, entered the vertex modeler, and used the lasso tool to select the central body and limbs. Creating a new shading domain and adjusting the alpha leaves only the head, hands, and feet, which should work for you.
- You could use Daz Studio to pose and clothe your figure, then export as an .obj. Import in Carrara and place where wanted.
- You could also use the displacement shader on the clothes to expand them slightly (suggestion originated with Manstan, I think).
- Similar to the Manstan method, you could highlight the actor level of the clothes, enter the vertex modeler, ignore the topology protection warning, use select all, and increase the size of the clothing to 101% or something similar.
-
Diomede 64, Dustrider, and Evilproducer
Many thanks for all of the suggestions, but I have grabbed the Poke-Away, so will give that a try first up.
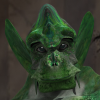
Very interested in the other methods as well, but it looks like the Poke-Away is the pick of the crop.Had a quick break from the Challenge and did a Critter Render in Carrara as well, for a Noobie quickie was very happy with it.
Will put it in the Post Your Renders thread.Back to the challenge tomorrow, hopefully Vicki6 will be a lot happier with those clothes moths sorted out !!!!!!!
Many thanks for the info on how to fix the problem - much appreciated !!!!!!!
Regards, Bunyip
The September Carrara Challenge : Just Say NO to Flat 3D - Spinning a Popular ThemeBunyip02 said:Title:- Vicki6 in Provence with Nightstorm (ConceptCar)Not quite mud-splatters.
I have tried to redo Vicki6 with another pose and a change of colours for her clothes.
Is there another way to get the correct fit other than updating via the Model room ?Seems the more I do the worse it gets.
Have followed the Learning Carrara tutorials but not having much joy on this part.Footpath shader worked out well once I resized it.
Aaaargh. I feel for you. If you don't have poke-away as Dustrider suggests, I have a couple of other suggestions.
- Parent clothes and G2F to a supergroup, not to each other. Then use "fit to" for the clothes to G2F. If you have closed the file and reopened it, try ungrouping everything and unfitting everything, then create a new supergroup with the figure and clothes and then use fit to again. Silly, but has worked for from time to time.
- Judging by the screenshots, it appears your character has long sleeves and long pants. You really only need the G2F head, neck, hands, and feet. You could create a new shading domain on the G2F and make it invisible. In the attached screenshots, I highlighted the actor level of G2F, entered the vertex modeler, and used the lasso tool to select the central body and limbs. Creating a new shading domain and adjusting the alpha leaves only the head, hands, and feet, which should work for you.
- You could use Daz Studio to pose and clothe your figure, then export as an .obj. Import in Carrara and place where wanted.
- You could also use the displacement shader on the clothes to expand them slightly (suggestion originated with Manstan, I think).
- Similar to the Manstan method, you could highlight the actor level of the clothes, enter the vertex modeler, ignore the topology protection warning, use select all, and increase the size of the clothing to 101% or something similar.
-
Store listed for discounts, but no discountsI don't know when it got fixed exactly, but it's 10:40p (Central Time) and it seems to be working now with the few stores I checked (that weren't working previously.)
Store listed for discounts, but no discountsI know this has to be frustrating to the vendors as well. It's got to be costing some sales because it's 5:30pm (Central time) and still not fixed. I do have to say I really appreciate all the participating stores- thank you PA's! :)
NEW! Novica & Invited Guest Contributors Tips & Product Reviews Pt 5Well, DAZ sucked me in with the 3 punches instead of 2 on Monday, so I easily got to 5 punches, then with several lower cost/freebies I was up to 8, then with the added 15% off, I went for 10 so I could load up on Aave. I saved $18 overall. But now it's ramen noodles and cheap microwave meals for me and no fast fun runs for a couple weeks. I did just get a free sub sandwich from Firehouse Subs- if you are in the South, the Jacksonville Jaguars have a page on their site (and for phone app) where you buy a medium drink and chips, and get a free medium sub of your choice. (So spend about $2.30 and get $5.50 off) They said they would do that if the Jags got a 40 yard field goal or something like that. It expires today btw.
"This offer is only valid at participating Firehouse Subs locations in North and Central Florida, South Georgia and Charleston, South Carolina. "
Anyone in those areas can PM me and I'll send you the page to print out. This evening only!The I lost my sheep Complaint threadMeh floods everywhere but only slightly damp in Melbourne central. On the upside sunset is all glowy pink and mauve streaked blue, teh awesome :)
Reward PUNCH Counter not workingITS WORKING. My banner just appeared (1:13pm Central Time)
Night & Day City - Product Promo [Commercial]kakman - So pleased you are enjoying it. I have been diverted from working on "City Central" for a week or two, but I should make more progress soon.
Night & Day City - Product Promo [Commercial]PhilW said:I am working on a companion product to Night & Day City, let's call it "City Central" for now, it will provide a range of taller feature buildings, inspired by some famous actual buildings plus a dose of my own imagination. This is a quick and dirty render so not what I would call final quality, but it gives you an idea of what I am working on - the existing Night & Day City in the foreground, the new tall buildings set in the background.Phil,
I really enjoy working with your Night & Day City set and look forward to purchasing any and all “Companion” products that you develop for it. City Central looks very interesting and will hit my “cart” as soon as it is released.
I really appreciate how easy it is to customize all of the different elements of the set including, but not limited to, the signage and the amount and colors of the light emanating from the various building’s windows.
Here is a quick test render using this set.
The I lost my sheep Complaint threadKyoto Kid said:..awake earlier today. Slowly been adjusting my schedule to more of a daytime rather than afternoon/night one in preparation for a workaday life again. Don't have much of a social life anyway.Still need to find a freebie model of one of those personal shopping carts for a scene I'm working on. Also need to get better with Garibaldi Express, to create more "lifelike" hair. In some cases and lighting situations, Transmapped hair doesn't look as good.
*Sigh* PA sale on and only have a bit of credit left. Not a member of PC+ so can't use my 6$ coupie. Need to get cracking on this month's RRRR submission (missed last month due to all the RL rubbish of losing my Net access & such).
Odd, feel like I've been here a good part of the day already and it's not even 09:30.
[football]
NFL Season Kickoff tonight, Green Bay at Seattle. Should be a good one, Packers 5 point favourites. Really looking for a bit of payback after that poorly officiated game a couple years ago with the substitute refs where they totally muffed a call (the NFL afterwards admitted it was a bad call) which gave the game to Seattle. Have a friend who works at the neighbourhood market who is going up for the game today. [insert envy emote here]. I'll just have to go to a pub to watch.
[/football][baseball]
Looks as if the Milwaukee Brewers certainly picked the wrong time of the season to go into a swoon. After leading the NL Central Division since Mid April they are now 3 games behind St Louis after being swept by of all teams, the lowly cellar dwelling Chicago Cubs, extending the current losing streak to 8 games. The once hottest team in the majors has become as ice cold as its hometown's most famous product. Tonight begins a three game series with the now high flying Cardinals which could lead to extending the Brewer's losing streak to double digits as the "big Milwaukee bats" have apparently gone to into hibernation for the coming winter.Look for the slide to continue in September, in spite of Milwaukee bolstering its bullpen through a late August trade with the Cincinnati Reds, and the reigning NL Champion Cardinals once again taking Central Division crown.
[/baseball]
This one is free at Turbosquid. No texture, but you got shaders.
http://www.turbosquid.com/3d-models/shopping-cart-max-free/684366The I lost my sheep Complaint thread..awake earlier today. Slowly been adjusting my schedule to more of a daytime rather than afternoon/night one in preparation for a workaday life again. Don't have much of a social life anyway.
Still need to find a freebie model of one of those personal shopping carts for a scene I'm working on. Also need to get better with Garibaldi Express, to create more "lifelike" hair. In some cases and lighting situations, Transmapped hair doesn't look as good.
*Sigh* PA sale on and only have a bit of credit left. Not a member of PC+ so can't use my 6$ coupie. Need to get cracking on this month's RRRR submission (missed last month due to all the RL rubbish of losing my Net access & such).
Odd, feel like I've been here a good part of the day already and it's not even 09:30.
[football]
NFL Season Kickoff tonight, Green Bay at Seattle. Should be a good one, Packers 5 point favourites. Really looking for a bit of payback after that poorly officiated game a couple years ago with the substitute refs where they totally muffed a call (the NFL afterwards admitted it was a bad call) which gave the game to Seattle. Have a friend who works at the neighbourhood market who is going up for the game today. [insert envy emote here]. I'll just have to go to a pub to watch.
[/football][baseball]
Looks as if the Milwaukee Brewers certainly picked the wrong time of the season to go into a swoon. After leading the NL Central Division since Mid April they are now 3 games behind St Louis after being swept by of all teams, the lowly cellar dwelling Chicago Cubs, extending the current losing streak to 8 games. The once hottest team in the majors has become as ice cold as its hometown's most famous product. Tonight begins a three game series with the now high flying Cardinals which could lead to extending the Brewer's losing streak to double digits as the "big Milwaukee bats" have apparently gone to into hibernation for the coming winter.Look for the slide to continue in September, in spite of Milwaukee bolstering its bullpen through a late August trade with the Cincinnati Reds, and the reigning NL Champion Cardinals once again taking Central Division crown.
[/baseball]Website too Slow, can't buySorry you're having trouble- one of the best times I've found to shop is 3am-4am- when the site turns over around 1am (Central time) it can slow down- but it perks back up a few hours later. It gets busy in the US again around 7am and across the pond is on then too. When are you finding the lag? (I haven't had any trouble.)
The Amorous Armadillo Complaint ThreadMisty Whisky said:Kyoto Kid said:Misty Whisky said:did someone say Friday? :lol: tahrahrahboobee-ayy, lie, ;) not that much energy this morning. shoulda got an extra shot of espresso this morning.waited an hour and half for the bus last night. and the bus's phone center shuts before 17:00 can't even call them to bitch about it.
still polishing my double flashback chapter for confusion spots.
made into a chapter 1 and he's remembering 15 years ago. makes it only one layer of flashback. chapter 2 is 'four' years later. :) - i cans feel almost happy about it now.seriously thinking about putting tentacles on the cover, but then i'd have to add a tentacle scene to the novel. gratuitous tentacles or make it relevant. i have to override my own inhibitions, can't have my sense of grossout interfere with the story.
if i finish rendering my covers this weekend, will be that much less temptation to spend more money on content. only thing left calling to me from my w/l is the omnifreaker extra layer thingee.
...there are no such things as "gratuitous tentacles". ;-)
Been designing more characters for the story (hence the comment earlier about slender women in leather trench coats). Currently working the lead antagonist, Ms Rita Kovec, who is head of the S.I.D. (State Intelligence Directorate) which basically runs the Serbian regime (which occupies both Croatia and Bosnia-Herzogovina) in the future. Maleficent has nothing on her when it comes to pure evilness and she's even make the likes of Stalin and her "mentor" Mr. Milošević wince.
maleficent was the bad lady in disney sleeping beauty?
...yes as ell as the central character in a new live action film (which BTW is at the neighbourhood pub cinema, may have to go see it to get more "inspiration").Show Us Your Bryce Renders! Part 7mermaid010 said:Could you do a quick render, small for an avatar (I don't know what is the size allowed here) of the mermaid sitting on a rock at the bottom of the sea.
Ok, render completed, here is a preliminary version. One problem I see, the max thumbnail size is 100x100, and when shrunk down to that size, it's almost impossible to see. Ideas?
EDITED TO ADD: crud, I must have bumped the camera angle, I see a gap at the waist that was supposed to be hidden by the arm. I never figured out how to transfer that particular figure/tail combo over to Bryce perfectly; while it seems fine in DS, when sent to Bryce the figure's legs become unhidden, and when deleted, there's a gap. I'll correct that with a slight camera position change in the next render along with whatever other changes you decide you want.In space I really have no clue as to artistic direction. Individual elements I can understand but what constitutes a space “scene” is somewhat opaque.
I think your scenes are great. Only thing I might suggest, only if you agree, is to make those four larger central asteroids in that middle astroid field a bit less rectangular?
What constitutes a space scene would really depend on whomever is putting it together, same as any other scene. One person might put together an exploratory mission, some might try for an alien scene, some might want to add a space battle, another might put together, some might be a big Star Trek or other movie/series fan and just use it as a backdrop for ships or the view outside a window framing an interior shot for their theme, some might do a space "landscape" (which I think your bottom captures quite well), many will probably do something totally unexpected with it. It could really be anything at all.Just bought Carrara .. Question about my DAZ stuffYeah.
I use Project Dogwaffle Pro: Howler for this sort of thing, but you could use anything that can treat animations like image files.
Take an animated fire effect and tweak it to run the appropriate amount of time and at the right frame rate. For Howler, and being a super-long animation with no breaks, the 120 fps likely wouldn't work. But anyways...In Howler, I would turn the flames animation into an animated brush
Open the texture map for the wings
set up the animated brush in the correct direction angle and scale for one wing and store the brush
Repeat for the second wing, if they're mapped individually
Set Black as the primary color and turn the original texture into the appropriate length of animation
Instead of having it auto-repeat the image on each frame, have it fill with the primary (black)
Use the first frame (still owning the original texture map) to line up the animated brush of flames effect and paint it accross the whole animation using the animated brush key framer
Repeat for the second wing, if they're individually mapped.
Animation > Save Sequence > Save the new animation as a sequence of images for use in the Color channel.
I would go with further steps to deselect the black (selecting only the flames) and save as png w/alpha sequence. But instead you can:Run a saturation filter on the sequence to turn it to gray scale for use in the alpha channel.
This gray scale might also work well as a multiplier in the glow channel with the color sequence if more brightness is needed.
==================================================================================================
Attach a particle emitter to each wing in a good, central location
Choose "Facing Camera" as the particle type
set the particle shader to use a gray scale "cloud" image to control a color gradient - initially as the colors of the flames (left side of the gradient) and ending in greys and perhaps a bit of brown (right side of gradient)
Still in the particle shader, use the life of particle to control the gradient as well
Now go into the emitter and set it up to start emitting sparks just before the animated texture starts flaming, having the particles use negative gravity so that they rise as the shader turns them from fire to smoke.
Duplicate the emitter as many times as you want for other parts of the wing, the other wing, etc., and make one that has positive gravity which starts later and spews hot coals from the wings to the ground. Make people scared to come near this guy!
Something like that is where I would start.
====================================================================================================
If you don't have the right flames animation sequence, you could make one in Carrara using either the Carrara Fire or particles or both.
Know that you may render in alpha in Carrara. So you could actually create the new texture directly in Carrara and avoid the need for using additional software, like Howler or Final Cut, After Effects... whatever....
Using the same methods, you can also create an animated backdrop which only flames up after a certain period of time.
Use a few spot lights grouped together which glow red, orange, yellow, etc., and spin the group under him. Carrara will let you change the rpm as well as direction throughout the animation. Once you get a cool (or HOT, rather! LOL) effect going, simply duplicate that and move it to come from behind a wing, lighting up only after the flames kick on, then duplicate that setup for the other wing, and another that goes along with whatever background flames you might add.
This stuff can get REALLY fun! Changing spin modifiers can take a lot of practice to get just the right effect. Well... all of this stuff takes practice, no matter what software you run. But I love how Carrara just begs us to do everything inside itself!
HINT: you can layer renders in Carrara - render something and then load it into the backdrop. Anything in the scene automatically appears in front of the backdrop. Add to the scene, render again. Add that render to the backdrop, and stuff, render again... and again...
Sequenced Image animation work great for this. And remember that you may render with alpha - so you can actually use atmosphere and/or background channels to add something 'behind' the backdrop, if it is using an alpha! Can we say... "Ouch!"?
Yeah... I think we can! ;)The Amorous Armadillo Complaint ThreadTroutFace said:fyredrygyon said:TroutFace said:fyredrygyon said:So I finally managed to get to look at the Ocean Queen dragon and she's gorgeous. I may have to buy her on Friday for use as my sea drakes. How big is the model compared to a M6 model, Woolytrout?I'm stuck at work right now, but as soon as I get home I'll load 'em both up and pop out a render. I'll PM you when I put it in the thread so you won't have to keep checking.
It's about an hour and a half before I leave, then add an hour or so for the commute home.
I never checked the sizes, otherwise I could tell you right off... :red: :red:
That's cool. I know I can resize n stuff but I'm just a bit worried that the extras might not resize well. Also are there wing morphs? I saw that the use dynamic and assume that means poser but I use Daz, which is why I'm hesitate to buy (other than the dreaded wait for payday)
Also you and I are in the same time zone so I'll just assume 6ish, ok?
I'm in lovely and uber-hot Tulsa, OK - Central Time. I leave at 4:45pm, catch the bus at 5:05pm, then show up at home - depending on the bus - abut 6:30pm. Just watch after that as putting some size comparisons together will be the second thing I do when I get home (the first is getting a beer, lol)!
Not sure about the wings - I just wanted the main body + wing skeleton, so I'll have to experiment., I use DS 4.6 so we're in the same boat there... :blank:
Yep, get off work at 5, get home about 5:30ish. Sometimes later if fiancé has to run back to office after getting me or we have a gym session
The Amorous Armadillo Complaint Threadfyredrygyon said:TroutFace said:fyredrygyon said:So I finally managed to get to look at the Ocean Queen dragon and she's gorgeous. I may have to buy her on Friday for use as my sea drakes. How big is the model compared to a M6 model, Woolytrout?I'm stuck at work right now, but as soon as I get home I'll load 'em both up and pop out a render. I'll PM you when I put it in the thread so you won't have to keep checking.
It's about an hour and a half before I leave, then add an hour or so for the commute home.
I never checked the sizes, otherwise I could tell you right off... :red: :red:
That's cool. I know I can resize n stuff but I'm just a bit worried that the extras might not resize well. Also are there wing morphs? I saw that the use dynamic and assume that means poser but I use Daz, which is why I'm hesitate to buy (other than the dreaded wait for payday)
Also you and I are in the same time zone so I'll just assume 6ish, ok?
I'm in lovely and uber-hot Tulsa, OK - Central Time. I leave at 4:45pm, catch the bus at 5:05pm, then show up at home - depending on the bus - abut 6:30pm. Just watch after that as putting some size comparisons together will be the second thing I do when I get home (the first is getting a beer, lol)!
Not sure about the wings - I just wanted the main body + wing skeleton, so I'll have to experiment., I use DS 4.6 so we're in the same boat there... :blank:
Daylight -how to createprixat said:Those tiny extra steps to more realism are very subtle.Which UE2 mode are you using?
I would use ILT.
Make the distant light a bit yellow.
Put a 1% shadow on that distant light.Put reflection on those windows.
The lawn edge and brick path needs a bump though it may not show at this distance.
The path needs some unevenness and dirt.
Turn some of those plant pots round so they look random.In terms of composition, a large part of the house is featureless!
Bring the camera angle down a bit, crop out the top of the house.
The central part of the garden where the camera seems to be looking is empty, what is the main subject of this shot?I use UE 2 base.
How to put reflection ?
Daylight -how to createThose tiny extra steps to more realism are very subtle.
Which UE2 mode are you using?
I would use ILT.
Make the distant light a bit yellow.
Put a 1% shadow on that distant light.Put reflection on those windows.
The lawn edge and brick path needs a bump though it may not show at this distance.
The path needs some unevenness and dirt.
Turn some of those plant pots round so they look random.In terms of composition, a large part of the house is featureless!
Bring the camera angle down a bit, crop out the top of the house.
The central part of the garden where the camera seems to be looking is empty, what is the main subject of this shot?Orderly Chaos - Just a Bowl of GelatinOroboros said:What you're really after is collision physics, which Bryce doesn't have.Failing that, I think a judicious amount of the Solo tool will help cut down the 'noise' factor of arranging the cubes.
Start by layering the 'bowl' level cubes as you see fit. Put them on angles, go crazy, have fun, because no-one's going to see the bottom layer (other than the camera-facing cubes) so there's no point stressing about it.
Copy all those cubes and raise them both above, and to one side, of the originals. (Generally I do this with this sequence: Select Cubes, Group, Copy, Paste , Edit Attributes, add 10 to both the X and Z position coordinates, Ungroup. You may wish to select your floating cubes again at this point and copy paste a few times, to get more cubes.)
So now you have a pool of floating cubes you can drag into position. I offset them from both X and Z to allow me to use the preset orthographic views (`1234) for quick views without the floating cubes interfering with my central view. I also find that placing the Director in 'Center to Selection' view is the most useful view.
Select a floating cube. Also Select, say, 3-5 bowl cubes in close proximity. Click the Solo button.
All that should be visible now are the selected cubes. This should greatly cut down the wireframe noise when dealing with multiple objects. When you're done with the area you're working on, click the Solo button again, reselect a new area of bowl cubes and go again.
EDIT: Just by way of interest, Andrew Price of BlenderGuru.com created this short, entertaining tutorial on Blender's Rigid Body Physics settings that seem very appropriate for your needs, CT :)
The video was, as you said, entertaining. I started watching, and said to myself, "This isn't what I'm doing at all." I don't even have Blender, but I still watched the whole thing all the way through.
However, after looking at a few real pictures of gelatin cubes, (such as the one below), I realized they have too much character to simply duplicate them. I started looking at pictures like this because of what you said about the bottom layers not mattering. They are transparent, so I thought perhaps that's not true. In fact, the bottom layers do not matter, as the picture below shows. Those will be duplicated, and laid out without regard to their intersecting. The top parts are going to be placed one cube at a time, and I will add character to each one. Some will have corners missing, some will look bent, some will be shorter or longer, some will be dented, there will be a lot with ridges on their sides, etc.. They will all be larger than the ones I started with. It's going to be a royal pain in the bowl. I'm going to finish though ... someday.
PICTURE BELOW IS A REAL IMAGE ... NOT A BRYCE RENDER. It's not my work, but a Corbis image.
Daz 3D is part of

Connect
DAZ Productions, Inc.
7533 S Center View Ct #4664
West Jordan, UT 84084Licensing Agreement | Terms of Service | Privacy Policy | EULA
© 2026 Daz Productions Inc. All Rights Reserved.