-
Face Transfer 2
Thank you for sharing your experiments! So the one created by FT1 is the one one the left hand side, looking straight at the pictures - am I getting this right? Weird, would have thought it the other way round! Also, are you not getting the 'eyeballs wrong size and wrong position'-problem when converting the figure with Manfriday's converter to G9? Or how did you handle that here?
Thanks again, I wish you would publish something like a tutorial on FT and also on how you create these amazing source figures in AI.
The one from FT1/G8.x -> ManFriday -> G9 is the one on the left in the head-on shot. The one created in G8 has the narrower head shape. In the profile shot, you can see she has the more sharply defined lips and chin, which is the result of the Face Transfer Shapes that I applied before converting the shape. (FT2 is better out of the box in that regard but could still use a nudge. And yes, I did some rudimentary testing of applying the FT1/ManFriday head shape to the FT2 shape, with mixed and inconclusive results which I'm still pondering.)
There are definitely issues in G9 converted figures with fit and tracking of the eye. I'll revisit that and see if - on further testing - I have any nuggets of wisdom to share.
Thanks for clarifying! I now bought FT2 as I got it down to something like 18 bucks, which I thought was very reasonable. Will hopefully find time to play with it on the week-end. I think I will also try the AI sites you mentioned for some source material.
If any nuggets are forthcoming in your own testing, please do share! Let's appreciate/discuss today's new releases - ongoing thread
I really love the looks of the "Dragonhide PCS for Genesis 9 Bundle". And the same is true for the previous iteration.
I had these things in my cart at least a dozen times, but they never lasted until checkout.
And here is why:
I can`t wrap my head around the question, how a pilot would fit and/or act in its inside.
In my mind it does only work as a robotic iteration or if one would scale it up several times and place a full size cockpit in its head.
The only types of humanoids i could imagine, who would fit in such an armor, would look like these:
(EDIT: or could be the arch-enemy from that Tank Girl movie )
And this just doesn`t work for me. It would be sth. that i buy and most likely never make use of.
If anyone who owns the products could provide some renders with a human in front of the armor to get a more precise impression on how it would translate
it would be very much appreciated.EDIT 2: this picture is not meant to violate the owners copyright, but to explain the situation (educational purpose if one may say so)
and i DO LIKE the bundles a lot! I just wish there would be an option to morph them towards a more realistic(?)/reasonable(?) shape
Genesis 9, Inflating Cloth in Marvelous designer 11 (Solved)If you import it with no patterns from that product, there won't be settings of particle distance ~~
I just don't know why... unless you name the product that I can check if I have it for a test...
Edit: Actually, if you wanna make an FBM on this item for a G9 character, you don't have to sim it in MD with G9 avatar or morph target. Instead, you may do it in DS, by using dForce modifier, with a lower Contraction-Expansion Ratio, then export / import via Morph Loader Pro, that'll also do.
Genesis 9, Inflating Cloth in Marvelous designer 11 (Solved)from a product.
Skin offset and particle distance has no effect.
And I shouldn't change the particle distance, cos the geometries will change, and I can't import it back as a morph.Genesis 9, Inflating Cloth in Marvelous designer 11 (Solved)What do you mean by "make a morph of other people clothing" ? You import clothing from DS into MD and simulate it based on a G9's avatar ?
How does the "inflating" look like ? sort of collapsing ? (with unwelded mesh...?) Better post a screenshot.
Genesis 9, Inflating Cloth in Marvelous designer 11 (Solved)I use MD 11 to make a morph of other people clothing.
But recently I use genesis 9. And everytime I simulate a cloth in MD 11 on Genesis 9 avatar, the cloth inflating very much.
Do you know how to not make the cloth inflating on G9?
Face Transfer 2tsroemi said:
paulawp (marahzen) said:
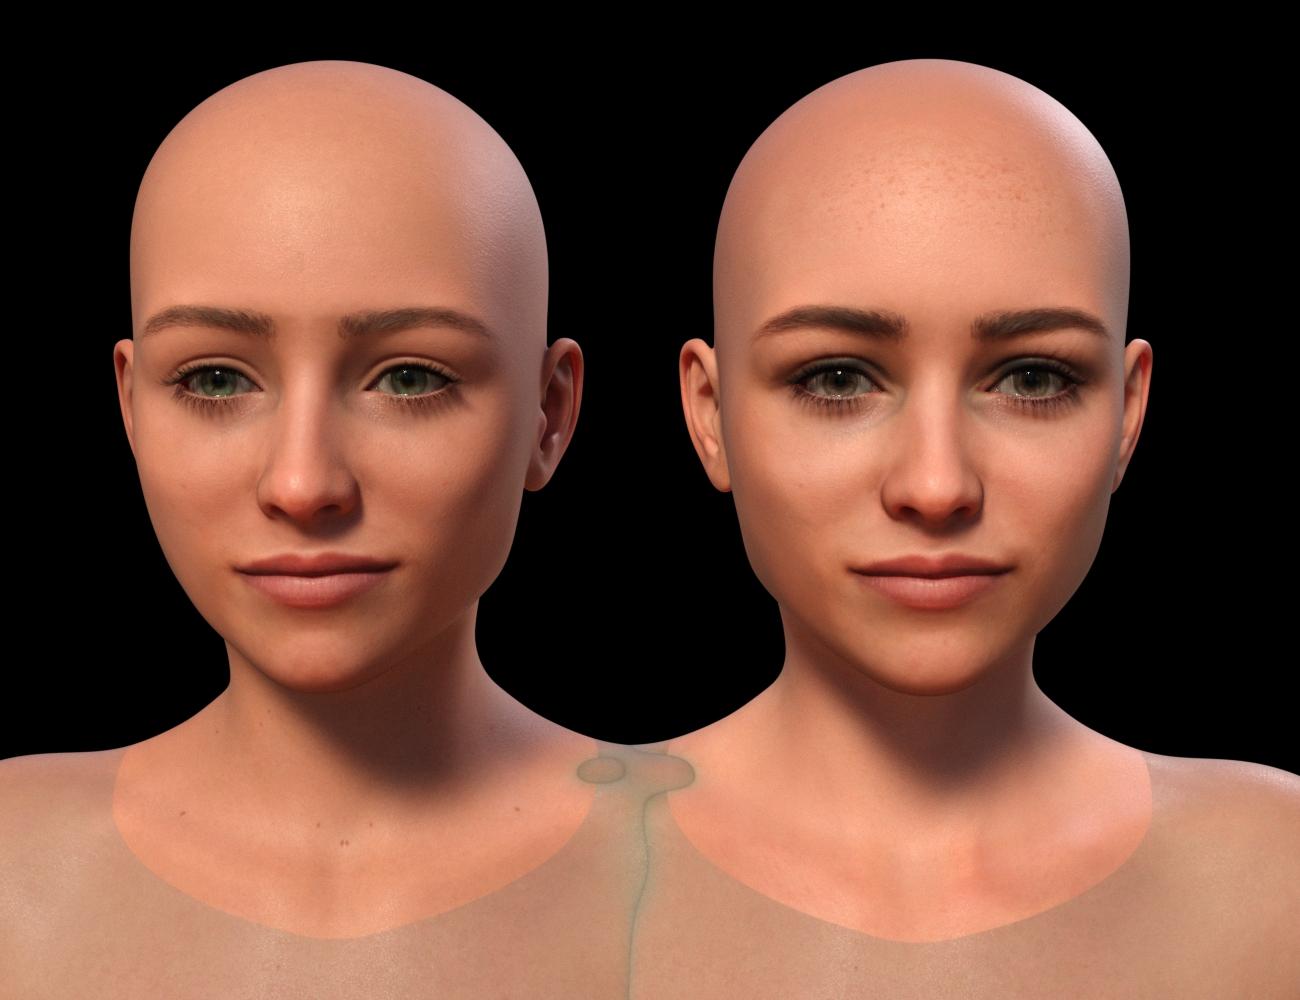
I figured that it was worth sharing this experiment. This is a comparison of the shape created by original Face Transfer to that created by Face Transfer 2, on G9s with the texture created by FT2. The shape created by FT1 was created on a G8.1 Female, to which I applied Face Transfer Shapes at about 70%, and also fixed the head and neck to more closely approximate a stock G8.1 figure. (FT1 makes heads that are too small - I would create the FT shape, then load a second stock G8.1 figure and twiddle neck length and head propagation scale until the FT figure was approximately correct compared to the stock figure.) I then used ManFriday's converter to convert that shape to G9 and create a dial for it. The FT2 shape is just FT2 + Base Feminine as you get when doing a FT2 with "Feminine" selected. The one with blue eyes is the one that came from G8.
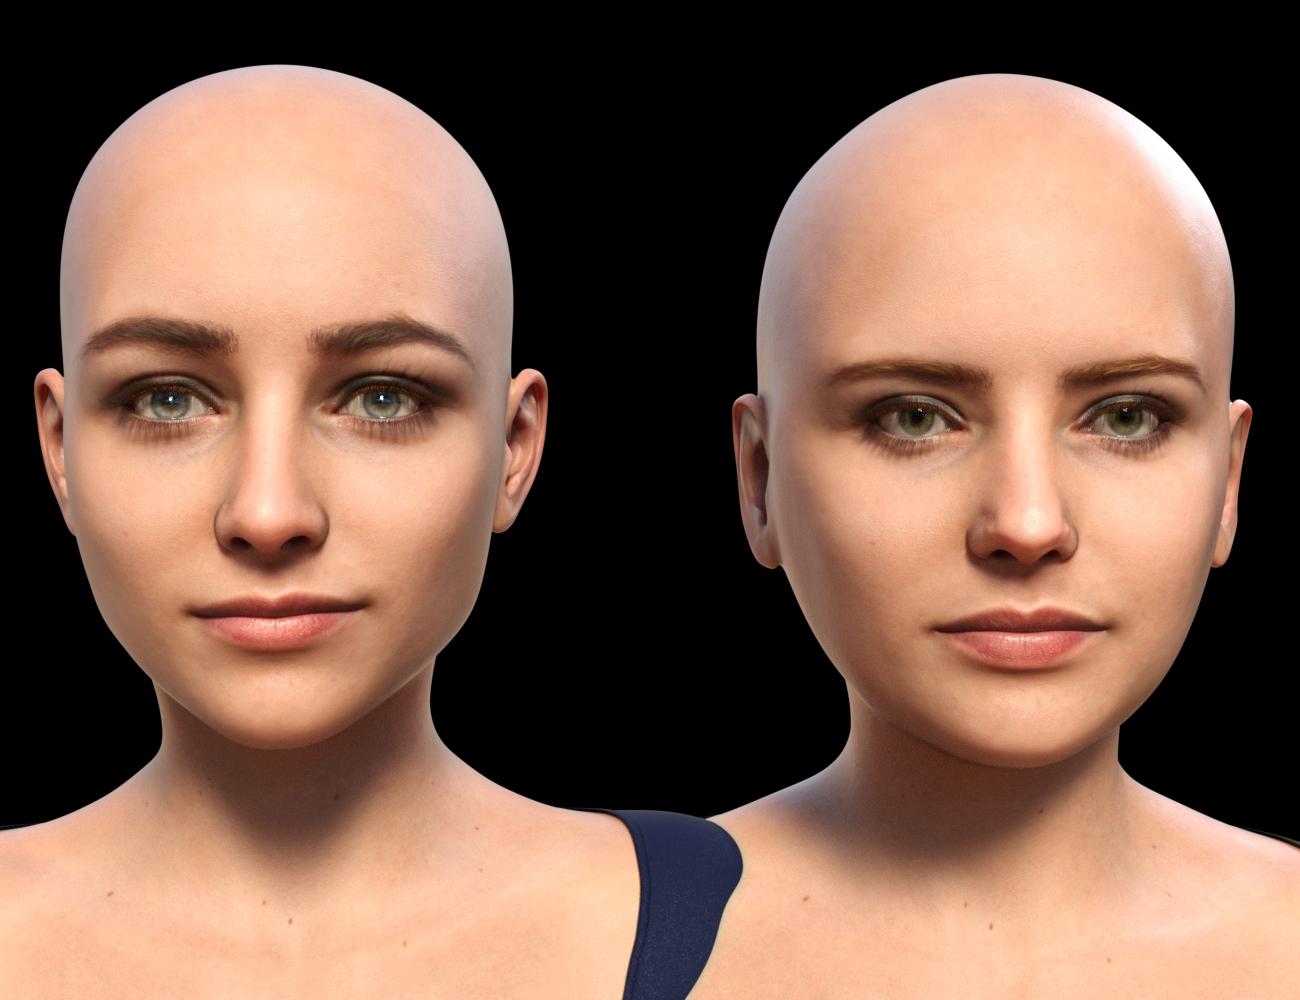
Seeing them side by side makes me suspect that while I am still testing all options - which include more than just Face Transfer - FT2 may end up being my choice. It gets rid of that oval android head shape that I have never liked in G8. However, it would be nice to have a bit better lip and chin definition and as others have noted on this thread, there is a problem with FT2 ears. Some are better than others, but the best are not great and sometimes they are downright deformed and unusable.
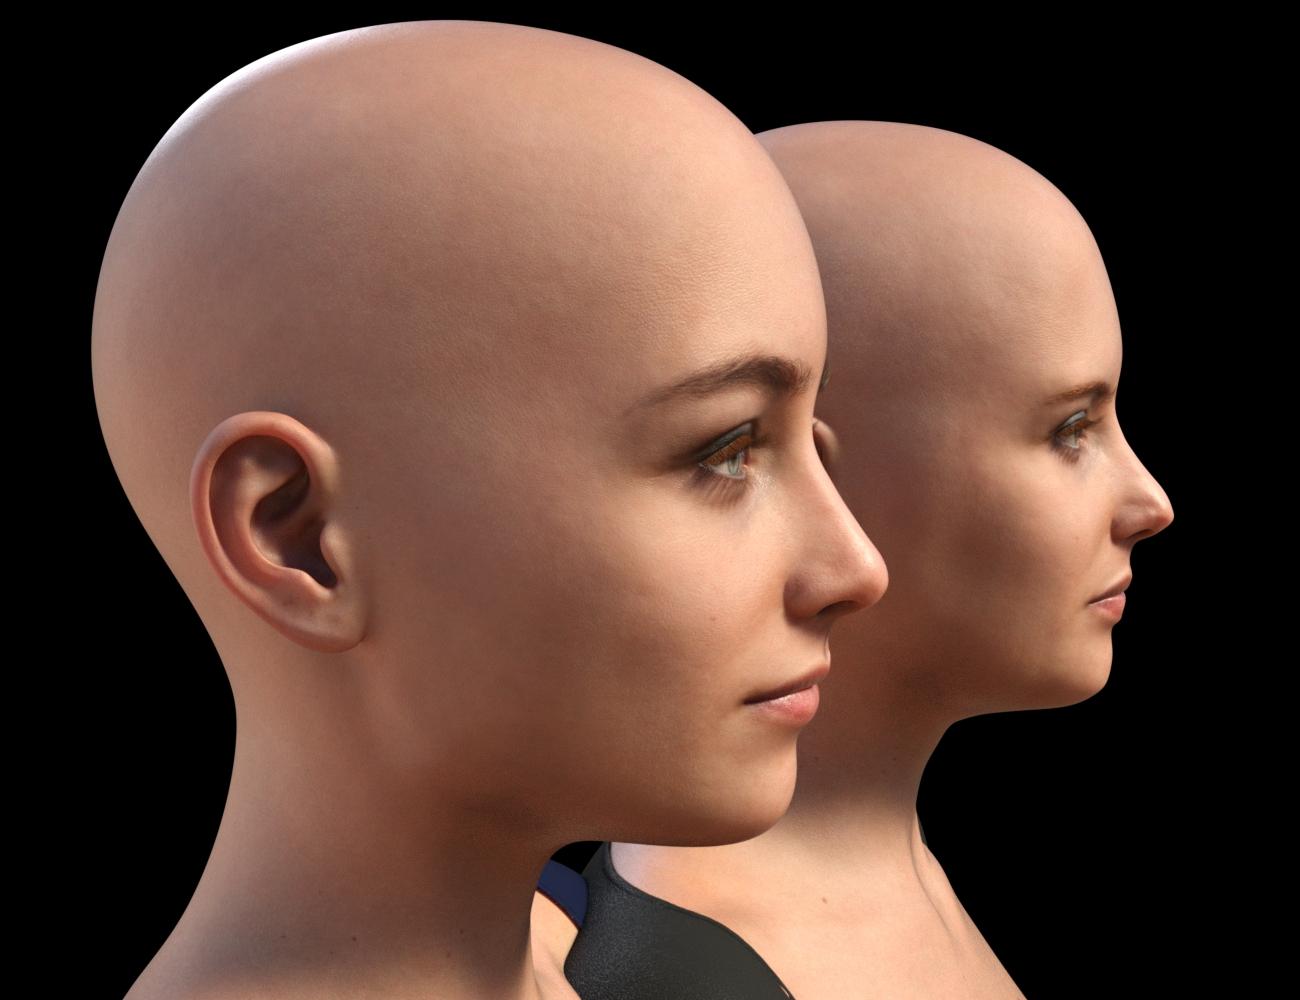
Thank you for sharing your experiments! So the one created by FT1 is the one one the left hand side, looking straight at the pictures - am I getting this right? Weird, would have thought it the other way round! Also, are you not getting the 'eyeballs wrong size and wrong position'-problem when converting the figure with Manfriday's converter to G9? Or how did you handle that here?
Thanks again, I wish you would publish something like a tutorial on FT and also on how you create these amazing source figures in AI.The one from FT1/G8.x -> ManFriday -> G9 is the one on the left in the head-on shot. The one created in G8 has the narrower head shape. In the profile shot, you can see she has the more sharply defined lips and chin, which is the result of the Face Transfer Shapes that I applied before converting the shape. (FT2 is better out of the box in that regard but could still use a nudge. And yes, I did some rudimentary testing of applying the FT1/ManFriday head shape to the FT2 shape, with mixed and inconclusive results which I'm still pondering.)
There are definitely issues in G9 converted figures with fit and tracking of the eye. I'll revisit that and see if - on further testing - I have any nuggets of wisdom to share.
What's the proper way to split head/body morphs on a character shorter/taller than the default?If you need a head morph on the base figure with Attenuate by HeadSplit dFormer, you shouldn't have scaled down the figure's "height" by dialing any morph related to Scale, Height, Proportion Height... etc. i.e., keep the figure's height with no change before exporting to OBJ.
What's the proper way to split head/body morphs on a character shorter/taller than the default?I made a morph for G8.1m and it works fine with the full body. I then split it using the headsplit deformer and it does work but it sinks the head into the character's chest (the full character is shorter than default). How can I avoid that and will the same solution work for the body only morph?
Face generator now loads G9 figures... any way to default to Gen 8?https://www.daz3d.com/forums/discussion/662091/face-transfer-2#latest
If you have a Genesis 8 figure selected then face Transfer will use that, if you have no figure selected it will default to creating a Genesis 9 figure. Face Transfer 2 does not stop Face Transer from working, you are not forced to buy FT2 is you do not want it. There is active discussion in the release threads for Daz Studio https://www.daz3d.com/forums/discussion/665996/daz-studio-pro-beta-version-4-22-1-41#latest , https://www.daz3d.com/forums/discussion/656716/daz-studio-4-22-0-x-pro-general-release#latest and (in the wrong forum, of course) in a thread on Face Transfer 2 https://www.daz3d.com/forums/discussion/661746/face-transfer-2#latest
Face Transfer 2Artini said:
I like the character made with Face Transfer 2,
but do not like dark stains on the face and light border on the upper lip.
I haven't seen so much of that in FT2. What was the source image?
Face Transfer 2I like the character made with Face Transfer 2,
but do not like dark stains on the face and light border on the upper lip.
Face generator now loads G9 figures... any way to default to Gen 8?I got the latest update of Studio out of habit, and I don't see much change except Genesis is a non-binary figure not compatible with Genesis 8. With Face transfer, it automatically loads a Gen 9 figure even though I have no intentions of abandoning the massive resources I have collected foe Genesis 8. I further learn that to continue to use Face Transfer, now I have to spend $35 to upgrade to a second liscense. I know the secret to making money in DAZ is to make previous genesis figures obsolete so you have to buy all the same stuff all over again for yet another figure, it's been a bane since DAZ replaced Genesis with Genesis 2. However, I do not feel I should have to forced into Genesis 9. To be frank, defaulting new FT characters to Genesis 9 may be a slick marketing move, but infuriating since the plug in for Genesis 8 that I paid for is now useless. Is there a way to detect if a liscense has been purchased for Genesis 9, and if none exists, to default to Genesis 8, or have a preference dialog that you can choose which figure to load when loading a new Face transfer character?
Gen 9 body shapesAs below - You have to buy some morph packages if you don't sculpt the figure yourself, for instance
https://www.daz3d.com/genesis-9-body-shapes
https://www.daz3d.com/easy-shape-master--age-control-and-shape-tuning-for-genesis-9
Merry Christmas to everyone that hangs out in the Daz forums ...Matt_Castle said:
WillowRaven said:
Awesome, lol ... please tell me how you got hotpants on the horse end and what elements went into this amazing scene.
I created clone shapes to fit Genesis 8 and 9 clothes to the centaur - the process has more steps and manual intervention than auto-fitting, but it gets the job done if you're prepared to crunch through it.
Some things, like cutting holes to fit trousers to the front of the centaurs (here messing around with Lyoness's Tinsley Outfit) are a lot more involved and require use of Blender to make changes to the geometry, but just fitting stuff to the hindquarters isn't massively more complicated than reshaping it and then running it through Transfer Utility. (Although I'll often go in and cut a tail hole even then).
As far as the other one, I list most of the assets I used on the gallery link.
Way too much work for my needs, but so much fun to look at. :)
Face Transfer 2paulawp (marahzen) said:
I figured that it was worth sharing this experiment. This is a comparison of the shape created by original Face Transfer to that created by Face Transfer 2, on G9s with the texture created by FT2. The shape created by FT1 was created on a G8.1 Female, to which I applied Face Transfer Shapes at about 70%, and also fixed the head and neck to more closely approximate a stock G8.1 figure. (FT1 makes heads that are too small - I would create the FT shape, then load a second stock G8.1 figure and twiddle neck length and head propagation scale until the FT figure was approximately correct compared to the stock figure.) I then used ManFriday's converter to convert that shape to G9 and create a dial for it. The FT2 shape is just FT2 + Base Feminine as you get when doing a FT2 with "Feminine" selected. The one with blue eyes is the one that came from G8.
Seeing them side by side makes me suspect that while I am still testing all options - which include more than just Face Transfer - FT2 may end up being my choice. It gets rid of that oval android head shape that I have never liked in G8. However, it would be nice to have a bit better lip and chin definition and as others have noted on this thread, there is a problem with FT2 ears. Some are better than others, but the best are not great and sometimes they are downright deformed and unusable.
Thank you for sharing your experiments! So the one created by FT1 is the one one the left hand side, looking straight at the pictures - am I getting this right? Weird, would have thought it the other way round! Also, are you not getting the 'eyeballs wrong size and wrong position'-problem when converting the figure with Manfriday's converter to G9? Or how did you handle that here?
Thanks again, I wish you would publish something like a tutorial on FT and also on how you create these amazing source figures in AI.Face Transfer 2Very nice, but FaceGen costs a small fortune, so I stick with Face Transfer 2 for now
and hope for the improvements in the future.
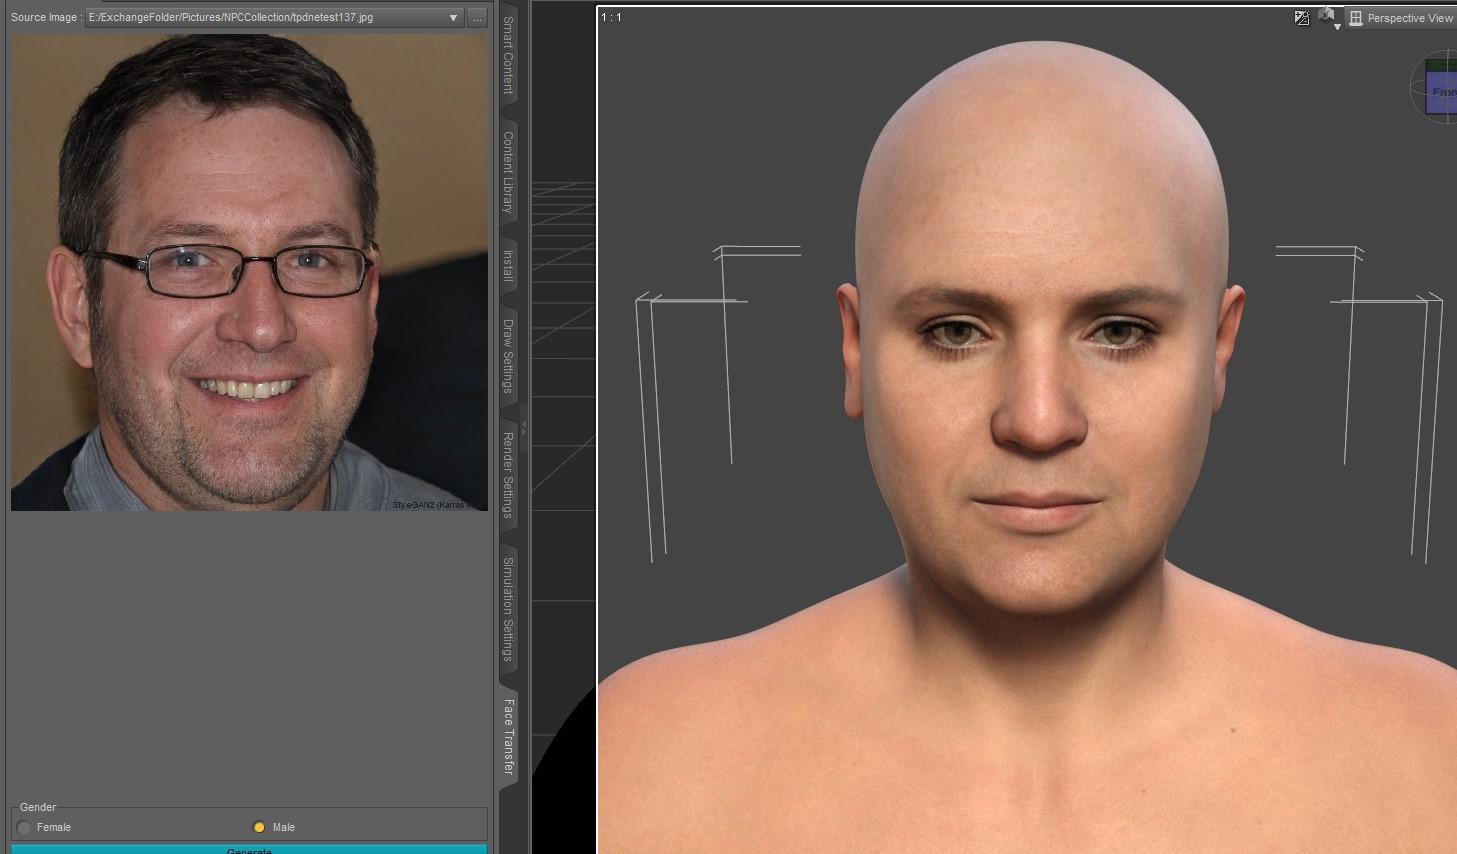
Face Transfer 2I just did some specific tests on these topics:
1) Chest hair on default male
This is the untouched output of what is created when I create a male FT2 figure with the source image that created the example of my male character a couple posts back. If you look closely, there are a few hairs. They're there - but considering the magnitude of what I've learned to do with Photoshop in my FaceGen/Face Transfer experimentation over the last two and a half years, this is a trivial fix to me.
1a) While showing this, it was worth sharing this "Less Ideal Example." I still think you're best off with a better source image, but this shows the immediate output from using FT2 on this source image that has important issues. FT1 faithfully puts that open-mouth smile, the facial hair and most of the glasses onto the texture it creates. You could not use this as a source image for FT1.
2) As noted, FaceGen allows you to select source skins:

The "Color -> Custom" tab allows you to select base maps appropriate to the generation in question. The "Color -> Daz" tab - for G9 - would offer the G9 stock skins 1-4. I experimented a lot with this. I found that there is a difference but it's not as huge and dramatic as you might expect. This example shows two stock G9s, to which I applied the ManFriday-created shape* as noted in my previous post above. I then put the stock G9 Feminine 1 skin on both, then replaced the base and translucency with the base created by FaceGen and - in this specific set of examples - translucency files I created with settings I was testing at the time. The one on the left is the stock Daz G9 1 feminine skin and the one of the right is based on a skin from a commercial character. (The Body on both figures is still using the stock Feminine 1 skin.) (* That means that these are FT1-sourced shapes from G8/G8.1.)
2a) And yeah, sure, you can use FaceGen-sourced textures on a Face Transfer character. I spent all summer and fall experimenting with my FT1-sourced shapes, converted to G9, with G9 FaceGen textures. This is the first time since I started testing FT2 that I put one of those textures on a FT2 shape. This is the FaceGen skin on the figure at right, above, the commercial skin with some freckles on the upper forehead. There might be some weirdness around the lip. This is obviously a different lighting choice than above and I've also tried to tone down the translucency a tad. I haven't done much experimentation with it yet.
 Face Transfer 2
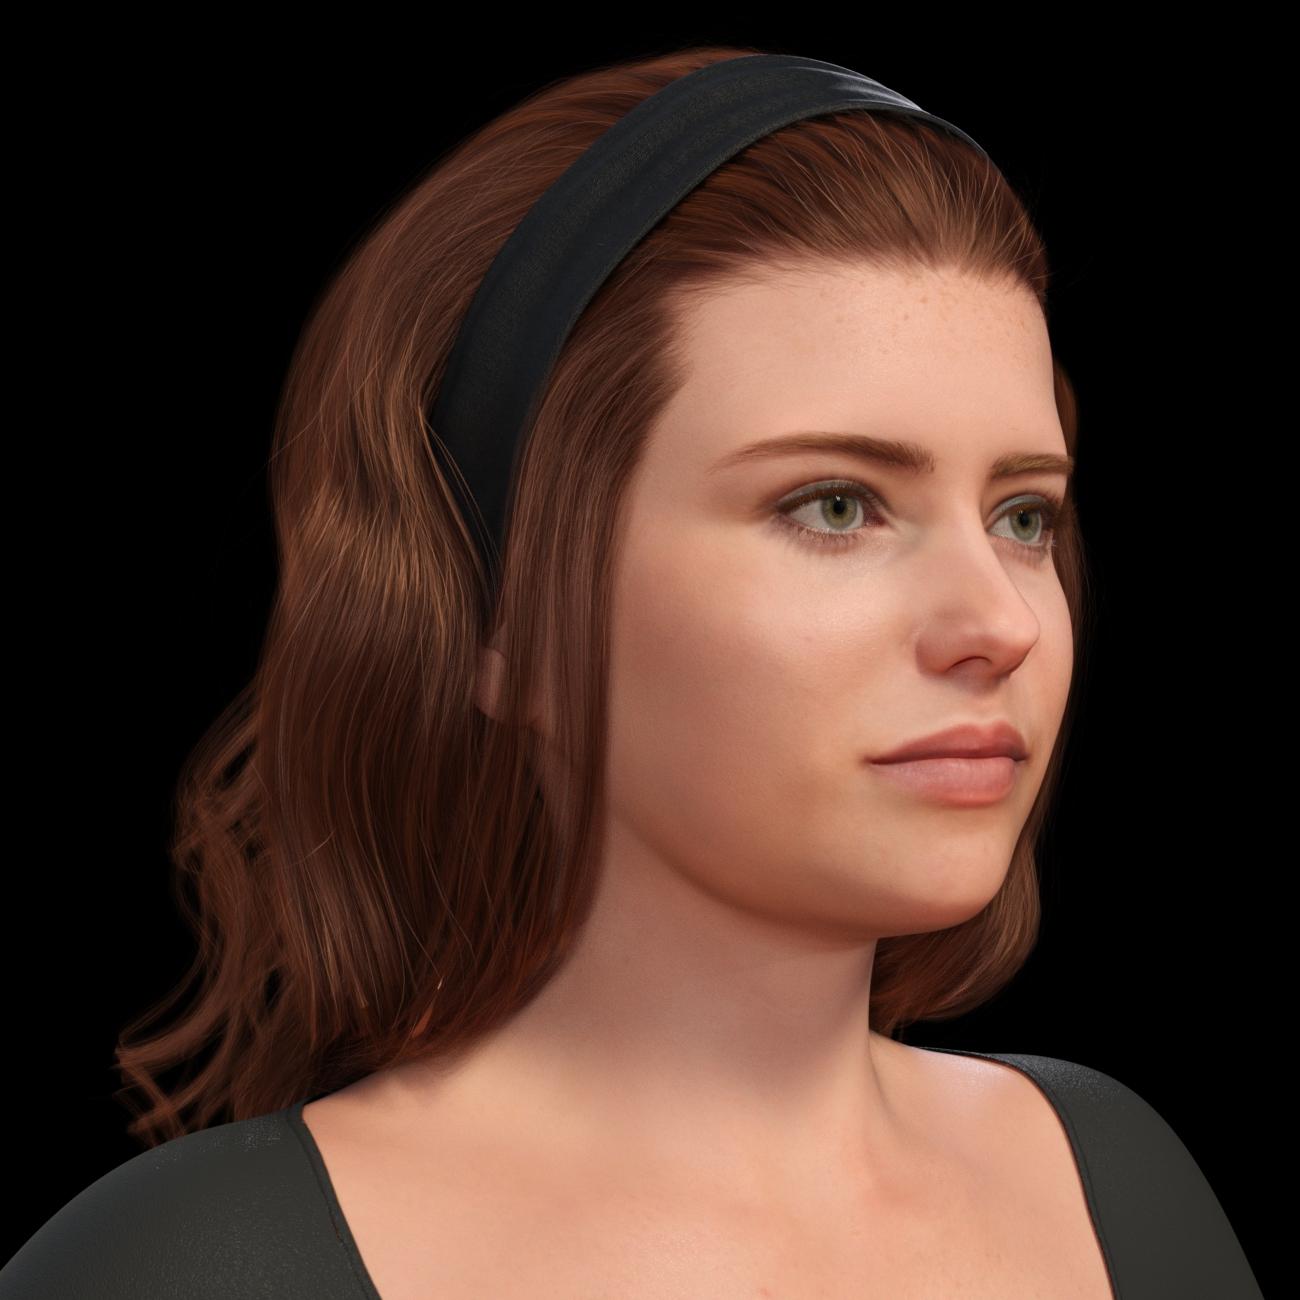
Another creation made with Face Transfer 2.
 The best 3rd party software to create animations for Daz?
TheMysteryIsThePoint said:
Dartanbeck said:
And now that crosswind turned me on to Mesh Grabber - I ain't leaving Studio!
Much like making my animation control dials, I can make specific changes to any mesh - even after its been simulated in either dforce or VWD, turn that into a new dial and animate that - and continue to do these things any time I feel the need! So Cool!!!
Body2Hip makes all of my Mixamo downloads work as aniBlocks of the same data
Bone Minion Bundles have made every single animation pack I've ever bought compatible with every single Daz Figure generation I use - which is all of them from M4/V4 through Genesis 8.1
aniMate 2 allows me to save bits and pieces of motion capture data into their own partial aniBlocks that I can blend in anywhere
LimbStick helps me tell my stories my way, along with aniMate 2's incredible Parent Constraint - one of the things I used to dream about LightWave was it's parent constraint system - now I have pretty much the same thing!
VWD lets me add jiggle and simulate clothing that is too stubborn for dforce
dForce lets me have really cool hair and simulated cloth
I don't care what anybody says - I really like Iray! But then again, I have the unfair advantage of having HDRI Photoshoot by joelegecko. Oh... wait... anybody can get that. Oh well.
Before DaVinci Resolve came bundled with Fairlight and Fusion, I had the standalone free version of Fusion and I was starting to get somewehere with it.
When Blackmagic Design bundled it into Resolve (which used to be just a color corrector - but one of the best in its class) they gave it an interface that made it a Lot easier for me to get started on. I'm still a total newb with it, but I love it! Fairlight too!!!
Hi DB, I know that you know what you are doing and have found a workflow that works for your purposes, so feel free to ignore me because you can't argue with "It already works".
But like you, one of my main protagonists has long, curly, usually unruly hair. I think it is based on the same asset you use for Rosie. After trying for a VERY long time trying to get hair sim with collisions working in Blender and failing utterly, I looked into other solutions. Houdini did not find long curly hair much of a challenge and it pretty much just worked, even with the character wearing a tight headband. But after getting through both Pierrick Picault's "The Art of Effective Rigging" and "Alive", as well as some other YouTube video of his, I realized that you don't have to simulate everything... you can just rig things. For that Linday hair, I eventually settled on this. You might want to play around with it... you might appreciat the additional control you get with it. But yeah, man, I'm with you on hair sim in Blender, it's not ready for Prime Time. But I hear they're working on getting a GPU accelerated, realtime solution.
There's no way I would ignore you!
But even if I did, this is really, really cool!!! I would love doing that over having to simulate. 3DU's Spring Dynamics can't quite do that because it doesn't detect collisions. So while we can use it to give things nice natural motions, that's what they are - motions. They'd just pass through geometry withouyt seeing or feeling a thing.
I started working on a similar idea - but from my very lack of knowing how to do such things! LOL
I was trying to make a Carrara version of the long curly hair that I could manipulate by hand. I spent way to long before finally just using dForce - and that worked! LOL
It's tricky, but we can manipulate the outcome of the simulated hair using Mesh Grabber. To keep it from stretching and messing up the mesh too badly, I use large envelops and move a lot of it with each pass - and only by a little bit at a time. I've done some and failed miserably too - so we have to be careful.
My favorite method to use would absolutely be something exactly like this link you gave me! So Cool! Did you say you got a working version of it going with Long and Curly Hair? Because that's when things get tricky because we don't have any room in between anything. So we have to stop thinking along the lines of strands that can avoid each other - and figure out how to treat it as a blanket made of ropes with springs on them.
A friend and I spent months trying to get it working in VWD. As close as he got, it just kept turning out results further and further from what I actually want.
The cool thing about Mesh Grabber for this kind of hair is the fact that it can do such a quick Save to Dial out of what we do with it. Don't like it? Reset the dial. Bam.
So I label these dials by the frame number I make them on, with an alphabetical suffix in case I need to make a fix in that same spot. So "Downward115A" would be a common dial name for me, and it's only for that scene - not saved to the figure.
When I do want to save them as a reusable asset, I make a new wearable rather than to assign the morph to the full product. These things get weighty - especially if it's saved with a simulation.
Daz 3D is part of

Connect
DAZ Productions, Inc.
7533 S Center View Ct #4664
West Jordan, UT 84084Licensing Agreement | Terms of Service | Privacy Policy | EULA
© 2026 Daz Productions Inc. All Rights Reserved.