-
What's Next [coming soon] [Commercial]
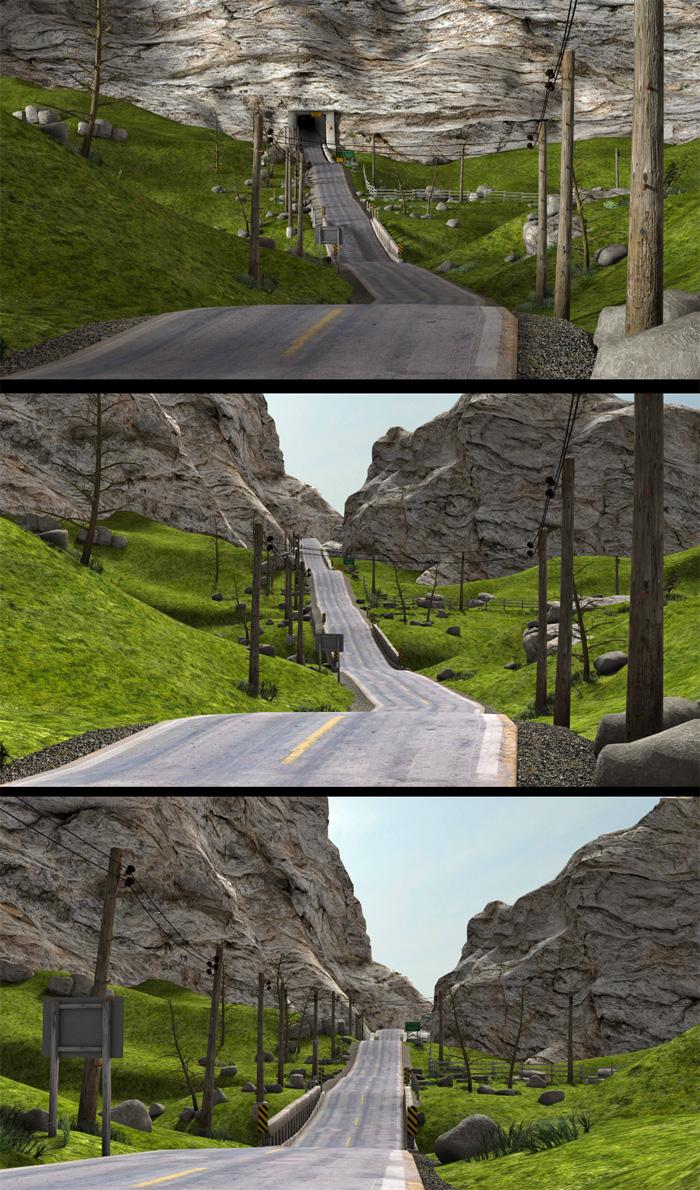
I had a question in PM regarding the Rural Crossroads set, whether or not the tunnel can be removed, and if the side roads can be hidden. The sideroads have their own material zones so they can be hidden in the surfaces tab by setting Opacity = 0. The tunnel is connected to the central mountain slope, so if it gets hidden or removed, there is a big void there, but luckily there are a couple additional mountain slopes on either side, that are individual props, which can be repositioned and rotated in the y-axis giving the illusion that the main road continues into the distance.
please note: used the Secluded Shoreline 3DL lightset for these renders.
 Gia 7 Thread
I loved Gia 6.
Again, the face has (almost) no personality, contrario to previous generation (6) where each babe was clearly identifiable.
But...
Positive side: the skin and the morph are wonderful. really. At last a really white person (likle caucasian in central europa or slavonic/slavic ).
In the bundle, there are at least 2 superbs items: UMA is AWESOME. And at last, we have a good ponytail. (do you know that it is the favorite hair of men for women? ). The geneva hair seems really nice. The node of the ponytail is a bit big. But we waited 7 month to have a decent ponytail (not as good as my 2 fav ones)
The Doctor Appreciation threadYes I agree that all of the greeblies would kill the poly count, and yes, it was those central consoles and the basic room layout itself that screamed "potential TARDIS design". A toned down version of the set with few to no greeblies would work for a custom TARDIS interior for people to decorate as they please, though, given that the set does feature passageways branching off (like they showed in the older Classic Who episodes, leading to the other TARDIS rooms).
As for your confusion about the room being the Death Star "office", I initially had the same feeling back then, and wondered why it wasn't in the film. Given that I had the pre-recorded VHS tape sold in stores back then (IIRC it was one of the very first cassettes we had for our "new" VCR back then) and watched it many times over the years, I eventually realized my mistake, which is a shame, the set would've fit in perfectly in the movie, if not on the Death Star, then at the Yavin IV base. Thanks to Facebook and TubeOffline, I now have that "Making of" special on my 2TB portable HD.
Target Helpers?I think the problem is that I don't understand the animation you want,. i've tried to ask if you can describe the motion of each part, or the whole thing, since that would help us to understand what you need to do to get that type of animation. ....but I think we'll get there, it's just a frustrating process at times.
The basic construction is correct,. but in the example of the tentacled beastie,. the model would be a simgle object,. rather than separate limbs unconnected to the body
it would have a central HIP, and all of the tentacles would come from that,.
that's what i meant by selecting the mesh and then you can detach the bones from it,
You mentiond that the Blue and Red sections were constructed with multiple cylinders,.
Try making these as single objects, rather than grouped structures.,.. Unless they are supposed to flex and move,... in which case each of thoise would require more bones.
bear in mind that the bones (once attached) have an influence over the vertices of the mesh object. and parts of your current mesh may be outside of that influence
this envelope of influence is normally adjusted in the vertex modeller,. using the Weight painting tools (another reason you should use a single object)
think of the bones as a magnet which influences the object
I think you're getting the Hip/foot thinnk just fine,. I think the construction of the object should be a single object
Have a look at this ,. https://dl.dropboxusercontent.com/u/7907045/Bones.car
now, i'm unsure whether you want the vertical stubs (Bone3 and Bone5) to be freely spinning around the main part,. If so,. then thse parts should be made as single objects without any bones, and simply parented in place on the main item.
If you want to connect Multiple versions of this object together,. then Bone2 and Bone6 can be either parented to, or use track, to follow the bones on another version of this.
Hope it helps
The Doctor Appreciation threadAs it has been 39 years since I saw that special, I somehow convinced myself their setting was that small Death Star "office" where R2 discovered the location of the Princess. Obviously, I was woefully confused.
Given the interior designs we've seen since the '96 movie, my following assessment doesn't carry as much weight, but personally, I find that set far too "greebled" . I guess what caught your eye was that central control station and the fact the floor bordering its plinth is a hexagon. I guess the overall "white" scheme resembles the "classic" console room. One thing you can't deny, modeling all those components and would send the polygon count through the roof!
Still, I want to thank you for posting that link. I have not seen that special since it debuted in Septemember 1977, over 39 years ago! Being 14 at the time and living with a grandmother on a fixed retirement, I couldn't afford the early videotaping technology that existed at that time. But I did use a cassette device to make an audio recording that I played many time over the next few years. Eventually, I either lost the tape or I wore out the media; I can't remember which. This is certainly a pleasant stroll down memory lane!
Sincerely,
Bill
Enjoying vertex modelling in DAZ CarraraI have a current project in which I will be using a simple shape and a curved polyline so I will show an example from that. I made a mistake but I think the steps might still be helpful. (My mistake was using an edge instead of an interior, which I will be fixing later). It is not a screw, but maybe the concept will still be recognizable.
I am modeling a pair of moccasins. Here is an example of using a simple shape and a sweep path to get a start on some laces. I will be using the central flaps of the moccasins to help define the sweep polyline path.
1) Modeled a pair of low poly moccasins (then copied all the polygons of one shoe mesh)
2) Inserted an new vertex object to be the laces for a moccasin. Pasted the shoe mesh that was copied in step 1.
3) Used construct : oval, and then reduced the scale to a tiny size, which is the circumference of a shoe lace.
4) Chose the curve tool from the polyline menu. Chose the preset that I wanted (pipeline) Then started at the top of one flap and crisscrossed points back and forth down the shoe flaps, and then back up.
5) Selected the oval. Chose Construct : Sweep. Carrara prompts for the polyline sweep path. Clicked the crisscrossed curve that I just made.
6) Carrara swept the oval along the path, but off to the side. No big deal, I selected the new mesh and translated it to the correct place.
7) I deleted the duplicate moccasin mesh, the oval and the polyline.
So, this will work as a concept, but I forgot to make the holes for the laces to go through, so I will have to do it over.
How can Victoria stand in those high heels?Honestly? if you gave me a pair of 6 inch heels and a pair of those stupid "ballet flat" things and told me we'd be walking for the next 4 hours, I'd take the heels, at least with the heels it would take 3 hours before they really started to hurt with all those stupid flats it takes about 10 minutes. 4 inch heels and my feet will be fine all day
(Seriously for some reason every single shoe company has decided that, to make up for the shoes being flat, they have to be extra narrow and all cut across the widest part of the foot)
I'm not claiming heels are great, just that flats are perfectly capable of sucking far more. Did you realize most flats have pretty much no padding? because they mostly don't which is something you quickly realize when you have a gravel driveway.
In conclusion, flats were created by the devil to give me blisters and make the back of my ankle bleed. Down with flats.
I used to do a whole lot of walking in my last job, which I held for 15 years. I did Contract Services for The Royal Parks in Central London and Outer London, so could find myself walking on a variety of surfaces. As I was management level it was a business suit. I settled for around 1½ - 2" heels, not too thin. they were the best for me. Kitten heels when it was business suits with a skirt, sometimes chunkier heels if I wore a trouser suit..
How can Victoria stand in those high heels?It's not just DS outfits that wouldn't work in real life. I was happily rendering the Regency Cottage as part of a period piece until I noticed that it didn't have a chimney. In the days before gas central heating, I can only imagine Regency Vicky kept warm by snuggling up to Regency Mike, and that she ran round on high heels so that he could catch her more easily!
Where in the World has the Forum Gremlin gone Now? Complaint Thread..well the biggest Powerball (1.6$ billion) is history. there were three winning tickets one in California one in Tennessee and one in Florida.
I don't know, but it seems that whenever we get a large jackpot, more often than not the winning ticket tends to be from Florida. I'm beginning to wonder about this. True, Central Florida is known as Lightning Alley but I don't recall any history of meteor strikes there (the most recent occurred in west central Russia but no winning ticket there yet) and I haven't heard of any resident of the "Sunshine State" drowning in their dog's water bowl (though Miami has seen more frequent flooding as of late).
California I can understand as it's a large and heavily populated state. But why seemingly always Florida? Why not New York, Pennsylvania, Texas, or Illinois (or crikey, even here in Oregon, we could use some "Powerball Love" here too).
...The Why Does Someone in Florida Always Keep Winning My Powerball Complaint Thread?
Importing .BVH file from iPiSoft questionsHello Everyone,
I'm currently using: Daz Studio 4.8 Pro on Windows 10 and iPiSoft's Mocap Studio 3.2.5.193 without the Biomech license.
I've setup a single camera Kinect 2 system to record mocap thru the iPiSoft products and then save them to a .BVH file format. Which I'm currently trying to import onto a model within Daz Studio. From a T position I've recorded data where I bend my elbow 90 degrees upward into a wave and back to T position with one arm, then lift each leg in a stationary walking action twice, followed by a second wave with the opposite arm. Daz Studio is showing the leg movements very nicely, but the wave actions are barely moving the hands and showing no arm adjustments.
The import process seems clear cut enough. On a Genesis 3 model (Michael) I've expanded the details screen for the BVH Importer Options. and compared the file nodes to the figure nodes. Here are the comparisons:
LowerSpine = Abdomen Lower
MiddleSpine = Abdomen Upper
Chest = Chest Upper
RClavicle = Right Collar
RShoulder = Right Shoulder Twist (I've tried remapping all the following Twist options to the equivalent Bend option with no visible difference)
RForearm = Right Forearm Twist
Rhand = Right Hand
LClavicle - Left Collar
LShoulder = Left Shoulder Twist
LForearm = Left Forearm Twist
LHand = Left Hand
I've left the Scene Animation Setup Options as Adjust Scene to Match the File. I'm just running the model at the moment, nothing else loaded into the scene.
It did occur to me that perhaps the Genesis 3 model was too advanced (before I looked at the detail maps), so I tried a Genesis 2 model as a control. It performed a bit better in that it tried to bend the elbow, but it moved the forearm forward instead of upwards.
Any thoughts? I'll attempt to attach the .BHV file on a follow up post in case anyone wants to test with it. I do plan to expand my camera system to a dual camera setup in order to get better positional data, but I would like to be able to show a simple demonstration what a single camera system can do to my fellow K-12 staff members next week.
Christopher Waltner
District Network Engineer
West Central School District 49-7
Ethnicity quistionFrom various Dictionaries
Caucasian In the racial classification developed by 19th-century anthropologists, Caucasian (or Caucasoid) included peoples whose skin colour ranged from light (in northern Europe) to dark (in parts of North Africa and India).
Caucasian Relating to one of the traditional divisions of humankind, covering a broad group of peoples from Europe, western Asia, and parts of India and North Africa.
The Caucasian race (also Caucasoid[1] or occasionally Europid[2]) is a taxon historically used to describe the physical or biological type of some or all of the populations of Europe, North Africa, the Horn of Africa, Western Asia, Central Asia, and South Asia.[3] The term was used in biological anthropology for many people from these regions, without regard necessarily to skin tone.[4] First introduced in early racial science and anthropometry, the taxon has historically been used to denote one of the three proposed major races (Caucasoid, Mongoloid, Negroid) of humankind.[5] Although its validity and utility are disputed by many anthropologists, Caucasoid as a biological classification remains in use,[6] particularly within the field of forensic anthropology.[5]
Ethnicity quistionEven within the Caucasian grouping there's a lack when it comes to the DAZ females. Most of them seem to be Scandinavians, Central Europeans and Russians. While there's a distinct lack of Mediterranean, Arabian, Semitian, Persian and Inuites among the whiter girls. We've finally got some Indian looking ones the last years though. (then I'm talking New Delhi, not Lakota, there's no Native Americans available.)
The 3D joke is on me.
Hi mostly anonymous viewers :-)
I'm thinking of starting a service where I e-mail my cartoons out every morning - in my time zone (CAT = Central African Time) = GMT +2. These would be the mobile-friendly version and they'd be in a format that you could forward them to other people (for those that actually know people ... ). Anyway it would be using a service that has an automatic subscribe / unsubscribe function. If you'd rather read them in that format the sign-up is here: http://www.outerspacetv.com/subscribe.html
Thanks for looking.
Curly toed slippers for Genesis1?Hi. When I saw your question last night I assumed you meant backless slippers.
I've been searching for Genesis Middle Eastern/Central Asian footwear for about 6 weeks.
The only 3 slipper/soft shoes with curly toes I've found are:
https://www.daz3d.com/princess-asia
Where in the World has the Forum Gremlin gone Now? Complaint Threadgrey goop can't be pretty, unless it has sparkles in it?
wanna playyy with carrara skies and animating clouds.
still haz some ravenskull to render,.was thinkin put the halls around a central courtyard, mebbe merlin's secret garden
January 2016 New User 3D Art contest “Composition” (WIP Thread)Tone mapping can help, I very often have the ISO between 200 - 400 for interior scenes, but like @evilded777 pointed out above creating some meshlights/softboxes to fill out the lighting can really help out without having to mess too much with tone mapping - the interior scene below has a single 4x2 trough light for the corridor from IG Iray Lights and Shaders - Architectural Lights, 2 scounces in the room from an iRay lighting props pack, a central ceiling light from the iRay Architectural Lighting rig and a HDRI from Skies of iRadiance - Night Sky HDRIs for Iray (set to 0.26 intensity) for light from the (unable to see them!) windows. I was pleasantly surprised at how the lighting turned out as I was happy with the setup I just let my lighting test render run to this result.
 ISO: Central Park-like set
Actually, its for a series of renders. I need a top view of the park, to kinda show the fullness of the park. Then i need a more concentrated side view to show a side perspective of the first. Then i need a even more concentrated view like a walkway path. I think i can "cheat" and just use an image of the first, since its primarily just an overhead, setup shot, but i need a set to duplicate the other two scenes. The last scene is the most involved and will include a number of figures and props. I was hoping i could acomplish this with one set. All of which happens at night time.
Blooming Alley is a very nice set and very comparative to some other images Ive seen of Central Park, but it doesnt quite fit the bill for what i need.Based on the first reference photo you shared, you may want to consider looking into http://www.daz3d.com/kaleidoscope to help flesh out whatever set of distance-viewed trees and greenery you wish to use. Kaleidoscope is one of those tools that has a bit of a learning curve but will save you from doing a lot of tedious instancing and postwork yourself. I've never tried it with animation but it works well for stills.
Unfortunately, I don't know of any single set that can do all that you'd want to capture in the other two reference photos. An enterprising vendor might take notice of this and eventually put out a product based on large public parks such as Boston Common and Central Park but in the short term it looks like kitbashing is in order.
Im trying a number of ideas to pull this off. Maybe even scaling back some of the original scenes i planned and changing it up a little. This is for a 5-6 panel scene and purchasing multiple sets for such a small set of renders i think is becoming impractical. Im hoping i could pull off the distance scenes with a little postwork with existing images and props; and just worry about the ground scene with what I have, or free ground plane props and add some trees, maybe a background (maybe both) and call it a day.
-MJISO: Central Park-like set.
Unfortunately, I don't know of any single set that can do all that you'd want to capture in the other two reference photos. An enterprising vendor might take notice of this and eventually put out a product based on large public parks such as Boston Common and Central Park but in the short term it looks like kitbashing is in order.
And if they do the price may be very costly.
At least one vendor has made such a set but the price is astronomical: http://www.turbosquid.com/3d-models/manhattan-district-block01-3d-max/988862
ISO: Central Park-like setActually, its for a series of renders. I need a top view of the park, to kinda show the fullness of the park. Then i need a more concentrated side view to show a side perspective of the first. Then i need a even more concentrated view like a walkway path. I think i can "cheat" and just use an image of the first, since its primarily just an overhead, setup shot, but i need a set to duplicate the other two scenes. The last scene is the most involved and will include a number of figures and props. I was hoping i could acomplish this with one set. All of which happens at night time.
Blooming Alley is a very nice set and very comparative to some other images Ive seen of Central Park, but it doesnt quite fit the bill for what i need.Based on the first reference photo you shared, you may want to consider looking into http://www.daz3d.com/kaleidoscope to help flesh out whatever set of distance-viewed trees and greenery you wish to use. Kaleidoscope is one of those tools that has a bit of a learning curve but will save you from doing a lot of tedious instancing and postwork yourself. I've never tried it with animation but it works well for stills.
Unfortunately, I don't know of any single set that can do all that you'd want to capture in the other two reference photos. An enterprising vendor might take notice of this and eventually put out a product based on large public parks such as Boston Common and Central Park but in the short term it looks like kitbashing is in order.
ISO: Central Park-like setActually, its for a series of renders. I need a top view of the park, to kinda show the fullness of the park. Then i need a more concentrated side view to show a side perspective of the first. Then i need a even more concentrated view like a walkway path. I think i can "cheat" and just use an image of the first, since its primarily just an overhead, setup shot, but i need a set to duplicate the other two scenes. The last scene is the most involved and will include a number of figures and props. I was hoping i could acomplish this with one set. All of which happens at night time.
Blooming Alley is a very nice set and very comparative to some other images Ive seen of Central Park, but it doesnt quite fit the bill for what i need.Daz 3D is part of

Connect
DAZ Productions, Inc.
7533 S Center View Ct #4664
West Jordan, UT 84084Licensing Agreement | Terms of Service | Privacy Policy | EULA
© 2026 Daz Productions Inc. All Rights Reserved.