-
How to autofit keeping the rig?
You need to use Transfer Utility, for tail (modeled for gen2) convert for Genesis with original rigs and weight (tail part)
you seems have clone which can use to convert figure of genesis2 to genesis1 (then auto-fit work)
you can use the clone shape to transfer rig and weight by transfer utility. with merge hieralchy option.
though I do not check each option of transfer utility at current,, I test with creature bundle tail for gen2M then ,
then transfer weight and rigs from genesis (cloned shape) to the item with merge hieralchy option.
now ihe tail seems almost ift genesis hip, then can move well.
(I do not remember each option detail ,,eg Resepct hidden facet how work, or Projection option ,,
But this item is actually geo grafted item,, then,, I may need more tweaking to convert it for gen.
(may modify mesh, then change it new geo grafted item for gen mesh, and transfer weight etc from current tail)
How to make a light from inside the object and cast shadow on the surface?LOL
The reason is: rendering time. I have one HP workstation Z230 with:
- HP Z230T – Intel Core i7-4790 – 3.6 GHz Processor
- 16GB ram
- HP NVIDIA Quadro K620 2GB Graphics
- 1TB 7200 RPM hard drive
I was testing Iray with GTX960, 16G RAM and A6 6400K 3.9GHz CPU and the rendering time was tooo long, more than 30 minutes per frame so for 3 min animation 30fps would take 2700 hours or 112 days.
Trying Nviadia Cloud Rendering failed, it won't work easily with Daz3D and there is big buttle neck: each frame is around 200MB so it is around 1.08Tb - how to transfer quickly that amount to remote server?
So I decided to go with CPU rendering only as is lower cost comparing to GPU.
Now, I have network drive with frames(RIBs) and workstation with Puppy Linux(30% faster than windows) and 3Delight processing each frame around 3 minutes or less - acceptable
NEW! Novica & Invited Guest Contributors Tips & Product Reviews Pt 6I had to laugh at the "look, he's taking another bite" one. That is EXACTLY what it looks like at dinner time in my house. Hubby and I sitting down to eat dinner, and we'll look down and both the cat and the dog are just sitting there, staring at us, watching us eat and doing the 'puppy dog eyes' (even the cat does it) like they are absolutely starving and have never been fed in their lives and how mean we are to be eating in front of them and not giving them any. :rolls eyes:
Vintage Aviator has 3DL regular materials but rendered in Iray, did NOT apply the UberBase Iray materials.
Wanted to share this thread with you just for giggles. Someone posted to ignore the thread and bring on the cats, but it was the dogs, aka, golden retriever image that made me giggle. I can just HEAR them saying it, and I had a golden retriever who scarfed up my dad's ham sandwich (with the last two pieces of bread, it was so funny!) when Dad went to answer the phone. (Back in the 70's when we all had home phones. Remember that?) He came back after only a minute and the sandwich was GONE. Look at MistyMist's post.
In another OT link, enjoy what this slow motion team does with a Fire Tornado. (gets interesting about 1:30) Check out the rest of their channel, really neat.
Coming up: Alfred with Mathew Hair. Will post here in a few minutes. Also wearing Alternate Identity which went on without any problems (which is good, looking at the morph list. I don't have a problem with limited morphs if the outfits FIT.)
NEW! Novica & Invited Guest Contributors Tips & Product Reviews Pt 6Recommend: FW HD Alfred for Michael 6 and Mathew Hair, Alternate Identity.
Vintage Aviator has 3DL regular materials but rendered in Iray, did NOT apply the UberBase Iray materials.
Wanted to share this thread with you just for giggles. Someone posted to ignore the thread and bring on the cats, but it was the dogs, aka, golden retriever image that made me giggle. I can just HEAR them saying it, and I had a golden retriever who scarfed up my dad's ham sandwich (with the last two pieces of bread, it was so funny!) when Dad went to answer the phone. (Back in the 70's when we all had home phones. Remember that?) He came back after only a minute and the sandwich was GONE. Look at MistyMist's post.
In another OT link, enjoy what this slow motion team does with a Fire Tornado. (gets interesting about 1:30) Check out the rest of their channel, really neat.
Rating: Recommend
Alfred with Mathew Hair. (I don't think it looks anything like the promos. Like it MUCH better.) Also wearing Alternate Identity which went on without any problems (which is good, looking at the morph list. I don't have a problem with limited morphs if the outfits FIT.)
BTW, I like when vendors don't make teeth ultra white, but be sure and check his teeth with your lighting. One of the surfaces is a pale yellow and I had to lighten/whiten his, which is the opposite of what I normally have to do. Alfred is a winner! Anyone render Ragnar yet?
EDIT: That hair does have Slosh's UHT Iray hair shader applied.

 February, 2016 New User 3D Art Contest “Lighting” (WIP Thread)
This is the adjusted rener where the pointlights been moved abit closer to the middle kids to give them brighter view, I also rufflrd the boys hair as much as the hair morph control provided.
Morph Loader Pro for propsHi Szark,,, I think,, you may need not any ERC if you only need controller (as delta morph)
and need not tweak it in property hieralchy pane without You set other ERC .
(then your pic is correct to set ERC as delta add, (default of morph loader)
to make controller of moprh, by morph loader)
just import morph.obj by morph loader,, as same as Figure.
it should auto-generate new controller.
(as you mentioned,, just keep vertex order,, and keep poligon count)
But if you hope to change controller type as boolean "on" "off" switchhc,,etc
you may need to tweak and edit them with edit mode and property hieralchy pane
(eg make new controlelr , then multiple it , if you hope to do it,, I may discribe,
step by step all,, (if you need,,)

the pics is one simple way to, produce morph switch property, for "morph", with simply ERC
Question about David 3 for GenesisThanks for the tips, fool. That is probably more work than I'm going to invest because I don't think there are any characters that are important enough to me to warrant that kind of work. But still, it's good to know. I did buy it today, BTW. And the ethnic morph packages for Genesis. With the discount and a coupon, they were only about $1.50 - $1.80, each.
February, 2016 New User 3D Art Contest “Lighting” (WIP Thread)This is my last render for the evening. I decided to get the lighting right while I play around with creating morphs to fix the coat. I found that the texture I chose for the captain just wasn't working for him. It seemed flat and obscured some of the detail. So I replaced it with another and am much happier with it.
Then I struggled with some dark shadows on the captain I didn't like. Most notably is his finger casting a shadow on his chin/neck that looks weird. I used several linear point lights w/o shadows to soften the vertical shadow on his sleeve and bring in a little more light to his face. I tried a point light between his hand and face, but either the shadow was still too dark or his face became too light. Here is a limitation of 3Delight - a light addition won't make a shadow go away as in real life. I had to settle for an ok medium and decided I will do a little postwork to soften the shadows.
I discovered that the bishop was hidden in the shadow of a rook, so I played with the arrangement of the black pieces on the right so that the bishop is now prominently lit. I raised the light in the lamp to showcase the pieces a little more.
I can't twist the lamp any more, because it results on unwanted shadows on either the sailor or the captain. So with maybe a little more tweaking, the light is about where I want it. I have some nice backlighting from the moonlight I like.
Never mentioned the title, but this is "Bishop Takes Queen."
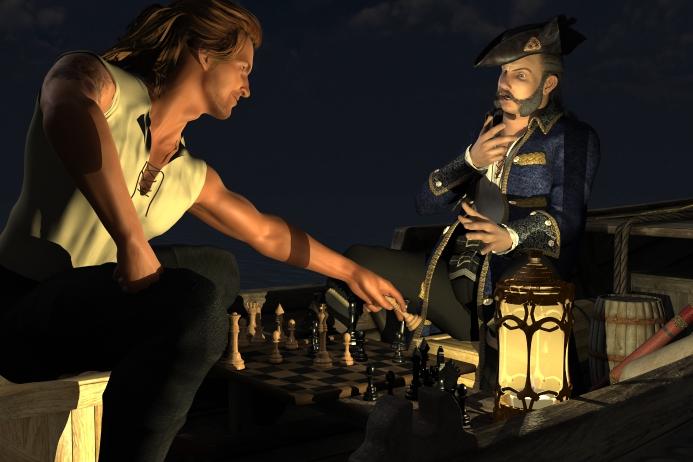
Great expressions. I love the smug look on the sailor's face and the look of dismay on the Captain.
I noticed in your early shots showing us the setup that the water has slight ripples. Perhaps a slight tilt to the camera angle to tell the viewer that they are on water? Or maybe tilt the boat slightly either towards or away from the camera?
The water came with the Jolly Boat, and has a surface morph so that the inside of the boat isn't flooded. So there is no way to turn the boat, and I have the camera angle the way I want it. But I do agree that the water needs to be brought out.
The water prop is pretty small, but I also have Ocean Wide, which is what I wanted to use in the first place, but it "flooded" the boat. I'm thinking I could add Ocean Wide to make the horizon more distant and increase the water in the picture, but I will have to lower it on the Y axis so that it is below the bottom of the boat. I can play with the surface color of Ocean wide to blend it with the Jolly Boat water prop. I'm hoping it's dark enough so that there isn't a line where one ends and the other begins (possibly more post work).
I was planning on painting in the reflection of the moon along the water in post work anyway. The moonlight is coming from the port side of the boat. While I'm at it, I could also add some highlights here and there to bring out the ripples. Maybe a spotlight or two may do the trick for me.
Morph Loader Pro for propslol The thing is I still after all these years have no idea what ERC is or does, this is why I asked if it was a different process. So for argument sake say I have a cube and want to add a morph to it to deform it. I know they have to be the same poly count to make morphs. Oh and this is my reference guide
 Dynamic clothing tips
For some clothing that was designed for V4 when trying to use it on a different figure with significant difference in the shape (say Arabella 7 who is more slim than V4) I will start with the V4 clone morph dialed in and the character dialed out on Frame 0, do a single frame drape. After the drape, then do an animated drap where I dial out the V4 clone morph and dial in the character morph while also applying shrink to the panels. I found this really helps with collars and long sleeves from getting crazy bunched up or shooting off into space.
Morph Loader Pro for propsI have been gening up on making morphs and all I can find, tutorial wise, are for Figures and Clothing but I just need it for a prop I am working on. What difference would the process be. All I want to make is a deformation morph?. A single on or off or somewhere in between morph
Fit Control for Genesis3 (Commercial)So is there a way to transfer Fit Control only to selected items conforming to G3F? Or does it automatically transfer the morphs to all every time? I do a lot of tinkering with my outfits, so, if the pants and shoes are set, but not the shirt, I swap out various shirts. That means Fit Control propagates to all clothing, and I'm always deleting it from pants and shoes, 'cause I only want it on the shirt. Any ability to target where the Fit Control goes -- i.e., only into certain items?
--MW
SimTenero Randomizer OMG!!Keep in mind that none of the morphs that I selected in the randomizer have any direct or indirect impact on the values of those hidden fit morphs. This is not a case of randomized morph A controlling hidden morph B. The values of these hidden morphs are set when the hair is fit to the character in the first place, before the randomizer is even opened. Those hidden morph values were not changed when the randomizer was applied, so they should not have been changed when the Undo was applied. I hope this helps you identify the Undo problem.
Celebrity Look-a-Likes for 3D figures Part 2Looking for a Linda Carter / Old wonderwoman one to buy if anyone has seen any.
Looked everywhere and I can't find a single one. Would have thought this to be quite popular...
There's a free one at ShareCG http://www.sharecg.com/v/42665/favorite/21/DAZ-Studio/Diana-of-Thermyscria
I used the morph here http://fav.me/d9argpd, it looks better if not dialed to full 1 value
your heroines are amazingly well done.
SimTenero Randomizer OMG!!Thank you for the update. I'm sorry to report that Undo still does not work right.

I fit North Hair to Hachiro for Lee 6. I used the randomizer on North Hair. I selected Actor/Style + Movement morphs with the filter. I checked Randomize Selection, Zero Before Randomizing, and Use Limits. I Randomized Selected Morphs one time and then did Undo. The hair jumped up away from Hachiro's head when I did Undo. What I see in the Parameters pane is that the hidden fit morphs in the hair got doubled in value when I did Undo. Those morphs were not even in the set of morphs that were randomized, so I don't know why Undo affected them at all. For example, the hidden morph FHMLee6 was 44% before randomizing and 88% after Undo. I attached some screen shots of what happened.
Thank you for testing! The new fix applies specifically to default scale modifiers. As you know, any morph can be made to control other parameters as it's applied. I've tried to come up with a generic system for accounting for these connections, but the truth is, I won't be able to anticipate all of the many possible ways the connections could be made. That is to say, some morphs may still exhibit wonky undo behaviors, but I have tested with hundreds of morphs on a bunch of figures, and those effects seem limited to a very small fraction.
That said, I'll, of course, continue to work to improve Randomizer and if I can come up with a reliable way to apply the "undo" without affecting any potential controlled parameters, I will definitely do it.
Thank you again for for the feedback! I maintain a list of to-do items and this is super helpful! :-)
Question about David 3 for GenesisActually D3 maps on Genesis is easier than later figures as body one map and head another so only two zones
if you bake vertex colours in Blender or some other app and transfer
virtual penny 4 yor carrara thoughts ?You might wish to continue using Poser's cloth room and then import the cloth objs as morphs to be applied in Carrara, epecially for Aiko3. That is what I would do. There is a free python script somewhere to help with this workflow in animations.
Meanwhile, here is a link for a still image with a genesis character from Studio character creation to Poser cr2 and cloth to Carrara
http://www.daz3d.com/forums/discussion/comment/675785/#Comment_675785
- using poser as a cloth plugin for G2F and G2M in Carrara
Not surprisingly, with the G2 figures you can still use Poser as a cloth plugin for Carrara if you get the DSON importer working. This will be old hat for a lot of you, but one thing that I like is that you can still attach the posed prop to the skeleton within Carrara and make some additional changes to the pose, which you can't do if you just import the figure and cloth as an obj.
Here are the steps that I did.
Part I - creating and saving the character, clothing item, and pose to Studio, Poser, and Carrara
- in Daz Studio, I loaded a G2F character (Riven) and dialed some more morphs. I made sure to include some Stephanie 4 morphs to change height.
- use "save as" and save the adjusted G2F as a character preset so the shape can be loaded directly in Carrara later
- still in Studio, use "export" and save the G2F figure as a Poser CR2 fle.
- In Carrara, load the morphed G2F and model a simple dress tailored to the morphed shape
- Optional uvmap and make other enhancements if desired
- change scale to 1.042 and export the obj in Poser format
- Open Poser, locate the saved CR2 file, and load your custom G2F
- import your dress obj to Poser. It should fit the figure. Double check to make sure youdon't have poke through
- advance forward a few frames and pose your figure to what you want. Save the pose to your pose library
- use Poser's cloth room to drape the dress to the pose - make sure you like the results
- export the dress as an obj and reimport it to poser.
- add the posed reimported dress to Poser's props libraryPart II - using the figure and clothing item in Carrara
- Open Carrara. Load the morphed G2F figure from the character presets in the content browser
- Apply the pose from the Poser library runtime in Carrara's browser tray
- Load the posed clothing item from the Poser props folder. It should fit the posed G2F figure . If not, edit with vertex modeler.
- If you want to make some minor changes to the pose, you can still attach the dress prop to the g2f skeleton hip
- if there is poke through after attaching skeleton, you can edit in the posed position in animation mode (make 1 morph first), or edit bone influences, etcDaz Connect and a bundle...The generation 4 figures use ExP system to add morph 'hooks' to the base, this system requires that all morphs be installed to the same location as the base. DAZ Connect installs each product in its own sub folder under the cloud folder thus breaking ExP.
It is possible to animate a single figure with Genesis?hi john
Yes the eye blink is a morph,.just one morph which is either open or closed, as needed.
:)
Ragnar for Gianni 7 Available Now (commercial)I don't know if Ragnar has his own thread. If he doesn't he should if he does then go ahead and put this post there. But I ramble, this guy is so hot that I bought Mec4D Dragon Rider which I thought I already had, just so he can have all the facial hair. But what is the hair in the last promo pix, the tossuled sexy one? Is it a female hair?
Yeah, he has his very own thread... :) He's so damn cute. :D
That's actually hair from that "other" place. It's Ades Hair by Studio Art Vartanian.
The textures look atrocious in Iray, so I retextured it and completely changed the shaders. But otherwise it is good hair. And it has a fit morph for G3Males.
Daz 3D is part of

Connect
DAZ Productions, Inc.
7533 S Center View Ct #4664
West Jordan, UT 84084Licensing Agreement | Terms of Service | Privacy Policy | EULA
© 2026 Daz Productions Inc. All Rights Reserved.