-
Question on morphs: copy a pose morph and convert it into a shape morph, possible?
You have a pose morph for breast left up/down, so can I copy this morph and make a shape morph out of it so that I have the breast left up/down morph as pose morph and as shape morph, having it twice, means using the shape morph as RAW VALUE for example.
Question on morphs: copy a pose morph and convert it into a shape morph, possible?Yes. The attached viewport captures show the Breast Up Left pose on G3F (left), exported as an object then re-imported via Morph Loader Pro as a morph (right).
This is not what I meant
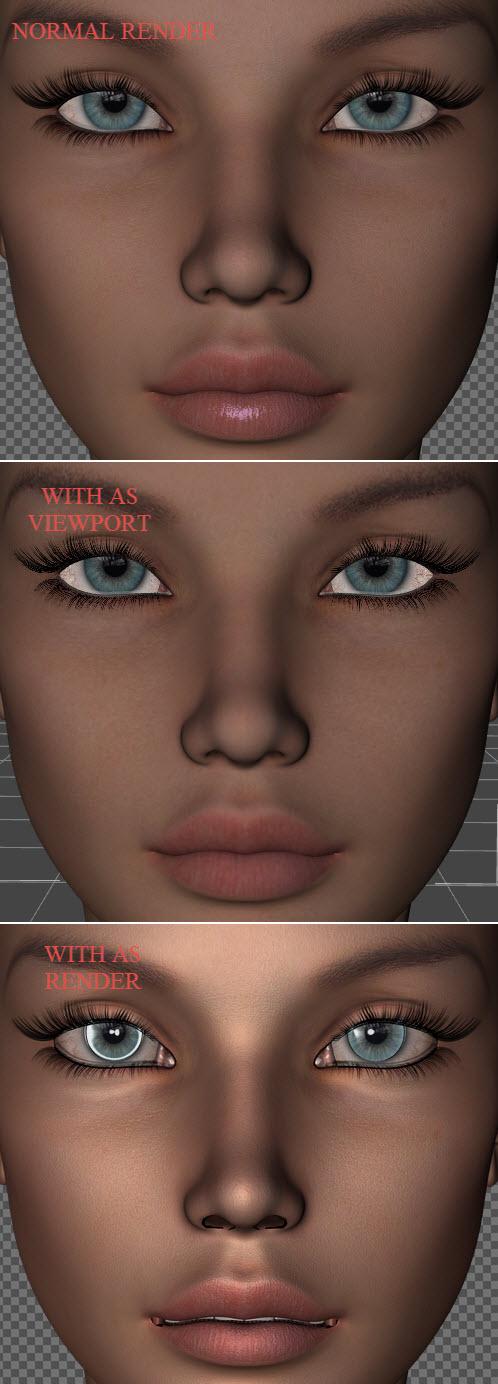
Amazing Skins - strange problemWas just testing a new G2F character and tried to apply Amazing Skins for G2F because the skin looked a bit dull. The result are rather odd though, for what I know it's just shaders but it's almost as if they morph the face. Nose gets smaller, and with some black stuff in the nostrils, and mouth is deformed. There's nothing unusual to see in the Viewport, it's first when I render that it shows up.
I've tried applying AS with the same settings to several other characters, it works fine with all of them, it's only this particular character that is distorted this way. Any idea what can be causing it? My guess is some UV map thing, but I'm not an expert on that stuff.
 NEW! Novica & Invited Guest Contributors Tips & Product Reviews Pt 6
I have the Wear Them All - Autofitting Clones and Clothing Smoothers for Genesis 3 Male, and did some promos with it a while back. I can HIGHLY RECOMMEND it. Works fabulous. Even with shoes - it's got a good pdf tutorial included with it and shows how to use smoothing etc for the nubbly bits of shoes :)
I've also got oot's Mega Wardrobe for Gen3Male but haven't really used it as yet! I'll give it a go and let you know if I recommend it (although I'm pretty sure I will)
Rich, can you render a few of the Dial-a-Girls? If I recall, you got the Genesis 3 product after I showcased all these separately for G2? I'm picking this up now I think. With 3 things i the cart, 60% may be worth peanut butter and jelly sandwiches the rest of the month, lol.
Other goodies in the 2015:
Since we do have more Gen3 Males now, this will let you use all the previous generation clothes on them- and I like that there are SIX morph adjustments.
Think of what you can do with the Mega Wardrobe and shaders!
I also like Specs Appeal, Space Station Living Quarters (missed that in Fast Grab a couple weeks ago, it changed while in my cart. I had forgot to check out, darn it.) Also may try Quiet Medium Hair (I think that would be AWESOME for kids) and same with Anny Hair.
What would you folks recommend?
NEW! Novica & Invited Guest Contributors Tips & Product Reviews Pt 6Tutorial: Victoria 4 For Genesis 2 Female- Putting Victoria 4 Materials On Genesis 2 Female. Creating A Custom Category For Them.
Ready for another tutorial? If you want to do conversions yourself, but want a bit of guidance (including how to set files up to zip along during the process) I am going to take you step by step. The only product I am using is the Victoria 4 for Genesis 2 Female. No batch or auto converter products. You only need to have the Victoria 4 UV to apply it to G2F. Because applying the materials requires a DUF format, we'll convert files and toodle right along. If you don't like going into the file structures/setting things up because you're not sure what happens and where to find things afterwards, this tutorial is for YOU. I've decided to name this Filephobia: 1) fear of messing up files 2) fear of not knowing how to work with files 3.) knowing you won't be able to find where things went once you piddle in the directories 4.) all of the previous.
Pick a Victoria 4 character. In Content Library (which we will use for this entire tutorial) try looking under Poser Formats>Daz>Pose to find them. They might be listed by character name or vendor name.
RE: your directory structure- you may be in C:/Documents and Settings/(name)/My Documents/DAZ 3D/Studio/My Library, or you may have it customized, but whatever you have, my main entry folder says Content> then I go to all the other files. If you do not have Content then don't worry about it, as discussed earlier in the thread last week that is an older setup. It's probably the equivalent of your My Library. Just know it's the main folder and all these others are going to be under it.
1. Be sure Victoria 4 for Genesis 2 Female is ALREADY INSTALLED. (If you load a G2F, you should have Victoria 4 under the UV Map choices.) TIP: Use Default Camera and set your focal length between 90 and 120. This will keep your objects from distorting when you do these extreme closeups. After you set the focal length, you can still scroll back out. That affects focal DISTANCE, not length.
Set up a folder for that character's DUFS. Go through your directory path mentioned above- to My Library>Materials and DO THIS: !!!CharacterName so it will stay at the top of the list. So if I am doing Ellie, the folder name will be !!!Ellie.
2. Load Victoria 4 in the viewport. I use 500 x 700 (they all shrink to the same size) as the heads fit nicely. The key thing to remember- when you make these dufs, it will capture the image in the viewport. You'll need to zoom in for the eyes for the eyes and makeups, and zoom in to the lips for the lips. Right now, put the entire head in the viewport. You don't have to have the top of the head or much of the neck. This is going to be for your "Base" image. One reason to make these look good is you might want to use these images / dufs when you do Genesis or Genesis 3 work in the future. Get in the habit of being picky about what's in the viewport.
3. Load your character (with morphs, even though they don't transfer, you want your character to look like her) with her skin (no makeup) Most of them are called "Base." Make sure you like the way she looks in the viewport. IT IS IMPORTANT TO HAVE HER WELL LIT. You may want to create a spotlight on her face from the front.
4. Go up to File>Save As>Material Preset and go to the folder we just made (Mine is Content>Materials>!!!Ellie) Save. When the list pops up, for your Base materials, leave everything checked. This means when you apply the Base materials, everything is a "clean slate" so to speak. BTW, what's nice- you won't have to find that folder for the rest of these, you will go there automatically.
5. Next, let's say Eyes (different eye colors) are next. Move your face in the viewport so you are zoomed in (and I mean ZOOM) on one eye. You only need one and it's important to get a closeup. Click and apply the materials. If I don't see things change, I'm in the habit of going up to Edit to see what the last step is that is showing. You will know right away if your clicking took, or if you need to double click again. Then Save As>Material Preset and name it (I use the same names as the original, except if it says 06 I usually do 6, etc.) Now pay attention because this is common sense but...
If you are doing Base, you want all the materials to change. You do NOT want that with eye color. Think about it- if you've already loaded up the lip color you want, and click an eye color, you don't want your lip colors to go Poof! back to the default lip color or whatever color you had on them when you did your eyes. You're going to have to deal with three sections: the skin of the face (makeups), the eyes (colors-Iris) and the lips. So here's what you do:
For Base makeup- that is supposed to reset EVERYTHING so leave everything checked.
For Eyes (color, that's Iris) you don't want your makeups to change so uncheck the skin of the face (it will say Skin Face or Face, it's slightly different when you do V4 and G2F) and uncheck Lips.
For Lips you don't want your makeups to change so uncheck Skin Face or Face, and uncheck Iris (eye color).
6. When you do your Makeups, again, be sure you have zoomed in to one eye. But look at the makeups FIRST because if there are exotic ones, you want to be sure you are zoomed out enough to get the pattern/design in the view. When doing the lips, zoom in on those too. If a character has thicker eyelashes in some makeups than others, you would have to include eyelashes (uncheck) when you do the lips and eye color, because you wouldn't want the eyelashes to change. I haven't had any of those yet.
7. So you've saved as a material preset all of the materials (including the makeupREM) I close up Content Library and click Refresh on Daz Studio Formats. Now, the reason we created the folder in Content>Materials is because it's SO easy to find. Go to Daz Studio Formats>Daz>Materials and bingo! There at the top of the next menu set is your !!!Ellie or whatever you named it.
8. Load up Genesis 2 Female. Load up Base. Immediate distortion! No problem, select G2F in Scene and in Surfaces go to UV Map and select Victoria 4. Bingo, there's your character.
9. Browse in your directory to (mine is Content, remember yours is probably My Library) > People>Genesis 2 Female>Character> and make a folder !V4 to Gen2 This is where your final V4 conversions will be, ready to load onto any Genesis 2 Females. You can name your folder anything that makes sense to you, and after you do all these, THEN you can more them to your custom Category. If you are going to do G2 materials to G3 later, it makes sense to leave them in G2F Characters too.
10. So get the head centered in the viewport for G2F. You know the drill, apply the Base material. However, this time you don't have the morphs unless you have GenX2'd the morphs for your gal, so just leave the G2F character as the figure unless you know who you are going to be using.
11. File>Save As> Material Preset, leave everything checked.
12. Remember to zoom in for the eyes and the lips. Again, when you do the eyes (Iris) uncheck the face skin (makeups) and Lips. And when you do the Lips, uncheck the face skin and Iris.
13. Now your Genesis 2 Females can wear these Victoria 4 materials, and are easily found in Daz Studio Formats>Daz>People>Genesis 2 Female>Characters>!V4 to Gen2 or whatever you named yours. Let's go one step further and create a custom Category. Still in Content Library, go to Categories. Do not go under Default, as you are creating YOUR own. Right click Category and Create New Sub-Category. Name it whatever you want, such as Gen2 Females (then click that and create another Sub-Category called V4-G2F.)
14. Go back up to Daz Studio Formats>Daz>People>Genesis 2 Female>Characters>!V4 to Gen2 (or whatever you named your new materials) and right click the folder. (Let's use Ellie) Select "Create A Category From..." and either choose This Folder Only or This Folder and Subfolders (which we didn't create any, we did all these in one)
15. When the popup opens, scroll into your categories and select your new category (Gen2 Females>V4-G2F) What's nice- if you convert several V4's, it remembers this file path and you zip right to the Gen2 Females>V4-G2F (or your file name) without you having to scroll to it.
Done! You have converted V4 materials and made files in both Daz Studio Formats AND created a custom Category, which is SO fast to get to.
CHECKLIST BEFORE YOU START:
Make sure Victoria 4 for Genesis 2 Female is installed. Use Default Camera, with the Focal Length between 90 and 100. Add a spotlight and get the face well lit.
Then, when shooting, don't forget to zoom in for the complete face, just the eye, just the lips. If you aren't sure the materials took, use Edit and check. The glossy options are hard to tell as the colors are the same. Remember to uncheck the sections you don't want to change (you are dealing with Makeup (Face/ Skin Face) Eyes (Iris) and Lips.
Edit: and, as mentioned a few posts up, if you do Iray skin settings, those DO save and transfer in the Material Presets. If you're not sure you will be rendering only in Iray, don't add them.
Have fun!
Question on morphs: copy a pose morph and convert it into a shape morph, possible?Yes. The attached viewport captures show the Breast Up Left pose on G3F (left), exported as an object then re-imported via Morph Loader Pro as a morph (right).
There appears to be no Girl 7 threadI'm curious -- why no Fred Winkler character for The Girl 7? There's usually a FWA or FWSA morph/texture for new bases.
Because Fred doesn't favor toon style.
The style is not for everyone, although The Girl is cute. It would've been interesting to see what FW could do with her. He's so outrageously talented.
Thanks for the response.
Question on morphs: copy a pose morph and convert it into a shape morph, possible?Hello, I have a question on morphs.
Is it possible to copy a pose morph for example and convert/transform it into a shape morph?
The reason I want to do this is asymetry. An example:
I want different breast hights but want not to use the pose morphs for that. So is it possible to copy the both breast up/down pose morphs and create shape morphs out of them so I have them twice, as shape morph and as pose morphs.
In DAZ studio without using another software.
NEW! Novica & Invited Guest Contributors Tips & Product Reviews Pt 6Rich, can you render a few of the Dial-a-Girls? If I recall, you got the Genesis 3 product after I showcased all these separately for G2? I'm picking this up now I think. With 3 things i the cart, 60% may be worth peanut butter and jelly sandwiches the rest of the month, lol.
Other goodies in the 2015:
Since we do have more Gen3 Males now, this will let you use all the previous generation clothes on them- and I like that there are SIX morph adjustments.
Think of what you can do with the Mega Wardrobe and shaders!
I also like Specs Appeal, Space Station Living Quarters (missed that in Fast Grab a couple weeks ago, it changed while in my cart. I had forgot to check out, darn it.) Also may try Quiet Medium Hair (I think that would be AWESOME for kids) and same with Anny Hair.
What would you folks recommend?
Panties and ThighsAnd,, about gen3F clothing,, we can not add buldge map for each axis rotation (+ and -) , with general weight,,
Can we use triax weight for gen3F clothing? will it work?
if it work,, I feel,,, I may choose triax weight just for adding buldge weight map.
Nowdays I do not try tweaking product rigging to reduce these problem,,,
because I have alrady experienced almost same thing long time,, but after all,, it may work well only for one shape, one generation figure.
then do not expect much.. I already feel clear limit to modify clothing which can work for all posing and shape.
Then use smooth modifier,, and make morph for one final render,,,
(My hope is,,, I think we can not find answer for this problem without cloth simulation,
but hope DS offer simple editting mesh tool (not D-former, or modifiers) for morphing , then we need not export, import much..
it is really anooying to export and import each assets again and again to make one scene,,,
(I know it is my problem,, because,,I like strange pose ,, and like such clothing ^^;
and like layer costume,,then I often need set morph only for one scene,,,one pose,,)
then which product current you try?
I like to try samething with same product,, then clear show what I could or not.
Though I currently have not bought sickle cloth template for G3, (in wish list long time)
may be I try with transfer tools, and customize weight map ,, then add JCM for each axis rotation,,,
(at least,,, 2 morph may need to transit smooth,, for each rotation = 2 *3 ^^;) If I modify it,,,
though it seems not so exciting work,,,,,, I know my limit about this problem,,, .
WIP - SF Superhero Battle SceneTOBOR: I just ran a quick test -- the geometric edge tool in Poser's Comic Book Preview works perfectly with the Morph Brush. All changes to the geometry were captured perfectly by the preview. I do think, however, that I got better results with my postwork than I did from the morph brush. But that could be based on the fact that Im much better at Photoshop than I am with the morph brush.
NEW! Novica & Invited Guest Contributors Tips & Product Reviews Pt 6I do have a quick question- if I am saving V4 skins as Material Presets (making DUF files) to use those materials on Genesis 2 Female, would your settings transfer in those V4 Material Preset DUFS? I am so not technical, I don't know how these scripts work and what can transfer in Material Presets.
Yes, if you convert to Iray settings before saving as .duf then the Iray settings are saved.
Well dang it, wish I'd thought of it before V3Digitimes posted! I've already done quite a few of my Rendos. I guess for consistency I'll do them all the same, but good to know!
Fit Control for Genesis3 (Commercial)Will we still need to save modified assets or save figure/prop to prevent the file bloat that happens otherwise? The G2 versions also had a utility to remove unused morphs as well, I know.
Only way to remove bloatedness is to click on the remove unused morphs. You can load the others back on a saved scene or file and dial what you need, and then remove the rest again. It is the only way this can be done. The script has to copy all morphs over everytime the script is activated. I don't know if that answers your question.
Glad I found this thread again. My files were going from a few hundred K to a few hundred megs, sometimes over a GB. I just wish the remove morph tool would work on multiple items at once. Still, it's a great product that's invaluable.
February, 2016 New User 3D Art Contest “Lighting” (WIP Thread)Entitled "State Secrets"
Comments welcome!
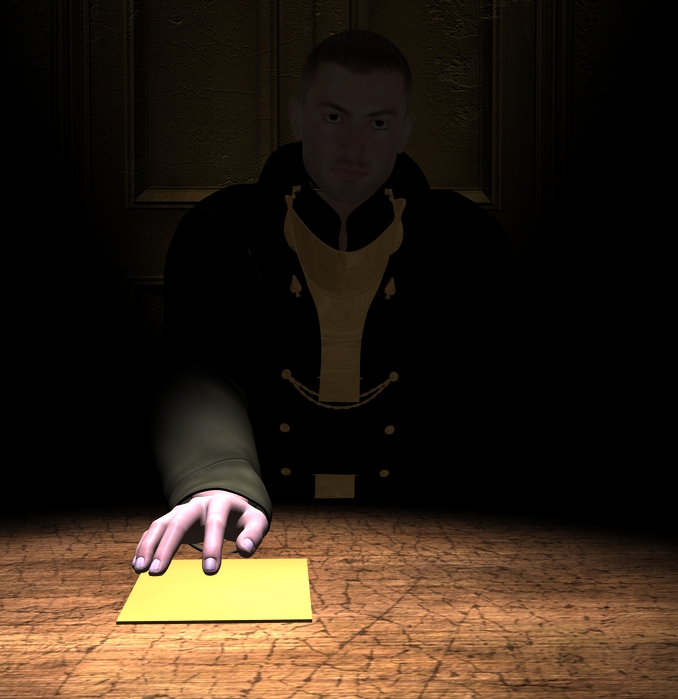
Hey, FyreHeart! Looks like we have the beginnings something very interesting. Iray or 3Delight?
First and foremost, what's the story here? Set this in your mind and then we can work on the details and the lighting to bring it out. As I look at your render, I'm trying to find some clues as to what is happening. We have what appears to be an officer in uniform handing a paper with secrets to me the viewer. The background is just a wall and the officer is in the dark.
So, why is the officer in the dark? Flesh out your backstory as an author would. Darkness implies that he does not want to be seen - why? Is he doing something he should not be doing? Treason perhaps? Let us know what your story is so we can make more suggestions. Think about the clues in his body language, expression and surroundings including props that will tell us the story.
As far as the lighting goes, he looks very flat in the shadows. Also, in a historical setting there are no spotlights, so you will need to think of where the candles or oil lamps are located that are providing the lighting.
3Delight render. Iray (again) ignores my lighting effects. And yes, that's Michael 4.
Story wise, I was kinda thinking he's just returned from behind enemy lines and is passing on the intel he's gathered. He and his contact (the viewer) suspect their identities are known and counter-intelligence is attempting to stop the transfer of the documents, so they must act quickly and secretly.
I hadn't given much thought to the era. I picked his uniform because it "looked right". The setting is supposed to be a seedy back-alley hotel or bar where nobody asks questions, and a single dim bulb hangs above each table, hence the spotlight effect.
-Fyreheart
Great backstory!
Now, think about how you will give the clues to the viewer to reveal this backstory. As an artist, you are a storyteller - but you do it with pictures. Logically, we would want to see that single, dim bulb at the top of the render, with a lamp shade to block the light shining in your officer's face.
Since he has just returned from enemy lines... where's the dirt, disheveled hair, stubble, bruise, cut, etc., to show that he just came back and had a rough mission?
Seedy is displayed by the cracked surfaces of the wall behind him and the table. How about something on the table besides the paper? A glass, cigarette in an ash tray or something like that? An empty plate or place setting pushed to the side would show this. Go through your environments and see what you can pull out of them to enhance your render. Sometimes you already own cool props in a package that you may have overlooked. Even if you Photoshop/GIMP it, a hole in the wall with a rat peeking out will make the place seedy.
You may want to rethink your uniform for two reasons: You are in the age of electricity and the uniform looks like it's from an era earlier than that. Also, if this is a secret meeting, he wouldn't want to announce to the enemy who is by wearing a uniform.
What will clue us in that he is wary of being watched? Maybe his eyes can be looking to the side while the paper is being thrust forward. Pinch his brows to give the look of strain. Make him lean forward to give tension. You can also think about adding tension in his hand by raising his forearm and bending his wrist down so that only his fingertips are touching the paper.
As far as lighting, I think adding a rim light on one side would outline his features and really bring out depth. If you choose to have his eyes looking to the side, have that be the side the light is coming from. The look of one side of the face lit and the other in shadows is very dramatic. Also, incandescent bulb light is yellow - tint your spotlight with a little yellow. Same with the light coming from the side, unless you are in a neon sign era and you want to add a little color to the rim light. 3Delight lighting looks best when you blend light from several sources. Even a light that is very dim and a dark color will add depth - like the dark background in a oil painting.
A couple more things - how do we tell that he is not some bad guy selling secrets? Perhaps a ring on his right hand, and a hand opposite him (i.e.., from me the viewer) of the person reaching for the papers - if it's the same ring, you demonstrate that they are of the same organization. Rings for men, however are pretty hard to find though. You could take a woman's ring and turn it around so all you see is a band.
These are all suggestions, so use what you like.
Question about David 3 for GenesisIt does create pz2 files. Go into the settings (the small cog wheel at the top right), and there you can specify which directory TC2 will store the pz2, and where it will store the texture files.
With GenX2 you can select a directory for where to store the files. If you do not set this, it uses one of your runtimes (I believe by default it uses the runtime where it found D3/M4 etc). The morphs are stored under the data part of the runtime, so if creating morphs from David3 for G2M, they are placed under data/DAZ 3D/Genesis2/Male/Morphs/D3D Gen X/David 3
If transferring a character I would advise you to use the option "Create single morph", rather than transferring the numerous individual morphs that make up the character, and then create a preset to dial them in the appropriate amount. A single morph is much easier to manage and find.
Question about David 3 for GenesisThey do look like nice poses.
I would certainly buy a new David if they brought one out. When David 3 was current, I thought he was the best looking of the male characters. Now of course there are many more to choose from.
To more questions...
1. Does Texture Convertor 2 create pz2 files to go with the converted textures? I'm thinking no as it didn't ask me where to put them. If not, then how do I create some? Can I load another genesis or would it be M4 material preset and then change the materials and then save it to a new name?
2. When you use GenX2 to transfer the morphs, does it put them in a folder or does it just mix them in with all the other Genesis morphs? And I assume once you transfer them that they will always load with Genesis from then on?
Thanks.
NEW! Novica & Invited Guest Contributors Tips & Product Reviews Pt 6I do have a quick question- if I am saving V4 skins as Material Presets (making DUF files) to use those materials on Genesis 2 Female, would your settings transfer in those V4 Material Preset DUFS? I am so not technical, I don't know how these scripts work and what can transfer in Material Presets.
Yes, if you convert to Iray settings before saving as .duf then the Iray settings are saved.
The Guy 7, looks like it's officialI wish they would just release more morph resource elements for G3M, that way we can do our own dial-spun characters rather than waiting months at a time for a an official release.
G3M barely has 170 items in the store, now compare that to the nearly 1000 items available for his female counterpart.
G3M has only been out for 3 months, where as G3F has been out for nearly 8. Thus, assuming content arrives evenly over time, since G3M was released there have been 170 G3M items and 375 G3F, which, if true, represents a ration of a bit more than 2 female items for every male released since G3M went live. That seems bad, however, by comparison to other stores, where the ratio is closer to 1-10, or even 1-20, then it could be much worse in DAZ land than it actually is. Having said that, I suspect at least some of those 170 G3M items are hair etc that support G3M and G3F, which would worsen the 2-1 ratio here if only items exclusively for one, or the other, are considered.
You're right... I was being a bit of a stick in the MUDD. :D
Anyway, I like having more options to tweak the figures features even more. I loved that about the previous incarnations of genesis. I'm gonna have to be patient. Cheers! :)
There appears to be no Girl 7 threadI'm curious -- why no Fred Winkler character for The Girl 7? There's usually a FWA or FWSA morph/texture for new bases.
Because Fred doesn't favor toon style.
WIP - SF Superhero Battle SceneTOBOR: I didn't think of using that tool, to be honest. I was focused on the CB effects to the extent that I really didn't play with customizing the model very much (But I'm going to test it soon -- you've made me curious!). At the time, I was in a rush because of the deadline to get this done, so I wanted it out of Poser and into Photoshop so fast. I was halfway through the piece when I decided that the bricks just looked too perfect. At that point, I was committed to what was in Photoshop, so I decided to manually edit them.
BUT, I think the Morph Brush would be something I'd do the next time I try an effect like this.
In the near future, I'm planning to do a pastiche of the classic "Hero lifting the car" pose from Action Comics #1. I will use the Morph Brush for that scene and see how it goes. Thanks again for the tip!
Daz 3D is part of

Connect
DAZ Productions, Inc.
7533 S Center View Ct #4664
West Jordan, UT 84084Licensing Agreement | Terms of Service | Privacy Policy | EULA
© 2026 Daz Productions Inc. All Rights Reserved.