-
PCI-E 2.0 Standard and Geforce GCs
The version of PCI-E is really a question of how much bandwidth it supports (via more available lines on the data bus, as well as how it handles the data transfer along those), and all the new versions are fully backwards compatible.
The simple explanation is that putting a PCI-E v2.0 card in a PCI-E v3.0 slot is the same as if you'd plugged that card into a PCI-E v2.0 slot. It won't use the extra bandwidth. Putting a PCI-E v3.0 card into a PCI-E v2.0 slot will limit the card to the PCI-E v2.0 bandwidth limits.
Unless your machine is pretty high-end, you probably won't ever hit those limits. Bandwidth is largely a question of what it CAN do, not what the machine is capable of delivering to it.
For something like DS Iray rendering, where everything is loaded at the beginning to the card, then runs on the card, most of the data transfer bandwidth is needed during the initial loading period. Higher bandwidth means it loads quicker (assuming the southbridge and memory can keep up with it.) But beyond that, the actual rendering speed won't be affected hardly at all.
For gaming however, bandwidth becomes more of an issue, as new textures/meshes may be streamed to the card as they are needed, and that requires bandwidth. The faster you can do that, the less 'stutter' you may get when a bunch of new monsters/players/effects/whatever pop into the scene.
Show Us Your Runtime DNA Content Renders!Green Star
Credits:
Star - LittleFox
Nether Morphs for STAR - Netherworks Studios
Star Fantasy - Eblank
TC49 for Star - Sanbie
49Stripes - Wayii
Oriental Outfit (Shoes) - Pusey Designs (Wilmap)
Athanasia Hair - 3Dream, Mairy
Build Your Own Backgrounds Vol. 1 - Amaranth
Fairytale Hour
Credits:
V4WMAS - Aeon Soul
KynleeFae V4 - The Laughing Lion Studios
Elfin (Jewelry) - Mada, Sarsa, Thorne
Florabelle - Mada
Anemone Hair - 3Dream, MairyDaz Dragon 3, Morphs and Textures - Daz
Mythic Beasts - Sickleyield, Fuseling
Dragon Trainers Toolbox - Design AnvilFlinks Summer Ground - Flink
Pine Forest - vikike176
DRTreeSet201203 - Dinoraul
Wildflower Mega-Pack - Judith, Chrisjol
Modualz Old Wood Pines - Mega Pack - Traveler, Judith
Ground Covers Vol1 - Traveler
Mushroom Singles Vol. 1 - Traveler
Songbird Remix, European Edition 1, European Edition 2, Woodland Jewels - Ken Gilliland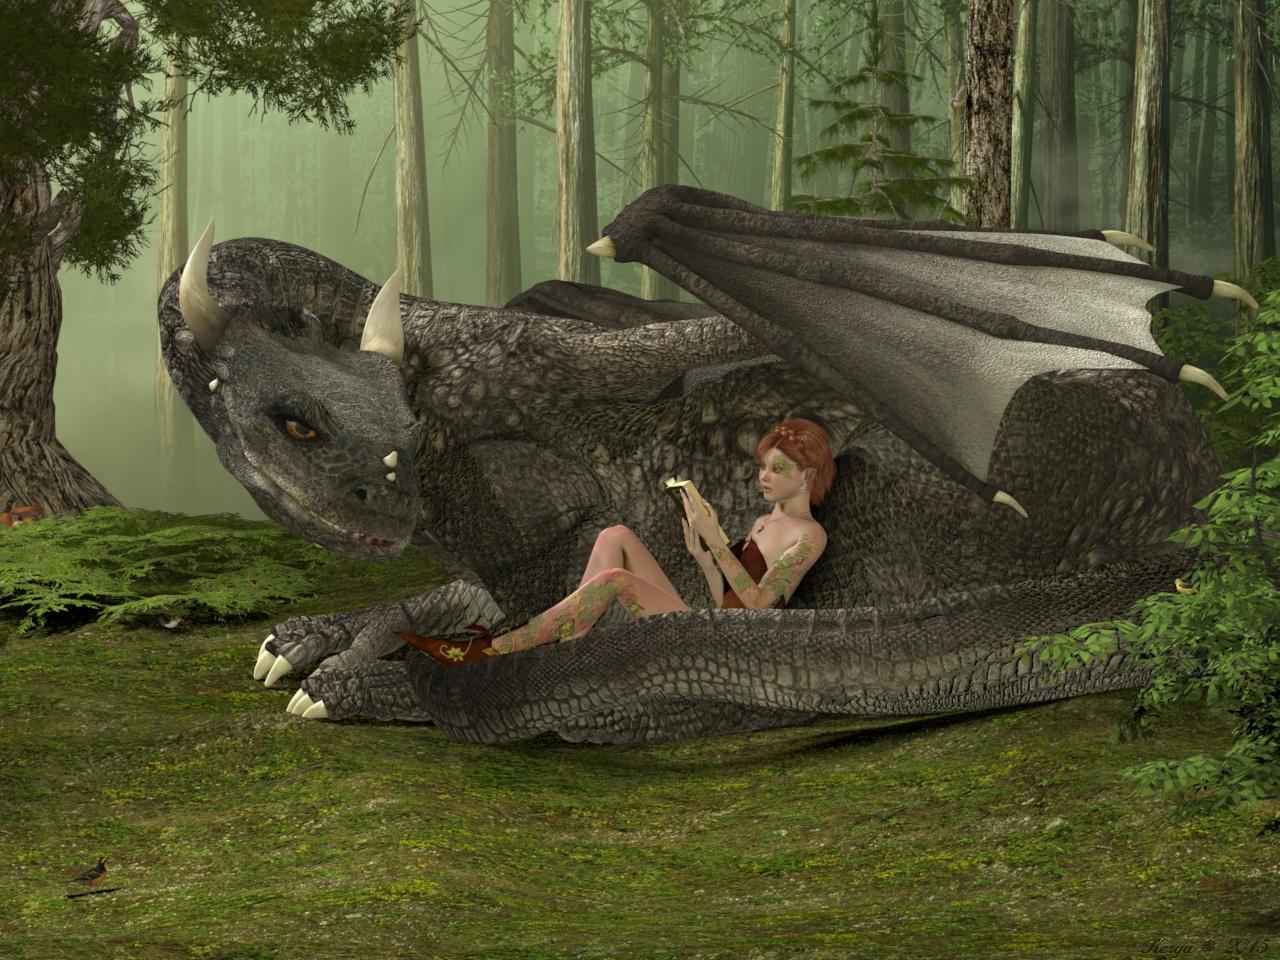
Retro SciFi
Credits:
Patchouli for Aiko3 - Illusionsdesigns
Dragon Princess For Aiko 3 - MAB, WillDupre
Songbird ReMix Vultures - Ken Gilliland
Rocket Ship Retro Style - Kurokuma
Joshua Trees - Traveler
Stage~Another World - vikike176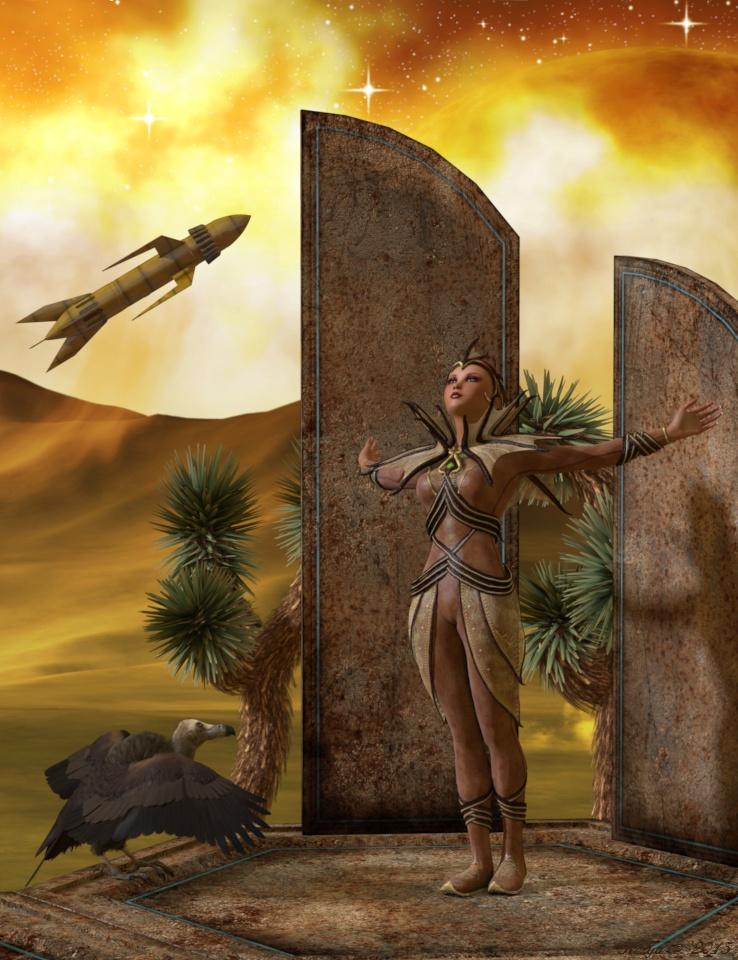
On the way
Credits
Dawn, Head Shapes and Body Shapes for Dawn - Hiwewire3d
Sinead - AetherDream
Amphitrite Hair - 3Dream, Mairy
Fantasy Rogue - Xurge3dHivewire Horse - Christopher Creek
Mustang - CG Cubed, Christopher Creek, CWRW
Draft Horse - CG Cubed, Christopher Creek, CWRW
FlintHawk Pose Pack 1 - FlintHawk
Native Costume for the MilHorse - Daio
Native Costume for the MilHorse Textures - Chohole
Lead Line from MilHorse Barnhalter - Daio (Daz PA Xmas08)
Rope Texture for Lead line - Bo Hammarberg
DNA Adventure Gear - RDNASongbird ReMix - Ken Gilliland (Free swallows)
Songbird ReMix Flock Formations - Ken GillilandRDNA Fields - Traveler
RDNA Grasslands Volume 5 - Traveler
Grasslands Foliage Vol 7 - Traveler
Autumn Shrubs - Traveler (Leave material treated with Baggingsbill's help: http://www.renderosity.com/mod/forumpro/showthread.php?thread_id=2882065&page=1 )
Terradome and Expansions - Colm, Traveler, Syyd
Frost Fairy
Credits:
BJD, BJD Type2 - MayaX
Ball Joint Boy (texture) - Thorne, Sarsa (with Bagginsbill's post 240 shader)
Dali - Capsces
Lily Fairy dress - Bobbie25 (Crossdresser 4 and Morphing Clothes)
Lily Fairy dress textures - Chohole
Kai (Boots) - Xena (Crossdresser 4 and Morphing Clothes)
Kai boots material: FabricBazaar - Cyllan
Bandua Hair - 3Dream, Mairy
Black Leopard - Sannzi
Wallthingie - by me (a Hexagon and graphics tablet glitch ... but I quite liked it)
Wallthingie material: Seachange - Cyllan
Gothic Christmas Tree - Traveler
Infinity Cove 3.0 - RDNA
IC3_Winter11 - HoboBo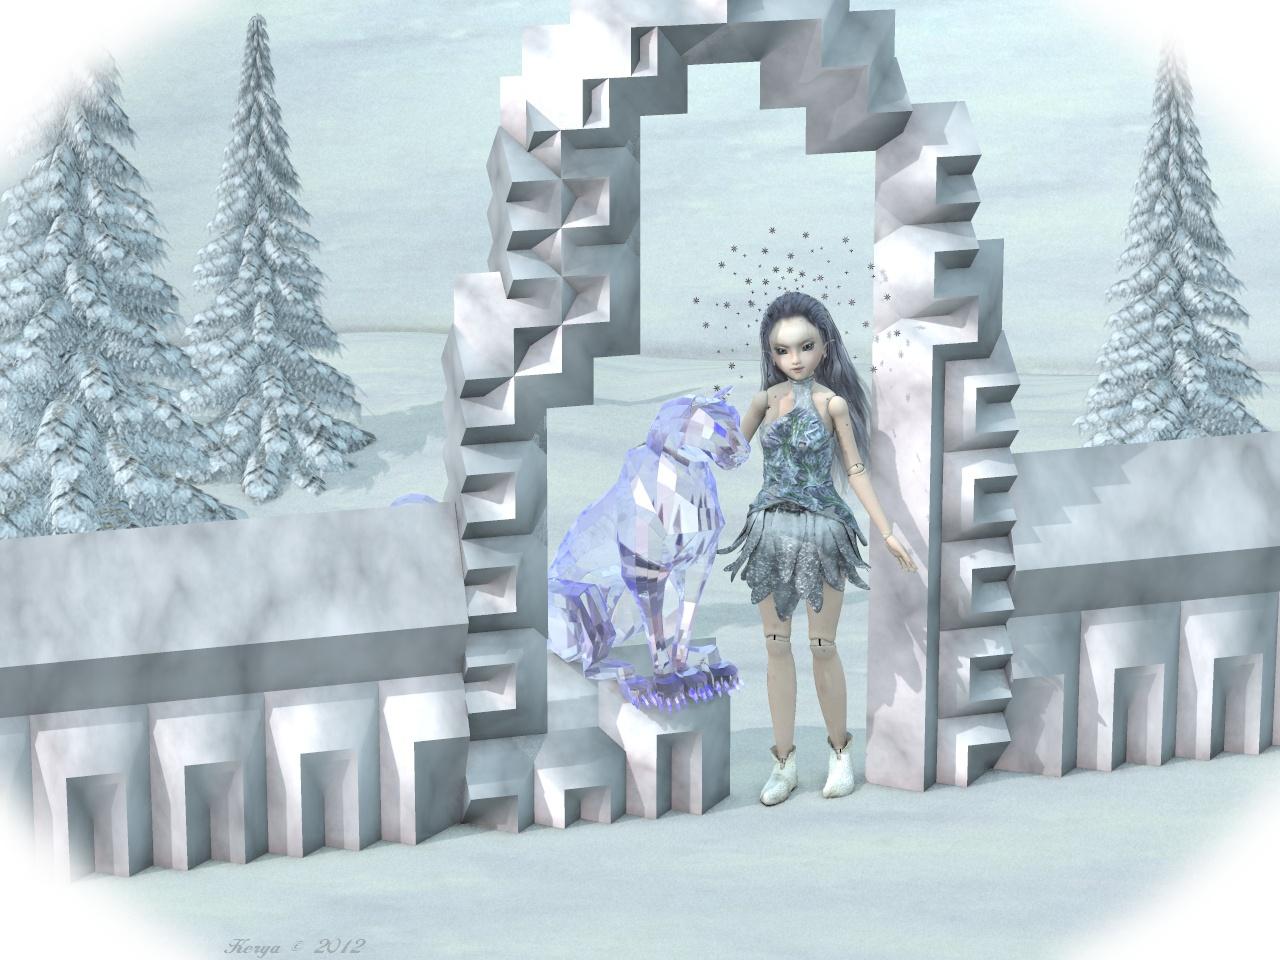
Encounter in the Woods
Credits:
Eepo - Nursoda
VSS - Bagginsbill
Helios Hair - Mairy, Plus3d
Stoertebecker - CorporateArts
Forest 18 Background scene - Bo Hammarberg
ModualzRocks 3 - Traveler, Judith
Modualz Old Wood Pines - Mega Pack - Traveler, Judith
TransPond's Fern Pack - Judith
Shiny 3 - vikike176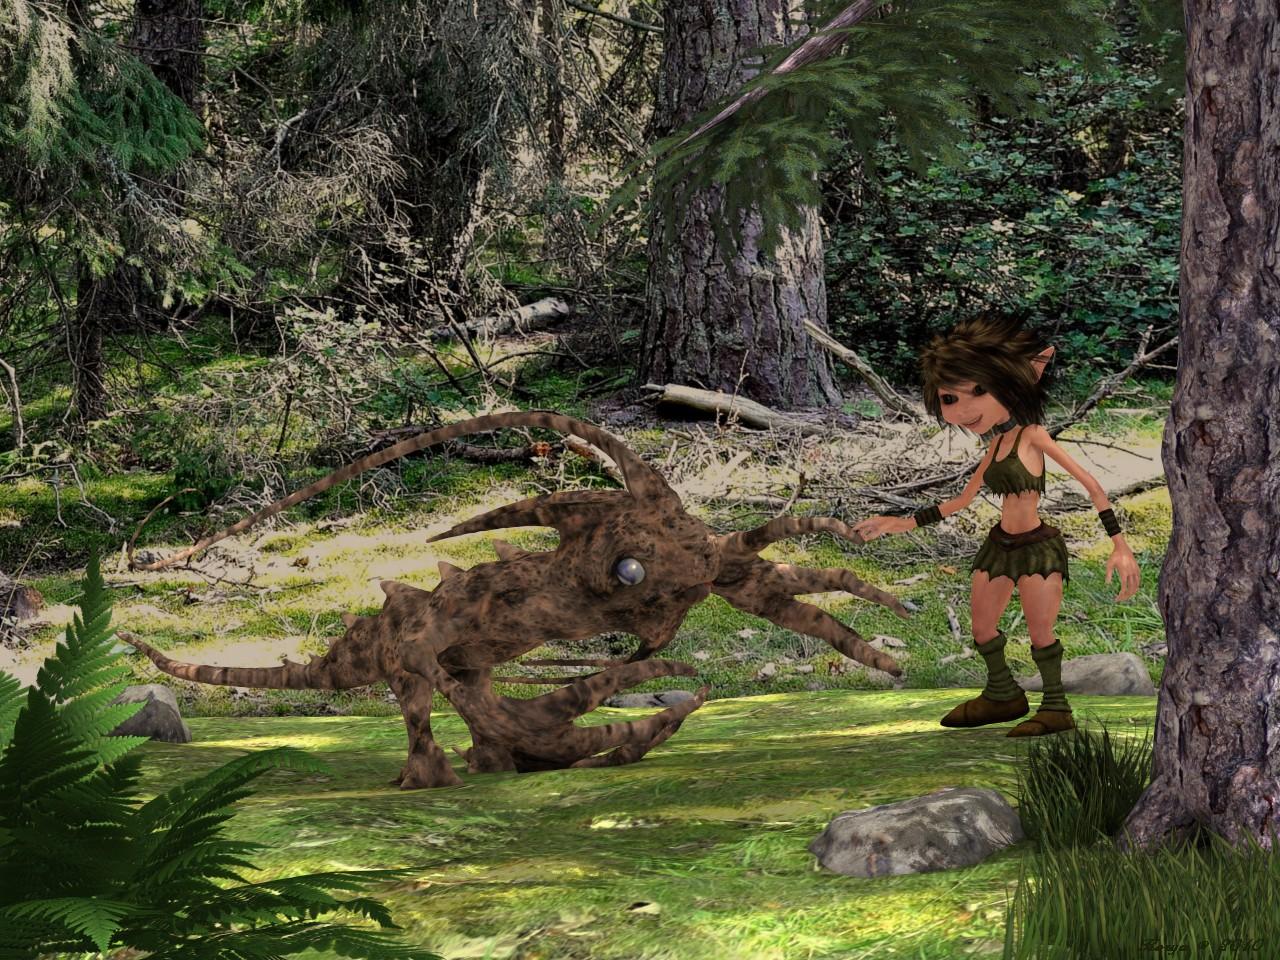
Happy Gardening
Credits:
BJD - MayaX
Dali - Capsces
Cookie (texture) - Winter200 (my morph)
Sarah Hair - Littlefox & Capsces
Sarah Hair Shades - Outoftouch
OnePiece Dress - Aoaio
Sensible Shoes - Headkase
Hoe - DanHorland
Watering Can - Traveler
LB Tall Grass, Hosta, Daylily - Lisa Buckalew
Hosta Garden - Laurie S
Broken Path - Joe Kurz (texture by me)
Modualz Rocks - Traveler
Pond03 for IC3 - HoboBo (ground texture by me)
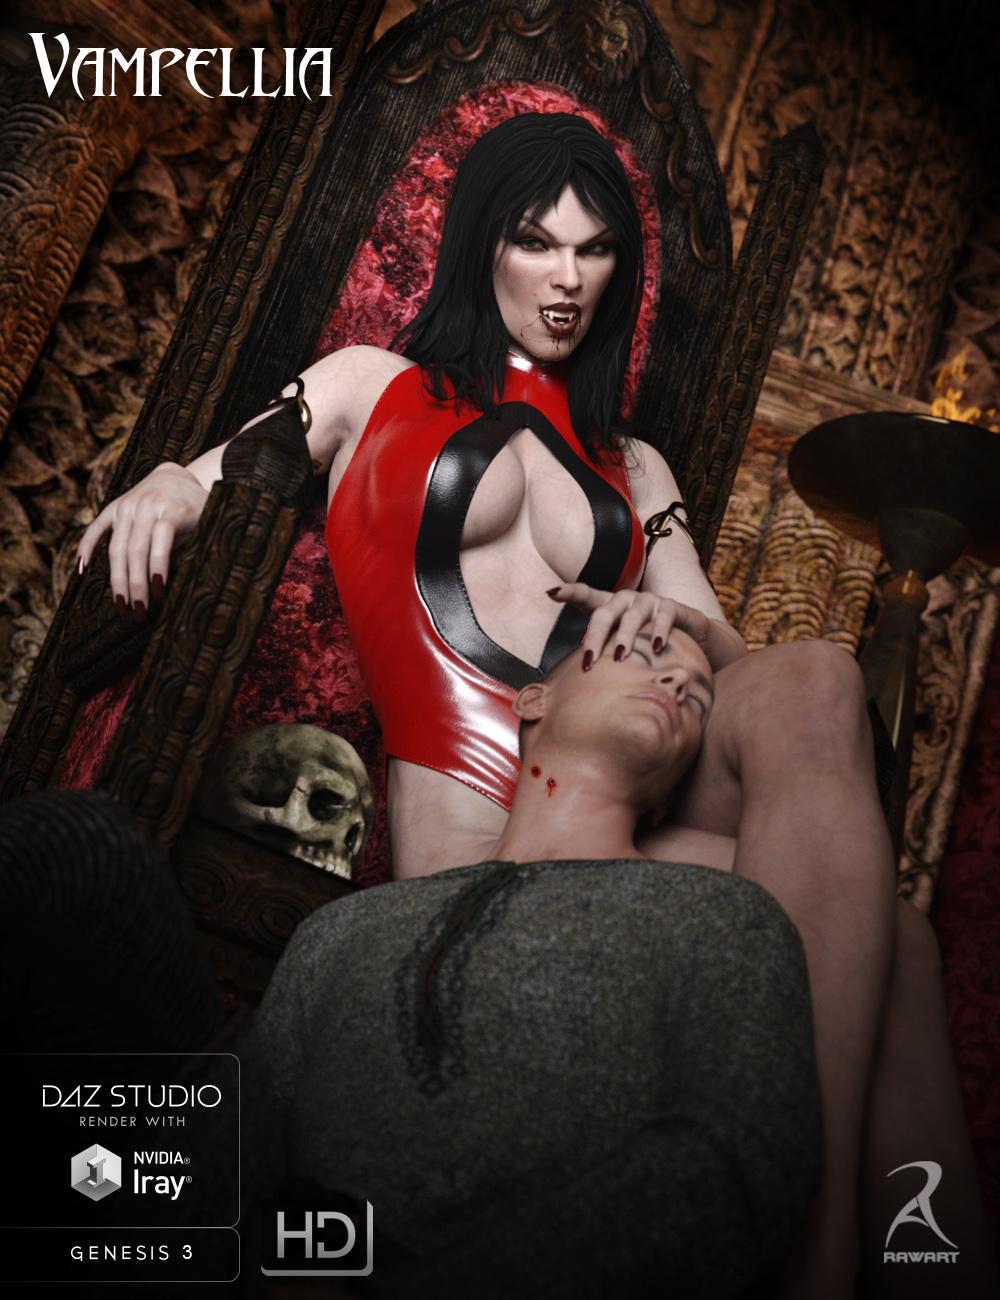
ahEnvironmentLight Version 3 - Arthur Heinz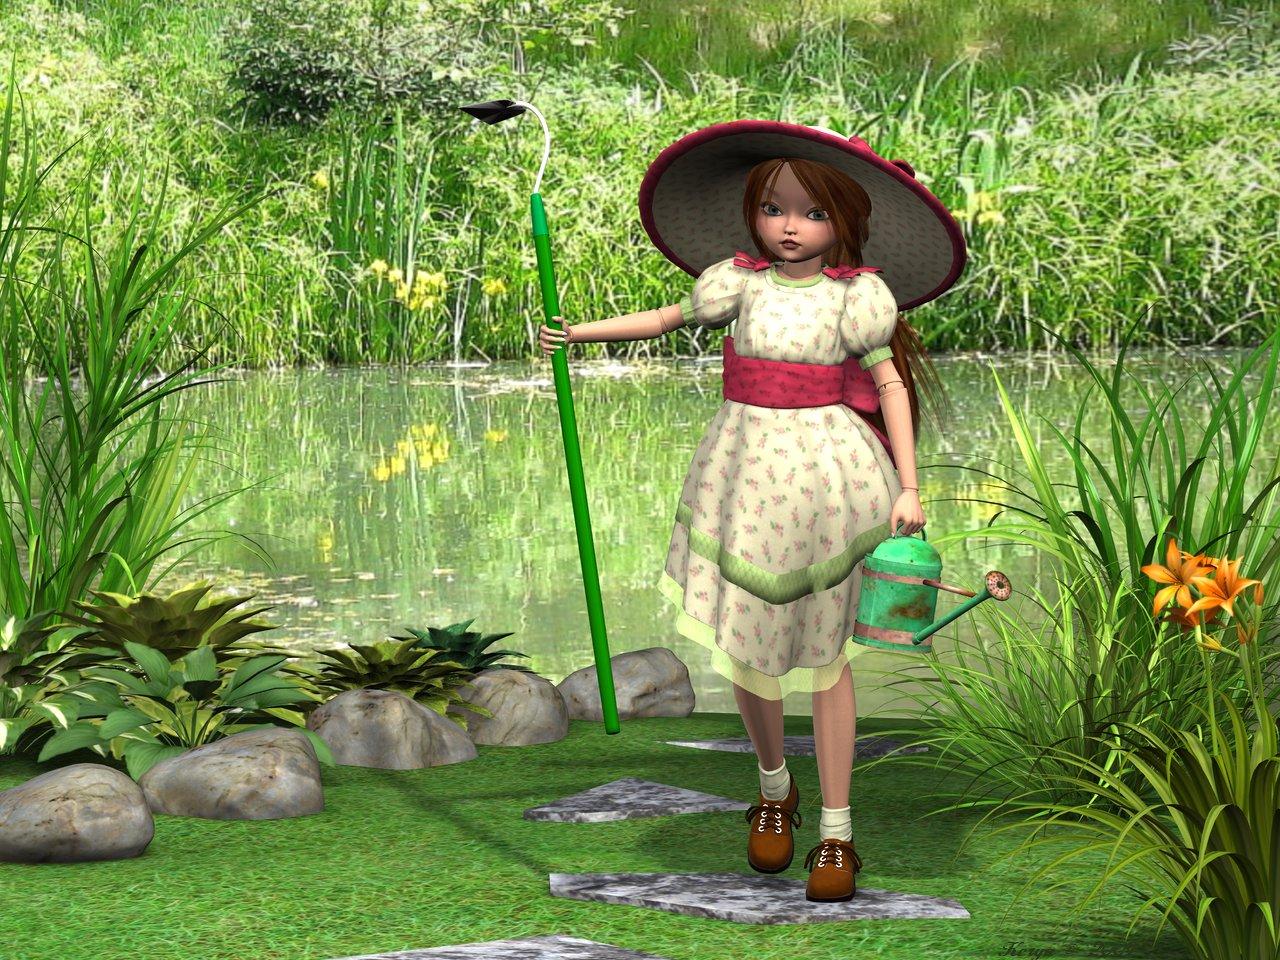 Vampellia [commercial]
Vampellia
http://www.daz3d.com/vampellia-for-genesis-3-female-hd
An ancient and immortal queen calls to you from beyond the grave. Her hunger is as great as her beauty, and she welcomes you with open arms. Stay and have a drink, we know she will.
The set comes complete with custom crafted High Definition Morphs, and a highly detailed texture set, suitable for Iray and 3DL
Product Includes:
• One Vampellia Character Preset
• One Vampellia Morph Preset
• One Vampellia Full Material Preset
• Six Vampellia Face Material Presets
• Two Nail Colour Material presets
• Four Eye Material Presets
• One Genital Material Preset
• Also includes IRAY and 3DL MAT files
 How do I make transmaps in GIMP?
Much easier...render to PNG with no background.
In Gimp... Layer > Add Layer Mask >Transfer Layer's Alpha
Then Layer > Show Layer Mask
Then Layer > New Layer from Visible...\
Save that layer as your mask.
That worked a charm, and so quick and easy! This will come in very handy! Cheers MJC (and the other guys for their suggestions), much appreciated.
DAZ Export to Element 3DIn DAZ you open the character or other content you want, morph it and apply the other changes you want, and export it as Wavefront obj. It must be one obj at a time. You cannot have complicated scene with many characters and other content and export it as one giant Wavefront obj scene.
You can only use the models personally. If you use commercially i recommend you read the terms of the DAZ 3D lkicense agreement yourself.
How to make Connect installed content show in Content library tabThank you barbult, now it makes alot more sense to me, that really helped, I appreciate that you took the time to do that. I don't have alot installed yet especially things like amazing skins, shapeshift, or shaders but I assume these would show up also if they were compatible with the item you had selected in the scene, like an outfit and you wanted to use PD Iray shaders on it? I have to say the more I am playing around in the smart content and seeing how its working I think I will start liking it more and more.
Morphs, like those in the Shape Shift product, won't show up in Smart Content. (The product will show up to allow you to install it, but the morph files themselves won't show up there.) The morphs don't show up in Content Library either when you look at the product there. The only Shape Shift things you see in either Content Library or Smart Content are Shape presets to zero out Shape Shift morphs. The morphs themselves are "not user facing files". You find morphs in the Parameters pane under Actor usually.
Shaders will be found in Smart Content. You need to go to the Surfaces pane first and select the surface(s) that you want to apply a shader to. If the shader files have good metadata, you will find them in the appropriate subcategory, like Shaders>Iray>Fabric. But I find it much easier to use PD Iray Shader Kit 1 (one of my favorite products!) from the Content Library Products listing. The problem with using Shaders from Smart Content is that too many get jumbled together in generic categories like "fabric" and "metal", and many Shaders have very poor metadata, putting them in incorrect categories. PD Iray Shader Kit 1 is one of those without very good metadata, unfortunately.
Smart Content really shines in finding Material files for props, figures, and wardrobe items. When metadata is good, you find all appropriate materials without having to remember the names of the products that contain them. You will find textures you forgot you even had! When metadata is bad, things will be missing.
Explore the right click options in Smart Content, too. Just snoop around. There are so many features in 4.9 Smart Content.
Mesh resolution - what's the difference?Hi Stabio
Subdivision has a form of 'smoothing' built in. Subdivision 0 will not add any polygons but will still do that smoothing.
You can think of it as virtual. The base mesh (sometimes called the control mesh or control cage) is the 'real' mesh.
The added polygons are recalculated and redrawn every time you move a joint, apply a morph or move the camera etc.
Magical Moving Morphs?The reverse Deformations option in Morph Loader pro will subtract the applied morph (or pose) from the loaded morph, leaving just the chnages unique to the morph). However, you do need to bear in mind that a morph moves the vertices in a straight line, not along a curve, so it won't really look like a pose if you apply it gradually. A better option for ears would probably be new mesh applied as a GeoGraft, giving you posable ears with bones in place of the originals, but that is of course more complex.
Mesh resolution - what's the difference?Ys, SubD 0 applies the smoothing algorithm to the mesh but doesn't add polygons - if you are still seeing the SubD polygons then you may have set the Render SubD Level rather than the plain SubDivision Level. Generally for morph creation and the like you want the Base resolution option before exporting, so that you have not incorporated any additional changes into the mesh that would then be included in the morph on top of the intended SubD.
Install Manager Problem:I can't seem to open the log file. It says "log.txt" is an unknown format and can't be opened. This is when Illustrator is automatically started. Is the log always an Illustrator file?
I should add that my setup is a bit unorthodox. I have a separate machine for video work that isn't online so I download Daz purchases to one machine and then transfer the downloaded zip files to the Daz Library download folder on the other machine. And that folder is on a separate drive from the OS and Apps. It's worked out very well for over a year now, but this last batch of purchases isn't recognized.
Female Character MorphAh right, because the body was a different base shape the rig was slightly off. To fix it you can use the joint editor and right click, edit > adjust rigging to shape, check orientation, and the rig should update to the new figure. I'd include that in the download but I'm not really sure how the packaging works and I don't think that the rigging info is included in the morph files, though I could be wrong.
Female Character MorphThanks, CJ. Interesting face morph.
For anyone who may not know how to "install" this. the .dsf file should be placed in your content library under data\DAZ 3D\Genesis 3\Female\Morphs\. It should then show up in the parameters tab as a slider titled Female Morph 1.
CJ, there seems to be an issue with the body morph in that it comes in with the shoulders fairly close together and back, and that causes some odd issues with poses. Maybe you already had it posed before importing it? Just a heads up.
Thanks again.
Celebrity Look-a-Likes for 3D figures Part 2ok - opinions plrase. Anouk - who does she lok like to you?
Brooke Shields but I didn't recognize until I saw the response below your post. If it's a very modern celeb that I am out of the loop mostly.
.......
I bet Sophie Ellis Baxter would be one of those faces that would be easy to recognize as a DAZ style morph. Generally I find Wert's morph's the most consistantly recognizable of those that I've seen.
Brooke Shields is too obscure for you, but Sophie Ellis Bextor would be recognizable?
(And I express disbelief as an American who had Murder on the Dancefloor as one of my several wake up alarm songs this past month).
I was referring to other modern celebrities, eg Lady Gaga or many of those listed on that BeamMeUp Celebrity 3D model site, when I said that, not Brooke Shields. I didn't recognize Brooke Shields until a poster said that's who the picture looks like. That said, if I spy myself in a mirror that I wasn't expecting to be there, I won't recognize myself at first either.
Show Us Your Runtime DNA Content Renders!Nice render of Girl 7! I like the shadows, which most any good portrait should have. Been seeing a lot of renders lately that are absolutely flat.
One question, though: What's wrong with her hip? Looks like an issue with a bend morph.
Interesting - I missed that. I think it may be a light angle/shading odity caused be the string. I'll look into it latter.
Show Us Your Runtime DNA Content Renders!Nice render of Girl 7! I like the shadows, which most any good portrait should have. Been seeing a lot of renders lately that are absolutely flat.
One question, though: What's wrong with her hip? Looks like an issue with a bend morph.
Magical Moving Morphs?I have a question that I suspect the answer is "no", but here goes...
I created a full body morph in Hexagon from the G2F base. Part of the morph includes long rabbit ears. All worked out pretty good, but now I find that I'd like to be able to pose the ears in an alternate position. So, the question is, can I just reposition the ears and save out a second morph that only changes the ears and add it, or will it re-apply the rest of the morph changes, basically doubling them?
I suppose a work around is just to zero out FBMorph 1 and add FBMorph 2 at 100%, but it would be nice to get some pseudo-movement by mixing them and just changing the ears. If I were to set a 60/40% split, for example, would that leave the rest of the body changes at 100%, and just mix the ear area?
Also, assuming that would work, is there a way to link sliders, so as one goes up, the other goes down, with them totalling 100%?
Thanks!
The new Centaur 'n stuff thread - reloadedhere is my centaur tutorial for you guys
Centaur Tutorial
Hello all. This tutorial will teach you how to turn Vicky 6 and horse 2 into a centaur. You will need Vicky 6 and Horse 2.
Step 1
Load Vicky 6 into your scene, then load Horse 2minto your scene. You will need to scale Vicky 6 up to 140% and move her to Z translate 36.72 and Y translate to 14.25. It should look like Figure 1.
Step 2
You will need to bend horse 2’s neck to -35.00. Then hide neck 3and the head of horse. Make sure to hide ears, eyes and tongue as well. Then on Vicky 6 you will need to hide from the thighs down on both legs. To hide things click on the little eyes next to the items you want to hide in the scene tab. Be sure to expand and hid all the tongue on the horse and all the leg and feet and toes on Vicky 6. It should now look like figure 2.
Step3
Now comes the fun part. We will be morphing Vicky 6’s waist hips and thighs as well as horse 2’s neck to get the two to fit together and look like one centaur. In this section we will be changing a lot of sittings and this will take some time. But the end result will be worth it.
Ok let us start with Vicky 6. Go to the scene tab and select vicky6. Then go to the parameters tab, click on actor and expand go to full body and expand then go to real world and set androgynous to -.1, thin to .86, and weight to -.80. then got to lower body and expand go to hip and set glutes size to -.50, hipbone size to -.50, and hip size to -.75. Then go to legs and set thigh size to -.50. then got to upper body and expand go to waist and expand then go to real world and set lats size to -.50, love handles to -.50, rectus width to -.50,stomach depth to .23, stomach soften to -.50, and waist width to -.79. When done with Vicky 6 it should look like figure 3.
Step4
I know this is time consuming and slow going but these sitting will make it faster for you guys then it was for me to find them all in the first place. And remember that these sitting are a good starting place for other figures like Michel 6 or gia or any other gen2 figure you want to try. Just remember to take your time and don’t get frustrated with it.
Now let’s move on to horse 2 sitting these are easier to do. Go to the scene tab and select horse 2 and expand till you see the neck select neck one and go to parameters tab and select general. Set x-scale to 140.7%, y-scale to 61.7%, and z-scale to 113.0%. Then go to scene tab and select neck2 and then back to parameters tab and general. Set bend to -24.31, side-side to -.40, x-scale to 104.7%, y-scale to 42.9%, and z-scale 86.6 %. Then go to scene tab and select neck3 and back to parameters tab and general. Set scale to 86.1%, x-scale to 256.1%, y-scale to 13.6%, and z-scale to -177.1%. When done it should look like figure 4.
Step5
Now that we have all the morphing done we need to parent Vicky 6 to horse 2’s chest. Go to scene tab and select horse 2 and expand till you see the chest then select Vicky 6 and move her to horse2 chest by holding down the left mouse button. Now we can apply horse 2 textures to the horse 2 it don’t matter witch color you choose. Now in scene tab select horse 2 then go to surfaces tab and expand so that you can see coat, select coat and go down to opacity strength and click on the space where you apply a texture map go to browse then go to the file location where you have installed the free trans map that I have provided with this tutorial. Now it should look like figure 5.
Now I understand if your Vicky 6 still has her textures that she loads with. I choose to remove them for this tutorial.
Some tips for posing your centaur.
When posing your new centaur you should pose the horse part first. When posing the horse be sure to hold down the control key, then in the pose preset load options uncheck morph forms and uncheck all the scale setting. It should look like figure 6.
After you get your main pose on the horse the pose Vicky 6 upper body the way you want then you will have to move the horse neck to make it all look right again. Remember that some clothing will not work well around Vicky 6’s hips and waist so be sure to turn off the auto follow and the clothing for her lower body that will help some. I hope you all enjoyed this tutorial and have fun with your centaurs.
By Ginger Lee Mckee of Tiger Lee Arts
sorry pictures not included
How I can replicate this in daz studio?Don't overlook the power of D-form, it works right inside studio eliminating a lot of guesswork as to bringing it back into DS correctly. It allows you do set up the figure and keep the morph on consecutive uses, it allows you to save not only the morph but the dform instance for use with other props and figures, not just a morph target exclusive to a generational figure.
While this can be in Zbrush and Blender it does bring in an extra step of importing and exporting so I only use those if D-form is inadequate for what I need, but for clothing poke through and bumps and valleys D-form is awesome and saves lots of side work. Zbrush, Blender are amazingly powerful and will without question allow you much more versatility but there is a bit more of a learning curve along with steps needed.NEW! Novica & Invited Guest Contributors Tips & Product Reviews Pt 6Appreciate the input from folks who don't want to post but who PM me or email me regarding products, I certainly understand posting isn't for everyone and I will be happy to pass along information as long as I can see what you're talking about via the promos or the product listing. (If I don't have the product.)
Regarding M3D Jesse HD for Genesis 3 Males, two people have mentioned the shape of the buttocks is different in shape than the characters they own, and the promo does show that very well in the last thumbnail, and the others where Jesse is turned. Everyone doesn't have the same body shape, this figure gives you an option of the more stocky build, the hiney is definitely different, so you'll have to see if this appeals to you or not. I like vendors who give us versatility, just pointing out this may or may not be the "norm" for you.
Second, it was pointed out this is a morphed figure. There is no skin, only morphs. While it clearly states it is a morph product, just wanted to be sure you caught that. I'm not sure how you define things, in my head, a character is skin and morphs, a figure is morphs.
Does anyone have Jesse? What did you think of his booty shape?
I didn't buy it. It didn't appeal to me at all. I also didn't realize that it was morphs only, so thanks for pointing that out.
NEW! Novica & Invited Guest Contributors Tips & Product Reviews Pt 6Appreciate the input from folks who don't want to post but who PM me or email me regarding products, I certainly understand posting isn't for everyone and I will be happy to pass along information as long as I can see what you're talking about via the promos or the product listing. (If I don't have the product.)
Regarding M3D Jesse HD for Genesis 3 Males, two people have mentioned the shape of the buttocks is different in shape than the characters they own, and the promo does show that very well in the last thumbnail, and the others where Jesse is turned. Everyone doesn't have the same body shape, this figure gives you an option of the more stocky build, the hiney is definitely different, so you'll have to see if this appeals to you or not. I like vendors who give us versatility, just pointing out this may or may not be the "norm" for you.
Second, it was pointed out this is a morphed figure. There is no skin, only morphs. While it clearly states it is a morph product, just wanted to be sure you caught that. I'm not sure how you define things, in my head, a character is skin and morphs, a figure is morphs.
Does anyone have Jesse? What did you think of his booty shape?
Daz 3D is part of

Connect
DAZ Productions, Inc.
7533 S Center View Ct #4664
West Jordan, UT 84084Licensing Agreement | Terms of Service | Privacy Policy | EULA
© 2026 Daz Productions Inc. All Rights Reserved.