-
Problems with Autofit on custom figure
Are any auto generated morphs getting added to the clothing, if not then odds are the "Default" setting is the same as the "Value" setting in the morph's parameters, when it's like that DS doesn't realize that anything has been changed so doesn't create the auto generated morphs.
After re-reading your comment about 8 times because, at first, I didn't have a clue what you said (hahaha... sooo tired.....), I think I get what you're asking/saying. The main morphs I did was adjust the torso/breasts larger than the default figure I used as my template, widened the waist, thinned the hips and thighs. I haven't seen any issues with the chest/breasts, but since there are so many morph packs available, plus morphs that come with custom figures, I'm guessing the basic rigging of that area makes it pretty reliable that that area will auto generate a proper fit.
However, the area I'm seeing the most issue with is the waist/hips. I'm not sure what you mean about the Default setting (would this be what the default figure had before I adjusted it?) and the Value setting (would this be what the final morphed figure is?). How do I make sure DS is seeing the morphs settings? Where would I check this? With all the customization abilities, I'm actually surprised this would even be an issue.
Show Us Your Iray Renders. Part VFolks were grumping a little about how the Aiko line lost it's old school anime style. But hey, GenX2 and legacy morph packs to the rescue... here's G3F with Aiko 4 (I THINK I got the morph as a G2F legacy thing).
With a very appropriate G3F outfit, I think. (I only morphed the head, because the body ended up very... booby with Aiko 4 body)
Can Star character be converted onto Genesis?Star is standalone, so can't be combined with other characters. Is there a way to bring her as a morph on Genesis 1 or 2? GenX can't do that. Any ideas?
Aiko 7The thing is, with Genx and similar, you can transfer most of the older Aiko stuff, anyway...
Is It A Secret?The folder you pick in the options dialogue is the base folder - in that - for this - you will go to \Data\DAZ 3D\Genesis 3\Male\Morphs\Author\Product (where Author and Product are the names from the options dialogue) to find your morph files. Morphs always go in the Morphs sub-folder of the basic asset folder for the item being morphs, that way DS can find them and load them automatically.
Michael and Friends Appreciation Association [Lots of images, please.]I liked the brows, once I figured out you can morph them quite nicely. You can also 'pull them back' so that they aren't really too groucho marx. Some expressions did deform the brows a bit I found. But overall, I think they are a cheap and good investment. Will be interesitng to try on a texture without brows to see how that looks. =-)
The chesthair I believe is also by Redz. It came with one of the figure packs sold on rendo. I think they are 5 bucks now. Or were. I believe it's Kane's or Ayo's. Recolored with OOT's shaders.
Glad y'all liked it. =-)
Including addons in existing Product metadata.You would need to add the Base morph injection folder contents to the Victoria 4.2 Base product. Assuming you haven't change the file paths or V4.2 product name:
1. Select the Poser Format Library folder Pose>DAZ's Victoria 4>Morph Injections>Base
2. Right Click, select Create a Product From..
3. Enter the exisitng product name when prompted: Victoria 42 Base Victoria 4.2 Base Click OK
4. You'll get a message the product exists and if you want to add the files to it, Click YesGo to the Victoria 42 Base Victoria 4.2 Base product and launch the Content DB Editor and go to the Assets tab, you should see the morph presets in the upper window.
_____________________________________________________
Edit: Upon viewing your picture, in Step 3, Enter Victoria 4.2 Base
What Lindsey said.
You have not properly added them to the product. Not sure what you are doing, but its not the correct method.
When will RDNA-products arrive here?Transfer has already started, they're adding items in batches.
When will RDNA-products arrive here?Does anyone know when the RDNA-products will begin to become transferred from ones accontant over at RDNA to DAZ. And if there's any information going out when that transfer takes place.
I thought it was going to happen immediately after the merge, and that it would be done automatically, the only thing I had to do was making sure that my email account was the same here as at RDNA. But I have still not seen any of my RDNA-products in my DAZ account.
Problems with Autofit on custom figureAre any auto generated morphs getting added to the clothing, if not then odds are the "Default" setting is the same as the "Value" setting in the morph's parameters, when it's like that DS doesn't realize that anything has been changed so doesn't create the auto generated morphs.
Novica & Forum Members Tips & Product Reviews Pt 7Some Bedrooms and Buildings
Products that don't have separate walls are in red, as in warning! You can't expand width/depth, must scale the entire thing.
I've been kitbashing the past week (that's why not posting much, working on the book sets) and here's what I am finding as I go. Today mostly looking at combining things, changing them from their original purpose, what can go with what, etc. As always, lthough I am giving it sincere effort to ensure this is correct, I always welcome people double checking behind me in case I'm missing something. I break it down in Scene, if I can't find something I use the Surface tool to locate it, I check Actor for morphs in Parameters, etc. I check it more than once but again, I welcome double checks.
Doing a lot of i13 since they're all together in Content Library>Environments
The Attic Bedroom I couldn't find a way to select individual walls, none listed. All the walls as one piece. I don't want to scale the entire blasted thing!
i13 New Visions Bedroom- No curtain morphs. Would have to use cutout opacity to just make them disappear. Walls are separate.
In the i13 Comfortable Living Room, the curtains only raise half up. (If someone else wants to test that to see if I'm making a boo boo- but if you undo the parameters to go past 100%, the blinds go wonky.) Has a nice "Close Blinds" morph. The set has only one window. Walls are separate though.
Classic Comfort Bedroom- if you want glass doors that open and close onto a balcony, this is the one for you. However- small thing- would appreciate vendors putting door knobs on BOTH sides of the door, in case we want to connect two of them for two rooms. What a PAIN to have to load a wall, opague out the wall to overlay just the door to get a knob (since door won't detach from wall.) So vendors- door knobs on BOTH sides of the door please! COOL tray ceiling!
i13 Stylish Room and Poses Top marks for windows and doors positioned to give you great light. There are two in one corner, nicely done! No morphs though.
i13 Visions of the Past- only has two walls, so great for lighting a room, and the walls have TWO material zones so you can use two shaders on each wall. Definitely one to pick up if you want to tweak things.
Hotel and Lounge- All walls separate. Nice to have a separate door for bathroom, does not open though. You could use it as a bedroom if you widened the set (you have to be careful there are no doors on the walls you widen, learned that the HARD way. You end up with King Kong doors.) then opague out the doorhandles and replace with other knobs. The two thin windows at the end of the room DO HAVE MORPHS TO CLOSE BLINDS (they are vertical, long) but not to pull left or right. Your natural light is extremely limited with this set as it runs very long, windows thin and at one end. (WHY?????)
Modern Loft- Again, all one piece. Outside, the tin roof extends past the wall and black beams you see in promos stick out under it. Weird.
Modern Office- Walls are separate. Exterior of building looks good. Windows everywhere. Open ended, 3 walls.
Private Party (Half red on purpose) Have a wall that creates a small room (you'll see it in the passthrough window) but in the main room, two walls are gone so a lot of light. That small room would have that wall missing too (think of it as the one closest to us, that runs all the way across.) The back wall of the big room is separate (keeping the back wall of the small room, which is good) Bad: the small room, ALL THREE WALLS ARE ONE THING. This means you can NOT take out that wall separating it from the main room, to make the main room bigger.
i13 Visions in White- Open ended, no morphs for curtains, walls separate. One wall has a lot of windows, really easy to light. It's nice and square and easy to attach to another room.
i13 Productivity Area- only one wall! Spiral stairs decor only, no ceiling.
i13 Neighborhood Bar has a regular sized door that morphs open and closed. No door knobs. Also has a pane of glass (front windows) you could use elsewhere, and an Open sign. Brick walls (and if you don't like the back one, can use one of the other ones. Walls are separate.)
i13 Late Night Fantastic- Well, if you're looking for a fish tank and a shower that's IN the bedroom....huh. The walls are one piece. Open ended (front wall gone.) Can hide the ceiling beams No morphs on window blinds, and there's only one small window. Your light will come from the front. (As facing the end of the bed.)
Getting Ready- Only two walls, not separate. Nice that they have two material zones (crown molding separating top and bottom.)
Is It A Secret?Ok, see this is a good example of why it is important to lay out your exact process. You are using a head morph resource kit. Hopefully you read the licensing agreement for the use of these morphs ( http://docs.daz3d.com/doku.php/public/read_me/index/31276/start). Some kits require you to make morphs that must, in turn, require the customer to have those morphs in order to utilize yours. It would be a different process for setting that kind up for distribution.
Ok, sorry if I haven't been spacific on what I'm actually doing. I am using Genesis 3 Male Head Morph Resource Kit 2 within Daz Studio. Following Richards steps to the best of my ability on the thrird post above.I load genesis 3 and zero any morphs left on him out and leave him in the default pose.This is fine.
I apply the head merchant resource morphes, shaping them to my liking. No poses, no other morphs and set the mesh resolution to Base.Fine, too.
Now this is where I feel like I'm messing up.I export it in Wavefront.obj (that's the only choice I get as an obj.) As in the screenshot below, I leave the default settings alone. Including the "Convert To Daz Sudio to: Daz Studio (1unit = 1cm) at the top. (I'm actually doing this as I type)This is correct.
Then I go to Morph Loader Pro, but Wavefront (obj) isn't in the list to convert it to Daz Studio From: dropdown,This is where we have been trying to tell you that what MLP is looking for is the scale that you want to import at and that this MUST be the same as the scale you exported so you choose Daz Studio.
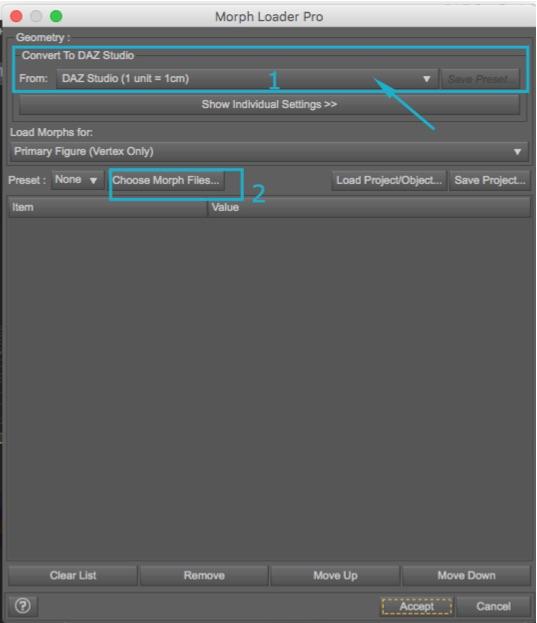 so I choose "Custom".
Do the above, previous, instead.
I chose the obj file in "Choose Morph Files",Correct.
Drop down the file list and right click on Property Group and choose Actor/people. Hit Accept and get "Morph Created Successfully"I would use Actor/Head. This is a head morph. Actor/People is usually for full character morphs such as Victoria 7 or Michael 7.
Now where did it go? I can't find it in my Daz files anywhere.Select the Genesis 3 Male root. Actor/Head should be in Parameters under Head or Shaping under Head (if you use what I suggest).
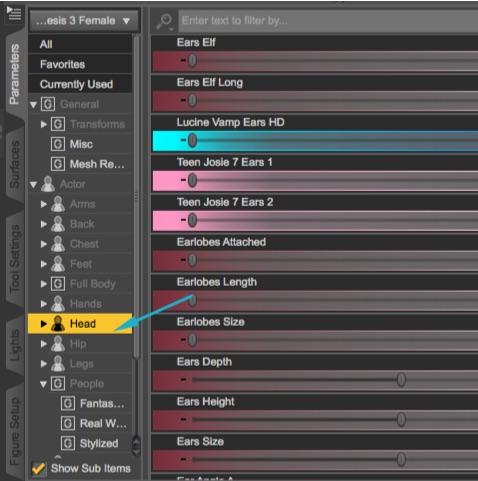
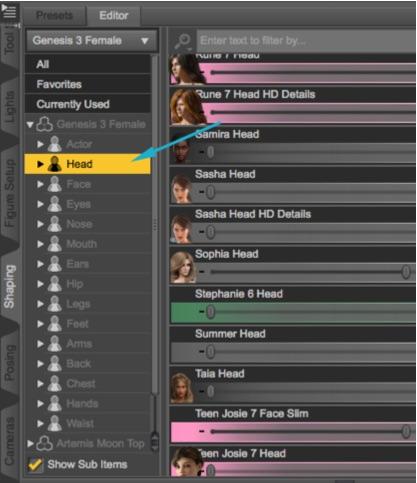 When I try to save it as a morph asset I get vendor name and Product name. But the only two choices I get to save it in is either C:/Users/Me/Documents/DAZ 3D/Studio/My Library or C:/Users/Public/Documents/My DAZ 3D Library, as well as the choices as what to save in a tick list below, from Genesis 3 male at the top (on to pelvis, left thigh bend etc.) to Head at the bottom.
I believe you need to use the one that ends in My DAZ 3D Library to be correct, but I just got contradictory info (as I am on a Mac, not a PC). I have to check with Richard to make sure, so wait on this one.
The Genesis 3 male at the top has a dropdown containing Actor, Hidden, Morphes and Pose controls. Sorry I'm being such a pain, I wish this would all soak in, if I don't get it this time, I give up.You need to know where your morph is in order to properly save it and you will drill down to it in the asset window with the same path you used to create it.
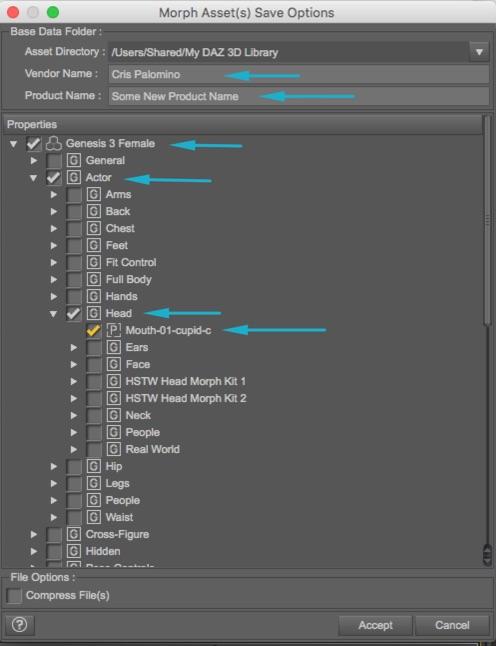
Hopefully, that explains it. I'll get back to you on the library location.
Aiko 7Although I do like her and most likely will get her, I too am surprised how non Aikoish she looks. I was hoping for more of a Genesis 1 look or even Aiko 3/4
Same here. Surely if Raw can make animal people out of the new figures, someone could manage to make something that looks like an updated Aiko 4. Aiko 7 strikes me as too realistic and too old.
Natsuko and Sakura are actually closer to what I would expect for a base Aiko figure.
I am glad you like Sakura, Both Characters (Sakura & Lolita) i wanted to make very different to show the diversity of Aiko's morph.
Including addons in existing Product metadata.You would need to add the Base morph injection folder contents to the Victoria 4.2 Base product. Assuming you haven't change the file paths or V4.2 product name:
1. Select the Poser Format Library folder Pose>DAZ's Victoria 4>Morph Injections>Base
2. Right Click, select Create a Product From..
3. Enter the exisitng product name when prompted: Victoria 42 Base Victoria 4.2 Base Click OK
4. You'll get a message the product exists and if you want to add the files to it, Click YesGo to the Victoria 42 Base Victoria 4.2 Base product and launch the Content DB Editor and go to the Assets tab, you should see the morph presets in the upper window.
_____________________________________________________
Edit: Upon viewing your picture, in Step 3, Enter Victoria 4.2 Base
Transfer Utility distortionThanks again, Richard!
I followed your steps closely, and I achieved some difference (as well as learning some new processes!), but not quite there yet. Unless, of course, I misapplied something along the way. The balls become somewhat corrected, dialed to 100%, but then the whole collar gets buried into Genesis when V5 and Supermodel are applied.
Curiously, with Genesis zeroed out, I can see the balls become properly spherical when the collar morph is set to 100%. But, it becomes buried as well.
I tried this both with Genesis zeroed out before clearing the created morph process on the collar as well as leaving Genesis as V5 Supermodel. But the results were the same.
I feel like I'm so close!
July 2016 New User 3D Art Contest “Portrait Rendering” – WIP ThreadOkay, so I've been playing with some characters in recent weeks for a story idea I had for a children's book. Mostly, I've just been trying to create my own characters using the Little Ones morphs. You can use G3 morph dials on them and it's been interesting trying to create new characters because the morph dials don't work exactly like they do on a normal G3 figure. I think there might be some hidden controls in there to prevent the user from completely breaking the Little Ones stylist appeal. Which is a good thing because I really like the characters. So, my story revolves around two best friends and I thought I'd do a portrait with my current version of their morphs because I haven't actually done any real renders with them, just test renders. So, here are best friends, Makenna and Toby, who have lived next door to each other the entirety of the young lives and have become inseparable getting into all kinds of trouble much to their parents' dismay. I still have a lot of work to do as this is just a test render of what I've done with posing so far. Still need to work on things like background and possibly different lighting. It's just a start.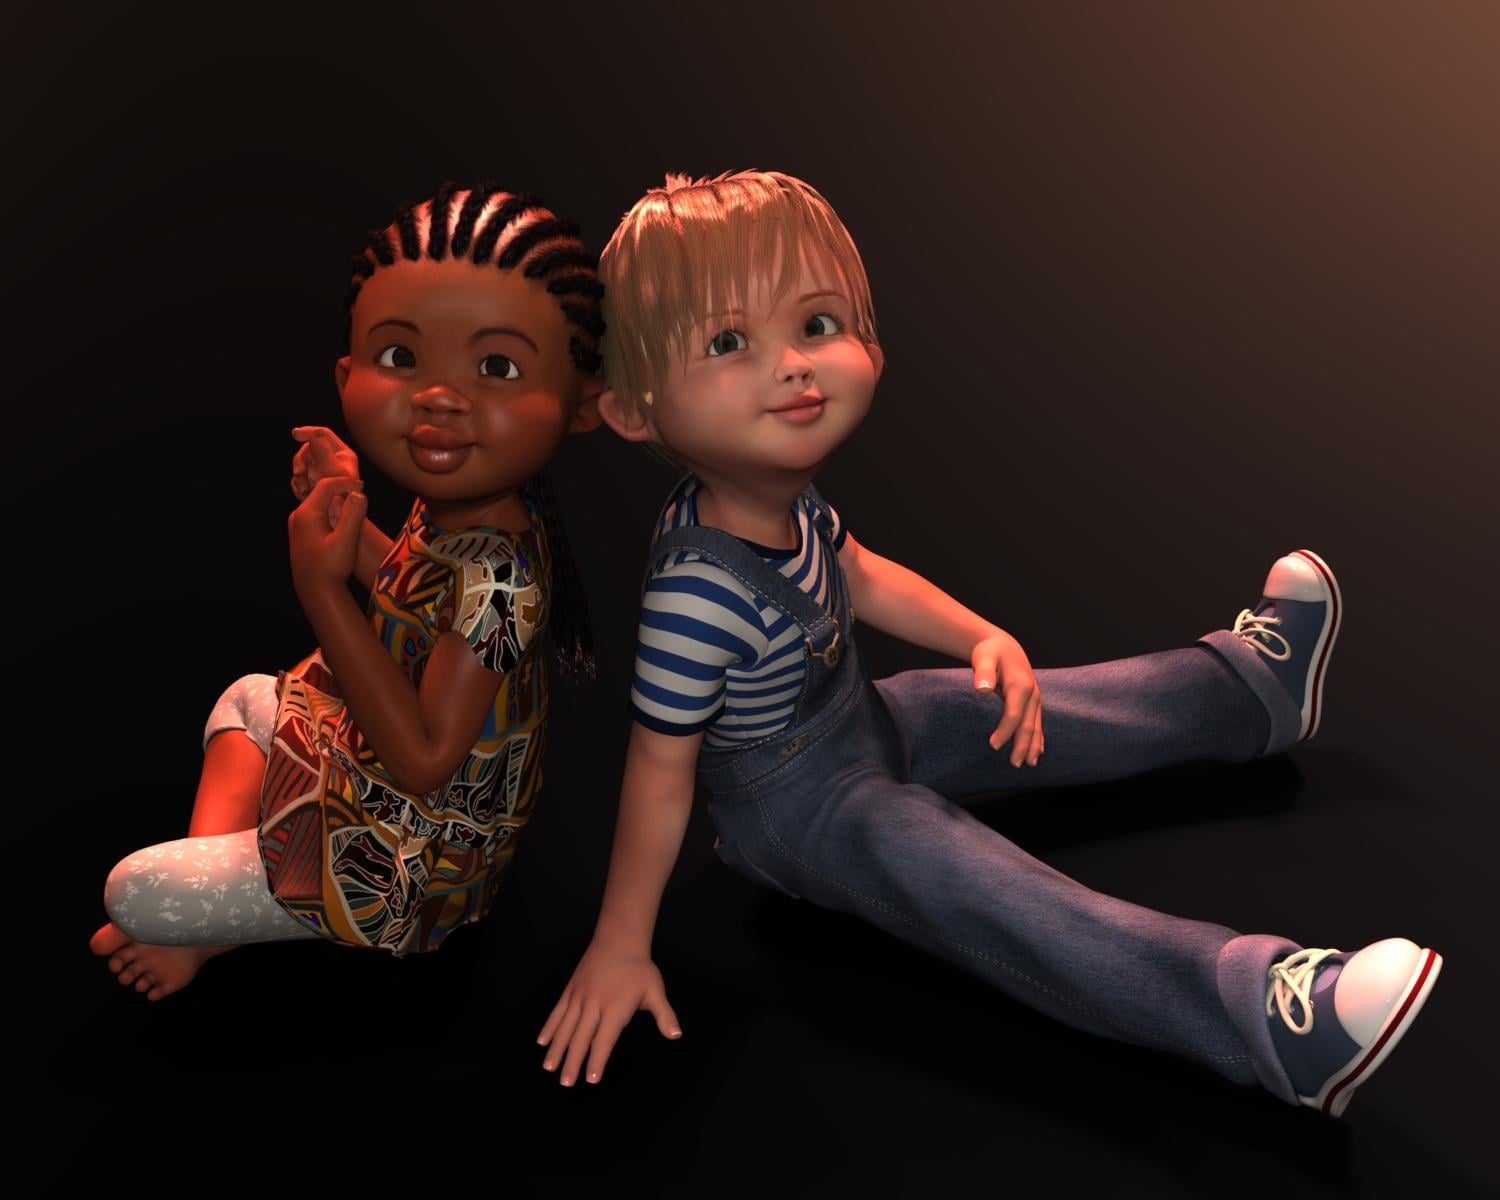
Oh, Knittingmommy, you have captured cuteness and personality! I agree with the comments on the pose, that it would be great if you can get them leaning their bodies together, in spite of those big heads. I think you did a great job of getting the clothing to look good on the sitting poses; that can be hard. The little boy's left arm looks like it is kind of floating in air. I thought maybe it was supposed to be resting on his leg. Other than that, I think the poses look relaxed and realistic. I don't mind the dark background. The characters still seem to stand out OK.
Is It A Secret?Dang, I dunno how I did that, I was afraid of that, thanks for checking it and seeing that Chris, I took it down. I figured it was ok since it had been approved for posting.
Ok, sorry if I haven't been spacific on what I'm actually doing. I am using Genesis 3 Male Head Morph Resource Kit 2 within Daz Studio. Following Richards steps to the best of my ability on the thrird post above. I load genesis 3 and zero any morphs left on him out and leave him in the default pose. I apply the head merchant resource morphes, shaping them to my liking. No poses, no other morphs and set the mesh resolution to Base. Now this is where I feel like I'm messing up. I export it in Wavefront.obj (that's the only choice I get as an obj.) As in the screenshot below, I leave the default settings alone. Including the "Convert To Daz Sudio to: Daz Studio (1unit = 1cm) at the top. (I'm actually doing this as I type) Then I go to Morph Loader Pro, but Wavefront (obj) isn't in the list to convert it to Daz Studio From: dropdown, so I choose "Custom". I chose the obj file in "Choose Morph Files", Drop down the file list and right click on Property Group and choose Actor/people. Hit Accept and get "Morph Created Successfully" Now where did it go? I can't find it in my Daz files anywhere. When I try to save it as a morph asset I get vendor name and Product name. But the only two choices I get to save it in is either C:/Users/Me/Documents/DAZ 3D/Studio/My Library or C:/Users/Public/Documents/My DAZ 3D Library, as well as the choices as what to save in a tick list below, from Genesis 3 male at the top (on to pelvis, left thigh bend etc.) to Head at the bottom. The Genesis 3 male at the top has a dropdown containing Actor, Hidden, Morphes and Pose controls. Sorry I'm being such a pain, I wish this would all soak in, if I don't get it this time, I give up.
Update: I have now created a file with all the contents according to Sickleyields tutorial.
Transferring Morphs from Genesis to G2M/G2F and from G2M/G2F to Genesis (Now with Clones!)I successfully transfered a character full body morph from Genesis to Genesis 2 Male, it all looks good and if I load clothing items to the G2M figure it all fits perfectly.
However here's the problem, if I save the character with clothing items fitted to my library then reload that figure the clothes are still in place BUT they are full of poke through!
I have started from scratch about 5 or 6 times, thinking maybe I missed something but I just cant get clothing to look right after reloading
Celebrity Look-a-Likes for 3D figures Part 2Having just picked up the DVD of "Pride and Prejudice and Zombies", I'm now interested in finding a Victoria 4 morph that looks like Lily James or that I can kitbash one from. Does anyone have any suggestions?
Problems with Autofit on custom figureIs that all trousers/skirts/belts or only one set? In general if the clothing item doesn't support all of the morphs used DS will generate new ones, but some items have overly extensive Rigidity groups applied which can put the kibosh on all morph matching that isn't covered by built-in morphs.
So far I've experienced it on a few different sets. This is one (http://www.daz3d.com/gallery/#images/157776) although I was able to hide it pretty good adjusting the scale of the object. The item in the screenshot I posted was http://www.daz3d.com/get-funky-josie. ; Sometimes I can change the scale of the object to hide the issue, or shift on an axis, but that isn't always available (don't know why).
Daz 3D is part of

Connect
DAZ Productions, Inc.
7533 S Center View Ct #4664
West Jordan, UT 84084Licensing Agreement | Terms of Service | Privacy Policy | EULA
© 2026 Daz Productions Inc. All Rights Reserved.