-
Figure Challenge - Bong vs Loik vs Flisch
Thanks for the input all... I still havent made a choice yet, so keep the suggestions coming.
Ive always LOVED thiat render Walt and the other with the other toons... But heeeeyyy.... what happened to Bong on the end finger? Lol!
I forgot about that "hammerhead" morph pack for Bong.Thanks, it was a fun test; I smudged the "finger" because there've been some people sensitive to such things of late and the last thing I'd want a toon render to do would be to upset someone (the goal is always the opposite).
One other thing I remember (it's been a much longer while than I thought) was that I had a hard time with Loik and boots, Crossdresser didn't do a great job. That might be due to me, of course, as I never spent a lot of time in Crossdresser fine-tuning adjustments and mostly used right-out-of-the-box conversions.
Good luck.
-- Walt Sterdan
Curly Fingers, Please Help.The figure was totally fine before applying poses from that set. It seems that any pose from that set creates this issue. Even after setting all poses to zero, bending the hand/fingers results in this deformation.
Is it a joint constraint issue? Is there a way to fix this without loosing all the morphs I've worked on?
The figure has multiple morphs applied from different sources, could it be a conflict between morph presets?
Transferring TextureBasically yes. I am trying to create a texture for a figure that didn't come with one.
SickleYield has a Map Transfer tutorial where she uses it to create such a texture for a Genesis figure. You load the figure, you load these M4V4 mapped m5 gens by Cauri Blackthone and then you apply a texture to the gens and copy the hips texture on to the gen hips. Once you do all that, you use the Skin Map transfer utility to write out a texture map for the gen hips and the gens. Then you can combine them in Photoshop and tint the lower part to match the upper part. Works great. When you write out the gen hips map, all you get in what is applied to the gen hips, so it is easy to match up the two parts.
There isn't one of those remapped gen replacements for Genesis 2, but I do have the M4 remap set by Slosh, so I figure I could use those. Unfortunately nothing gets written out when I use the Transfer map. I guess the big difference is that the M4V4 mapped m5 gens by Cauri Blackthone are actually an obj that you load instead of the M5 gens. Maybe that has something to do with it not working the same.
What I was able to do was to apply all the textures and then copy the hips over. Then I exported the gens out as an obj. I took that into Blacksmith and I was able to tint everything to match the hips and clone out any seam. However the entire torso map does load even though only a small part of it is being used. Then back in Studio, I have to load up both maps instead of having just the one if it was a store product. It would be easier to create bump maps and all, if there was a way to transfer out just the hip map on the gens map.
I haven't tried using the M4V4 mapped m5 gens by Cauri Blackthone on Genesis 2 and then trying this. But I might give it a go. The neat thing about the process with Genesis is that you end up with a map that applies to the defaut Genesis and not the M4 remapped.
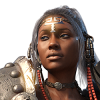
StrangeFate's stuff: Argentheart Crowns promos.It helped Linwelly, thanks.
I imagine 'unbreak the spine' is a morph too, or otherwise still something people need to have, to see the difference ?
Made a few more poses, I think that's enough for a first set. Need to get the last weapon into Daz, make sure at least most poses work for it too, then read up again on where the files are required to be and how they have to be packaged aaaand things should be good to go.
 Glute Control for Genesis 3 (Commercial)
here a some another image I have posted before in the one thread I have asked because of the equal geometry that is not 100% correct
Again as mention the equal geometry issue is in that products morph and not the figure. Why not ask that Vendor to update his product to fix the issue?
Glute Control for Genesis 3 (Commercial)Using Glute Control and Bend Control. I have no issue making sitting in chair options that show lower compression of the glutes and widening of the upper thighs. You can even take it a step further by adjusting the x scale on the pelvis bone which will widen the glutes.
Yes, I have both of these tools but some "combination" morphs like a "sitting on a chair" morph would make things easier, sitting on a chair needs three morphs in my opnion. Both, Left, Right. Here are some screenshots of such combination morphs "buttock works" has. The first three screenshots will show sitting on a chair at 50% without bend control morphs, the next two will show the the sitting on a chair morph at 50% with your bend control for legs and hip at 75%. The last two will show a sitting on a bar morph at 50% without bend control.
I have forgotten to zero the glute inner close morph (sorry) but the screenshoot I think show what I mean.
The reason I did not create combination morphs or presets such as sitting on chair is because it will not look right on certain shapes if it is a fixed combo or morph. This is why I give users all the morph elements so they can create the sitting results themselves that will work on the shape they chose. Here is a test. Go apply that sitting on a chair morph from buttocks work on G3F with Heavy morph or some heavily modded alternative shape and tell me if it works like it does on default shape. Also try and move the legs slightly outwards or maybe move one leg higher than the other and look at the result with that morph dialled and tell me if the results still look good. Maybe then you will understand why I did not offer such a preset, because not every user uses the same figure shape, and not every user will apply it to the same sitting pose. So, the best solution, was to offer morph elements that will allow you to create your own sitting pose morph and expand the usage to cater for variety. I will not be offering these type of presets because they do not work on multiple shapes, and manual adjusting will still be required.
Antique freebie problem, could use some helpGot it! Thank you! I had the base package and the morph targets but not the P5+ runtime(s).
It was a very nice outfit. I'm not going to hold out a lot of hope for it autofitting well (not with that skirt), but I'll be able to at least make the attempt. And I may be able to get some use out of the sleeves for kitbashing.
Official Release of Carrara 8.5 **Update - 8.5.1.19**i wish i could shape the edges of ocean primitive.
mebbe similar to like how to shape a motion path with like bezier control thingies.and like a spherical ocean primitive and an inifinite ocean plane.
MistyMist, I don't have a lot of experience using the ocean primitive, but I have seen other users put a black and white mask in the alpha channel to create a custom shape. I know that's not exactly what you are requesting, but that might work for your needs. I guess you could even use an animated mask...hmmm... As for a spherical ocean, I tried some Modifiers, like Spherical Morph, but the results looked pretty awful. Formulas didn't seem to work either (way beyond my comprehension so I'm sure I did something wrong...), but other Modifiers had intertesting results
 Getting the most out of a littleOn the topic of prices, I was contemplating how much stuff is free, and how far you can get with the least. I'm away from my house so posting from phone, but if it were me, the products I'd get: Aging and Growing up, base morph packs for Genesis or Genesis2, GenX2 to maximize sharing of skins and morphs. I'd probably work in Iray because 3dl would push me toward more base purchases. Then I'd dive into the freebie section and get Dietrying's base morphs and collect free stuff madly.On hair (G3F) - a critical note to vendors
The Geneva has many adjustment and fit morphs, none of which where needed to get it fit Genesis 3 Female base. Fitting it to Genesis 2 Male did require parenting, scaling, translating and one fit morph but it can be made to fit.
rig human meshThe Transfer Utility works on meshes thata re more-or-less the same shape as the source, if your new human mesh doesn't line up (which seems likely unless you are just trying to up-res) then it will put the joint centres in the wrong place and the projected weights will be odd. Adjust Rigging to Shape is for adjusting joint centres of well-rigged figures to accommodate morphs, it does nothing to a base rig. You really need to use the Figure Setup pane for this, then adjust the joint centre and end points with the Joint Editor and finally set up the weight maps with the Geometry Editor and Node Weight Paint Brush tools.
Daz > Zbrush Teeth problemThe main issue is probably that when you divide with smoothing in ZBrush even the base resolution is then changed - the teeth and fingers are particularly affected. You will also be seeing a contribution from the Mouth realism (and navel) morphs which are set on the Genesis 3 figures when they load. What I would suggest trying is stopping the above steps just before the masking, then skipping down to resetting the divisions to 0 and sending back to DS. Call that "ZBrush distortions" or something like that. Now, zero everything, then set each of your bad morphs to 1 and export as OBJ. Finally zero everything, delete the bad morphs (including the assets if you'd saved them), set ZBrush distortions to 1 and import each of the bad morphs with Morph Loader Pro enabling Reverse Deformations - that should leave only the intentional changes.
Daz > Zbrush Teeth problemHi,
I'm having a problem with the teeth when i bring the morph back in from zbrush. I've tried a number of different suggestions i've seen but none of them seem to have worked.
This is what i usually do;
- select genesis 3 base character > parameters > mesh resolution> set subdiv to 0
- file > send to zbrush > draw out > press t > press f > turn on polyframe > autogroups uv > merge similar groups > turn off polyframe
- subdivide to 5 (ish)
- ctrl + shift click on face twice > mask off eyeballs and mouth > ctrl +shift click on canvas
- Do all the altering
- when finished > undo masking > reduce subdiv back to 0 > GoZ > back to daz
- name morph > select Actor > accept > set subdiv back to 1 > increase custom morph to 100% > done
It all looks and works fine and then i noticed that the teeth are really thin and pointy!i've tried setting the resolution level to Base (which i think you are suppose to do anyway), setting mouth realism HD & Navel to 0 etc and not much worked.
I think i have managed to narrow it down to Subdividing in zbrush being the problem but i need that to see what i'm doing better.
Does anyone have any other suggestions of what i could have done wrong?
And is there a way of fixing the teeth of a morph i've already done?Thanks for any help! :)
Why does Fantasy Races: Aunrae the Dark Elf need G2F morphs?Title pretty much says it. It's for Gen3Female, but needs Gen2Female body morphs as product dependency? Sounds very weird to me. Is it a typo? Should there also be some transfer product present as dependency that allows to transfer G2F morphs to a G3F figure? Or maybe the character can also be used for G2F?
TangoAlpha's Coming Soon Thread [Commercial]we need a Baldrick morph for M4......

He would need a turnip model...
Curly Fingers, Please Help.Is this on the base Genesis 3 Female or is there a character morph applied (or any other morphs like GrowingUp)?
Celebrity Look-a-Likes for 3D figures Part 2after 10 pages everything is starting to blur together for me. can someone tell me if there is a Sienna Guillory (Jill Valentine) morph? google pointed me here, but havent found a referrence to it.
Reference to her on page 1. http://www.daz3d.com/forums/discussion/comment/850773/#Comment_850773
went through every page 4 times. wasn't there.
I linked you directly to the comment that references her which was likely the 'cause of your Google result.
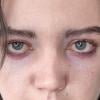
Skin in Iray vs Cycles vs ???
Hi please consider the context of where a thread is posted. Those head models are hi Res scans of real life humans with a topology completely different from models built for daz studio. They are not really relevant for a discussion about rendering daz content in various engines. What point are trying to debate here????I am. Like I said, the name of the thread is 'Skin in iray and Cycles...' Doesn't say 'Genesis 3 skin in iray and Cycles...'
Using freely available scans are actually a good idea. Everyone have access to it and they don't have to download DAZ Studio or the Genesis 1/2/3 starter essentials to get the model or textures into their app. The file sizes for both are larger than say, that Lee Perry Smith scan. The textures are captured by camera, not painted. Very important especially for displacement.
If you want to haze the same scene across different apps (not just renderers), just export it as an FBX file (figure, texture, camera and light position). With a free model, there's no copyright issues of mesh exporting like if you're using any DAZ models (distributing the actual mesh or textures).
The current setup for comparison forces you to have DAZ Studio and the Genesis 3 Starter essentials, load the scene and manually transfer it to other app to get the same light and camera placement.
Yes. The Title is "skin" genesis has a skin texture, So how exactly is the title incorrect?
Technically I guess, the thread should be named "Genesis 3 skin and eye shaders in Iray, Cycles and hopefully some other renders controlling for factors such as different textures and lighting" But i figured that might be a bit of a mouthful ;) I did however mention all of that in my introductory post.
You are more than welcome to do a comparison using whatever mesh and texture you want. I wanted to use Genesis. I even have some reasons: I wanted to include eyes, and teeth, My preferred Iray setup uses the grey SSS map of which I would have had to create my own, or figure out a different shader setup, and as i mentioned before I wanted something relatable to my workflow.
Clothes from MD appear stretched out when posing in DAZ3DWhen you create a new garment for Daz Studio, whether you are using Marvelous Designer or another modeling program, you need to adjust the weight maps on the garment after fitting it to your character. When you use the transfer utility, the weight maps from the character are transferred into the clothing, and of course the way a shoulder bends on skin is not going to be the way it bends on cloth, to the weights need to be different. Skin stretches when it moves, so the weight maps reflect that... but clothing for the most part does not stretch, it drapes. Adjusting the weight maps will help with the majority of the stretching. After that, you need to create JCMs to remedy any addition misbehavior by the clothing during a joint rotation. This is one of the things that makes clothing creation take so long for us PAs... trying to make sure the clothing moves correctly when you pose the figures and does it with as little distortion as possible.
Skin in Iray vs Cycles vs ???Hi please consider the context of where a thread is posted. Those head models are hi Res scans of real life humans with a topology completely different from models built for daz studio. They are not really relevant for a discussion about rendering daz content in various engines. What point are trying to debate here????I am. Like I said, the name of the thread is 'Skin in iray and Cycles...' Doesn't say 'Genesis 3 skin in iray and Cycles...'
Using freely available scans are actually a good idea. Everyone have access to it and they don't have to download DAZ Studio or the Genesis 1/2/3 starter essentials to get the model or textures into their app. The file sizes for both are larger than say, that Lee Perry Smith scan. The textures are captured by camera, not painted. Very important especially for displacement.
If you want to haze the same scene across different apps (not just renderers), just export it as an FBX file (figure, texture, camera and light position). With a free model, there's no copyright issues of mesh exporting like if you're using any DAZ models (distributing the actual mesh or textures).
The current setup for comparison forces you to have DAZ Studio and the Genesis 3 Starter essentials, load the scene and manually transfer it to other app to get the same light and camera placement.
Daz 3D is part of

Connect
DAZ Productions, Inc.
7533 S Center View Ct #4664
West Jordan, UT 84084Licensing Agreement | Terms of Service | Privacy Policy | EULA
© 2026 Daz Productions Inc. All Rights Reserved.