-
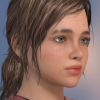
Black Is Beautiful II
Thank you very much. :) I have to use a lot of morphs to get that body shape (which is why I haven't shared it, you'd have to own a lot of sets to be able to use it), but it's fun to make your character original and as close to how you imagine them to be. You can never go wrong buying morph sets if you take the time and try using them.
Move my layout and scripts to the BetaA safer/less scary alternative than fiddling in the registry would be to take Rob's sample script http://docs.daz3d.com/doku.php/public/software/dazstudio/4/referenceguide/scripting/api_reference/samples/file_io/save_mapped_paths/start
Rob has added scripts to transfer the UI settings too: http://docs.daz3d.com/doku.php/public/software/dazstudio/4/referenceguide/scripting/api_reference/samples/general_ui/copy_ui_from_channel/start
Panties and ThighsSorry if this is an old post; but I ran into this problem recently and I think I know how to fix this. I'm also relatively new to DAZ, so take that into account as well.
This is what causes the problem:
1. The weight map for the crotch area gets assigned to the left and right thighs. That's why it "sticks" to the thighs when they bend.
2. There are two JCMs in G3F called pJCMThighSide_85_L, and pJCMThighSide_85_R, which further deform the geometry when the thighs are bent to this extreme position.
To fix point 1. You have to use the Node Weight Map Brush (Alt + Shift + W), select the Pelvis bone on the underwear to be fixed, use Symmetry on X axis, and paint the crotch area read completely. This will remove the regular influence from both thighs when they bend -- which already will fix about 80% of the problem because the underwear will no longer stick to the thighs. However, some of the geometry will still look a bit wrong.
To fix point 2 you'll need to export G3F with both thighs bent (just as a guide) and make two custom morphs for your underwear to replace pJCMThighSide_85_L and pJCMThighSide_85_R. If you want to understand the problem, select "Show Hidden Properites" in the Parameters tab and navigate to "Hidden -> Corrective" and set both these JCMs to zero. The geometry should snap back to its original position; but it will also leave a gap and it will probably intersect G3F in some areas.
Making these morphs isn't hard; but you have to remember that the middle symmetry line will get applied *twice* when both legs are bent like this. So, when creating these morphs bear that in mind. In my case, the way I fixed this was by exporting G3F with both thighs fully bent. Then I created a single morph that fixed both thighs at once and then I split this single morph into left and right morphs -- but keeping the influence of the symmetry line to 0.5.
Finally, when importing these morphs back into DAZ you need to use "Morph Loader Pro" and select "Hidden/Correctives" in the "Property Group", "Deltas Only" for "Overwrite Existing" and change the names to be exactly pJCMThighSide_85_L and pJCMThighSide_85_R as needed so that they overwrite these JCMs.
Fixing point 2 requires a couple of custom morphs to be created for the underwear, which is probably not easy to automate. This should explain why it's nearly impossible for any content creator to create a single-click solution to import G2F/V4 content into G3F that will work for all cases.
Anyway, hope this helps.
Genesis 3 Skin on a Genesis Model ?was there a map transfer utility ? never really understood it, TC2 converter bit the dust.
There's a Map Transfer utility by blacksmith3D at Rendo, but it has add-ons to convert to G3, not from G3.
Genesis 3 Skin on a Genesis Model ?was there a map transfer utility ? never really understood it, TC2 converter bit the dust.
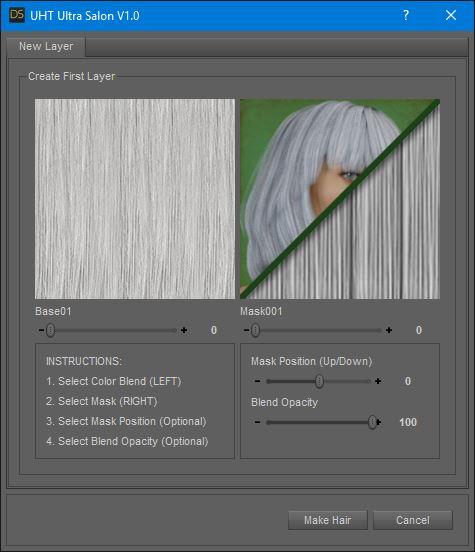
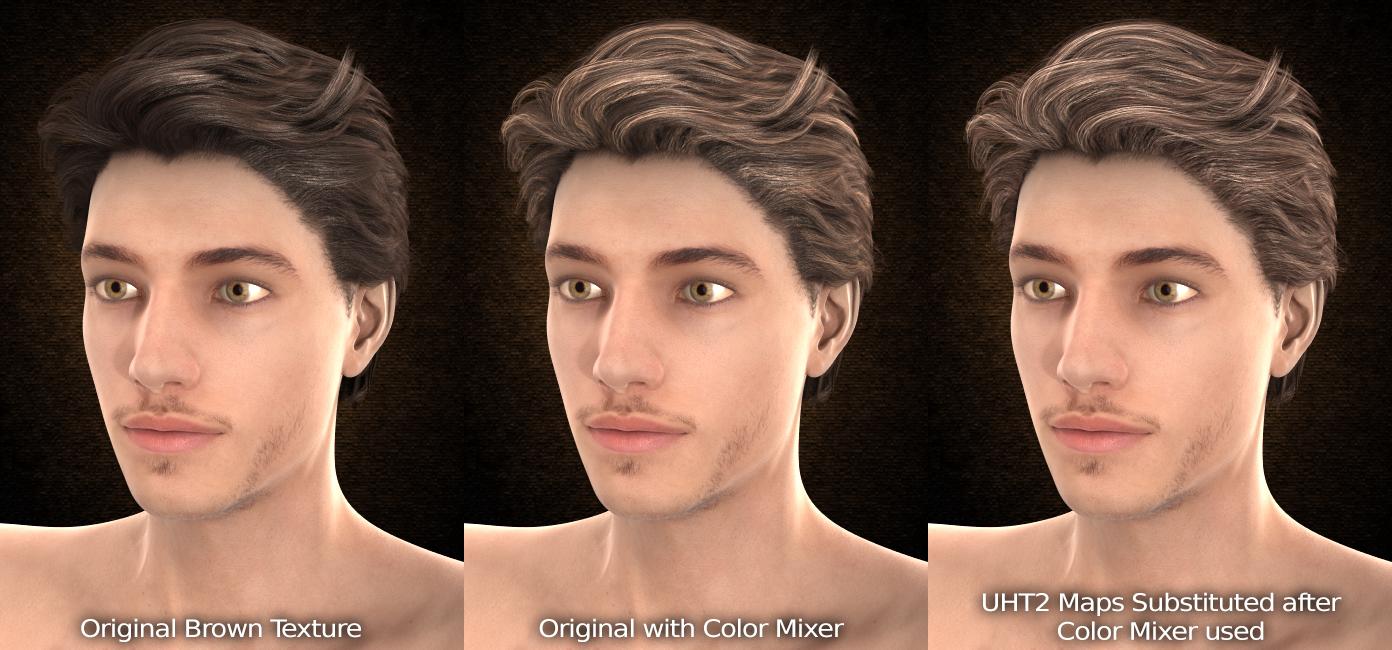
Product Updated: UHT2: Ultimate Color [Commercial Product] with video links... Share your renders!Okay, I know this question kinda goes against the intent of the product, but hear me out.
I don't do a lot of straight Iray images. I'll often render once in 3DL, and then apply Iray surfaces, adjust the lights and render again, then compositing the two. (sometimes I reverse the process, but since the majority of my stuff doesn't have Iray settings yet, it's usually 3DL first)
So how much does the hair color feature rely on the Iray shader, and is it in theory possible for me to re-create the color in 3DL?
Please note I'm not asking for the scripts to make something instantly compatable with 3DL, or for 3DL results to be as fantastic as the Iray results. I am perfectly aware of the limitations. I just want to know if I use this to set up an image where the character has black hair with an electric blue skunk stripe, for example, if I can keep the basic "Black hair with blue stripe" part when I change the shader to a 3DL compatible one?
Hi DaWaterRat (seeing your nickname always makes me chuckle)... When I started UHT2, I had intended to try to make it 3Delight compatible as well, but as I started adding more and more "features" to it in the utilities, I began to realize that the 3Delight shaders did not offer some of the options that I wanted to include.. the biggest of them being the tiling of individual textures. UHT2 tiles the Base Color, the Translucency Color, as well as the glossiness and normal maps, but does not tile the Cutout Opacity (transparency) maps. I was not able to replicate this with 3Delight shaders and this is an integral part of being able to use the Color Mixer effectively.
The Color Mixer takes your new "mix" and applies it to both the Base Color and Translucency Color channels... that being said, Color Mixer will still work, even with 3Delight shaders. You can apply a color mix over a omUberSurface or AoA SSS Shader and it will mix the color in without overriding any of the other 3Delight settings. The problem then lies with wanting to tile that new mix over the hair. The masks in Color Mixer are a bit to chunky sometimes to get a good look without any tiling whatsoever, so the results might not be as desirable. I know some will probably not want to watch videos, so here is a screenshot of Color Mixer... you can see the interface is not overly complicated, and I even included step by step instructions right on the interface:
As for mixing the hair first on a Iray shader hair, then transferring the textures to a 3Delight setup manually... yes, you can do that as well. If I could write a script that would do that transfer for us in one click, I would do that, but so far I haven't been able to figure it out. And the renders times to test these settings over and over again as I tweaked them was killing me, if I'm being honest. This example shows just that: I applied UHT2 to the hair surfaces, used color mixer to add some blonde streaks, then converted the hair to omUberSurface, then plugged the UHT2 textures into the appropriate blocks. For some reason, 3Delight does not like my normal and bump maps from UHT2, so in the bump slot, I used the UHT2 Shine map, and in the displacement as well. Put nothing in the normal map slot. Then substituted the UHT2 Shine map everywhere that a grayscale image was used in the original texture (not counting transparency, of course. Use those original maps). Finally, I turned on Translucency, used the same map as the Diffuse Color, and set it to 50%.
Edit: Just thinking about it... another option: If you can navigate to the UHT2 texture folders, you can plug in the base colors and all the bump, spec, etc. directly into the 3DL shader, then run Color Mixer for your streaks and highlights. Save some steps that way. The result is exactly the same, but with less "converting back and forth".
So, as you can see below, either method will give some nice 3Delight Hair. I have provided 42 masks to use in Color Mixer, so you will have to experiment with them to get the proper "chunkiness" of your streaks, since tiling the result is not an option for 3Delight. To compare, here is the hair with A. The default Brown Texture that came with the hair, B. The Color Mixer used over original Brown, and C. UHT2 applied first, Color Mixed, then manually converted back to omUberSurface and the new maps plugged in. The last option is kind of a long, roundabout way of doing it, but it gives nice results. In a future version or update, I might be able to crack the 3Delight mystery and get UHT2 to work natively with 3Delight.
 Carrara 8.5 and Genesis - Please Help!
You don't need to use daz studio ever,. or "deal with it" ......other than using DIM to download and install it,.
I'm still pretty sure that you don't need to install DS to make Carrara work either. .. DIM was built to install the CMS and update the database of installed content.
You should really contact Daz3D Support to clarify what's needed.
Also Check that the Postgre database is actually installed and that the service is running on your system.
I still don't see any of the morph controls even though they have been installed
If you're loading a "saved" figure,. it won't have the newly installed morphs. ...unlike previous generations of figures.
Load a New fresh version of the figure,. eg G2 male or female,. then check the morphs by selecting the Actor or Head
Hope it helps :)
June 2016 New User 3D Art Contest “Scenes and Landscapes” – WIP ThreadThanks evilded777 and Linwelly for your recent comments - and everyone else who has contributed to the bread crumb dilemma!
I was thinking about your comments, evilded777, regarding no focus and how to fix that. So before I go back to the drawing board, I thought that perhaps a camera angle change is what it needs. Rather then looking towards the people and shelter with the city beyond, how about I move the point of view to behind/off to the side of the old man, facing the wall, the people and the city. The subject then becomes the old man and his point of view of the scenery and subjects. This would require moving the wall and people opposite of the shelter where the old man is sitting, because the viewer will be looking out.
I don't have time to work on it tonight, but wanted to know what people thought of my idea before I tear into my scene.
By the way, the magpie is a morph and texture from Noggin's Poser Crow. People must really like those magpies, because you are the second person to ask me about them!

Having trouble visualizing, but that's on me. Interested to see, though.
Childe of Fyre - FreebiesQuestion: could you tell me more about your promo character? Please? Textures, morphs, hair? Pretty please?
The promo character in this case? He's one of my own personal characters from my storyline - Seamus Stormwind.
He's built on a Genesis 1 figure, but he uses a lot of Zev0's morphs, some of the Die Trying morphs, quite a few Mike3 and Victoria 3 morphs that I ported over to Genesis via GenX, some of the Genesis ethnicity morphs, the Mike 5 morph, and scattered other morphs as well.
His skin is my own work, built off of a Michael 4 merchant resource.
The hair in use here is 3DCelebrity's "Kaylum Hair," though again, I've done some editing on the textures and shaders to give it the right look for Seamus.
And obviously the clothing is the Bluebird3D newly released G3M outfit. Yes, I bought it to specifically use on Genesis 1. :) Almost any clothing I buy these days is still for use on Genesis 1.
I might at some point release the skin once I've fleshed it out with other options and such, but if I do, it will have to be a paid item, as the resource I used in this case does not allow for freebies. I would not be releasing these morphs, though... this is a very personal character, and he relies on so many additional 3rd party morph packs, that it would be un-marketable.
GENESIS 3 Iray Smart Converter And Advanced Managers (Commercial)I have all the Iray converters for each generation but I am confused about one thing...I transfered some G2F mats that uses V4 UV's to a G3F figure and then applied the iray uber base to it. Since the mats are for G2 but on a G3F figure( I assume the UV's don't matter) Do I use the iray converter for G2F or G3F?
The best result you will have in your case is : 1. use my converter on G2F (the UV set does not matter indeed), and then in a second time, transfer to G3F.
If you have already done the transfer to G3F and don't feel like redoing the transfer to G3F, then use the G3 converter directly on G3F, but the results will not be as good as if you used the G2F first. Plus you will have some additional work to do on the gloss of the skins (G3F skins will probably be more glossy than it should be), but all the tools are provided. And then the other part of the work, if you are using theG2F to G3F tool which is based on geograft, will be, after using my converter and adjusting the skin, to transfer the skin properties to the additional geograft elements (using my geograft transfer tool).
So finally, it is less work and give better results to do first the converter on G2F, and then the transfer to G3F.
How do you Correctly Display And include anatomical elements?If he's clothed you'd just want to use a bulge morph anyway, but if you need an anatomically correct male figure and don't have $$$ to spend on a Pro Bundle full of things you might never use, Anatomically Correct Male by ghastly on sharecg might work though you'll probably need to alter the textures to match the skin textures.
What male is this?I'm still a big fan of M4, he's more my type than the G3 guys. Saw this yesterday while checking out the M4 sales. I'm thinking it's just a morph of the base M4, not an actual character, but if anyone recognizes him, please let me know! I'm single. Wish I could bring him to life LOL.
Oh, and Divamakeup, that could just be a morph dialed by the PA or maybe a new character she is creating. She doesn't usually do characters, but she keeps expanding what she does. If you really want to know, she has a store at Renderosity where you can contact vendors directly...
Ironman13 is a she? *PHEW!* Mind Blown! lol
And yeah, I have yet to really dig very deep into M4 or the characters for him. I've always really just created female art (most of the 2D commissions I get are for pin-up girl type art) and it's never really been very appealing to me to make male art ...until recently. Seeing ironman13's guy on many of (her? really!? lol) recent pose packs really makes me interested in maybe looking into a few male characters and doing some art with them. :)
Black Is Beautiful IIMy usual character. :) Genesis 3 version uses Amaya texture, two Alicia afros (for density), and Eternal outfit (but still with some of the old V4 stuff).
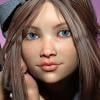
Beautiful morph, I like her torso specifically - still curvy and womanly but doesn't look like she's going to break in half at the waist.
As she actually has one!
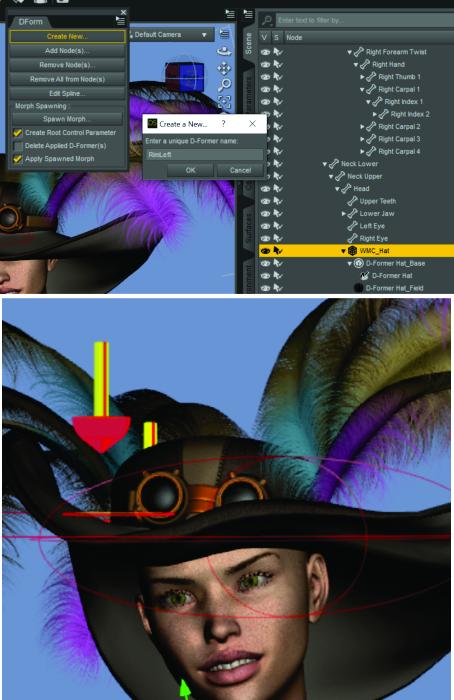
Novica & Forum Members Tips & Product Reviews Pt 7Showing the rim being pulled. Just for you Kharma!


When you save the morph (In Windows>Panes>Dform this is the popup. Bottom image shows the morph in action. There ya go, the rim moves! It will be a slider in Parameters under Morphs (once you create it like the top image shows you.) Click to enlarge.
 Novica & Forum Members Tips & Product Reviews Pt 7
For folks who have never done one: When you do one, go to Create>D former. It will load like this. The red areas will have the most influence. You must have the item selected first in Scene, so the D former can be put with it to influence it.

Then I go to Top View to see where that Base is. It is what pulls your field. It is buried inside the hat. I'm not guaranteeing to do this to the completion, depends on how easy it is. I haven't done D formers in over a year. Hope I remember how to save the thing. We'll see.

You can see the base, looks like a spinning top. That big red circle is the field, I am going to click on the field in Scene, and Scale to scale it down. I want a small, concentrated area to get specific pulling. Edit: To move the base, you need to select D Former Hat Base, NOT D Former Hat. The latter will move the mesh of the hat!
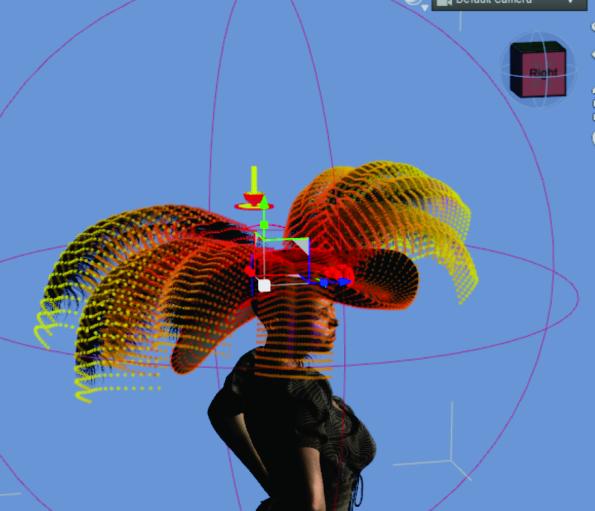
So this is with the D former Hat Base moved to the rim of the hat.
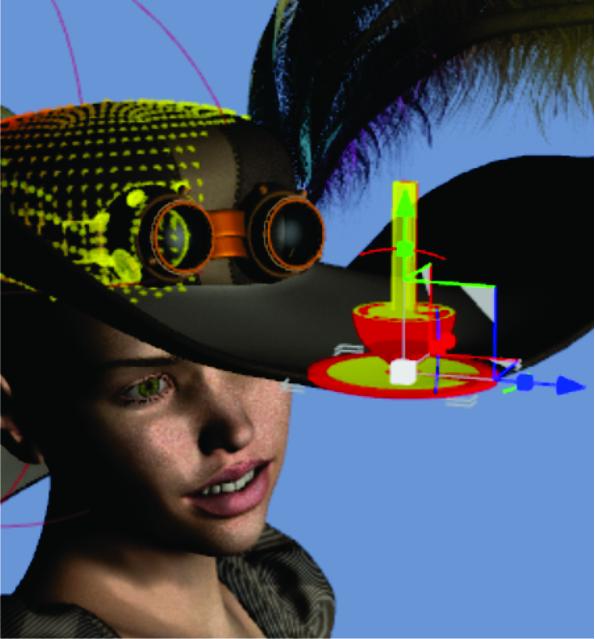
Then you move your Field, and use the Scale to get it as small as you want. Use Y Scale to shrink it in height, X to shrink the side/longways, and Z to shrink the front/back. I narrowed it to the rim.

Once you have the Field right, you pull the D former (not the Base, not the Field) and get it slightly changed. If you don't have a change, it will not form a morph. Dear Jaderail, Szark and I went around and around for a few hours three years ago, we couldn't figure out why it wasn't working. Once you get a slight change, you do the Windows>Pane>Dformer thing and create your morph. There are a lot of tutorials on that, I am not recreating the wheel. I already did this two or three times, but next post I will show you the screenshots.
What male is this?I'm still a big fan of M4, he's more my type than the G3 guys. Saw this yesterday while checking out the M4 sales. I'm thinking it's just a morph of the base M4, not an actual character, but if anyone recognizes him, please let me know! I'm single. Wish I could bring him to life LOL.
Oh, and Divamakeup, that could just be a morph dialed by the PA or maybe a new character she is creating. She doesn't usually do characters, but she keeps expanding what she does. If you really want to know, she has a store at Renderosity where you can contact vendors directly...
The official "Galactus Rising" WIP threadAnother unreleased clip:
Another Planet Destroyed &Threat Assesment meeting
With military leadership:https://drive.google.com/open?id=0B2TYEp536iB8d0tVRmpMTFZMM2c
This scene Establishes the dynamic of underlying tension
often seen When military systems are under Civilian control.
This scene in the film also marks the Farewell appearance
of the Daz Millenium man 2 as a repeatable pipline for Sending animated Genesis meshes to Maxon Cinema4D has been established
Missing planets, Stellar cartography:
https://drive.google.com/open?id=0B2TYEp536iB8QU5qb0Z0NW9vaWcThe part of "Talib Ibrahim" is now "acted by the Daz Genesis2 male
Daz Vicky 3 with original "girl next Door" morph,Making Final Appearance as "Dr Ursula Healy".Replaced By Genesis 2 Female with "girl next door" morph intact via
the GENX2 plugin Available at DAZ.Black Is Beautiful IIMy usual character. :) Genesis 3 version uses Amaya texture, two Alicia afros (for density), and Eternal outfit (but still with some of the old V4 stuff).
Beautiful morph, I like her torso specifically - still curvy and womanly but doesn't look like she's going to break in half at the waist.
What male is this?Well if it is M7 I'm certainly not buying them its really misleading to use a different figure in the promos than the figure they say they are built for, means I have no idea of how much tweaking will be required, especially if theres some Lee 7 in there as well - most misleading.
Ummm...M7 IS a morph for G3M.
I'm quite aware of that but if the poses are advertised for and created for the base G3M then thats what should be used in the promos, otherwise as customers we really have no idea how much tweaking was done to make them look good and its rather misrepresenting the product. They were either made with a base G3M or M7 or Lee or whoever, its why you see poses made for different morph sets; I'd like to be sure I know what I'm getting before I buy something, there can be some distinct differences in arm, leg and torso lengths between morphs.
How do you Correctly Display And include anatomical elements?I bought B JAY for G2M. Everything is working . Textures everything but first of all. He doesn't have genetalia. Not that i need it since he'l be clothes but In DAZ 4.9. how do you put genetalia on men? I've neveer been able to do it. Then there is a MAT for B JAY GENITALIA. When i apply it. it's just a weird texture and it covers the lower body with Black color and genetalia color. I guess that's cause he doesn't have the genetalia on. How do you put one on?
The only thing i see in the Parameters tab there is a genetil bump morph. But that is not the actual genital
(Title Edited)
Daz 3D is part of

Connect
DAZ Productions, Inc.
7533 S Center View Ct #4664
West Jordan, UT 84084Licensing Agreement | Terms of Service | Privacy Policy | EULA
© 2026 Daz Productions Inc. All Rights Reserved.