-
Confused with all the figures names: Genesis, Victoria...
Thank you everyone for your helpful replies.
Why better bending with Genesis 3? Where does it come from?
I guess Genesis has a more "detailed rig" (I hope I'm using the right terminology), I mean, more articulations in her skeleton to speak like people in the street. Am I right? Or is this extended bending capability of Gen 3 related to something else?
Yes, there are several extra bones that help with posing (though there are also some extra bones that are there because of the way the new rigging works - limbs are split into bend and twist bones where previously there would have been only one bone). Also the way in which the deformations are calculated does a better job at avoiding some issues, and there are correction morphs which kick in automatically to deal with others.
Morphs.
I'm not sure yet what morphs are and how they work when I read "for better result, buying a morph is recommended"
If buying a morph gives better results, how then do you select your morph? What are the criteria?
Once bought, can I easily updated the figures in my existing wrestling scenes with the new morph?Morphs are shapes, they alter the way the mesh looks - they can be used in all sorts of ways (I mentioned above that there are morphs in the base figure that subtly alter the shape in response to a bend), but I think what was being referred to was things like the Head and Body Morph packs which allow you to change the appearance of the figure to make different characters.
My Characters Are Now Jacked Up - Please Help!Can you not uninstall the G2F morph bundle that you installed and see if your characters go back to how they should look? Then install each G2F morph you bought one by one to see which one is causing the issue? That might be the only way to find out.Using GenX - How do I just transfer just a Head morph from M4 To Gen 3 Male?Try posting your question on the Commercial forum for GenX2:
http://www.daz3d.com/forums/discussion/94881/genx2-update-genesis-3-add-on-commercial/p6
I personally have had success with transferring morphs from Genesis to Genesis 2. I assume the steps are the same for all the Genesis characters. I just recently tried V4 to G2F, but have only succeeded with one full body/head morph. It looked to me that we are limited by what's provided by the PA's, which is usually a body and a head INJ - and I haven't succeeded with that one yet.
Confused with all the figures names: Genesis, Victoria...Thank you everyone for your helpful replies.
Why better bending with Genesis 3? Where does it come from?
I guess Genesis has a more "detailed rig" (I hope I'm using the right terminology), I mean, more articulations in her skeleton to speak like people in the street. Am I right? Or is this extended bending capability of Gen 3 related to something else?
Morphs.
I'm not sure yet what morphs are and how they work when I read "for better result, buying a morph is recommended"
If buying a morph gives better results, how then do you select your morph? What are the criteria?
Once bought, can I easily updated the figures in my existing wrestling scenes with the new morph?A precision on my wrestling scenes
My goal is to generate standstill pictures, photo-like rendering of wrestling scenes. I want them to be very aesthetic, like fashion shots if you will.
I'm not familiar with Cararra and have no intention to create animation at this stage.
Why Are Anime Figures Impossible in DAZ?Thank you. Your criticism is not necessarily wrong; the "wallet vote" pretty much agrees with you. And if LadyLittlefox manages to pull off a great-looking working anime head for G3, more power to her. She's a very talented artist and I have the greatest respect for her work.
It's always a good rule of thumb that when you submit a support ticket, you're talking to a corporation; when you post on the forum, you're talking to people.
Hi ScikleYield,
Thank you very much for SF-Anime-Character-Builder! I have purchased it and my DAZ 3D modeling life has been completely upgraded sice the day I did! The resources from that pack that has gave me limetless possibilities. Coincendetly I've just put one of my scenes I'm busy with on hold to log on today on DAZ site for the sole reason alone to ask DAZ why are they promoting the crap out of SF-Character-Builder on the Aiko 7 release. It just seems such a fantastic time to do Anime Bundles and stuff. I just so happen to run into this thread. I have been using the product on every scene I have built since purchase and your morphs has made my characters shine better than out of the beutiful box G3F models. It has been adding an amazing anime feel to everything,
I'm quite new to the scene as I've been in 2D for years prior but your stuff is the most used resources I have in my library. I've even gone so far as to convert your G1 / G2 morphs to G3 so I can use them in my scenes since G3F release. I still use them in pretty much all my scenes. Thank you so much for creating fantastic content!
I'm sorry, I didn't mean anything personally by it. Even if I don't care for how these figures look, I was rude. However, I feel like I'm entitled to my opinion that these figures ended up not really being anime and more like some creepy imitation of anime. I'm sorry that these figures ended up not selling well and I ended up unintentionally rubbing salt in the wound with my frustration over the lack of decent anime head options in DAZ.
The problem as hphoenix mentiond, there has always been a great obstacle to translate 2D anime to 3D. Even anime studios and games companies completely hit and miss it good amount of times. And there are so many different anime styles as well. It really all just boils down to what anime feature aesthetic you are going for. Then morphing your character slowly to that look.
Especially with the human eyes as it conveys a great deal of character emotion etc. Exactly why there is a style chart for what shape sunglasses on certain shape of head would immediatly make it look like a natural fit in a suiting aesthetic. Where some glasses frame shaped ones would never look well on certain head shapes. Projecting anime eyes on a G3F takes very slow tweaking to accomplish the look your going for. Most of the ones that looks the best to me are ones I've worked the longest on to look just perfect in regards to shape and perportion.
I personally find the same procedure with products body morphs and the 200+ head body morph packs. It take a lot tweaking to get the perfect look but when you do it turns out great. Some of my 3D anime characters looks so well in 3D it will now be hard to translate them to 2D because of so much details would be lost. Unless I really up my 2D art skill to make deviant art type portaits instead anime 2D cell shading.
What best worked for me, I've been reading mangas and watching anime for years. From drawing anime chars in 2D cell shading, I've learned I need to first establish what anime character type look am I going for. And that alone could take quite a few face redraws. Same I found with 3D anime, Its takes a lot of morph tweaking.
Thanks to everyone here that posted the resource links. I will certainly be looking into a lot the stuff here and procedures suggested.
Edit: Just want to include. If anyone here have bought or thinking of getting Aiko 7. Then also please look into SF Anime Character Builder. The amounts of G3F morphs sliders and materials has added countless dimensions to my anime character builds. Ones I will certainly take back to my 2D anime cell shading art.
DIM or DS4... which is wrong?In the installation panel I saw that 64 bit app were directed to:
C:\Program Files\DAZ 3D\DAZStudio4 Public Build
rather than just
C:\Program Files
I changed the 64 bit app installation path in DIM to the Program Files folder and uninstalled both DS and GoZ. I reinstalled DS and then GoZ using DIM. Now DS can send figures to Zbrush correctly and Zbrush was able to detect the DS app and send a morph back to DS via GoZ.
So, it appears that the issue may have been my fault for not having the correct paths setup (apologies for that). I will see if this remains a problem after the next DS update.
Thanks for your help.
And another bad crafted G3F morph - breast naturalHere is another example for a bad crafted g3f morph - breast natural. Have a look at the images. They show breast natural at 0% and at 40%. Can someone give me a good answer why this morph have influence on the side of the ripcage, I guess there will be no good answer.
Because all the figure details on the torso share the same geometry, there is no independant geometry for skin or muscles or bones. So if you morph the breast geometry that enters the area of the rib cage, ribcage geometry will move as well, same for any other details on the mesh. If I create a belly move up and down for the skin, and the figure has a six pack dialled in, the six pack will move as well. There is no way around this unless you create a brand new figure system where skin & fat is independant from underlying skeletal and muscle details. Right now, they are all on the same mesh layer. Sure you can mask off bits of geometry when making a morph, but then you are restricting what that morph can do if it is not allowed to enter the space of the geometry other details occupy, and the details won't blend in well together.
Well, that sounds logic but as I remember well V4 hasn`t got this issue, sure V4 have had others but not this and also not the gap underneath between breasts and ripcage. Well thank for your body shaping morphs zev0, nearly the whole body of my character AVA now is shaped with your morphs and not with DS morphs execpt breast natural which is a bit better and body size, these are the only DS shaping morphs I have used on the body.
Other question, ever thought to create an own figure zev?
Utilizing the Transfer UtilityOkay, so I'm having difficulty either A understanding exactly how the transfer utility is supposed to work, or I'm just doing things wrong. What I have is a ship that I'm rigging and due to the somewhat annoying inhibitors with the whole 'Object's geometry cannot be updated because the vertex and facet count must be the same" I find myself having to re-rig the entire thing from the ground up, for the third time. What I'm attempting to do is use the transfer utility to copy the bone structure, locations and limitations to the new instance, since really only the UV mapping and some small geometry details are different.
What I get however, is not so much a perfect copy, but one where all of the geometry stretches when it really shouldn't. I'm wondering how to fix this.
Kenji 7 - DiscussThere's a decent bit of the guy mixed in with the face too, (I also go all out with morph dials, I ported over Dogz 200+ facemorphs from G3F which I find particularly invaluble for changing the whole head shape, there's a bunch of different head width morphs)
Dogz 200+ morphs...well there is a another product I need to buy. :-)
Looking for primitives...I did come across this: http://www.daz3d.com/everyday-morphing-primitives . The description says it contains an extruded sphere, but I'm not seeing it in the product images.
Thank you for any suggestions,
Robert
I think the extruded sphere is a lozenge, like a pill or capsule. You can morph it down to a sphere, or extend it as a rod with hemispherical ends. Or use the XYZ Scale sliders to flatten it.
The primitive tool in Studio is found under "Create", "New Primitive". Same place where you create a new camera, but down a little.
Kenji 7 - DiscussThere's a decent bit of the guy mixed in with the face too, (I also go all out with morph dials, I ported over Dogz 200+ facemorphs from G3F which I find particularly invaluble for changing the whole head shape, there's a bunch of different head width morphs)
Kenji 7 - DiscussIray (rendered out as an exr and tonemapped in PS as I generally do), and Kenji's textures (with some really quickly modeled mesh eyebrows)
He should probably be more noodly actually, which is crazy because his height and leg length sliders are at maxed out
Thanks again. Well, that's excellent with just morph dials and there is no mistaking who that is. Will definitely need to buy Kenji.
PA asking what you'd like to see more/less or new of....Maybe culottes?
That is what we called them when they first appeared on TNG
Oh, okay thanks.

Another request:
Would like more attention paid to the groin area on men's clothing. I've noted lately that the groins seem to look kinda female. I'm not talking that I want a liberace bulge, although having the morph is nice, but men and women's pelvis and groin aren't the same. Some outfits lately seem designed for a woman that are too short- like nothign whatsoever is in that region. It looks painful to say the least and odd to me. Also the way that area looks when a character is posed that area seems to tear or look weird. Thigh areas tear if you use other bulge morphs too. So built in morphs maybe to address that issue?
IF you are going to do skin tight pants with no actual cloth shape. Then guys are going to have a skin tight pelvic areas. But they just don't. That area is usually quite smooth. IT looks odd.
Confused with all the figures names: Genesis, Victoria...No, you won't get better render quality with the G3 characters.
Genesis 1-3 are the base characters, each with different "skills". Victoria and all the other characters are morphs and additional skins.
You can create your 'own' characters by usining the morphs that the Genesis characters come with, though for better result, buying a morph is recommended. Also, you can make your own skins, but it might not give you the result you are looking for.
This zhread might be interesting to you: http://www.daz3d.com/forums/discussion/24257/daz-3d-human-figures-a-history/p1
And another bad crafted G3F morph - breast naturalHere is another example for a bad crafted g3f morph - breast natural. Have a look at the images. They show breast natural at 0% and at 40%. Can someone give me a good answer why this morph have influence on the side of the ripcage, I guess there will be no good answer.
Because all the figure details on the torso share the same geometry, there is no independant geometry for skin or muscles or bones. So if you morph the breast geometry that enters the area of the rib cage, ribcage geometry will move as well, same for any other details on the mesh. If I create a belly move up and down for the skin, and the figure has a six pack dialled in, the six pack will move as well. There is no way around this unless you create a brand new figure system where skin & fat is independant from underlying skeletal and muscle details. Right now, they are all on the same mesh layer. Sure you can mask off bits of geometry when making a morph, but then you are restricting what that morph can do if it is not allowed to enter the space of the geometry other details occupy, and the details won't blend in well together.
Creating morph dials for character distributionI'm just using Daz shapes (from the 7 series, head and body) and a merchant resource I've used before. So what is the correct method? This is the only thing holding up my product and I'm pulling my hair out over it!
The Daz shapes are not merchant resources so you can't use the bake to a single morph method (and wouldn't want to as many of the Daz shapes use correction morphs that should be applied as other morphs or transforms are turned up, which would be lost in baking).
Either save a Shaping preset to apply your shape or, if you really want a single slider, set the shape, create a new property as in your steps above, set the new property to 1 (or 100%), right-click on the nwe property and select ERC Freeze. Save the new property. Copy the created folder and files - e.g. \Data\Daz 3D\Genesis 3\Female\Morphs\Author\Product (where Author and product are the values from the Morph Asset save options dialogue). Either preset or control property will give something you can share and which people with the morph sets used can then apply to get the shape you made.
And another bad crafted G3F morph - breast naturalHere is another example for a bad crafted g3f morph - breast natural. Have a look at the images. They show breast natural at 0% and at 40%. Can someone give me a good answer why this morph have influence on the side of the ripcage, I guess there will be no good answer. The problem of this influence is that if you have breast natural at 40% for example and you bend the arms down you will see the side of the ripcage because it gets widden and is wider than the armpit. area that is much wider than it should because of this bad crafted morph
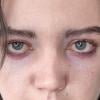
Tips on making good Eyes?Genesis 2 characters were released before Iray was added to Daz Studio. Michael 6 did not come with Iray materials. Daz provided the "Optimized Genesis 2 Male Mat" to convert non-Iray materials to a pretty good Iray materials. The right way to use it is this:
- Apply the Michael 6 materials (non-Iray) to the character.
- Apply the selected Genesis 2 Eye color to the character.
- Apply "Optimized Genesis 2 Male Mat" to the character.
You can also improve the look of the eyes by dialing in the Eye Cornea Bulge morph.
Do not try to apply Iray eyes made for other generation characters to Genesis 2. Stick with Genesis 2 eyes and convert the surfaces for Iray. There are also numerous threads in the forums here with people's suggestions for Iray eye materials. Here is one suggestion from a Daz employee.
It looks to me like part of your issue could be lighting and reflections. Look at the hair. There is a big white spot on it. Is the character lit by an extremely bright light? The image with the eyes out of the socket show some very jagged edge reflections. What HDRI or background are you using?
PA asking what you'd like to see more/less or new of....I'm a fan of weird creature/alien morphs. I'd also love some kind of rig/morph for women's clothing to let stuff 'hang' (or maybe something that cleanly scales the torso forward to fit breasts). Granted, the limitations of previous efforts suggests that isn't easy. Oh, also Genesis 2 or Genesis 1, please.Anyone know which cape this is?The cape is still free in rendo freestuff but it doesn't have morphs to make the collar so big. You could get it there with magnets or the morph tool in poser. Just search for "Uzilite".
Daz 3D is part of

Connect
DAZ Productions, Inc.
7533 S Center View Ct #4664
West Jordan, UT 84084Licensing Agreement | Terms of Service | Privacy Policy | EULA
© 2026 Daz Productions Inc. All Rights Reserved.