-
WIP dress - what now?
Not sure --but in case other more experienced modelers see this ...what figure is it? also It kind of looks like the dress was modeled on a morphed figure and then rigged on a non morphed figure
It is the Genesis 3 Female base!
The dress was modelled on the Genesis 3 Female and then the Transfer Utility used; on an unmorphed G3F.For the UV issues...look online at dress patterns...actual patterns to make a dress from. Those pieces should give you some help in breaking up the dress into a logical UV layout. For clothing, you will need several seams, not just that one cut you currently have. I would, minimally break it into a front and back for the unwrapping...maybe even more pieces.
Second, possibly more important...are you modelling this to the base (G3F or whatever) or to a character?
That's really key advice, thank you!!!!! Especially regarding several seams! I made a strange assumption that because it was a simple dress, it would only need 1 seam. I'm not sure why. Thank you so much!!!!! <3 It is being modelled to the base! I tried modelling it to a character before and that was certainly a mistake. The only morph loaded in was at the last picture, which shows how it distorts when a character -is- added.
UV mapping is a skill all it's own. Just so you know that that uv map is going to stretch horribly when you put a texture on it. I tend to cut uvs for clothing like I would a pattern for the same item of clothing. Cut it down each side so that there's a front and a back...if that makes sense to you ;) It also looks like maybe the cloth may have thickness which "might" cause problems for you down the line. Most DS clothing doesn't have a back side, or in this case an "inside" since that's something one will never see and is just wasted polygons anyway. Maybe you only need a few rows of polygons around all the open edges on the inside. The rest of the interior you can delete.
Good lord, tell me about it. It really did stretch horribly and I was devastated, lol! Also, I don't know why it has that thickness, but you're right; I think I might start the dress from scratch again and try ensure that it doesn't have that thickness to it!
WIP dress - what now?"Oh God, not Ashfire again", I hear you cry. And I agree whole heartedly. :p However, I find that my momentum with my first project has stopped completely. I'd love some advice/crticism and what I should try fix and improve upon!


ISSUES I'M HAVING:
1) I can't create a tidy looking UV map. No matter where I place the seams, even taking note of where other modellers put their seams and loading a similar dress to see where the creator has put theirs, I end up with just... a big untidy looking blob. Therefore, I unfortunately can't get started on a texture map. If I apply a texture map to the UV I have., it's wonderful looking in some areas, but stretches in others.
2) I've used the transfer utility to get a basic rig going, but it doesn't bend very nicely, particularly the chest. How do I fix this?
3) Morphing in other characters makes it so much worse...
I know, I know. What you're seeing is an insanely amateurish piece of work. And I want you to be harsh on this - right now it's a piece of crap, and I want to learn how to make it better! So don't be afraid of being rough on it, because I'm here to learn and improve, not have my ego stroked for baby's first model! :p
creating content for a specific pose/ morph?Well, you basically model an item in a pose you wanted.
Afterwards Transfer Utility on the .OBJ mesh you imported.
The item will get screwed up, but you just unfit it.
Pose the character into the pose you modeled the item on.
Then you follow the steps to transfer rigging (figure space) when unfit.
Aftewards just fit the item. It should now work.
creating content for a specific pose/ morph?Thanks Thomas, is it the right course when importing a .obj? Use transfer utility with a default figure, unfit it then use transfer rigging?
Removing weight maps from a node selection?Removing a weight map makes the part not move. The easiest way is to use the "Distribute Selected Bone Weights" option located in the Node Weight Map Brush.
Lemme check if I can copy a tool description from the Rigging Guide I'm writing...
Well it kinda worked. Here's a sample from the Rigging Guide:Distribute Selected Bone Weights – Requires an area of the mesh to be selected first. This option allows you to take a selected portion of the weight map and transfer it to another map. It can also distribute the selected weight map evenly between multiple other maps. In order to use this option, carefully perform the following steps:
- Using geometry selection, select the area of the mesh from which you wish to extract the Weight Map Influence.
- In the Scene Tab - Select the bone or bones that will receive the Weight Map Influence. Remember you can hold CTRL to select multiple bones in the Scene Tab.
- While still holding CTRL, select the map that the Influence will be extracted from.
- At this moment you should have at least 2 bones selected (or more). In your Viewport you should be seeing the Weight Map Influence from which you wish to extract from.
- Select “Distribute Selected Bone Weights”.
- The weights should now be spread out to the other bones evenly.
The distribution process will take the weights from the selected area and put them on the desired bone. If you select more than one target bone, the weight will be split evenly between the bones (so each will receive its fair share).
The order of selection is important here! Be aware that the Last bone selected will be the DONOR of the weights for the other selected bones.
This process is especially useful when fixing Weight Maps created by Transfer Utility on clothing items. If a piece of the map is affecting the wrong part of the mesh, you can use this option to transfer it to the correct bone.
For example – let’s say you have a glove item. The Middle Finger for some reason moves a portion of the Ring and Index Finger. You can select the index finger mesh and use the above process to transfer it to the Index Finger bone. Afterwards select the Ring Finger mesh and transfer the map from the Middle Finger bone to the Ring Finger. This way you have accurately redistributed the weight map influences back where they belong.
Should 3 be selecting a map (in Tool Settings) or a bone?
creating content for a specific pose/ morph?Use the reverse Deformations option when importing the morph - that will strip out the effect of any other morphs or transforms, leaving only the corrective modifications you made.
creating content for a specific pose/ morph?You can use the Joint Editor and go to its Edit -> Transfer Rigging (Figure Space) options from the Right Click Menu.
Fortunately - I already answered such a question in my guide:Transfer Rigging (Figure Space) – Adjusts the target rig to match the current position of the source. To use this option, select a “source” that has the rig you want and hold CTRL to select a “Target” that will receive the change. Use this option and the rigging will be adjusted.
This tool is easiest to understand when you consider High heels. Heels are usually modeled in a “ready” state as if the foot was already positioned correctly. Using Transfer Utility to copy the rigging from a Genesis model will however make the shoe clip through the foot, as the default position of the foot is flat. (If you check the rigging in the shoes, you will notice that the toe bones are above the shoe) You can unfit the heels, position the foot into the correct pose and then “Transfer Rigging (Figure Space)” so that the rig in the heels will receive the correct position as its “default”. Now its rig will work correctly when they are fit.
It’s a useful tool when you have to match another rig – assuming you have the same bones as the “source”.
Did this answer your question?
Removing weight maps from a node selection?Removing a weight map makes the part not move. The easiest way is to use the "Distribute Selected Bone Weights" option located in the Node Weight Map Brush.
Lemme check if I can copy a tool description from the Rigging Guide I'm writing...
Well it kinda worked. Here's a sample from the Rigging Guide:Distribute Selected Bone Weights – Requires an area of the mesh to be selected first. This option allows you to take a selected portion of the weight map and transfer it to another map. It can also distribute the selected weight map evenly between multiple other maps. In order to use this option, carefully perform the following steps:
- Using geometry selection, select the area of the mesh from which you wish to extract the Weight Map Influence.
- In the Scene Tab - Select the bone or bones that will receive the Weight Map Influence. Remember you can hold CTRL to select multiple bones in the Scene Tab.
- While still holding CTRL, select the map that the Influence will be extracted from.
- At this moment you should have at least 2 bones selected (or more). In your Viewport you should be seeing the Weight Map Influence from which you wish to extract from.
- Select “Distribute Selected Bone Weights”.
- The weights should now be spread out to the other bones evenly.
The distribution process will take the weights from the selected area and put them on the desired bone. If you select more than one target bone, the weight will be split evenly between the bones (so each will receive its fair share).
The order of selection is important here! Be aware that the Last bone selected will be the DONOR of the weights for the other selected bones.
This process is especially useful when fixing Weight Maps created by Transfer Utility on clothing items. If a piece of the map is affecting the wrong part of the mesh, you can use this option to transfer it to the correct bone.
For example – let’s say you have a glove item. The Middle Finger for some reason moves a portion of the Ring and Index Finger. You can select the index finger mesh and use the above process to transfer it to the Index Finger bone. Afterwards select the Ring Finger mesh and transfer the map from the Middle Finger bone to the Ring Finger. This way you have accurately redistributed the weight map influences back where they belong.
Is there a Santa Suit for G3M (aka George)?Doesn't have George listed as supported morph and I don't have George to tryit on.
creating content for a specific pose/ morph?I face two problems:
- I need to create adjust morphs for my prop when fit on a figure with specific morphs (like fabric hanging under larger breasts)
- I want to create high heel boots, from a posed figure with the foot bent
How do I create content based on a shape other than the default one?
Removing weight maps from a node selection?Hi, I am making an armor like prop and I want sections to stay rigid, but still making a single full body prop. After transfer utility some nodes don't belong to the right bone, what is the simplest way to fix this? How do I assign a node selection to the right bone, or remove all the weight maps from these nodes?
Kinematic and Morph functionHello !
I downloaded Daz3d Studio 4.9, I miss the Kinematic at Daz3d like Poser.And I can not find a morph function If it's there, where can I find it?
(In Poser you can use the kinematics function "Hip click so the legs move down, right and left)
Thank you in advance for your help.
Kinematic and Morph functionHello !
I downloaded Daz3d Studio 4.9, I miss the Kinematic at Daz3d like Poser.In Poser you can use the kinematics function "Hip click so the legs move down, right and left.
And I can not find a morph function If it's there, where can I find it?
Thank you in advance for your help.The older generation: Victoria 2/3, Michael 2/3 and their children rendersYou're welcome!
Making a cute Mil3 baby face has been a bit of a challenge for me. One of these days I'll get around to buying the CDI set for this little figure.
There were nice freebies for the PT Girl, like the Miko uniform.
The Miko Uniform is still available: http://web.archive.org/web/20061017162942/http://digitalbabes2.com/~yamato/MilGirl.html

Wanna see a very old render (2008) of the Milbaby3 in DazStudio?
A child's fantasy
Credits:
Milbaby3
Lily (texture) - Thorne and Sarsa (morph by me)
Dazzling gaze - TiffT785
Ysaris hair - AprilYSH
Omaru - Batlab (limited time freebie)
Mute Swan - ContentParadise
Niké's Place#1 - vikike176
Weeping Willows - Paleman
Pondlife plants - Lisa Buckalew
Water displacement map - mcvdaz
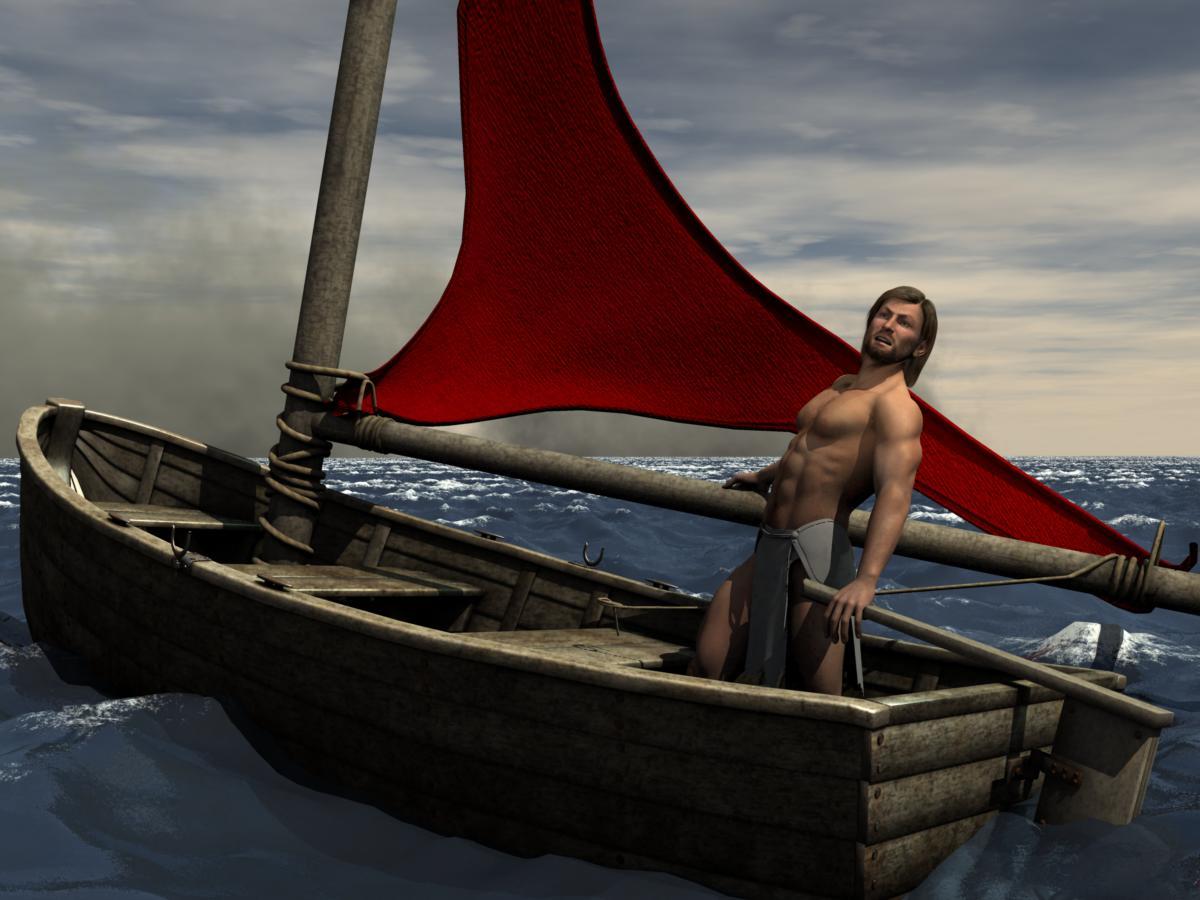
Background - Jean-Luc AjrarnIt's Raining Men Again! Winners Announced!!! Over in the Art Studio!Last year, there were some images that had women in support of the main male character. For example, Disco David 5 by me. Also, last year, we were encouraged to repurpose an item designed for female figures for another use. Additional category if included repurpose. For example, Disco David 5 is wearing an outfit designed for a female character but converted with the transfer utility. Ulysses's boat is being powered by a sail that is actually a woman's panties.
I am neither recommending nor disparaging last year's rules.
.

.
 Buy Something That Doesn't Work in Carrara? Post your Questions and Workarounds here. (please)
I am having more frequent problems with the Daz Studio transfer utility. For example, I got a V4 outfit by stzham (goes with Hamelian poses) from that other store site. I loaded in Studio and used the ransfer utility to make compatible with G2F and saved as duf. The top works fine. The skirt won't load as Duf even though it loads in its default form. Didn't Jonstark or someone have a file edit solution
Sliding feet in AniMate walk cycles and movementsMy first warning is that Animate2 is barely compatible with the Genesis3 (current) character family, and none of the 'big users' of animate2 that I've seen discussing the tools in these forums will touch G3 with it. There are a few hacks to make G3 more compatible, but... that says a lot about the state of the product.
I have it, mostly like it, and happily use it with my older characters (Genesis1 and the Mil4 characters V4/M4) with the DAZ/Go-figure add-ons "keymate" and "graphmate". It also works well on non-humanoid characters and props/figures (there are aniblocks for a solar-system product in the store).
The older discussions are correct in that Animate2/aniblocks still don't have a 'nice button' (heh) solution, and no, I don't see much activity with it anywhere I've looked (and I've been watching for any news for a couple of years). A bunch of us are hoping, but not betting.
That said, the ideas, tools, and result of someone who uses animate2 with the keymate and graphmate add-ons, and knows what they're doing can build a pretty powerful library of blocks that can work to good effect. There are pinning tricks ('active pose' tool) and puppeteering recording features that make it very flexible and powerful, but it is an investment to figure out the 'DAZ way', especially grocking the interactions between the animate and Daz Studio timelines.
The existing aniblocks can be converted to the newer G1/G2 characters with add-on scripts ($), adjustment morphs (free), and strategic manual edits, and it DS can import and map BVH motion files to the new characters as well as most tools.
Personally, I do my animation work in DS because of the animate2 and puppeteering tools, but I usually export them in various formats for use in carrara, iclone, and poser, depending on what I'm doing. There are fairly decent workflow paths to and from most external tools (FBX/alembic/BVH/PZ2/collada/etc.), but it's amazing how almost every transfer requires some sort of hack/adjustment on the sending or receiving side to make it work as you'd expect (nice buttons are not so common).
Lastly, the ONLY two indications I've seen from DAZ that they are interested in animation over the long-term, is their recent set of youtube videos on DS animation and animate2. That and the plugins/tools continue to work through each DS version upgrade.
For that lack of activity (4+ years w NO DS animation function additions or plugin version updates), and the lack of G3 support, I would love to say it's a good path to take with a long life ahead, but I can't. Maybe they've got a big animation skunkworks project in the backrooms, but that's not how I'd bet.
I also use DAZ's bryce, carrara, and hexagon... Do a search on "Is XXX alive?" and you' get a feeling for how forthcoming DAZ corporate is with long-term product roadmapping transparency. I like those tools (and animate2/keymate/graphmate) as they are, but I think that's all we'll ever have from DAZ, given the information we've been given. Daz Studio is the most productive tool for them to sell content, and that is their business, so that's where they invest. I dont' begrudge them that, but I won't Rah-Rah the story, just because I use the tools. I know better than to hope for change.
Good luck with this and other feedback. Again, I like the tools, as I've invested and learned them, but with no pinning button, and no updates, and no word from the company on updates in 4 years...
It's a good question.
cheers,
--ms
Question - preferred setup for furniture props with drawersWhat is the preferred arrangement?
It is much easier to work with if the moveable items like that are individual objects instead of just individual groups of the same object. So, separate them out and parent/rig them in your chosen application.
It's generally best to never use morphs for this kind of radical movement of what are, after all, individual objects. For instance, in some applications, depending upon the rigging, morphing the object to open a drawer or cabinet will cause the application to recalculate the entire object's center. ie: Open drawer with simple morph, object jumps two feet backwards... It's also not intuitive to use morphs for this and users would probably like the ability to hide the drawer, rotate it, etc. And, for animation, having it rigged/parented as a separate object is much more desirable as well.
Egypt outfits for G3MJust a heads up, on the Anunnaki outfit, for some weird reason the left bracer doesn't seem to accept shaders or textures that are iray compatible. The right one does just fine but the left one renders as if it still has 3dl shaders on it. It's really weird, since this vendor's stuff is usually perfect and I've never had any trouble with their other stuff in iray. All the rest of the outfit is fine though.
That is because the material zones are wacked. the right bracer has seperate ones for the various parts, the left bracer is all in one which is really odd. They both will take IRAY shaders, just not specific materials for specific areas.
That's unfortunate, since I could export it has an obj and fix that in blender, but then I'd lose the rigging once I dumped it back into DAZ. The only thing I could do in DAZ was use the geometry editor to assign the appropriate surfaces the correct materials, but that won't save as a material preset. I could save it as a scene subset though.
Ah well.
You can use transfer utility to transfer rigging from the original after re-importing the fixed obj. Easiest would probably be using "replace source with target"
Selective autofollow? (beard vs. teeth - hair vs. ears)You can save the null-morphs from option 2 via File>Save as>Support Assets>Morph Asset.
It would, I think, be possible to write a script that would generate null parameters for all morphs with a set path - though the moprhs would need to be zero to start with. Not going to say I will do so, however - my list of things to be done is growing faster than I can do them.
Thanks for that info. Got me thinking:
(edited to correct speculation):
Mechanically, doing that asset 'save' as you described, of the manually created null morph properties for each that I wanted to protect, would simply create a bunch of small DSF null-ish morph property files in the item's (e.g. teeth's) existing "data/..." subdirectory (one per morph, right?), leaving the original item's morphs alone, right? I would think that same set of null 'dsf' morph files might be useable as a collection on any other item (e.g. hair) that you wanted to protect in the same way, right? Simply copy the set (or subset) of the null morph dsf files into the proper target item's morph directory? Maybe an ID-string-edit or two across the series to bind the morphs to the target item? I know D3D's DSON editor can do that sort of edit pretty easily, once the file exists. or 'sed' for the *nix savvy. hmmm.
That might also be fairly practical, because once you established which morphs you wanted autofollow to ignore, you could create a folder/library of them (generic) to copy from (and/or make some effect-specific zip collections) and not have to browse through the zillions of figure morphs using a GUI, possibly missing some, manually creating the null-morphs by hand. Add new null-morph files to your collection when you add new morph-packs, etc. I'm liking that direction, unless I'm forgetting something about those dsf files.
If my theory is viable, I could see all sorts of scripting options making the creation and management of such 'hide-me' morph-files being handy. Almost a product idea there: 'not-o-follow'... With a front-end list-picker like the GenX2 'Morphs' tab/picker, that would generate/list all possible morph-ignore dsf's in a to-the-side library, and enable/disable them per-product/figure with the chooser. Reload the figure and test/verify, etc.
(nice idea but the 'null' morph files reference parent items, which breaks my scheme)
I did a rigidify test with my teeth, and it worked for all of the standard morphs, but simonWM's expressions didn't work completely, which is weird, but I don't need those to move forward. Curious why his expression morphs could override the bounds of a 100% rigiditifide figure, but so be it.
Moving forward, Richard, I'm going to try your null/save (option2) advice on a morph that I want to hide, and see if it appears as I speculated above, and see if I can replicate the rest of the set, using the test file as a template, etc. I think I can make this work now, and hope others can use these ideas as well.
Update: per your suggestion in another thread, I tried option2: created and saved a 'null-morph' and it seems to work as expected. It's located in its own separate folder near the original item morphs folder, which is good. The new null morph file is sparse and the id/name/label fields can be edited in copies of this file to quickly create a bunch of these 'hide-me-from-autofollow' morphs if I want to.
cheers,
--ms
Daz 3D is part of

Connect
DAZ Productions, Inc.
7533 S Center View Ct #4664
West Jordan, UT 84084Licensing Agreement | Terms of Service | Privacy Policy | EULA
© 2026 Daz Productions Inc. All Rights Reserved.