-
New User Contest Revamp Discussion
You know, DAZ_ann0314, I like this idea very much. I have learned considerable over the months that I have been participating in these contests. More importantly, I have really had fun with the opportunity to both give and receive feedback.
I think that participation is important to encourage, especially from the contestants. There are always a few entries during the contest where the artists posted the finished work without asking for any feedback in the WIP thread. I would have loved to make some comments/suggestions to these individuals, but as the Entry thread doesn't allow comments, I wasn't able to.
Also, the change in the rules allows for other individuals to be recognized who don't have the perfect render - I really like the Most Improved and Most Revisions idea. Best Answer/Comment/Suggestion is a great way to encourage feedback participation.
Here are some category suggestions (yours are included):
Most Improved
Most Revisions
Best Question
Best Answer. There were some great tutorials in the October contest.
Best Encouragement. (I say this because someone once commented that he/she wouldn't bother with entering because some renders were so good. I encouraged him/her to enter anyway because the point of the contest is to learn).
Most Unique/Unusual. Something for a really cool idea that you just don't see everyday.
Best Shader Replacement. This is for replacing materials that are designed for the software/render engine you are using.
Best Kit-Bashing. This could be an outfit/props or environment - but the idea is combining items into a unit and making them look like they belong together.
Best Background. You will need to decide if this includes photos. But there is definitely a challenge to make the subjects look like they belong in a photo (lighting, etc), and making a seamless transition from the render to the photo.
Best Material Conversion. Daz Studio: 3Delight to Iray and vise versa. Poser has 2 render engines as well. Items originally designed for Daz Studio used and optimized in other software (Vue, Bryce, Poser, etc), and items designed for other software and converted to Daz Studio or other application. It's always a challenge to convert items and make them look good in your software/render engine and I feel this is a good category to be recognized.
Best Problem-Solving. If there is a problem in a render that requires more work to fix, like deforming or importing a piece of clothing into a modeling program to create your own morph when there isn't one available.
Lucille (AKA Zombie Livinia)While I like the look of both, I really can't see getting either as the use vs the cost is prohibited for me since I can only see a couple of uses in my workflow
I got Lavinia and Lucille. Ill probably get the creature morph packs as well. I figured that I had made enough of an investment into G3 to warrant the seperate purchases. HOWEVER... (i say that alot:)) I wont be repeating this for G4. Since the daz marketing strategy seems to be to cut up complete packs and sell them in bites and pieces for G3, I can only assume that G4 will be the same if not worse. To be perfectly honest, G3 might be it for me. As ive indicated in other posts, its going to take a major advance in the technology to get me interested in another model. That goes for hair and clothing as well. If G4 is still using the same autofit, then forget it.
By the way, if anyone wants to see comparisons between the Lavinia and Lucille, just let me know.
Agreed. I get really put off by a released product with limited textures also selling additional textures for it as a seperate product when it could easily have been included. I rarely purchase any additional textures for any product, that is what photoshop is for, LOL.
Yep, G4 will have to be a HUGE step forward for me to invest what i am investing in G3 right now for me to jump on that bandwagon.
Lucille (AKA Zombie Livinia)I got Lavinia and Lucille. Ill probably get the creature morph packs as well. I figured that I had made enough of an investment into G3 to warrant the seperate purchases. HOWEVER... (i say that alot:)) I wont be repeating this for G4. Since the daz marketing strategy seems to be to cut up complete packs and sell them in bites and pieces for G3, I can only assume that G4 will be the same if not worse. To be perfectly honest, G3 might be it for me. As ive indicated in other posts, its going to take a major advance in the technology to get me interested in another model. That goes for hair and clothing as well. If G4 is still using the same autofit, then forget it.
By the way, if anyone wants to see comparisons between the Lavinia and Lucille, just let me know.
Animation Club for Carrara , Week #2 - Spooky Hollow. Ready To watch..Okay, mmoir, I ran into a gazillion gotchas, but managed to get the cat in the scene. I attached a zip file and he should open on the fallen tree trunk right behind FifthElement's kitty.
So, I attempted to rig the cat - he has IK on all four legs plus his tail. I've never animated a quadraped before, and barely a human, so I have no idea if it is correct or a disaster. According to the script he walks along the fallen trunk, arches his back and turns his head towards the witch. He can arch his back with a morph if you select the "cat" in the grouped object, and if you rotate his "Neck" bone his head should turn. It could probably use a corrective morph there, but maybe it will be so dark no one will notice.

And well, while typing this I went AWOL with several other problems. You can no longer rotate the eyes, sorry. A mysterious disaster I couldn't resolve...
Cool DesertDude! We'll see what we can get him doing! ;)
Animation Club for Carrara , Week #2 - Spooky Hollow. Ready To watch..Okay, mmoir, I ran into a gazillion gotchas, but managed to get the cat in the scene. I attached a zip file and he should open on the fallen tree trunk right behind FifthElement's kitty.
So, I attempted to rig the cat - he has IK on all four legs plus his tail. I've never animated a quadraped before, and barely a human, so I have no idea if it is correct or a disaster. According to the script he walks along the fallen trunk, arches his back and turns his head towards the witch. He can arch his back with a morph if you select the "cat" in the grouped object, and if you rotate his "Neck" bone his head should turn. It could probably use a corrective morph there, but maybe it will be so dark no one will notice.
And well, while typing this I went AWOL with several other problems. You can no longer rotate the eyes, sorry. A mysterious disaster I couldn't resolve...
A Rigging Tools PDF Guide (nearly complete)For some time now I have been writing a PDF that contains information on rigging tools in DAZ Studio and wanted to ask something before finalizing it since its nearing completion.
So, the Guide is NOT A VIDEO. It's a PDF file with an extensive Table of Contents. It contains the following topics:
- The Basics
- What is a Rig?
- Naming Conventions for Bones
- Bone Hierarchy
- What are limits and why use them?
- What is a weight map?
- Tools
- Joint Editor Tool
- Preparation
- Joint Editor Window
- The Shared Tab
- The General Tab
- The Bulges Tab
- The Display Tab
- Joint Editor Additional Options Menu
- Customize Drawing
- Create
- Edit
- Delete
- Rotation Order
- Align
- Snap
- Memorize
- Restore
- Geometry Editor Tool
- Selection Types and Radius Tab
- Grouping Tab
- Details Tab
- Geometry Editor Additional Options Menu
- Selection Type
- Selection Mode
- Geometry Selection
- Geometry Visibility
- Geometry Locking
- Geometry Editing
- Geometry Assignment
- Morph Editing
- Subdivision Weight
- Node Weight Map Brush
- Selection Types and Brush Modes
- Geometry Selection Mode
- Paint Brush and Smooth Brush Modes
- Directional Gradient Mode
- Sphere Gradient Mode
- Weight Maps Tab
- Map Types
- Bulge Maps
- Locking Tab
- Selection Analysis Tab
- How to use Selection Analysis
- Binding Tab
- Normalize Tab
- Node Weight Map Brush Additional Options Menu
- Brush Mode
- Brush Falloff
- Gradient Falloff
- Gradient Handles
- Gradient Editing
- Selection Type
- Selection Mode
- Geometry Selection
- Geometry Visibility
- Geometry Locking
- Weight Display
- Weight Editing
- Selection Types and Brush Modes
- Figure Setup
- Rigging Type
- TriAx Weighted
- Parametric (Legacy)
- Content Type
- Geometry List
- Relationships
- Creating and Assigning Bones
- Rotation Order and Weight Maps
- Regions
- Figure Setup Additional Options Menu
- Finalizing Options
- Rigging Type
- Transfer Utility
- Property Hierarchy
- What are Pose Controls?
- Creating Pose Controls
- Process Overview
- FAQ
The guide is currently counting over 100 pages, describing what each option in each tool does.
Also contains tips, how to use them properly and how to avoid certain problems and errors.Originally this was just a text file that contained how to use the options, since searching the net and videos for that one, freaking, slight mention of the tool usage was becoming TEDIOUS. Nobody lately writes PDF guides anymore... and the exisitng guides in the store seemed a bit outdated.
I literally describe every option there is in the tools, with minor exceptions if an option for some reason was giving virtually no effects no matter where I checked for it and how I used the figures. I can already say that these exceptions are the A few of the "Cuztomize Drawing" options in the Joint Editor Right click menu and the "Blended TriAx/General" weight mode which for some reason does not do the blending.
EDIT:
Forgot to mention - the Parametric (legacy) rigging is not described here. It's only mentioned.Also, the guide contains an FAQ that answers some of the questions I saw asked on the forums and which are not obviously answered by the tool descriptions and their usage.
My question would be this though:
The Property Hierarchy happens to be a huge topic and would delay the guide by a lot (maybe an extra month or so in my case even). Since not all of its options are related to rigging, would it be ok to only explain the options utilized for it and describe the full tool in a later guide down the line? Would the guide still be helpful to you if Property Hierarchy only described the creation of Pose Controls?Anyway, I'd like to hear your thoughts on this.
If even one person would find such a PDF file worth having - then it was already worth the effort.Show Us Your Iray Renders. Part V...that used the old Wanted DOA set which I saved as a Genesis wearable preset (there is not M4 to G2F transfer) Also used the hat and gloves from Outlaw for G2M. The big nasty gun is a freebie Colt Anaconda I picked up up off of Turbosquid and retextured (the character uses a huge futuristic revolver which this comes the closest to in appearance). The Tin Cup is from Western Bric-a-Brac (rescaled and again retextured).
The Doc Holliday reference is accident as the character has a strong interest in the old west and Tombstone is one of her favourite "classic" films.
Actually re-rendering the scene as I forgot to change the lighting model on the dumpster (default plastic) which gave it a glossy surface.
After I graduated college for my 1st job I moved to Fort Worth, Texas and on Saturday evenings at the right entertainment joints the guys would show up in that 'almost' tuxedo but with cowboy boots, a cowboy belt buckle, and a cowboy hat - sans the duster coat though. The gals would show up in a less 'bell' shaped Southern Belle type dress, sort of like a prom dress in style and color choices (think pastels) but the bell part was for practical reason more leg clinging or droppy. It was pretty neat, most places in US is t-shirt and jeans or very nearly that.
Show Us Your Iray Renders. Part V...that used the old Wanted DOA set which I saved as a Genesis wearable preset (there is not M4 to G2F transfer) Also used the hat and gloves from Outlaw for G2M. The big nasty gun is a freebie Colt Anaconda I picked up up off of Turbosquid and retextured (the character uses a huge futuristic revolver which this comes the closest to in appearance). The Tin Cup is from Western Bric-a-Brac (rescaled and again retextured).
The Doc Holliday reference is accident as the character has a strong interest in the old west and Tombstone is one of her favourite "classic" films.
Actually re-rendering the scene as I forgot to change the lighting model on the dumpster (default plastic) which gave it a glossy surface.
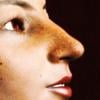
Nasolabial Folds?It seems a bit sad that there are many morphs to control breasts but none that deal with facial muscles. I'd love to have a pose-driven morph set for expressive eyebrows like Emelia Clarke (whose eyebrows are so fantastically emotive there are videos devoted to them, allows noses to scrunch up with the little pinch above the nostrils, etc..
Just look at how many muscles are working in Clarke's face here:

It would be wonderful to have the ability to simulate even 10% of that.
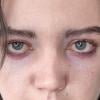
Nasolabial Folds?Marionette Lines and nasolabial folds are similar but different. Nasolabial folds are the lines that run from the corners of the nose to the corner of the mouth and are also called smile lines. Marionette Lines are the lines that run from the corner of the mouth down towards the chin (think ventriloquist doll) and are more common in older people, while smile lines are all ages.
Marionette Lines morph is a daz morph. I am pretty sure V4 had Nasolabial folds as a Daz morph, no idea about g1/g2 as I jumped from V4 to G3, I feel like having smile lines is so common it really should be a standard morph.
Nasolabial Folds?I managed to get this using the 200-Plus (and a few others). There was one morph called Marionette Lines. I'm not sure if that came from somewhere else or not but it worked well. No base characters - just G3F and morphs.
Thanks, I'd tried that one and it didn't seem to have much effect, I'll have to try again and see if I just didn't dial it in properly.
Never heard them called Marionette Lines before though!
Nasolabial Folds?sternocleidomastoid morph would be nice. never mind- found them in th HD muscular morphs.
Animation Club for Carrara , Week #2 - Spooky Hollow. Ready To watch..Oh... I was just asking... I hadn't had a chance to try it out yet. Cool... I'll check out the new download.
I got home from practice and had to check out Mike's cool bat - and is it ever Cool!
I added another morph and (there's a missing Grass texture map) added a new texture map to the shaders where it had them.
The model is beautiful and really easy to morph. I still don't have the animations quite right (using too many morphs). On my PC, the timing is as I created it, but it looks really slow right now in this GIF. Not sure if it's just an internet issue and it needs to warm up or what. We'll see ;)
Is it possible to save the results of smoothing as a morph.If you want to save this morph for future use, do File>Save As>Support Asset>Morph Asset(s) when you are done. Check only the box for the morph you created.
Tiny Petite G3Fs?...thanks that worked. This will save me a lot of time adjusting proportions by hand. Also won't have to bloat the base G3F by transferring all the Steph 4 morphs through GenX.
The "Youth Body Proportions" morph in Growing Up does OK to a point but I have to keep readjusting the head size afterwards.
Nasolabial Folds?I managed to get this using the 200-Plus (and a few others). There was one morph called Marionette Lines. I'm not sure if that came from somewhere else or not but it worked well. No base characters - just G3F and morphs.
 Show Us Your Iray Renders. Part V
Thanks, that's a nice looking morph. I would certainly buy any Disney-esque morphs for G3, including a Callie 7.
Show Us Your Iray Renders. Part V@nonesuch photoshop filters > camera raw > noise reduction. As you might guess from the name, also can clear up a good bit of grain. I abuse it so much. As for Star2.0's texures the only difficulty you might run into are the eyebrow textures, they can look a bit odd on non-Star figures.
@C3PO Betty Boop was definitely an influence, particularly in regards to the very low bouth and as near to a lack of chin as I could get.
@snowsultan the main base is my perpetually 75% done disneyesque morph (as seen below). One of these days I'll actually put my nose to the grindstone and finish it. A lot of the dialed tweaking is Dogz' 200 face morphs, they have a lot of general proportioning morphs wich are great for completly changing the general shape of the head.
There's also a bit of custom converted callie's body and a head morph based on decoco (pre-genesis original anime figure),
Is it possible to save the results of smoothing as a morph.If you talk about smooth modifier, yes.
1 change the figure or obj which you need to make smooth morph , as base resolution..
if your figure already posed and the item are parented, you must need un-parent the item which make morph. (keep the position)
2 check "on" "interective update" in parameter tab>meshsmoothing keep collision target,
3 export as obj, (keep default scale and axis).
4 remove smooth modifier defomation,, then import the morph.obj by morph loader pro. must set, Reverse defomation = yes.
5 it make new morph, then when you set 100% , it deform, as if it is applied smooth modifier.
you may retrun subdivide, to see better smooth effect, (if the item was sub-D and high resokution before)
it may not perfectly same (because, we need to keep base resolution,,) but almost same, and actually I often use the way.
the good thing is you can controll the strenght as morph too. (eg you can change limit, then set as 1.3, )
but at same time,, smooth modifier often fit current pose only. (then it should up-date for each pozing,,)
then mostly work about current pose and scene only.. but if you make these smooth morph with zero pose,, it may be usefulu for many purpose.
you can apply this morph with keep smoothing modifier, with different pose,, it often make more easy to fit and smooth with collision target.
=====
wuu I need to open my shop ><; good day.
Is it possible to save the results of smoothing as a morph.Is it possible to save the results of smoothing as a morph? Smoothing is nice but it slows down workflow significantly. When posing I either have to select everything which takes a minute and turn off smoothing on everything or I get a delay everytime I pose something. So is it possible to save the results of smoothing so it doesn't have to recalculate all the time.
Daz 3D is part of

Connect
DAZ Productions, Inc.
7533 S Center View Ct #4664
West Jordan, UT 84084Licensing Agreement | Terms of Service | Privacy Policy | EULA
© 2026 Daz Productions Inc. All Rights Reserved.