-
UV Unwrapping
 ...and what about Hexagon?
I've had Hexagon just as long as I've had Carrara. I've used it a few times, but only those few - and it was mostly just a shortcut for me into the morph loader dialog via the DS bridge.
So I see here, at the Store Page, that Hexagon also has UV Editing tools. How are those to work with? Anyone familiar with them?
Here I have this whole modeler at my disposal that I never take advantage of.
Any thoughts? Testimonials?
Talk about affordable. Even when it's not on sale Hexagon 2.5 is currently less than twenty bucks USD
This video shows a process of unwrapping in Hexagon
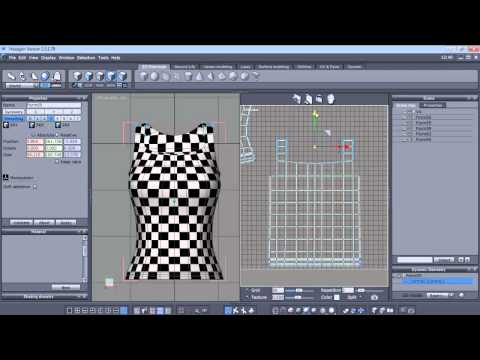
One big thing that caught my eye is that it says: If we add more polygons after UV Mapping, we lose the UV Map and have to start again! Yikes!
I don't think Carrara is like that. We'll see.
Depends. Some things will break a UV map and some things won't. Say for example you decive that an edge needs bevelling. If you make the bevel with the Fillet tool, that will absolutely break the UV mapping. But if you use Quick Fillet (on the Extract Along, Extract Around etc drop down button), that won't break the UV. Other tools on that dropdown dont break UVs either.
It's another good reason for modelling in lots of small component meshes - limits the amount of damage inflicted by changing the mesh post-mapping.
BTW, that surgical arm lamp that I showed on another thread (more about rigging than UVs) had 22 separate meshes in the vertex object.
Rigging Window Blinds?Hi all,
The blinds are done. Not the way I wanted them, but they raise and lower, open and close, and I'm done with them.
For some reason, DAZ kept changing my animation to 30 keyframes. I have no idea why. But it did. Or maybe there's a 25-keyframe animation overlaid over a 30-keyframe animation. Regardless, using the ERC Freeze to capture the animation keyframe data will always and only get the animation sequence that does not have the inner cords raising. I have no idea how to get that animation keyframe data ...
... and I'm absolutely not going to clear the animation and do it all over again. Been there, done that, twice. Not worth doing a third time.
Instead I used ERC Bake to undo my Lower-Controller (thanks for the tip, Richard!), stepped through my animation to the end position, and used the regular ERC Freeze. So now the footer and slats rise proportionally, rather than the footer lifting Slat24, which then lifts Slat23, etc. What I have now is what they would have done had I controlled them with a morph.
But the Blinds Lower-Raise controller now shortens the inner cords and extends the pull cord correctly, as the slats go up -- as shown in the renders below -- and that's good enough.
Thanks to all for your help!
Crissie
UV Unwrapping...and what about Hexagon?I've had Hexagon just as long as I've had Carrara. I've used it a few times, but only those few - and it was mostly just a shortcut for me into the morph loader dialog via the DS bridge.
So I see here, at the Store Page, that Hexagon also has UV Editing tools. How are those to work with? Anyone familiar with them?
Here I have this whole modeler at my disposal that I never take advantage of.
Any thoughts? Testimonials?
Talk about affordable. Even when it's not on sale Hexagon 2.5 is currently less than twenty bucks USD
This video shows a process of unwrapping in Hexagon
One big thing that caught my eye is that it says: If we add more polygons after UV Mapping, we lose the UV Map and have to start again! Yikes!
I don't think Carrara is like that. We'll see.
The older generation: Victoria 2/3, Michael 2/3 and their children rendersHere's Michael 3 with a custom morph by JoeQuick, recreating the features of actor David Tennant...or the tenth Doctor, depending upon your perspective. ;)
Sincerely,
Bill
Very, very cool. It most certainly looks like him. I like the textures and lighting choices you made, too.
Folded Clothes OptionI made a couple of changes, so now the rigging, while adjusted is closer to the original, so the morph will accept poses and the pose controls are useful. This basically means if you can pose G3F into a 'draped' position, the clothing will follow along. Also, there's a lot of control in what you can do with it...
(oh yeah, it works with long sleeves, now, too!)
Depending on the article of clothing used, you may need to switch the collision object to the hanger or whatever you have the clothing draped on.
Another thing that is easy to do with this: Put the clothing item on G3F and morph and pose it. Then make sure the clothing is at base resolution and everything, except it, is hidden. Then export it as an obj, then use Morph Loader it import it as a morph for the clothing item.
I'm not quite sure how soon I'll post it, but it should be sometime this week.
Prices...The socks come with hundreds of great pre-made material options... this is really what you're paying for with those socks. With the dress, you're paying for having a basic dress that has great multiple morph and transmap options. When you can use one item in a dozen different ways it ups the demand and price of that item.
The older generation: Victoria 2/3, Michael 2/3 and their children renders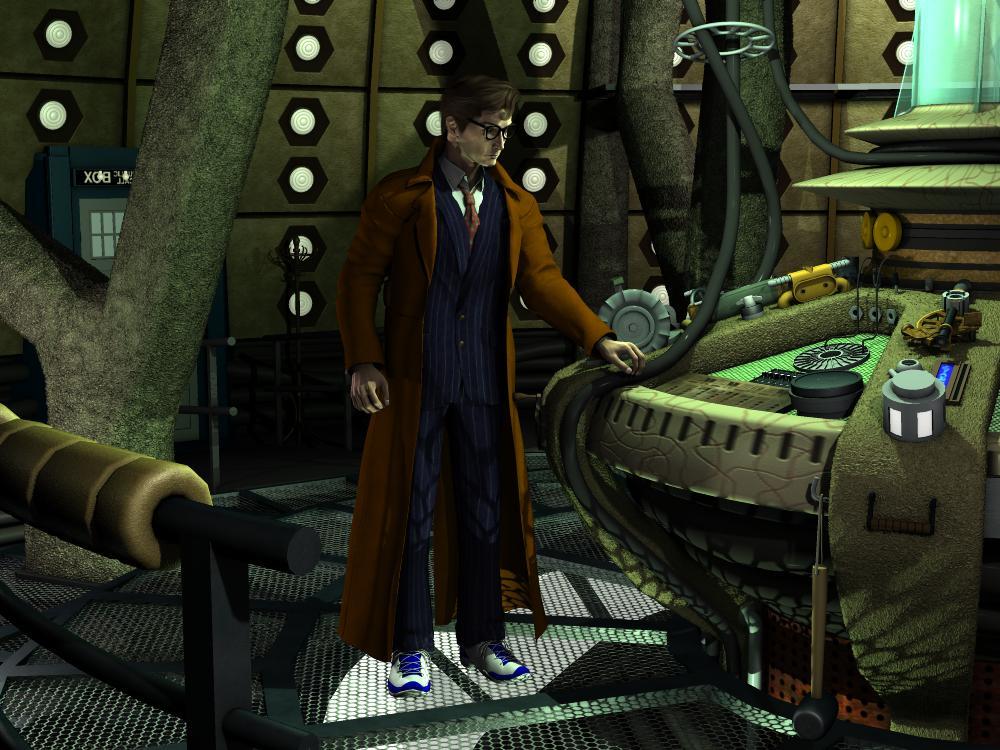
Here's Michael 3 with a custom morph by JoeQuick, recreating the features of actor David Tennant...or the tenth Doctor, depending upon your perspective. ;)
Sincerely,
Bill
Thorneworks' G3F Fantasy Morph Resource Kit -- "Eyes Gone?!"I would guess it would be something akin to RawArt's Slim Man.
That's actually a geograft face mask erasing most of the features, not a morph of the original mesh itself.
-MW
Yes, but that's probably close to what it looks like.
Thorneworks' G3F Fantasy Morph Resource Kit -- "Eyes Gone?!"I would guess it would be something akin to RawArt's Slim Man.
That's actually a geograft face mask erasing most of the features, not a morph of the original mesh itself.
-MW
Can you change a dsf's file name (and it still works)?i did it for a simple, single neck morph. and it kinda worked. kinda, because the line about the neck dsf wasn't in the missing files any more, and in the actor morph panels, the label had changed. but there was no change in my figure, and the value was 0. which means it didn't take properly - if my custom morph's value had been 0, it wouldn't have showed as missing in the 1st place...
so either i did something wrong when editing, or there is possibly some other kind of file needed, like auto-adapted or something (ofc all those "personal" files are also possibly missing everywhere since i didn't copy the backup ones into my new library, but i don't understand how they work at all, and there are so many of them, i couldn't make any sense of the folders i saw, henceeven if there was a corresponding file, i didn't find it...) ~
this is getting bothersome by now, and maybe the issue about the value not being taken can't be corrected (NOT meddling about with X lines of numbers!!) - so as you say, it will be easier to correct my scenes with other Gen morphs. *sigh*
i'm sorry, but i didn't understand the meaning of your last sentence
"I am assuming it is your custom morphs contained within the saved scenes you are really after, right? If you do get everything to load again, you might want to consider saving those morphs as a scene subset rather than part of an entire scene."
yes, the morphs were what i was after. but why a subset? i never use subset, or maybe 1-2x, and it was to save part of a scene as in, a couple of objects in a bigger scene, in the sense you'd assume a subset is meant to be...
Buy Something That Doesn't Work in Carrara? Post your Questions and Workarounds here. (please)I still don't quite get how he gets the waterfall tool to work the way it does. It's a conveyor belt system that works via morph dials - but without any special plugin like Sparrowhawke's Belt tool. It works great and Thunder River's river water has animation morphs. Now that I think of it, the ReadMe had his web address on it where I had to go to download the Pose files which added a one second clip of animation to the falls and one for the river - maybe more than one for each... it's a really cool setup with a lot of friendly support. Nerd's cool people!
Soggy Bottoms Swamp hasn't been played with much yet. That was the last thing I bought from him while he was still here - and it's definitely a Nerd3d product - packed with fun stuff and a bazillion options. It comes with some surrounding cyclorama backgrounds too, to give the same look as the promos. If anyone ever needs help using sky boxes, drop me a line - I've become quite good at it! :)
Both Tropical Cove and Thunder River require the separate purchase of the Waterfall tool to have the waterfalls in them. I bought all three of those things at the ame time at Daz.
I have a cool animation of Rosie kicking the crap out of three or four orcs on the stone bridge as a whole herd of them are coming in from the distant Boot Hill. The bad news is that by the time Dart gets there, they've already worn her down and taken her. Dart doesn't like that.
Buy Something That Doesn't Work in Carrara? Post your Questions and Workarounds here. (please)
(in fact - Dart, do you have a list of the nerd-3d prducts that you know to work in Carrara? - and do you use the Poser of DS versions? With Carrara, both might work, but there may be a preference as to which, etc.)
cheers,
--ms
Danger Pass
Stone Bridge
Soggy Bottom Swamp
Thunder River
 Waterfall Tool
Tropical Cove
Boot Hill
Of course his Walk Designer porducts work amazingly well
Note: I only have Poser versions where applicable
=========================================================
I still want to get (and am confident that they'll work):
Footsteps tool
Splash Tool (I know that we have particles... but sometimes it's just nice to have Nerd3d's clever morph tactics!)
 Waves on the Beach
Castaways
The Glen
 Thorneworks' G3F Fantasy Morph Resource Kit -- "Eyes Gone?!"
I'm dying to see what the "Eyes Gone" morph looks like, as I've never seen something like that in practice. Will someone who has purchased this product please show a render or give a description? Thanks.
--MW
Dear content authors: Please continue to support 3delightWell, basic tips:
Opacity maps aren't going to transfer right. So be sure to have copies or something to set Opacity properly.
I recommend US or US2, if you have it. Keep an eye on bump and displacement values, since those tend to default to -.1 - +.1
Metals are easily captured by looking at Raytraced reflections.
If you are stumped by specular (which I've gotten weird results with), I'd recommend finding a shader that's in the same ballpark and looking at it's settings. Like, you want glossy wood? Apply glossy wood to something and check the values. Or apply glossy wood and switch the maps back.
Skin is another story. I'm still struggling to get consistently decent skin.
Also 3DL seems to like really weirdly high lighting values. Again, struggling with it. 3DL seems to require a bit more unintitive learning than, IMO, Iray has.
Thanks, Will. Given your comment about opacity maps and skins, do you think that IRay to 3DL on the consumer end is best served with objects (vehicles, tools, sets) than with characters?
I agree 110% about the lighting levels needed for 3DL. My very first renders looked like they were done with a single flashbulb in the middle of a blackout in the middle of the night at Grand Central Station. There's a real learning curve with 3DL but I think it's worth it, especially if you treat a render as a starting point to be fiddled with further in Photoshop for artistic reasons (i.e. faking a painting on canvas).
...a good solution to that would be AoA's Advanced Ambient light which ambient produces fill lighting that is fully adjustable. UE does too but it can bloat render time pretty badly particularly if you use full GI, and you have to mess with the sampling rate to get a clean crisp image.
Animation Clubs 3rd animation finished. Watch the final film now.I ended up just converting the palm tree to a vertex object and adding a morph target, I haven't looked how much the vertex mesh added to the scene yet.
 Darwins' Schtuff
OMG, he just gets better and better. I'll definitely let you know when (not if) I use him, posting and tagging your products in the gallery. I'm trying to do that as I go.
I've got plenty of books left to write and covers to do, plus promo art, web graphics, etc. Plenty of characters to render. I'm really just getting started. Trying to bring what's in my head into the real world is a lot of work some days but feels great when I can finally see it. Some day I'll be able to do it full time. Until then, I keep plugging away.
Have a great holiday. Parker looks wonderful and I'm keeping my eye out for Damen!
I'll keep an eye out for notifications, then! XD Thank you!
and Thank you, Rhys- though his face had changed after that initial posting due to rigging issues with the morph.
SimTenero Shape Reprojector helpHi all. I own the SimTenero Shape Reprojector but it's difficult for me to "play" with it because it takes like 2 hours to make a morph. How can I replicate the effect of the image attached? What setting I have to tweak?
Thanks!
Hi Super Cheese! Richard is exactly right. I used a super high poly plane for that image, I think 100 sub-divisions or something crazy like that :-). Each figure was a separate morph pass with pre and post smoothing. I've managed to get the best results by using separate smoothing morphs and then playing around with the dials to get the effect I want. More iterations isn't always better, so start low and only dial up if you aren't seeing the detail you need (and remember to try separating out the smoothers and dialing them back later to see some detail return).
Rope to morph to Genesis 2 characterHello,
New to daz3d and i'm curious to know if it's possible for the rope in the tied up collection to morph with the Genesis 2 figure whenever a body part is moved.
Thx!
Well, it's possilbe.... assuming that the rope and knots are all welded properly, you might be able to convert the rope to to a dynamic item using the DynCreator script from Renderosity. If you're trying to do an animation, that's probably the best course, but if you're just doing a still, I'd suggest just rendering the ropes separately as a .png and then stretching/adjusting them to fit as an overlay in photoshop using Puppet Warp.
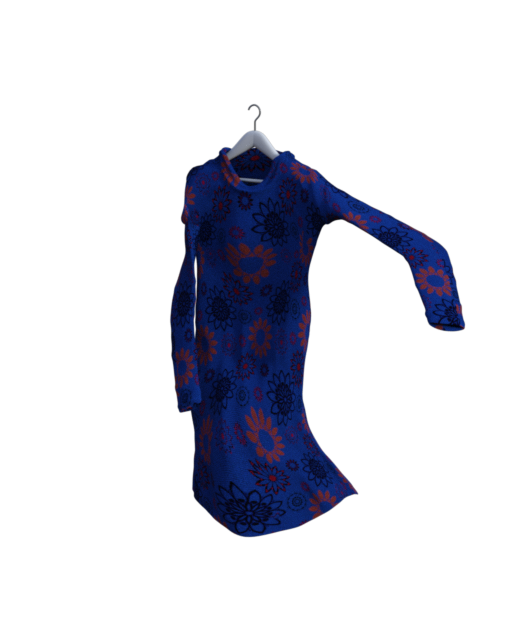
Folded Clothes OptionWell, here's a quick 'proof of concept' trial...
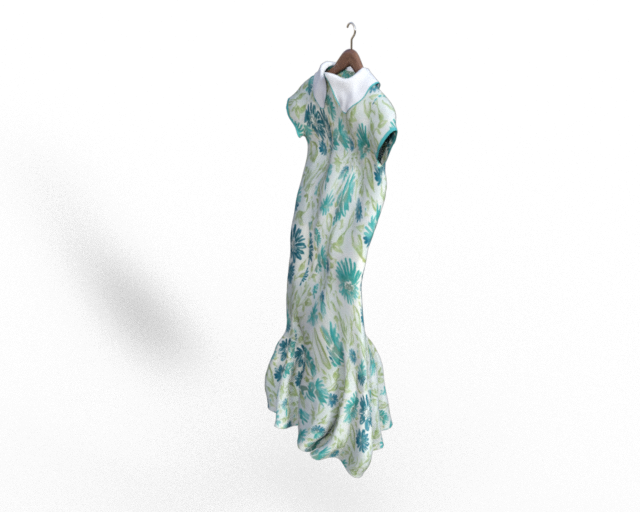
I used Blender to 'clothify' G3F and 'pinned' parts of her in place before running the sim against the hanger prop. I did a quick smooth/cleanup of the mesh before exporting back to Studio. Then I loaded the 'hanging' G3F through Morph Loader, fit the dress as usual (it's Wilmaps Princess Line dress for G3F), hid G3F and hit render...
That looks great!
Rope to morph to Genesis 2 characterHello,
New to daz3d and i'm curious to know if it's possible for the rope in the tied up collection to morph with the Genesis 2 figure whenever a body part is moved.
Thx!
Daz 3D is part of

Connect
DAZ Productions, Inc.
7533 S Center View Ct #4664
West Jordan, UT 84084Licensing Agreement | Terms of Service | Privacy Policy | EULA
© 2026 Daz Productions Inc. All Rights Reserved.