-
Released- Evan for Genesis 3 Male (Commercial)
I've been a bad creator- I had thought I made this thread alread! XD
Anywho...
I am intro'ing Evan for Genesis 3 Male-
Be Elven, Human, Fae- whichever you want to use him for, he's ready.
His set includes:
Full Human/Elven Presets, as well as each head/body base (which needs no additional morph packs) and Full (which uses Genesis 3 Male Head/Body Morph Packs), as well as Elven ears, cornea bulge and sharp teeth separate presets.
I've included two presets; Head and a set for his hands/feet from the Fantasy Creature Creator Morphs for a little added extra detailing, but it is not necessary to use them for the figure itself.
His base skin presets include the complete Base Preset along with separated arms, torso, and legs, along with 3 Brow options and a No Brow Option. With these, there are Displacement Presets; Off, Low, Medium, and Higher with anatomical displacement settings to match.
8 Eye Material Presets, with 2 Lashes and an additional 4 Scleara Presets to choose from.
His scars (face-all brow options, hand, arm, chest/torso, leg and back) are available individually and various combinations, as are his tattoos (chest, back, arm) with a mixing of both tattoos and scars added in.
Anatomical Elements are included, material settings are Iray only.


 Exporting to Max for Morphs Issues.
This is slowly driving me insane,
When I export GF3 obj using the default 3ds Max preset, it comes in Max back to front, the "Y" axis is reversed, instead of seeing the front of the model I'm seeing her behind.
Not only does the model come in the wrong way round but the normals are also flipped, when I check "Flip Normals" in Max's obj import options it still comes in with flipped normals and what looks like broken smoothing.So then I export from DS again, this time with "Invert Positive Direction" on the "Y" axis, now when I import to Max all is as it should be, the model is facing the right direction and the normals are fine.
I export back out of Max and go to load in the morph with Morph Loader Pro, but when I apply the morph the model is warped and reversed on the Y axis.
In Morph Loader Pro checking invert positive direction on ANY axis has no efffect at all, the morph still warps and flips.
So I go back to DS, export again with the default 3ds max preset, I edit the mesh in Max, re-export, load up the morph in DS and this time the morph is mirrored, completely the opposite of what I just did in Max.
I try again, this time I flip the normals in Max before editing, but the same thing happens all morphs are mirrored.
Even when I import and export a morph making no edits at all, the mesh still moves on the base of the hands and the lower back when I scrub the morph.
I've tried in Max 2014, 2016, and 2017 all with the same result, I also tried with GF2, same thing.
I tried this a few years ago and never had these issues, has something drastically changed in the process?
Is the required process documented anywhere ?Why do zBrush users have it so easy ?
GenX2 Update / Genesis 3 Add-On [Commercial]It shouldn't make a difference where you install V4 or other Poser figures. The only requirement is that the Runtime folder for the installation is part of one of the content folders listed in the DS content library, so GenX can find references to geometry files and other external files like morph injectons. (You may need a file "Poser.exe" in the top folder of the Runtime folder, or some V4 installer or scripts for the ExP system will refuse to work. This "Poser.exe" can be any file, even empty. This once was the case, not sure if it still is.)
Figure Metrics upgradesI love Figure Metrics included with Measure Metrics. It is one of my "go to" tools. If the PA has some intention of future upgrades, here are a couple I would suggest to make Figure Metrics even awesomer. :)
1. A new morph and measure for cup size. This would help a lot when creating various body types, so that the ribcage is properly scaled when the breasts are smaller or larger than average.
2. A body type morph based on weight stats. So, if a woman is tall but slender, the thighs and shoulders and buttocks are morphed accordingly, instead of just shrinking the standard measurements.
3. A general body type morph setting so Figure Metrics can get closer to the right look for a given figure. I.E...if I have a slender teen, I can set the general type to that as part of the FM calculation. The same would be true if the figure were voluptuous or heavy...etc. I realize I can do this manually with other morph dials. This would just be a nice additional feature.
4. A simple way to hide all Measure Metrics guides. Right now, the only way I can see to hide them in the Preview Window is to hide them one at a time. A global switch would help a lot.
These are just some suggestions from someone who uses the plugin on almost every character I make.
:)
Josh Crockett Suggestion Page for Monster Characters!What I'd like to see is a huge, muscular guy built along the proportions of The Hulk in Joss Whedon's Avenger movies. Someone who goes way beyond the Freak character. I suspect that a completly new mesh would be required, I doubt the existing Genesis figures would take such an extreme morph without something breaking.
Cheers,
Alex.
I'm quite sure it's possible to go big with G3 as we have had things like The Savage for Freak 5 in the past
https://www.daz3d.com/the-savage-freak5
Althought it was for Genesis, it is pretty much the same process for creating morphs
There's also this for Genesis 2 https://www.daz3d.com/genesis-2-swole-for-the-minotaur-6
Ice Dragon Art WIP'sSo, the move over to an external drive on my laptop did not go particularly well in regards to my categories. I lost about 2/3 of the links from the original files to my custom categories. I have been slowly going through everything and re linking. I already know the issue is because of 4.8 as my transfer went fine with my pc which runs 4.9. Not a big deal, I'm re linking slowly. So I was working on this tonight because my PC is busy rendering something and since I have a bit of a headache I'm working on my links. I just worked my way through my Genesis 2 Female characters and discovered that I have 78 of them. Not counting things like Faces of Asia and Africa, etc. How on earth did that happen?!? That's totally ridiculous....
Ha ha!
I'm not the only one who has more stuff than I realize. I don't have as many G2F's as you do, but I decided to do a count of my characters. Interestingly enough, I have more V4's than anything - she has more cool skins than anybody! I tend to buy for the skin rather than the shape - unless there is something really cool about that shape which I can't replicate with dial spinning. In truth, I rarely use characters straight out of the box but almost always modify them to look like the book characters in my mind.
Aiko 4: 5
Hiro 4: 1
Hiro 5: 1
G1 Female: 26
G2 Male: 18
G2 Female: 22
G2 Male: 15
G3 Female: 3
G3 Male: 1
M4: 9
V4: 32Show Us Your Iray Renders. Part VIHow do I delete an animation Time Line?I am working with dynamic cloth and attempting to save a piece of cloth/clothing in the final stage of a timeline so that I can then use the VWD Pythin Script with DS Bridge to move hair into a 'dynamic' pose.
What I am having trouble with is understanding how to run a timeline from default pose to a set pose to posiiton the dynamic cloth in the final posed position and then save it as a final posed piece of cloth or morph. ONce I can do this I will then work on the hair......but how do I save the final stage of the cloth as a mor[h for the pose?
Genesis 2 with 3 additional bones for fat?I could have been more precise on that - I never sayed something about weight mapping the additional bone - it was intended to be only a I think its called a ghost or helper bone with no weight map on it.
This is something I am using right now to control some morphs of the figure by linking the bone rotation with some parameters and let the bone point (with the Daz "Point At" feature) to something like a null or a little gizmo prop geometry that I can grab and move around with the universal mainpulator in the viewport. I am using it for to let the figure bend and twist the head with the pose control parameters and let the eyes point at a second target but thats another story that I will continue here LookAt-PoseControl with EyeTarget someday.
I also had this idea of adding bones to do some deformations once but there are some pitfalls along the way that I've learned from and therefore the method I've descriped earlier should go something like this
1. create morphs with DFormers
2. create bone
3. link the bone rotation to the morphs
You finished step 2 now - if you want to continue you need to finish step 1 before we start with step 3 where I can explain how you could use the Property Hierarchy pane to do the ERC-linking.
You sayed you never painted weightmaps before - so this is learning by mistakes - this is like I started with rigging in DazStudio about two years past now.

So you painted the "x rotation" weight map of the additional bone for genesis 2 I guess - at least now we know weight mapping the bone dosnt lead to the desired result - but wait did you try to translate the bone instead of rotating it - maybe this will move the influenced area of the belly like it should - you could save the shape as morph obj and use that on a default weight maped genesis figure or some of your scene file where you have added the bone but not the weight map. I'm assuming you doing incremental saves before every critical step - at least I would suggest to do it DazStudio can crash all of the sudden if you playing around with all these content creation tools?
There is a problem with this bone weight map method:
You altered the genesis 2 figures TriAx weight map channel for x-rotation in the belly region this means the figure will for shure no longer bend the waist like the original. Try to test it by bending (x-rotating) the abdomen, abdomen2, chest or use the pose control waist bend an you propably see what I mean. But dont act desperately I think we could copy and paste this weight map to a DFormer influence weight map.
Instead of just adding the belly bone influence on top of the figure bending system you have substracted the influence frome the other weight maps that also had some influence in this area and added that to your new bone.
Let me try to explain this: the weight map tool is by default set to automaticly "normalize" all weight map channels.
This means the more red weight map - that is higher influence - you paint on some spot of the figure - the more blue - that is lower influence - some nearby bone weightmap with the same rotation direction (in this case x-rotate abdomen and so on) will get in this spot. Since you have added the new bone as a child of the abdomen bone - and the influence map is not that bright red - it is maybe not that noticeable, but depending on the size of the area you have painted - the other maps suffer from that.
Use DFormers with Weight Map (Influence Weights) instead
Parenting the DFormer to the bone and doing x-rotation was a bad idea of mine and the deformation will also going inwards and outwards as you descriped. The deformer should be translated up-down and left right a bit - with maybe a slight rotation - I dont know how heavy weighted your figure is.

Did you know that you can switch the deformer influence field from the default sphere to a weightmap influence?
Maybe not everyone knows about - so you have to select the DFormer Field go to Parameters pane look for "Influence" and switch the "Influence Mode" from "Sphere" to "Weight Map". Then go to "Tool Settings" > "Node Weight Map Brush" and under "Unused Maps" you will find the "Influence Weights" channel you can now add with the button "Add Map". The new weight map gets the initial gradient of weight paint we have seen as shpere influence before.
Now you have the choice to eighter copy and paste the weight map you once painted in here or paint on this map untill you like the result - to see any deformation in the figure the dformer gizmo object in the scene should allready have some translation - rotation or scale.
For to copy your weight map you can select your added belly bone select the x-rotation weight map channel in the "Node Weight Map Brush" tool settings and right click > Copy Selected. Then select the DFormer Fild again right click on "Influence Weights" in the tool settings and choose "Paste Selected".
I hope everything will work as descriped and some interested readers will learn from this example.
Daz Studio Content Creation and Carrara "questions"...Have a look at this - it goes through adding a morph in Daz Studio:
To assign it to the Actor group, you need to edit the Property Settings for the Morph. Remember that the tutorial above was for an earlier version so there are a couple of changes, but the principles remain the same.
Daz Studio Content Creation and Carrara "questions"...actually, it was pretty easy and straightforward, again, thanks.
i would have to edit every morph i make if i went this route, and constantly resave the file, redistribute... It works, changing the morph around, but for the long haul i will have to let my ocd lose this battle, LOL!!!
Is this what they do for Daz Studio Character Morphs? how come those end up on the actor, and mine are ending up on the 2nd subset level? shouldnt they go to the actor level automatically by default?
Actually, in Daz Studio, for genesis they are ALL on the top level, separated by the catergory actor which has the morphs, and pose controls, which has the bend controls. My figure however, ALSO has them on the top level, set into a catergory I created.
so why does carrara flip the switch on things?!? does this even matter, will this have any affect on functionality in the future? (and that is what worries me)
Duplicating my DAZ libraryI'm running out of room on my C drive, but I have 2 larger drives installed in my computer. Can I just transfer everything over to the new drive internally and everything still work with install manager? Also, I want to be able to work on the road, so can I have all my content on my desktop and my new laptop? If so, what is the best way to copy the content to my laptop?
Facegen now on sale...get it!After some more morph dial work, a couple of quick tests. Any better?
Novica & Forum Members Tips & Product Reviews Pt 8You can turn the D-Formers into morphs... then in each frame, you just adjust the morph - and you shouldn't have to recreate the wheel for every frame. You can make a couple of different D-formers that convert into morphs for the same area to give yourself more control too - the BIGGEST problem with D-formers is that they can distort the UV mesh in ways that are hard to control, so textures, maps, patterns can get distorted.
A lot of times I buy a new product and realize it just automates some process I already know or is content that has a process I already know built into it. But... DAZ is a deep program - no matter what you learn about it, there are always going to be other areas of expertise in it you either don't know about, or aren't real competent in. I agree... I just started learning how to model my own content... and the more I learn about it, the more I realize I have to learn. I also sometimes do something and realize there was a better way to do it. I forgot who suggested turning limits off on short hair to be able to morph it into longer hair - but that was a brilliant idea that never crossed my mind. Another thing you can do sometimes is HIDE portions of an outfit... either morph it below the figure or hide parts of it by turning it off OR making the opacity of material zones 0... then kind of kit-bash your own outfit by putting another piece of content where you made the one piece disappear. So if you like the top of the Viking outfit and you can hide the skirt, you might be able to put another skirt on that character that flows better.
Thinking outside the box with DAZ really expands your horizons. Heh. Realizing there IS no spoon. :DNovica & Forum Members Tips & Product Reviews Pt 8She is right... spend 30 minutes playing around with this, do her demo... and it'll change the way you work with DAZ.
Every morph in Zev0's Fit Control *can* be done with a custom d-former with enough practice. His scripts just make it convenient. Which is totally worth the money. D-Formers can be frustrating.
But - often, when you just can't get something to work right, a D-former turned into a custom morph is your best bet.
I wish I understand bones and what you were talking about in your original post. I feel like I might be making D-Formers when there are already tools to fine-tune that I just don't know about that would be easier.I just watched it, and I can tell you that at least on the Viking for Genesis 2 Male(s), it appears deformers would be a much easier fix. I think because the adjustments are not provided and the bones kept moving larger parts of the tunics than I wanted - or nothing at all - that deformers appear a much better fix.
Although, because I was planning to use this outfit for some animated figures, I may end up looking into VWD Cloth And Hair 3D Software. Then again, there may be another Viking out fit that follows figures better. I wish I knew more. Everytime I turn around, I'm having to learn a whole new process or that is how it feels. And/or buying new products. Wish they sold VWD through DAZ.
Pix Merana for Genesis 3 Female missing from the storeI think it was added by mistake. The product description says "This amazonian beauty is a combined morph of Genesis 3 Female and Ophelia 7". Ophelia 7 hasn't been released yet, so I think this product was a little premature. It's actually reappeared in the store now and listed as a FREE item. But when I try to add it to the cart it doesn't do anything. It was proabably be back working again whenever they release Ophelia 7.
Edit - Looks like she is gone from the shop again now.
Novica & Forum Members Tips & Product Reviews Pt 8She is right... spend 30 minutes playing around with this, do her demo... and it'll change the way you work with DAZ.
Every morph in Zev0's Fit Control *can* be done with a custom d-former with enough practice. His scripts just make it convenient. Which is totally worth the money. D-Formers can be frustrating.
But - often, when you just can't get something to work right, a D-former turned into a custom morph is your best bet.
I wish I understand bones and what you were talking about in your original post. I feel like I might be making D-Formers when there are already tools to fine-tune that I just don't know about that would be easier.Dante 7I wanted to do a straight up, mostly, render of Dante. Here he is in the Ugly David outfit. He has Buzzed Hair, and Oh My Body Hair (face and arms). Two problems arose: one - the vest didn't fit right. It was sort of floating above his shoulders, the built in morphs didnt help - I'd get poke-through before the shoulder or back morph bought it down enough. I ended up using a D-former. Not major, but annoying. Second: look at the shoulder, I see a mesh pattern there. I almost rememer what causes that.. subdivision?
Anyway, here he is. I'm happy I got the pro bundle - at least at that sale price

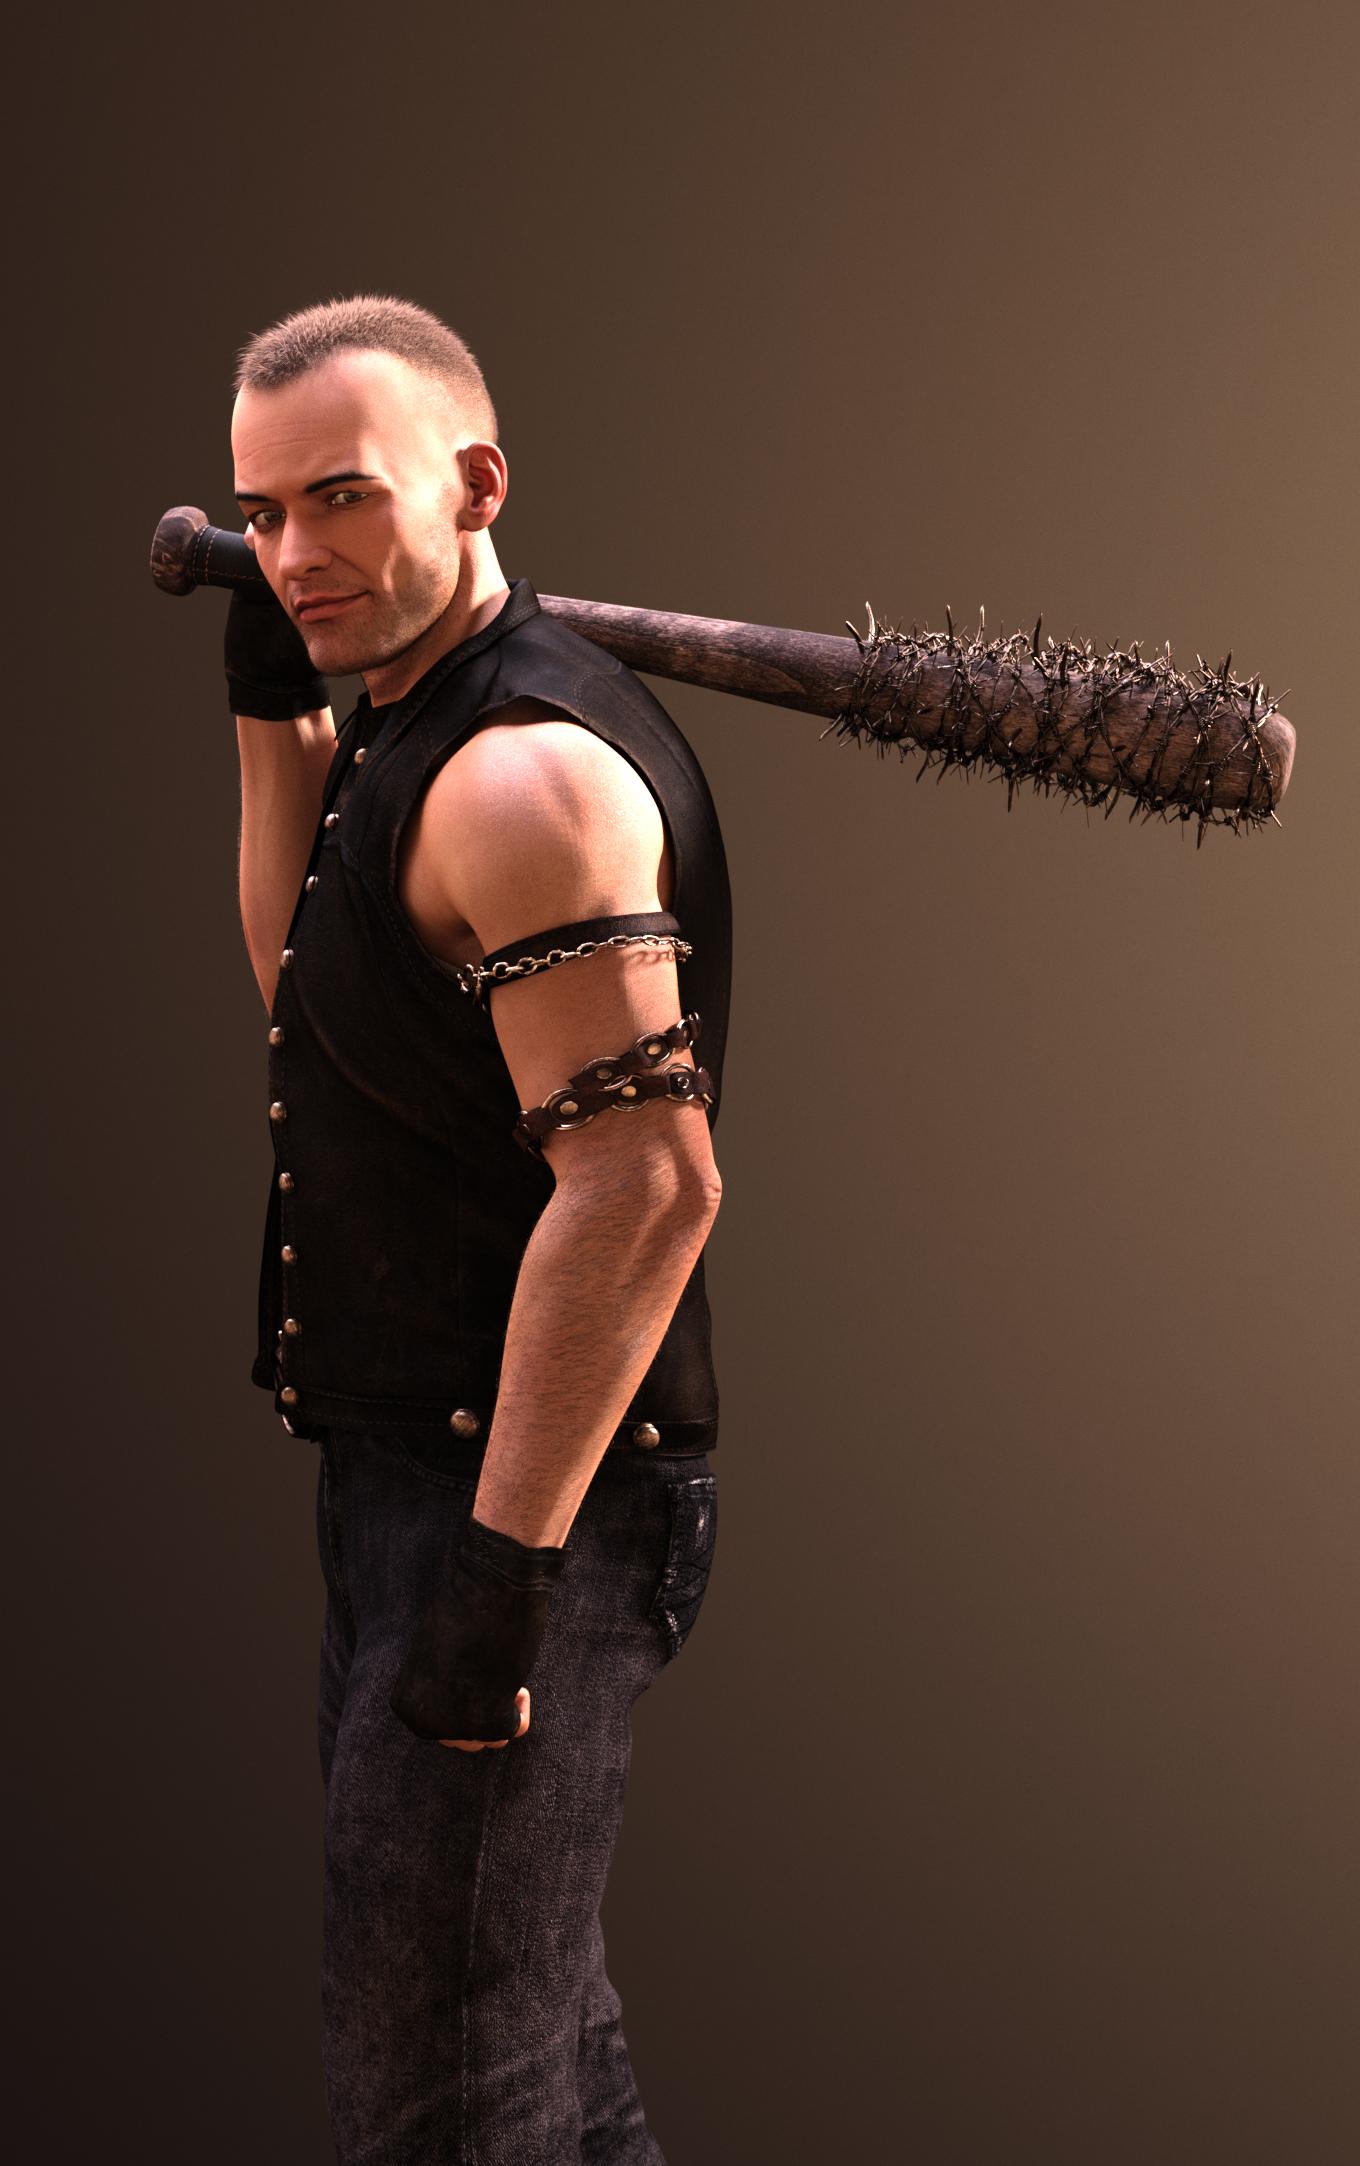
Fantastic render! Really shows some of his personality.
DAZ 4.9.3.166 Degradation of iRayThe tires on that jeep are flat, the tire pattern is made with a displacement map (made for 3DL), I don't use iRAY so have no idea what the problem could be.
I would think something wrong when transfer material to iRAY but if it works ok in one version and not another of DS I have no clue.
Daz Studio Content Creation and Carrara "questions"...I think what you need to do is create an alias for those morph dials at the level you want them and then hide the originals. Which node you need to put them in to make them appear exactly where you want though may take a little experimentation. You do need to do this in DAZ Studio as far as I know, so it will require making a change, saving it, then going back to Carrara to see if it worked.
Here's the basic process:
1. In DAZ Studio, open up Windows > Panes > Property Heirarchy Editor
2. Find the dial you want to move in the Parameters tab
3. Right click in an empty space in the Parameters tab and switch to edit mode
4. Click and drag the property you want to move from the Parameters tab to where you want it to go in the Hierarchy Editor (drop it in either the top level or one of the bones levels, not in the parameters - I suspect that the first level called "bones" might be the one that shows up as "actor/model" in Carrara but won't have time to test it until later in the week)
5. When it asks if you want to create an alias in the new location say Yes
6. Right click in the Parameters tab on the one in the spot you don't want it to appear and hide itIn my screenshot below, I dragged a dial from the "string" level of one of my Villainous Masks freebies to the top Tengu Mask level. This makes the dial show up on both those levels and if I wanted I could then hide the one on the string level and just have the controllers all in the very top level.
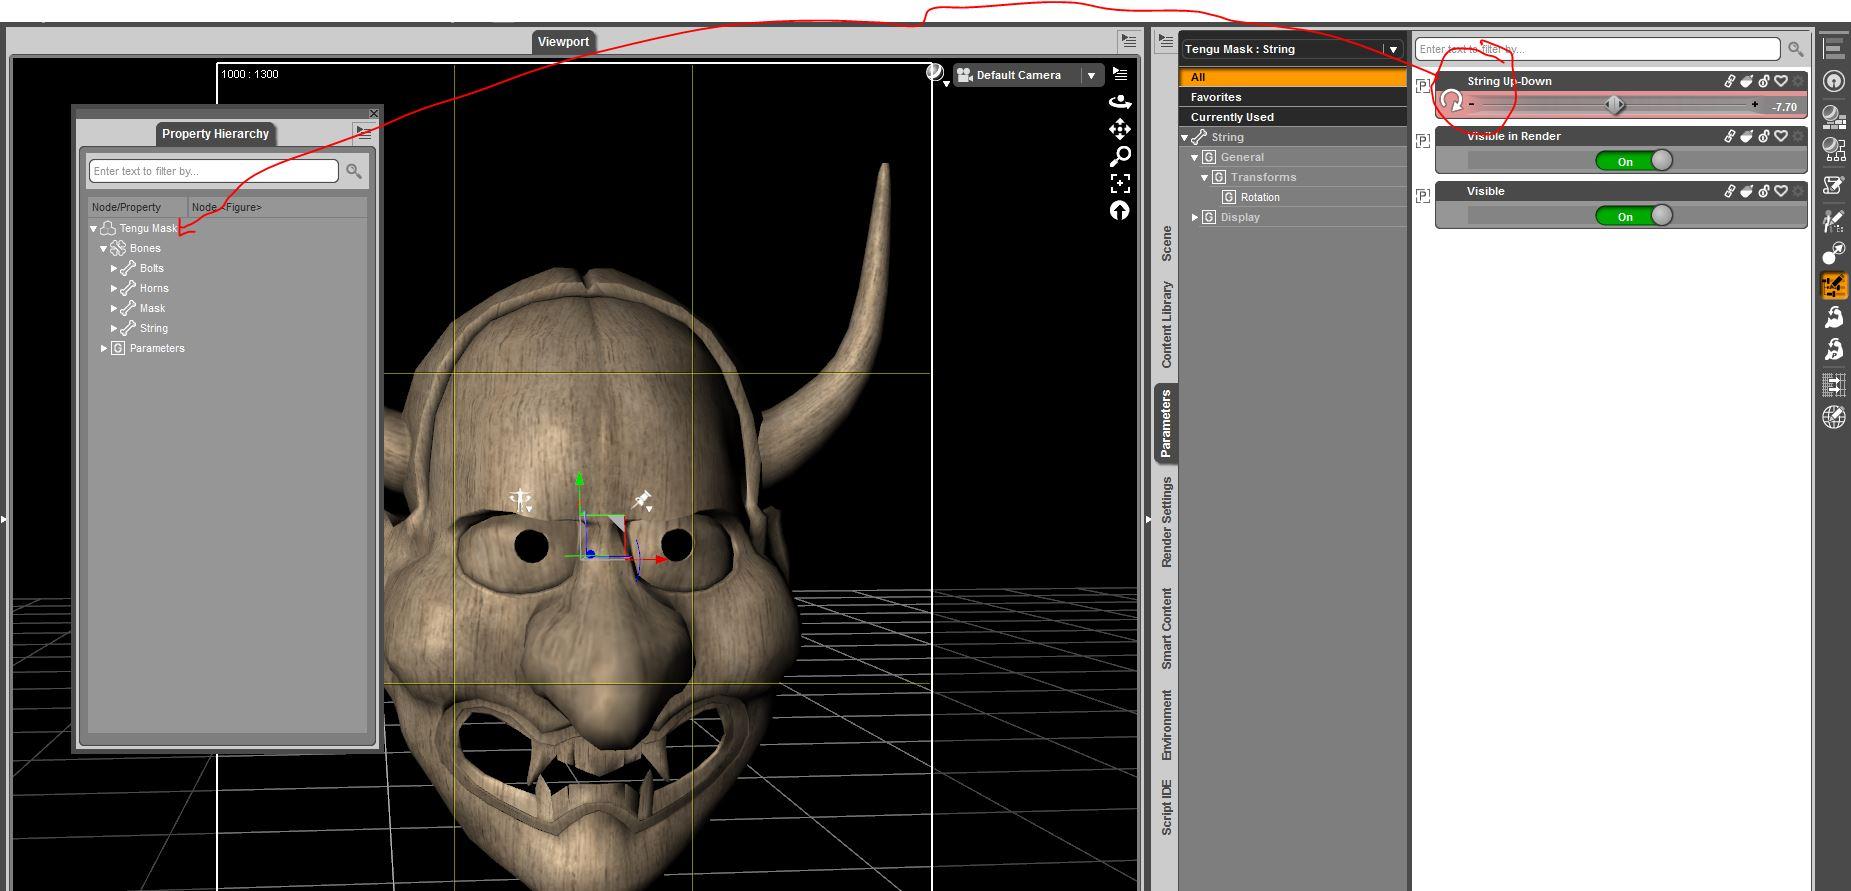
You may want to start by writing down the names of a few of the dials in Carrara and where they appear and then look at Genesis with the heirarchy editor to see where they show up there in DS to try and get an idea of what level they need to be at in DS.
Let me know if that doesn't make any sense and I will add more screenshots (although I won't be back on my home computer until Tuesday so it won't be until later in the week).
Daz 3D is part of

Connect
DAZ Productions, Inc.
7533 S Center View Ct #4664
West Jordan, UT 84084Licensing Agreement | Terms of Service | Privacy Policy | EULA
© 2026 Daz Productions Inc. All Rights Reserved.