-
Morphs from G3 to G8
So, bad news.
In the last 2.5 days at least two people have managed to do weird, time tor reinstall G8 damage to their runtimes. Seeing as how my prototype method requires one to muck around with G3, I've decided not to share it, in general.
I'm looking into the possibility of scripting this out. I know the main step, creating place holder morphs on G8 is scriptable. But I don't know of I can copy the ERC data, as yet. I see a number of methods that access someof the necessary data, but I've yet to see something that convinces me you can access all of it. (It makes me long for a blender feature where the tool tips for most items contain their Python identification data.) Anyway, I think it should be possible to automate, at least the dangerous part, because the are Dz mothods for copying at least some of the data in any property and and for checking a target node to see if properties with the same names already exist. This would eleminate the need to muck around in G3's guts AND prevent the most dangerous aspect of the edits to G8.
Since I have, already, done most of the leg work to build the method, I will share directly, but under the following two conditions: You do not share the method with anyone else unless you are prepared to hand hold them when they break things. This condition is because of condition 2. I will not hand hold you if you break things. You have to be prepared to take on troubleshooting on your own.
I really want to get something relatively safe that can be used. This method and recent events have convinced me that what I have now is a disaster waiting to heppen. I could slap an as-is statement on it and walk away, but I'd feel bad if I did. In the last 10 days, I've run 8 full tests of the method, and even I managed to break things in half of them. I didn't think much of it because they were easy to fix. But they were easy to fix because I understood exactly what broke and why. (Most were cases that would not come up for you. Me trying to see if a step was necessary or could be combined with another.) 50% failure rate is too high by infinite%. Like I said, if I can solve the issue with a sript that does the heavy lifting, I'm sure that it will be relatively safe. Largely because I believe I can eliminate all other variables, so if the user breaks something, it will be a matter of deleting a folder to fix it.
Just include a large bold warning and disclaimer.
Folks then make their own decisions. :)
With the clear evidence the folks don't bother reading the instructions? I'm pretty sre I could write a tutorial that was a warning every .5 steps and a diclaimer of responsiblity every .25 steps and people would still manage not to read either.
Anyway, I figured out how, in principle to automate at leas half of the dangerous part. I am less worried about telling people to delete and reinstall G8 as their collections of stuff have to be smaller. So we're back on for a general release. Which will have a disclaimer. Said disclaimer will be ignored, but this time I'll know I did everything possible to make it safe.Do like the software companies do, make them tick a checkbox that states they read the "legaleze" before they can download the tutorial. And when they mess things up, just point them back to the disclaimer they "signed!"

I'm going to do that anyway. Always was. But knowing how complex the whole thing really, is it seemed churlish to make a broad statement of "you're on your own." More of the standard "It is gamma tech. Not even beta. No warranties." I think there a difference between "I won't take legal responsibility for you using my idea," and "I won't take any responsibility for you using my idea."
So, bad news.
In the last 2.5 days at least two people have managed to do weird, time tor reinstall G8 damage to their runtimes. Seeing as how my prototype method requires one to muck around with G3, I've decided not to share it, in general.
I'm looking into the possibility of scripting this out. I know the main step, creating place holder morphs on G8 is scriptable. But I don't know of I can copy the ERC data, as yet. I see a number of methods that access someof the necessary data, but I've yet to see something that convinces me you can access all of it. (It makes me long for a blender feature where the tool tips for most items contain their Python identification data.) Anyway, I think it should be possible to automate, at least the dangerous part, because the are Dz mothods for copying at least some of the data in any property and and for checking a target node to see if properties with the same names already exist. This would eleminate the need to muck around in G3's guts AND prevent the most dangerous aspect of the edits to G8.
Since I have, already, done most of the leg work to build the method, I will share directly, but under the following two conditions: You do not share the method with anyone else unless you are prepared to hand hold them when they break things. This condition is because of condition 2. I will not hand hold you if you break things. You have to be prepared to take on troubleshooting on your own.
I really want to get something relatively safe that can be used. This method and recent events have convinced me that what I have now is a disaster waiting to heppen. I could slap an as-is statement on it and walk away, but I'd feel bad if I did. In the last 10 days, I've run 8 full tests of the method, and even I managed to break things in half of them. I didn't think much of it because they were easy to fix. But they were easy to fix because I understood exactly what broke and why. (Most were cases that would not come up for you. Me trying to see if a step was necessary or could be combined with another.) 50% failure rate is too high by infinite%. Like I said, if I can solve the issue with a sript that does the heavy lifting, I'm sure that it will be relatively safe. Largely because I believe I can eliminate all other variables, so if the user breaks something, it will be a matter of deleting a folder to fix it.
Just include a large bold warning and disclaimer.
Folks then make their own decisions. :)
With the clear evidence the folks don't bother reading the instructions? I'm pretty sre I could write a tutorial that was a warning every .5 steps and a diclaimer of responsiblity every .25 steps and people would still manage not to read either.
Anyway, I figured out how, in principle to automate at leas half of the dangerous part. I am less worried about telling people to delete and reinstall G8 as their collections of stuff have to be smaller. So we're back on for a general release. Which will have a disclaimer. Said disclaimer will be ignored, but this time I'll know I did everything possible to make it safe.Of course, but that makes it their fault, not yours.
... Having said that, there are ways of getting round the auto updates on W10, and I was going to post how... I thought about it and changed my mind. :)
Pretty much that. Just because you can do a thing, it does not follow that you must tell everyone how to that thing.
I really am all for sharing what I know in this case, but I want to have simple version for the people who want to do but can't be erm, motivated, to understand what they are doing.
I've found the right Dazscript methods to do what those people shouldn't do. I haven't found a method to launch Transfer Utility and run it, but that is safe enough so long as they don't save the figure. I've found a mass file editor with a commandline interface, so I can eleminate the use of FAR and, instead, do all the edits with a bat file. All but one, but testing suggests that edit isn't needed, and will be overwritten in the final save step, anyway.
Once I have a working script and prove out the bat file method, I should have a product that is no more dangerous to the n00b than Redz's files, and that's good enough.
Of course, I've never written a Dazscript before (though I've edited them) so I can't say how long it will take for me to write this. It's not super complex. It needs to iterate over the G3 proerty list, find all the favorites and subcomponents, compare them to the properties list of G8 and drop any matches, pull the URI's of remaining peroperties, convert the URIs to file paths and invoke DzFile to copy the files to a new location. Excepting the bits where I invoke DzURI, findMatchingProperty and DzFile, I know roughly how to do all that (because I can read the code of others. I have yet to find an example of scripts that use the last two methods, and I'm not sure what find matching property returns. It would be nice if it returned a bool, but if it returns a string it'll be annoying. If it selects the property, it'll be a pain).
The utility I've found for mass edits has a handy automatic commandline generator, and I know how write a bat file. So the hold up is going to be figuring out those last script methods, and proof testing the resulting script.Once I have all that, the tut will be reduced for 80 critical steps, to "Install files, copy utility to this folder, make a clone. Dial special morph and make a second clone. Select a morph and add it to favorites. Run script. Run Bat file. Run second bat file. Load G8. Transfer Uility. Save Morphs. Close Studio. Run 3rd bat file. Run 4th bat file. Run fifth bat file. Open Studio. Load G8. Test morphs.
So 18 to 25 steps, down from nearly 100 and most of them idiot proof. The one downside is it will be Windows only. If I knew of a Mac tool that would do the mass file edits, i couldn't test it.Attaching OBJs to Genesis's mesh and make it follow Morphs etc.If they are lined up by adjusting in DS, and assuming you have them lined up with the base shape, export as OBJ and reimport using the same preset to "bake" the adjustments, then use Edit>Figure>Transfer Utility setting the source to the Genesis figure and the target to the eyelashes. A figure will auto-folow morphs, and posing, though you may need to edit the weight maps to get the best results.
The Genesis I use is A4 Shape with some A3 Eye Shape morphs with HDStylized head.
Is there an easy way to "bake" Genesis so that it loads up like an already morphed figure as base?
Out with the old, In with the new V8Just sharing my perspective....
With Genesis 8 out of the bag... an update that caught me totally off guard.. Here I thought it had already gotten as good as it was going to get.. silly me. So now I don't want to spend any money on Genesis 3.. period. It's obsolete this week and while its true that you can put the old wine skins on the new wine, so far in my testing, the results haven't been very nice. The skin has been updated which means even if I can transfer the skins, I loose the added value of sub-surface updates that will go into the new characters... so if you want the best of the best, you have to be willing to wait for it and invest in that.
If you really think Gen3 is obsolete, you are way off the mark. G8 has yet to be established and only time will tell how long that will take.
Thanks for sharing your good opinion. When I compare the two characters side by side... it's no compitition to me. According to Arthur C. Clarke any sufficiently advanced technology is indistinguishable from magic.... so far (and DAZ should take this as a compliment) it appears the new characters are magic and the old ones look flat and dull. The revolution is here, hope you enjoy it. Happy rendering!
LOL, yes Clarke is right, however you do have to accept the word "sufficiently" in it's correct context. G8 is not much more advanced than G3. An improvement in some areas, I will grant. Worse in others such as base resolution. Hardly bedazzeling technology that looks like magic. :)
Less than 400 polys. And it's how the content artists (PAs) can manipulate the polys, with or without access to advanced tools that we can't use, that determines what a given character looks like, not the number of polygons they have available to work with.
"it's how the content artists (PAs) can manipulate the polys... not the number of polygons they have available to work with."
So daywalker, you seem to be suggesting that some people can make wonderful, realistic characters with a 20 poly figure. Have you got any examples? Now that would be magic!
No examples, but that wasn't the point I was trying to make. You're getting caught up in the perception that there aren't enough polygons to work with in the base mesh when you're actually impacting a lot more than the four you see when moving vertices around on a low poly mesh. PAs have reached the point that they understand that each moved vertex is affecting at minimum 16 polygons at the first level of subdivison, depending on the settings of your move tool, for example.
I'm not getting caught up in any such perception. What I have observed is that when I make a morph in a subdivided figure in Zbrush but then convert that back to base rez necessary for export to DS at the moment. The morph does not look the same on the DS subdivided (high rez) figure in DS. Perhaps there is an incompatability with the way Zbrush and DS do sub-division, I do not know. I just see the difference. I do know that it is possible to make great morphs on a subdivided figure in Zbrush that look the same when loaded on to the figure in DS (provided you have access to the DAZ HD technology). What I would like to see is that facility being made available to all DS users (under licence if necessary), or for DAZ3d to incorporate a set of morph brushes directly into DS to allow on the fly morphing within DS (at high rez). The latter option would be, by far, the most beneficial to the majority of DS users.
Actually you are caught in the perception because you are incorrectly starting with high poly sculpting then trying to go back to a low poly version rather than starting with the proper low poly mesh and subdividing for details. Yes there is a difference in how DS and zbrush does subdivision (as well as the real difference in sculpting in low poly and subdividing that versus starting at high poly and reverting to low in terms of delta positions), so genesis needs to know what the real difference in the morphs are via delta positions.. and how would you do that? By giiving DS a low poly sculpt first based on the actual exported low poly genesis and working from there. That's what we're trying to impress upon you to learn actual low poly sculpting because starting high does not work.
Ah, Male-M3dia, wrong again. I have no intention of morphing in high rez in order to go back to low rez. You have misunderstood the need for the resolution swapping. Perhaps that's because you don't have to deal with it, I don't know. Anyway, as usual, we can agree to disagree.
No i understand perfectly. That method, including resolution swapping does not work when importing your morph as it changes the vertex positions of **everything** not just the area you morph. Start with low poly and stay there unless you want to correct the whole morph before importing. Also that method may distort parts of the mesh when importing, like toe- and fingernails, and possibly eyes. Avoid subdividing or working with a subdivided figure when making your base morph.
Out with the old, In with the new V8Just sharing my perspective....
With Genesis 8 out of the bag... an update that caught me totally off guard.. Here I thought it had already gotten as good as it was going to get.. silly me. So now I don't want to spend any money on Genesis 3.. period. It's obsolete this week and while its true that you can put the old wine skins on the new wine, so far in my testing, the results haven't been very nice. The skin has been updated which means even if I can transfer the skins, I loose the added value of sub-surface updates that will go into the new characters... so if you want the best of the best, you have to be willing to wait for it and invest in that.
If you really think Gen3 is obsolete, you are way off the mark. G8 has yet to be established and only time will tell how long that will take.
Thanks for sharing your good opinion. When I compare the two characters side by side... it's no compitition to me. According to Arthur C. Clarke any sufficiently advanced technology is indistinguishable from magic.... so far (and DAZ should take this as a compliment) it appears the new characters are magic and the old ones look flat and dull. The revolution is here, hope you enjoy it. Happy rendering!
LOL, yes Clarke is right, however you do have to accept the word "sufficiently" in it's correct context. G8 is not much more advanced than G3. An improvement in some areas, I will grant. Worse in others such as base resolution. Hardly bedazzeling technology that looks like magic. :)
Less than 400 polys. And it's how the content artists (PAs) can manipulate the polys, with or without access to advanced tools that we can't use, that determines what a given character looks like, not the number of polygons they have available to work with.
"it's how the content artists (PAs) can manipulate the polys... not the number of polygons they have available to work with."
So daywalker, you seem to be suggesting that some people can make wonderful, realistic characters with a 20 poly figure. Have you got any examples? Now that would be magic!
No examples, but that wasn't the point I was trying to make. You're getting caught up in the perception that there aren't enough polygons to work with in the base mesh when you're actually impacting a lot more than the four you see when moving vertices around on a low poly mesh. PAs have reached the point that they understand that each moved vertex is affecting at minimum 16 polygons at the first level of subdivison, depending on the settings of your move tool, for example.
I'm not getting caught up in any such perception. What I have observed is that when I make a morph in a subdivided figure in Zbrush but then convert that back to base rez necessary for export to DS at the moment. The morph does not look the same on the DS subdivided (high rez) figure in DS. Perhaps there is an incompatability with the way Zbrush and DS do sub-division, I do not know. I just see the difference. I do know that it is possible to make great morphs on a subdivided figure in Zbrush that look the same when loaded on to the figure in DS (provided you have access to the DAZ HD technology). What I would like to see is that facility being made available to all DS users (under licence if necessary), or for DAZ3d to incorporate a set of morph brushes directly into DS to allow on the fly morphing within DS (at high rez). The latter option would be, by far, the most beneficial to the majority of DS users.
Actually you are caught in the perception because you are incorrectly starting with high poly sculpting then trying to go back to a low poly version rather than starting with the proper low poly mesh and subdividing for details. Yes there is a difference in how DS and zbrush does subdivision (as well as the real difference in sculpting in low poly and subdividing that versus starting at high poly and reverting to low in terms of delta positions), so genesis needs to know what the real difference in the morphs are via delta positions.. and how would you do that? By giiving DS a low poly sculpt first based on the actual exported low poly genesis and working from there. That's what we're trying to impress upon you to learn actual low poly sculpting because starting high does not work.
Ah, Male-M3dia, wrong again. I have no intention of morphing in high rez in order to go back to low rez. You have misunderstood the need for the resolution swapping. Perhaps that's because you don't have to deal with it, I don't know. Anyway, as usual, we can agree to disagree.
Modeling Objects in Carrara - Q&A - Come One and AllThank you Diomede :)
good to know we can create conforming content using the transfer utility in DS ,. then load into carrara and save as .car files
now i just need to make better outfits :)
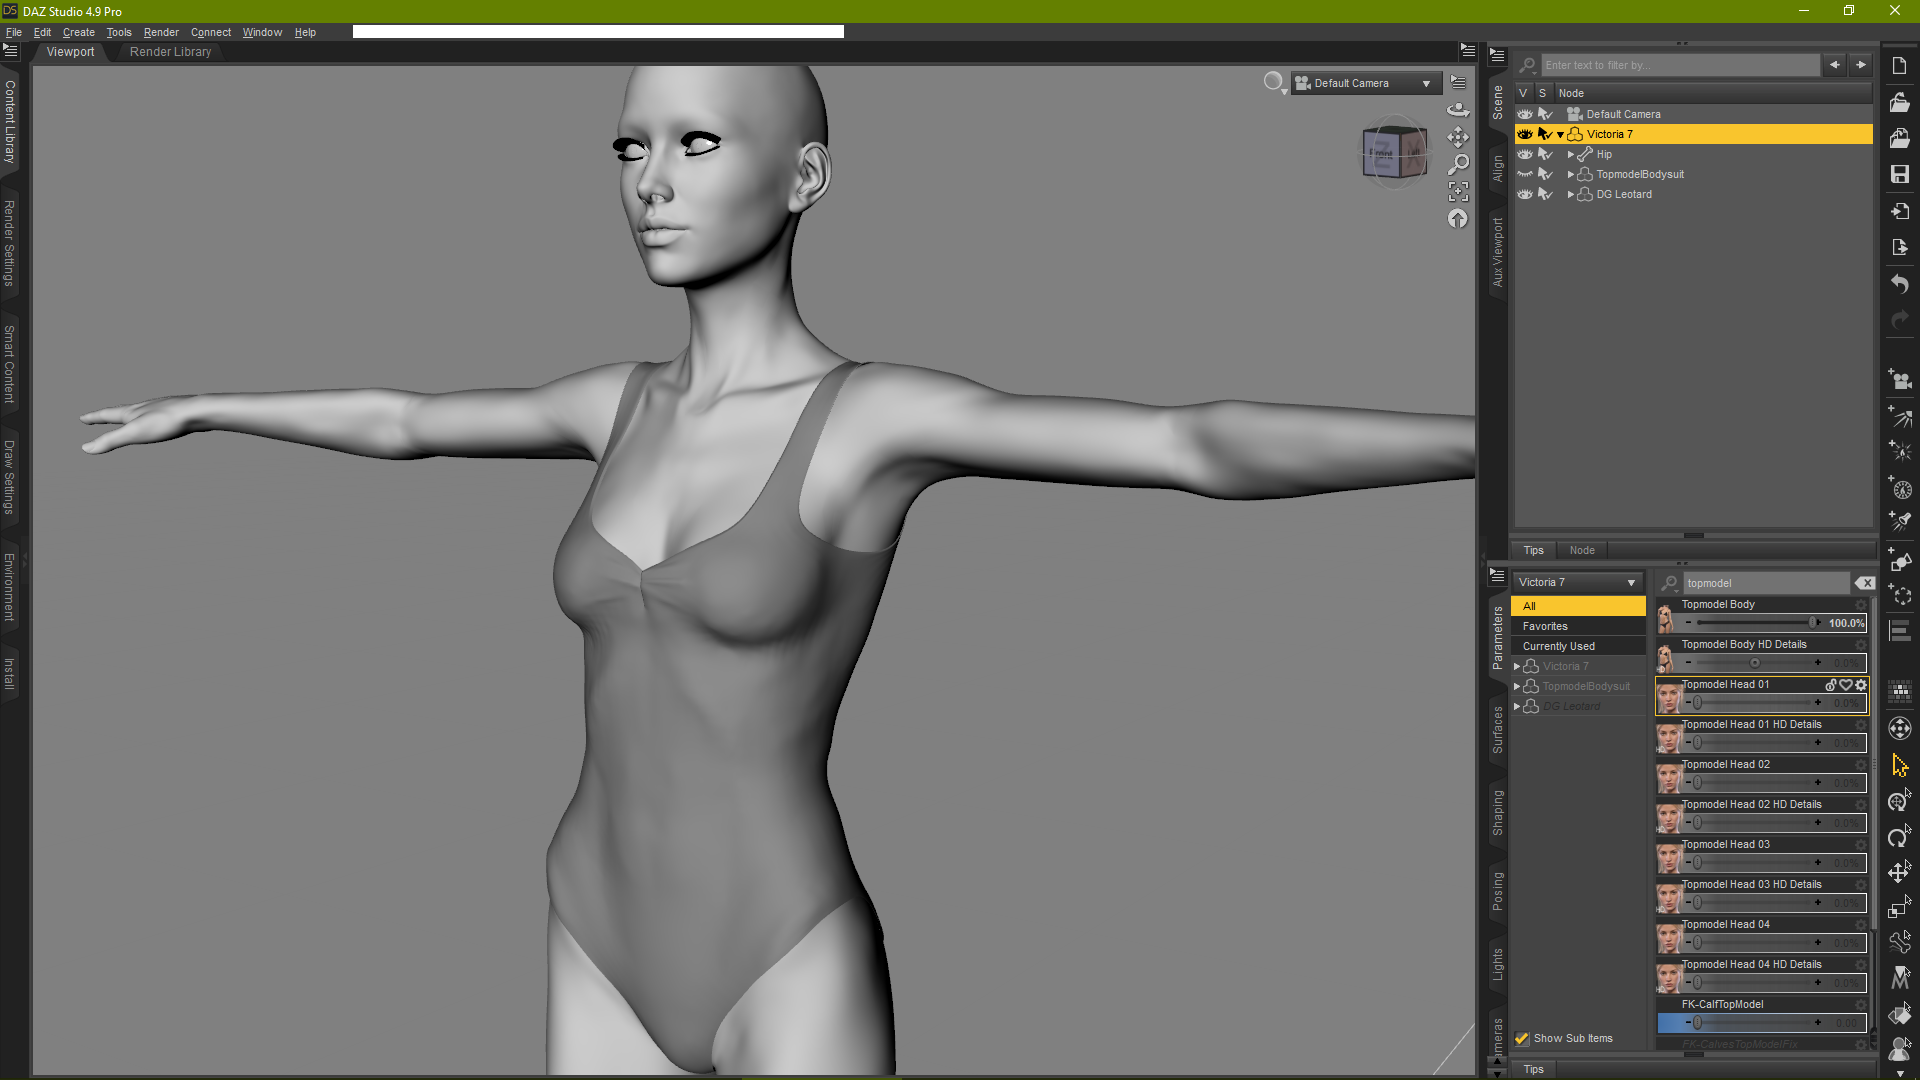
HD Add-on questionHere's another example of Topmodel HD morphs with Dance Gear leotard. This time with an outfit NOT specifically created for Topmodel HD. Using DG's default smoothing params. V7 at Subd 4 as before.
Before dialling Topmodel HD morphs:
After dialling Topmodel HD morphs at 400%:
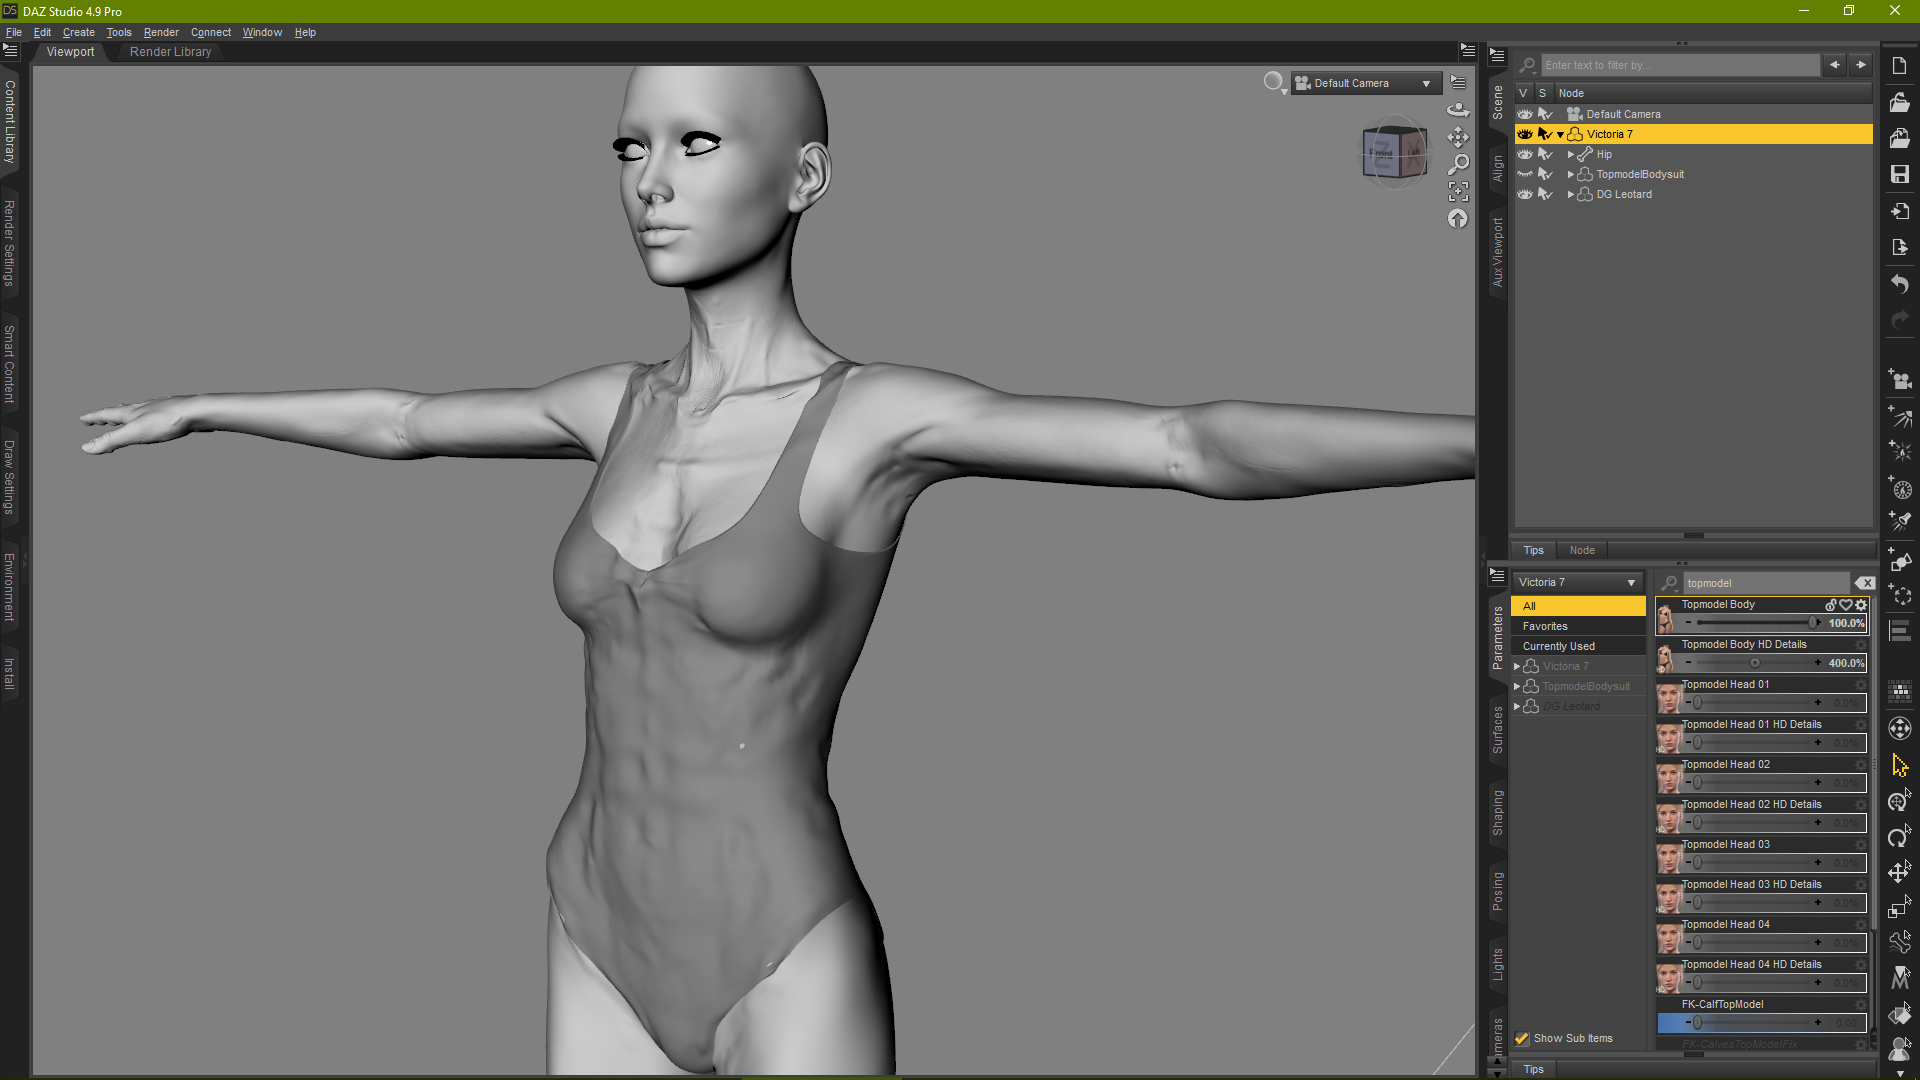
In both the examples above it is apparent that HD morphs from characters can/do project into clothing.
That's not HD, that's a projection morph. HD doesn't not project into clothing, so it needs a projection morph to tell DS where those morph deltas actually (approximately) are.
DAZ - PLEASE finish off the Ophelia 7 releaseHD packs should be part of the pro bundle.
I agree! My perfect Pro bundle would contain
++ the base figure
++ Head and Body Shapes
++ HD Add Ons
++ 'Anatomical Elements'
++ 2 characters
++ 2 hair styles
++ 2-3 sets of clothing
No, this is repeatedly buying the Head & Body morphs, the Anatomical Elements with each Pro Bundle. If the Anatomical Elements came with the Body Morphs and there was a Head, Body, Anatomical, and Expressions bundle that'd be cool and probably raise the sales of those morph packages.
Sure you could bundle that morph bundle with the character Pro Bundles to help incentivize buying at least one Pro Bundle but ultimately people will be buying the 2nd Pro Bundle of a female and 2nd Pro Bundle of a male purely on the merits of the clothing, hairs, characters, and poses and probably in that order too if DAZ 3D really believes the only incentive people have to buy the character Pro Bundles are the anatomical elements.
Guide: Working with Hd-Addons and Subdivision levels@ Understanding the difference between Subdivision levels
Basically if you subdivide a mesh you add addtional points without changing the position of the allready existing ones.
Each new subdivision level will increase the point count by multiplying it by ~ 4x depending on the shape of the faces (tris, quads)
https://en.wikipedia.org/wiki/Subdivision_surface
Note that different software may count the subdivision levels differently.
DAZ Studio calls the base resolution SubD level 0.
In ZBrush the base resolution is called SDiv level 1.
Make sure to always indicate the software when talking about subdivision levels.
The difference in the actual point count increases drastically on higher levels:
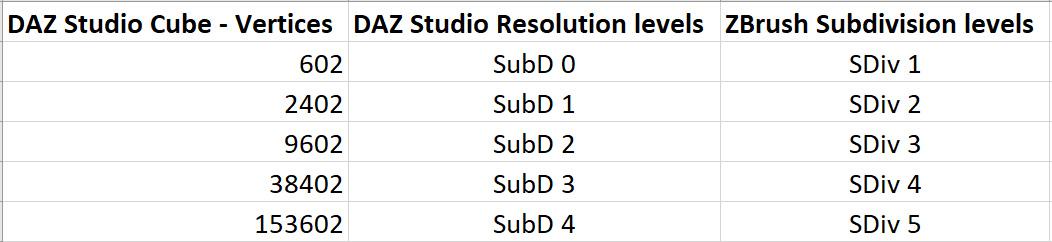

In practice this means:
If a HD morph is sculpted for the Subdivision level 3 you need to dial in the same Subdivision level 3 in order to see the morph. If you dial in lower subdivision levels you will only be able to observe the very rough changes to the mesh but not the finer details. The difference between SubD 2 and SubD 3 is ~ 800'000 points that are not being displayed on the lower level!
Another example: If micro level details like pores would be created at subdivision level 4 it is crucial to dial in the morph at subdivision level 4 as well. If you would dial in the lower subdivision level 3 the difference would now be ~ 3'000'000 points that are not being displayed.
-> It is crucial to know the SubDivision level for which the morph was created!
- - -
Commentary:
It might help both existing and new users if HD morph silders would include Subdivision level information
Example:
Charactername - Bodypart - HD - SubDivision level
Eva 8 Head HD SubD 3
Adam 8 Body HD SubD 3
- - -
Guide: Working with Hd-Addons and Subdivision levels@ SubDivision levels vs Render SubD levels
The Render SubD level raises the SubDivision level only in the calculations by the (Iray) render engine in the final render window. The SubDivision level of the object in the DAZ Studio scene is not affected.
Example G8F:
Set Render Subdivision level to 3
Set Subdivision level at 0
This means a scene object can have only 16'000 points (vertices) in the DAZ Studio scene but is calculated and displayed as a 1'000'000 points (vertices) object in the final render window.
-> You raise the Render SubD level to see HD morph effects during final rendering without slowing down DAZ Studio scene manipulation.
- - -
Raising the SubDivision level will also raise the actual point count of the object in the scene.
- You need to raise the Subdivision level if you want to see the effect of HD Add-ons in the openGL or Iray Preview viewport drawing styles that are not able to support Render SubD.
- You need to raise the SubDivision level if you want to export models with HD Add-ons to 3rd party software.
- You need to raise the SubDivision level if you want to see the HD morphs visible in 3rd party render engines like Octane.
- - -
- - -
Guide: Working with Hd-Addons and Subdivision levels@ Mixing HD Add-ons with existing maps
Question:
Is it wrong to use maps in combination with HD morphs? Or are you supposed to use one or the other?
- In theory when you create details for a model in a 3rd party software you catch all details together by exporting to the one map type or morph type you prefer.
In theory artists could provide all different map types as separate presets in their products so the customers can choose the one that bests fits the current need.
In practice DAZ3D artists have a history of mixing different map types for differrent types of detail.
- - -
- In theory HD morphs could be a replacement to use instead of other maps.
In practice HD morphs are often used to add some other type of details as well to be used in combination with existing maps.
- - -
Commentary:
Detailed product descriptions could help to answer how the product with an HD-addon is intended to be used:
- are HD morphs supposed to be a replacement or an "add-on" to the existing maps?
- what type of detail is provided with what type of morph or map?
- which subdivision level is needed to see the morph at the highest quality?
- are different preset types for each object included?
Example: One high resolution preset to use the model in the foreground One low resolution preset to use the model in the background
- - -
Guide: Working with Hd-Addons and Subdivision levelsThe goal is to provide an overview of topics that may come up when working with HD-Addons and Subdivision levels in DAZ Studio.
Because it has become quite long different sections are split into different posts.
Just jump to those sections which are of interest to you...
- - -
@ Understanding the difference between HD-Addon morphs and maps and their usage
The basics:
HD morph:
High Resolution. Used for objects clearly visible in the foreground of your image
Accurate physically calculated shadows are cast, works great with Physically based rendering (PBR).
For the best result dial in exactly the same (render) SubDivision level for the morph as it was created for.
You can improve system performance by adjusting the (render) subdivision to a lower level but then you will see less detail.
Allows export the model as .obj . at the highest SubD level to use or render in 3rd party software.
Displacement map
High Resolution. Used for objects clearly visible in the foreground of your image
Accurate physically calculated shadows are cast. Looks great in PBR but you need to set it up properly.
There are different types of displacement, more advanced ones like vector displacement are not yet supported by DS or Iray
There are different types of maps (0 = black or mid grey). Render engines feature adjustment sliders to make use of all of them
Bump map
Low resolution. Used for objects in the background of the image
Simulated simplified shadows can be detected in directional light situations. (clothing structure may look fake etc)
Versatile: Bump maps can be added to the displacement slot and with the help of adjustment sliders look great also in BPR
Normal map
Low resolution. Used for objects in the background of the image
Simulated simplified shadows can be detected in directional light situations. (clothing structure may look fake etc)
There are different types of normal maps designed by different software for different render engines.
Render engines may not feature sliders to quickly adjust normal maps.
- - -
- - -
Attaching OBJs to Genesis's mesh and make it follow Morphs etc.If they are lined up by adjusting in DS, and assuming you have them lined up with the base shape, export as OBJ and reimport using the same preset to "bake" the adjustments, then use Edit>Figure>Transfer Utility setting the source to the Genesis figure and the target to the eyelashes. A figure will auto-folow morphs, and posing, though you may need to edit the weight maps to get the best results.
Modeling Objects in Carrara - Q&A - Come One and Alltest of concept : can we share our own rigged "content" in a car file.
https://www.dropbox.com/s/q3ad9gv3hn9l2du/Sci-Fi_Suit for G2.zip?dl=0
Could someone please try loading these onto Genesis 2 in Carrara
They're basically modelled and rigged conforming clothes (made in Carrara,. rigged in DS (transfer utility) ,. then saved as Carrara objects
I just want to see if there's any errors,. or missing things,. hopefully not.
there's no texture maps,. just simple shaders,. although most of it should be UV mapped enough for texturing.
thanks :)
I like World Travels Wagon... but it needed a few improvements.Oh and three other renders of the modified Bow Top:
Breaking Camp

On the road base, but that backround looks odd. the trees are fine by the grass and flowers no so much. Let's fix that...

with foliage and a changing in lighting. Still really early morning so muted lighting, but the redish hue is gone.

The 19 different kinds of foliage, the 4 kinds of trees, and the Road are from RDNA, I'm not sure if the road made the transfer or not, but most of the foliage and trees did. The Backdrop is Millennium Environment, but I really need to find a better go to backdrop for fast scenes. Or I used UltraScatter to instance all that foliage, but going in and out and setting it up each time for each item is insane. For one or three items it is fine, but almost 20 or 50.... annoying!
One error I found with the Saddle for DAZ Horse 2, as the horse's neck goes down the saddle elongates. You can see it on if you ompare the saddles on the bay and the blue roan, at the front. The Triplet V4's behind are on Millennium Horse. Also I have a better seat for V4 on the Western saddle, which I built from scratch.
Shape Shift for Genesis 8 (Commercial)@Zev0 Does the G8 version contain ALL of the morphs present in the G3 version? If not, which ones were excluded? I need a cankle morph that is connected to a farmgirl lower & inside calf morph. We discussed this on the Killer Legs Morphs thread. I hope Shape Shift is available in early July.
Show Us Your Iray Renders. Part VI...I'm holding off until other utilities come available like breast morph and body shaping resoruces, as well as an updated Growing Up and SBP (the latter which I undersand Zev0 is already at work on which will go a long way to solving the "blah" skin issue).
Her cup reminds me that somwhere I have a freebie "Yoyodyne" coffee mug floating around in a folder soemwhere.
The cup is a freebie from RuntimeDNA: https://www.daz3d.com/genericorp-coffee-mug
I made the render as a joke from over at the PC+ member forum: https://www.daz3d.com/forums/discussion/comment/2579411/#Comment_2579411
We were talking about coffee and Kerya passed me the freebie mug. lol :P
Show Us Your Iray Renders. Part VI...I'm holding off until other utilities come available like breast morph and body shaping resoruces, as well as an updated Growing Up and SBP (the latter which I undersand Zev0 is already at work on which will go a long way to solving the "blah" skin issue).
Her cup reminds me that somwhere I have a freebie "Yoyodyne" coffee mug floating around in a folder soemwhere.
Unusual real-world bodies.I'm curious how many folks have created characters with unusual real-world bodies, such as amputatees, people with down syndrome, people with Treacher-Collins syndrome, scoliosis and so on.
I myself tried my hand at modeling a face with Treacher-Collins syndrome using just the morph sliders I've managed to obtain. I think it looks fairly like the Treacher-Collins effect.
I'd also like to hear how people feel about the creation and use of characters with unusual real-world bodies.
I myself have the fantasy of one day being a proficient 3D artist who makes images of people with unusual real-world bodies doing everything that people with normal bodies would be expected to do in the situations I depict in my art. My Treacher-Collins characters, for example, is a cop in future fiction space, doing everything a heroic cop would do. Her face has no impact on what she does, one way or the other. It's just not important to the action, the drama, or the story in any way.
So ya, what do y'all think and do?
HD Add-on questionThat's one reason I prefer Normals in Iray most of the time, since it shows details without a significant render load
I agree. I find that upping the values on the Bump Maps and Normal Maps does just as good as the HD morph and usually isn't as hard on the computer (at least in my experience). Add in a decent displacement map and you really don't NEED the HD (though it's still nice to have).
HD Add-on questionOoh I can speak on this
Firstly: AFAIK both the normals and hd morphs are made using the same hires mesh so while the difference between no normals > hd morph is subtle the difference between normals > hd morph is super subtle. Essentially both are trying to do the same thing and there are advantages and disadvantages to both (Morphs can be mixed and are a bit more accurate, normals can get smaller detail without bogging down your computer) I'll admit to using both from time to time, again afaik the Hd morphs are made at a subdivision level of 4 but that tends to make my poor computer cry, so I stick at a subd value of 3 and then use the normals to make up the difference and if its a bit linier tha it ought to be, well, I don't mind ;)
second: flat frontal lighting gets rid of any shadows which makes the details added by the hd morph (or the normal maps for that matter) really disapear, if you add some lighting from the side I'll bet you see more difference In the large image posted I could tell the difference between the 2 victorias (the edge of the lip is pretty noticable, the other big difference between HD morphs and normal maps is that the morphs actually move geometry) but not really with Karen.
Daz 3D is part of

Connect
DAZ Productions, Inc.
7533 S Center View Ct #4664
West Jordan, UT 84084Licensing Agreement | Terms of Service | Privacy Policy | EULA
© 2026 Daz Productions Inc. All Rights Reserved.