-
how to make pressure on clothes ?
Masterstroke said:
I did something like that, and you do not necessary need HD-Morphs or displacement maps for it.
My method is not super accurat, but it works.
If you have e.g. panty lines, load your character and your panties into Zbrush or Blender (don't know anything about Blender).
In Zbrush transparancy mode have your character selected and shape those pressure effect into your characters surface right underneath that panty line.
If both don't perfectly aline move the Panties in shape as well.
On GoZ give both Items the same morph name and set them in the exact place in each figures parameter list.
Make sure to save both morph assets.
Your Panties should follow your pressure morphs now. Don't worry, if you cannot see this morph on the Panties, it is hidden.
You need to check "show hidden parameters" in your Parameters burger menue.Thanks, I'll give it a try.
I have 2 small questions:
1/ In Zbrush transparency mode, when I select my character and draw the pressure effect below the panty line, normally it's the panty that's selected and not the character... right? am I wrong?
2/ I don't know much about Zbrush, do you have a screenshot showing how to place the character and the panty in the same place in the list of parameters for each character?
how to make pressure on clothes ?food.plus13 said:
Hello everyone

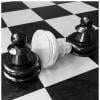
Do you know how to make pressure on clothes like in the picture below?
I read on this forum that you have to do a HD morphs but and that it's not accessible to everyone.
But what's the difference between a normal morph and an HD morph?
Thanks
I did something like that, and you do not necessary need HD-Morphs or displacement maps for it.
My method is not super accurat, but it works.
If you have e.g. panty lines, load your character and your panties into Zbrush or Blender (don't know anything about Blender).
In Zbrush transparancy mode have your character selected and shape those pressure effect into your characters surface right underneath that panty line.
If both don't perfectly aline move the Panties in shape as well.
On GoZ give both Items the same morph name and set them in the exact place in each figures parameter list.
Make sure to save both morph assets.
Your Panties should follow your pressure morphs now. Don't worry, if you cannot see this morph on the Panties, it is hidden.
You need to check "show hidden parameters" in your Parameters burger menue.how to make pressure on clothes ?felis said:
food.plus13 said:
Richard Haseltine said:
Displacement is an option, but that will not show until render time and is less controllable than a morph. Many modelling applications will let you make a height map (for displacement) from a modified shape.
Thank you, what do you mean by displacement? What do I have to do? Do you know a tuto?
Making a displacement is tricky.
You would have to model it based on a subdivided mesh, and then bake is to a height map referencing the base mesh.
Here is a video introducing displacement - you can search for others.
Thank you very much, and if i want to try it with the basic mesh to see how it works, how I could sculpt the swimsuit hollow without knowing where the swimsuit is exactly... What's the trick?
Custom Morphs Won’t Execute Gradually, Just Jump from 0 to 100% [Solved]I made a series of 10 custom morphs that approximate the curvature of a poster wrapped around a pole. Each morph is for a pole of a slightly larger diameter pole than the previous one.
Then I made a master slider control to execute all the morphs one at a time as the slider moves from left to right, small pole to big pole.
Each morph is keyed to kick in at a place on the slider control and finish off a bit highter on the slider control. When the first morph is done, the second begins, and so on.
But the morphs don’t execute gradually the way I want them to. The first morph, for example, jumps from 0 to 100% as soon as the master slider control departs the 0%. At the position where the first morph stops and the second begins, the second morph jumps from 0 to 100%. And so on.
It is as if the keyed motion were set to “Constant” or something. But it isn’t. I set all the key motions to “Linear”. After noticing the problem, I then tried “TCB”. Same problem.
I don’t get it. I’ve done this sort of thing before with complex keyed motions under a single slider control and the morphs or translations work fine, linearly and all. But this problem I’ve now got I don’t understand.
How to export a model from blender to daz?If you use the current beta you may have more luck with importing FBX, that had quite a bit of work done on it.
Yes, Transfer Utility projects bone placement and weights ino the target to match the source - useful for clothing and othe items that must pose with the base figure. It is not suitable for setting up new figues from scratch, nor is the rigging licensed for use in stand-alone figues, but it is the best way for most items that need to follow the posing of the base.
How to export a model from blender to daz?Gordig said:
What kind of model is it? You might have some success with the Transfer Utility.
In general, I want to load any model from blender to daz.
Wings, Dog, Human and so on.
I need to download Bones, Relations bones,
Mesh, And an exact copy of the vertex weights.
I just want to edit vertex weights only in blender because daz is inconvenient for me since it doesn’t have the tools I need.If I'm not mistaken, Transfer Utility attaches the model to the skeleton with automatic vertex weights.
And I'll still have to recreate the bones and vertex weights
How to export a model from blender to daz?What kind of model is it? You might have some success with the Transfer Utility.
Celebrity Look-a-Likes for 3D figures Part 4nabob21 said:
Stephen,
Which morph and texture did you use for the Linda Carter Wonder Woman image?
Character Morph: https://sharecg.com/v/100824/gallery/21/DAZ-Studio/WW-Character-and-Material-Bundle [Plus 50% of LCWW for G2F (purchased from the website that we are verbitten to mention)]
Character Texture: https://www.renderosity.com/marketplace/products/91051/vv-ginger-for-victoria-42-genesis
how to make pressure on clothes ?food.plus13 said:
Richard Haseltine said:
Displacement is an option, but that will not show until render time and is less controllable than a morph. Many modelling applications will let you make a height map (for displacement) from a modified shape.
Thank you, what do you mean by displacement? What do I have to do? Do you know a tuto?
Making a displacement is tricky.
You would have to model it based on a subdivided mesh, and then bake is to a height map referencing the base mesh.
Here is a video introducing displacement - you can search for others.
 how to make pressure on clothes ?
Richard Haseltine said:
Displacement is an option, but that will not show until render time and is less controllable than a morph. Many modelling applications will let you make a height map (for displacement) from a modified shape.
Thank you, what do you mean by displacement? What do I have to do? Do you know a tuto?
how to make pressure on clothes ?felis said:
An HD morph, is a morph that morphs a subdivided mesh, and only Daz PAs can create HD morphs.
And in order to do clothing pressure, you need a HD morph, as the base mesh is not dense enough to make a proper looking dent.
Ok thanks, who's Daz PAs?
If I want to try it with the basic mesh to see how it works, how I could sculpt the swimsuit hollow without knowing where the swimsuit is exactly... What's the trick?
how to make pressure on clothes ?Displacement is an option, but that will not show until render time and is less controllable than a morph. Many modelling applications will let you make a height map (for displacement) from a modified shape.
Need help importing G9 to ZBrush & being able to Import it back to Daz without error or geomtry issuFor ecent figures try using the Dev Build preset, rather than the base figure - that already has most of the required settings applied. Also, though this shouldn't generally cause outright errors, make sure you use the same preset in the options dialogue for OBJ Export and Morph loading.
how to make pressure on clothes ?An HD morph, is a morph that morphs a subdivided mesh, and only Daz PAs can create HD morphs.
And in order to do clothing pressure, you need a HD morph, as the base mesh is not dense enough to make a proper looking dent.
Need help importing G9 to ZBrush & being able to Import it back to Daz without error or geomtry issuImporting G9 to ZBrush correctly then exporting it correctly & importing it back into Daz3D without getting an error. Needing help properly importing G9 to ZBrush then importing it back to Daz 3D. Hi I hope everyone’s doing well. I am having a hard time importing G9 to ZBrush without it being an issue. What I do is, I’ll remove the lashes and everything and it’ll successfully import into ZBrush, but when it is time to put it back into Daz 3-D, so I can edit it, it basically shows up with a blue font explaining that something went wrong when I try to load it in the Morph section. (Please help me import by using the Morph slider, not ZBrush GoZ please. Sorry)
I’ve never had this issue when it came to importing G8, but I had my G8 file sent from a friend years ago. & this friend doesn’t use Daz anymore so she has no clue how to important g9. Would really mean a lot if someone could help me in the most simplest way possible. Thanks!
 how to make pressure on clothes ?
Hello everyone
Do you know how to make pressure on clothes like in the picture below?
I read on this forum that you have to do a HD morphs but and that it's not accessible to everyone.
But what's the difference between a normal morph and an HD morph?
Thanks
"No supported Face Transfer engine"Check the log after trying to use face transfer, though there may be relevant errors earlier. Help>Troubleshooting>View Log File.
Celebrity Look-a-Likes for 3D figures Part 4Stephen,
Which morph and texture did you use for the Linda Carter Wonder Woman image?
Missing Scene FileI took your advice and then added on a few more steps. I deleted the cache. I re-installed G9 essentials. I deleted my custom scene file and the G9 female character preset I had been using. Then I loaded up the base G9 character. I still got the error about the missing Gigaman scene file. The next thing I did was go through ALL of the base morph directories for all the G9 assets; tear, eyebrow, eyes etc. I found a couple of directories that still had items from Gigaman. I deleted all of those and re-installed G9 essentials again b/c why not at this point. Finally, I no longer get that error. It cleaned up countless other errors that were in the log file and now my G9 character base loads as fast as it did when I first added it.
I wouldn't have gotten to this point without your help and suggestions. I can't thank you enough.
"No supported Face Transfer engine"Trying to use the Face Transfer to see if I want to purchase it. The Panel opens and I can even load a photo, but right underneath the Gender selection buttons is written "No supported Face Transfer engine". I can select the gender, but the "Generate" button does nothing. See attached image of Face Transfer pane. I am on a Macbook Pro (2019 Intel) running MacOS Ventura. Daz Studio Pro 4.22.0.16. Everything is up to date. What am I missing here? Thanks!
Daz 3D is part of

Connect
DAZ Productions, Inc.
7533 S Center View Ct #4664
West Jordan, UT 84084Licensing Agreement | Terms of Service | Privacy Policy | EULA
© 2026 Daz Productions Inc. All Rights Reserved.