-
Non-photorealistic Renders (NPR)
Fixed a minor comic book law that I just learned about and still broke.

And what law would that be, friend? Nice work, btw. Colors are nice and the character definitely fits in with the style of the Starblazaers series. Raised leg joins to the hip in a slightly wonky way, but no other obvious problems with this illustration. I like the shading on the planet and space, too. Nice job all around.
I'd have to look up the rule again to get the name, but it's about lines touching and creating the impression that they are connected when they are not. In the original image, the wing of the left jet is touching the planet in that manner, at least to me, so I corrected it. The ackward hip is probably from me trying to add an additional morph to the Hiro 4 morph (for G1). I was trying to make him a little less skinny. The Hiro morphs are hard to work with IMO.
Rules schmules - personally, I'm not interested all that interested in following them. In fact, there's an argument to be made that they need to be broken if one wants to do anything new/unique/inovative.
- Greg
"Rules" can always be broken, but in general, they help you avoid mistakes of the past. You are learning from experienced artists or at least taking their advise. Once you learn the rules and get some experience of your own, then you can decide which ones to break. That's my approach for now. Of course there are always exceptional people who come around and change everything with an innovative approach. I don't think I'm one fo those people LOL.
I hear what you're saying, and of course there's always plenty to be exposed to and learned from others. Don't ever sell yourself short, though!
- Greg
Non-photorealistic Renders (NPR)Fixed a minor comic book law that I just learned about and still broke.
And what law would that be, friend? Nice work, btw. Colors are nice and the character definitely fits in with the style of the Starblazaers series. Raised leg joins to the hip in a slightly wonky way, but no other obvious problems with this illustration. I like the shading on the planet and space, too. Nice job all around.
I'd have to look up the rule again to get the name, but it's about lines touching and creating the impression that they are connected when they are not. In the original image, the wing of the left jet is touching the planet in that manner, at least to me, so I corrected it. The ackward hip is probably from me trying to add an additional morph to the Hiro 4 morph (for G1). I was trying to make him a little less skinny. The Hiro morphs are hard to work with IMO.
Rules schmules - personally, I'm not interested all that interested in following them. In fact, there's an argument to be made that they need to be broken if one wants to do anything new/unique/inovative.
- Greg
"Rules" can always be broken, but in general, they help you avoid mistakes of the past. You are learning from experienced artists or at least taking their advise. Once you learn the rules and get some experience of your own, then you can decide which ones to break. That's my approach for now. Of course there are always exceptional people who come around and change everything with an innovative approach. I don't think I'm one fo those people LOL.
Non-photorealistic Renders (NPR)Fixed a minor comic book law that I just learned about and still broke.
And what law would that be, friend? Nice work, btw. Colors are nice and the character definitely fits in with the style of the Starblazaers series. Raised leg joins to the hip in a slightly wonky way, but no other obvious problems with this illustration. I like the shading on the planet and space, too. Nice job all around.
I'd have to look up the rule again to get the name, but it's about lines touching and creating the impression that they are connected when they are not. In the original image, the wing of the left jet is touching the planet in that manner, at least to me, so I corrected it. The ackward hip is probably from me trying to add an additional morph to the Hiro 4 morph (for G1). I was trying to make him a little less skinny. The Hiro morphs are hard to work with IMO.
Rules schmules - personally, I'm not all that interested in following them. In fact, there's an argument to be made that they need to be broken if one wants to do anything new/unique/inovative.
- Greg
Marks on Teen Josie 8's Forehead When RenderingRendering in iRay on Teen Josie 8 with Jocelyn For G8F Hair. What could be causing the marks near her hairline?
I started with the Josie 8 Actor and made a few morph adjustments to the head using the sliders.
Shape TransferSo I may need an add-on, eh. Thank you for the links!
Yeah - the geometry is totally different for the figures, so the morphs won't transfer directly.
- Greg
Shape TransferWhat are the correct steps to transferring the facial shape of a g2 figure to a g3 figure?
(I tried saving a g2 face under 'Shaping Preset' and merging it with a g3, but nothing happened. Is it possible?)
Create a mannequin like featureless faceThank you both for your replies! I looked at them but they are not quite the effect I am looking for. I want a completely smooth surface that is absolutely featureless. Not looking for a spooky/horror effect. Its really a surreal look I am going for. Is there a way I can create the morph myself perhaps? Please forgive my lack of knowledge. I only am just begining to understand morphs and daz itself.
dForce Verified Functional Clothing [Out of the Box]I couldn't get a rope or belt to stick so I gave up on that. the rips are transparency maps which you can turn off or on. Not easy when it one of the first there nothing to go by.
Hmm might do a morph to hide the blade and make it into a staff
In another thread there was talk of taking things like belts and turning off dynamics on them. Select the belt, then dial down Dynamic to 0 instead of 1.0 so it's not part of the sim.
I tried that and it work to some degree, I also had edging all around the robe and collar and that was a bad idea it exploded so that had to go. The split in the middle is so the legs can be posed more easily. If I made it one piece with no split I would have to make the skirt a lot longer to allow for the movement of the legs so then it would have to sit above the ground or you would have collision problems. By default the tears are turned off and you just apply the material when you need the torn look. You could do a geograph of the robe and make another trans map to get a more layered look. I'm splitting up the products now so people can buy what they want. A female version looks easy enough to do, and I did get a G8M version working last night, so will gear them to look more like a monk and keep the AOD version for the Midnight Skeleton.
Okie, I just thought with dynamics that the legs could be posed even without the split, but that might be asking too much of the fabric. Look forward to seeing the final edition!
Novica & Forum Members Tips & Product Reviews Pt 10I want you to see this. The Genesis 3 Female Base and Ekatrina without materials. Please click on and open the first two. Click back and forth. I expected to see a uniquely morphed character. (It is advertised as a character, not just a material product.) The miniscule changes in the head surprised me. I didn't even bother with the body. When I get a character I expect the head to change and become a different person!
And then there's the materials. The last one shows the default makeup- and frankly, I don't like that harsh line of unblended eyeshadow, it looks unfinished to me. You might find that to be acceptable though, or, as usual, it may look different with other lighting. But here are the main things for me- 1.) ordinary makeup is lacking, it's all fancy, patterned makeup. (Which is pretty to be honest.) 2. THE BIGGIE- THERE IS NO NATURAL LOOK, you must use that prominent line default makeup.
Question is if it's actually a makeup or she's just supposed to look that way. Some people do look like that with dark areas around the eyes though it's usually because of an illness like kidney disease or whatever (whether that's acceptable in a character is open to discussion I guess). But I guess only the PA knows why it looks that way.
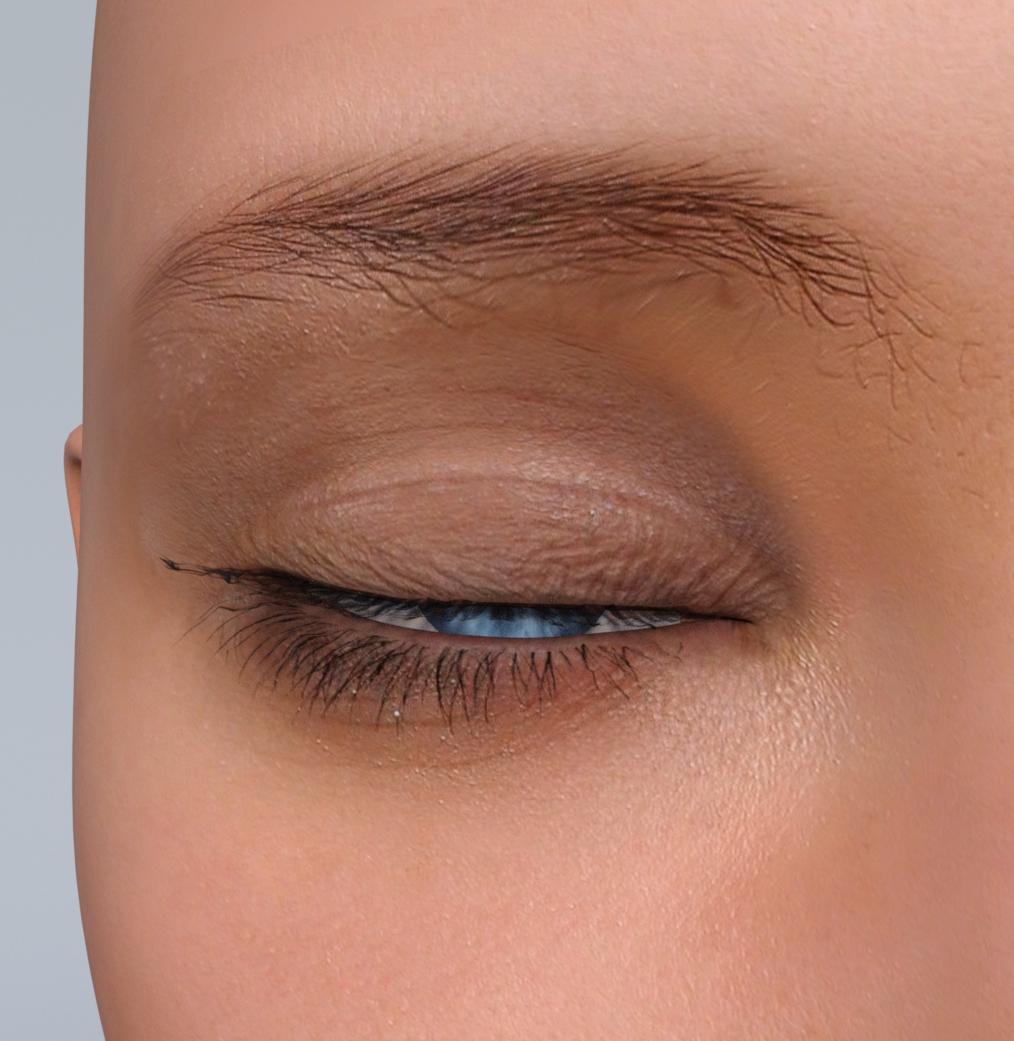
I've made a render with the eyes closed, it could look like they've copied the whole eye area from another texture rather than using a makeup. In any case it doesn't look good closeup IMO. Besides the eyes can't be closed completely, even if you turn off limits.
As for the head morph yea not much change, but she does look like in the promos, I guess that's what it's all about so as such there isn't really anything wrong IMO. I've seen something similar with other characters before. The body morph is quite different from the default G3F though.
There wasn't an Actor icon (I always use Content Library) so had to load the Genesis 3 Female then go to the folder and load the morphs/materials. See if it works for you, I'm always open to admitting to oopsies. I did this one twice, and if something seems wrong, I always do that. Let me know what you find out. When you load the morphs, watch closely in the viewport and see if there's barely any change.
Actually there is an Actor icon, their characters just start with IST (Ekatrina).
 Non-photorealistic Renders (NPR)
Fixed a minor comic book law that I just learned about and still broke.
And what law would that be, friend? Nice work, btw. Colors are nice and the character definitely fits in with the style of the Starblazaers series. Raised leg joins to the hip in a slightly wonky way, but no other obvious problems with this illustration. I like the shading on the planet and space, too. Nice job all around.
I'd have to look up the rule again to get the name, but it's about lines touching and creating the impression that they are connected when they are not. In the original image, the wing of the left jet is touching the planet in that manner, at least to me, so I corrected it. The ackward hip is probably from me trying to add an additional morph to the Hiro 4 morph (for G1). I was trying to make him a little less skinny. The Hiro morphs are hard to work with IMO.
A morph mask field / moving morphIs something like this possible?
Yes. With the usage of Attenuate By feature in Morphloader Pro it should be possible.
Not that easy as you may have thought - but possible.
The Attenuate By feature works like a Morph Filter while importing your Morph - you can select polygonal selections like Surfaces an Face Groups or Influence Weights of a D-Former.
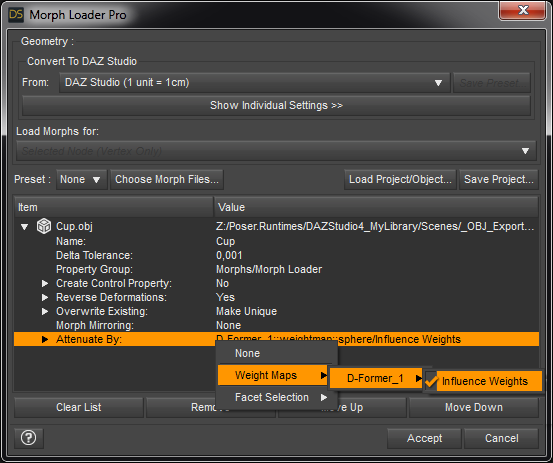
Remember the polygonal selection (they call it Facet Selection) and the Weight Map define the area of the Geometry where the Morph should be applied.
Will this be easy to realize? No. Do you have the skill to do it? I dont know - but I explain it anyway.
Did I have test this? No I did not - and I'm not exactly shure in every step - you have to do it by your own but I know of this Attenuate By setting.
But anyway - here are the step by step instructions - for this animated "Hulk transformaiton" how I call it:
1. create yourself a D-Former Influence Field with the figure selected then place it to the position on the figure where the transition should start
2. select the D-Former Field - go to Parameters pane and change the Fileds Influence from sphere to weightmap
3. change the tool to Node Weight Map Brush - look for "unused Maps" Influence Weights and press "Add Map" and see the Weight Map - finetune with the Brush if neccesary (maybe scale the D-Former up to see the influence in action temporary)
4. select the figure - set figure Mesh Resolution to Base - and export your "full body muscle morph" as an OBJ morph shape file
5. zero the "full body muscle morph"
6. then use the Morphloader Pro select the "full body muscle morph" OBJ file - especialy if you are also using a character morph on the figure change the import settings "Reverse Deformation" to yes (right-click)
7. Name your new Morph something like "Hulk transformaiton_1"
8. then right-click Attenuate By and choose Weight Maps > D-Former_1 > Influence Weights - then hit accept - and test your new morph
9. create a second D-Fromer_2 and place the Influence Field some way in the direction in which the "Hulk transformaiton" should go - but make shure there is some overlapping of the influence fields
10. select the D-Former_2 Fild and also change the Fileds Influence from sphere to weightmap and Add Map in Weight Map Bush tool like descriped in step 2. and 3.
11. use the Morphloader Pro select the "full body muscle morph" OBJ file - Morph name "Hulk transformaiton_2" - "Reverse Deformation" yes (this time the "Hulk transformaiton_1" is allready applied) - Attenuate By Weight Maps > D-Former_2 > Influence Weights
12. continue to work your way up the body with adding new D-Formers and create new morphs like "Hulk transformaiton_3"
13. once you have a bunch of "Hulk transformaiton" morphs you can animate them on the timeline with a few frames - the more morphs you have the more fluid the animation will look like - if you manage to set the keyframes so that the next morph in line fades in before the other morph reaches its maximum it will look even more like a fluid Hulk transistion
14. you can also create yourself a master morph slider / controller property with ERC-Freeze and the "Keyed" option (extract from timline play range) to have one single property slider for to control all "Hulk transformaiton" morphs at once
15. dont forget to save all your new morphs to the DazStudio Library with "File>Save As>Support Asset>Morph Asset" to use them with your figure in other scenes
I give no warranty that it will work like this - please test and give a comment.
Gen 7 Legacy Morphs?I didn’t do Legacy Shapes this time around, for Genesis 3 to Genesis 8. I wasn’t sure there would be an interest, since so many people have been transferring morphs on their own. Plus, there are so many Genesis 3 shapes compared to past generations. I couldn’t figure out which ones to do (and definitely don’t want to do ALL of them). Do you think there is enough interest in Legacy shapes to do them for Genesis 8?
One thing I considered was, instead of doing 4 or 5 shapes in each set, like I did for G2 to G3, that maybe I would do a “Generations” set for the main characters. For example, Aiko 3, 4, 5, 6 and 7 in one set (all for G8), Victoria 3, 4, 5, 6, 7 in another set, etc.
If enough interest is shown, I might consider doing something like that, skipping the characters that are less popular, such as Eva or Scott, etc.
That would be great! I think the idea of the "Generations" sets is really cool!
As for transferring morphs ourselves - I've had particular trouble with larger eye characters not transferring well. So I'd definitely be interested in a Girl set and an Aiko set. But yeah, a Victoria set sounds great too. MOST people are not transferring morphs themselves, I'm willing to bet. And I'm also willing to bet that most people who buy 3D content here would rather pay someone for the legacy shape morphs than fiddle with trying to do it themselves. lol I could be wrong of course, but I doubt there are seriously large numbers of people who know how to do morph transfers themselves between G3 and G8.
Gen 7 Legacy Morphs?No, it was probably just split up wrong... the hair is also for G3. Of course, it could be a hint that Elijah is the next G8 male to appear on the stage...
No, April herself just explained that she used Transfer Utility to create her own legacy morphs for the hair.
New question about Gen X and removing morphsFirst, Thank you to everyone that's helped me so far: Richard, Agent, Melanie, OOda, Ann... Thank you.

I've been able to get Gen X up and running and even figured out how to transfer V4's Morphs ++ Morphs to Genesis. Thanks again.
...but..
(Sorry. I know I'm flooding the forum with my constant questions)
I've realised I don't actually want ALL of V4's morphs transfered to Genesis...
But, somehow I have made them a permanent part of Genesis and I want to know how to either
1. Remove what I did and start over
or
2. Remove the morphs that are not necessary or don't work properly on Genesis....
What did I do?
Anyone have any idea?
Novica & Forum Members Tips & Product Reviews Pt 10I've said it so many times- CHECKLISTS. Each type of product should have a list and the reviewer has to sign off on it, after checkmarking and doing every blasted thing on that list. For characters there should definitely be a checkmark for substantial changes in head morphs. Totally agree QA is the last tester, not the first. And it's their JOB to help the vendors. The vendors don't want glitches in their products and QA should get their game going.
Regarding Chandra- here's the Facebook that shows more of her, and it's very noticeable. I just went into my external harddrive files all the way back to 2016 and not seeing a render, so I must have named it after the hair or the set she was in (and no way to sort through thousands of renders.) I do see what you mean about the lips.
I'm going to put on my content developer hat here and say it's not always easy to see how changes in a morph you're working on compare to the base figure unless you have an unmodified copy of the face (or body, or both) that you can overlay on it. That's how I do it in zBrush, and it's probably possible in other modeling tools as well.
Yes, a content maker should provide a checklist to the beta testers, and if they find a problem, it should be fixed and sent to a different set of testers to verify the fixes, before submission to DAZ. DAZ should require, if they don't already, such documentation of the testing done, and should only need to have people test the installation packages they make.
dForce Verified Functional Clothing [Out of the Box]I couldn't get a rope or belt to stick so I gave up on that. the rips are transparency maps which you can turn off or on. Not easy when it one of the first there nothing to go by.
Hmm might do a morph to hide the blade and make it into a staff
In another thread there was talk of taking things like belts and turning off dynamics on them. Select the belt, then dial down Dynamic to 0 instead of 1.0 so it's not part of the sim.
I tried that and it work to some degree, I also had edging all around the robe and collar and that was a bad idea it exploded so that had to go. The split in the middle is so the legs can be posed more easily. If I made it one piece with no split I would have to make the skirt a lot longer to allow for the movement of the legs so then it would have to sit above the ground or you would have collision problems. By default the tears are turned off and you just apply the material when you need the torn look. You could do a geogaph of the robe and make another trans map to get a more layered look. I'm splitting up the products now so people can buy what they want. A female version looks easy enough to do, and I did get a G8M version working last night, so will gear them to look more like a monk and keep the AOD version for the Midnight Skeleton.
Very cool! I look forward to seeing these in the store! :)
dForce Verified Functional Clothing [Out of the Box]I couldn't get a rope or belt to stick so I gave up on that. the rips are transparency maps which you can turn off or on. Not easy when it one of the first there nothing to go by.
Hmm might do a morph to hide the blade and make it into a staff
In another thread there was talk of taking things like belts and turning off dynamics on them. Select the belt, then dial down Dynamic to 0 instead of 1.0 so it's not part of the sim.
I tried that and it work to some degree, I also had edging all around the robe and collar and that was a bad idea it exploded so that had to go. The split in the middle is so the legs can be posed more easily. If I made it one piece with no split I would have to make the skirt a lot longer to allow for the movement of the legs so then it would have to sit above the ground or you would have collision problems. By default the tears are turned off and you just apply the material when you need the torn look. You could do a geograph of the robe and make another trans map to get a more layered look. I'm splitting up the products now so people can buy what they want. A female version looks easy enough to do, and I did get a G8M version working last night, so will gear them to look more like a monk and keep the AOD version for the Midnight Skeleton.
Wolf/Feline Padded Feet MorphHi, I’m trying to put together a furry/anthro promotional piece and while there’s plenty of morphs for different animal heads and legs, there’s one detail missing, padded feet! I have all the HFS bundle packs for Genesis1-3 and while the legs and feet are roughly the right size and shape, they just go flat on the bottom of the feet. While this may not matter so much for a standing character, if you have a character kicking or posed in such a way where the bottom of the feet are exposed, it looks off.
The Creature Creator legs for M4/V4 look perfect and have the pads modeled into them, why not any morphs? The piece is going to be animated so having to deal with the floating add-on Creature Creator M4/V4 legs isn’t an option. If anybody has any suggestions or ideas, I’d greatly appreciate it.
i13 Steakhouse Server Outfit problemsYou might want to check hidden morphs on your character to make sure there isn't an errant morph loaded at 100% that you don't expect. I tried the outfit with base Aiko 7 and I did not see that distortion (although it could also be the pose used if it moved the Pectoral bones). You could try changing the Collision Item from the figure to the shirt to see if that pops it out and smooths it out.
Gaming PC for DS rendering?I now see that my MB does not support PCIe 3.0 ... it is 2.0 . the ram is damn slow.
Are you sure the RAM speed will make much of a difference in real life?
not sure, but its 1600 Mhz .. which is real slow compared to todays ram ..but what is that in reality? zing instead of super zing ... nano seconds or less probably ...
but the pcie slot is the real killer for the video cards today..1070 requies pcie 3.0 which my MB does not have. even the 1050Ti requires 3.0.
pretty much a done deal as far as upgrading. its a no go.PCI-e is backwards compatible.
My rendering computer is running PCI-e 2.0 with a GTX 1080 ti with no issuesThe only effect this has on render times, is that it will take a little longer to initially transfer the render job over to the card. Oncs the render starts the GPU runs as a self contined unit. (For gaming this machines still maxes out all the settings at 4K resolution dispite the PCI-e 2.0)
Your machine will fit any GPU up to 9 inches long (or 228mm)
Looking at the Service manual for your machine that looks like a standard size Power Supply, and the motherboard has all the standard plugs.
I would just measure it's length (or see if there is anything preventing you from puting a longer one in if the size turns out to be smaller than standard)i will did deeper into that. Thanks. i hate to spend 400-500 on a card only to have it not able to pound out full performance.
Daz 3D is part of

Connect
DAZ Productions, Inc.
7533 S Center View Ct #4664
West Jordan, UT 84084Licensing Agreement | Terms of Service | Privacy Policy | EULA
© 2026 Daz Productions Inc. All Rights Reserved.