-
iRAY emissive shader + visible glow - How?
If you can isolate the filament in the scene tab and the surface tab then add the emissive shader to it and it will glow as a light. Adjust the temperature and lumens to get the glow you need.
iRAY emissive shader + visible glow - How?Glow in render works great on the entire scene, however I just want one object to glow. I have a lightbulb; all I want is for the filament to glow, but with render-glow, the entire bulb glows.
Any suggestions? Thanks.
NEW! Novica & Invited Guest Contributors Tips & Product Reviews Pt 6Glad to hear you and your family and horse are safe but sorry to hear so much damage occurred in the area. That's a lot of heartache for people to go through.
I grew up in St. Louis and we had periodic tornadoes come through. I remember one where my mom sent my brother and I to move the car out from under the carport (she said in case the roof would fall in; but if that happened, the car was going to get smashed by debris anyway). After we backed the car out, it was rocking like mad in the wind and rain and suddenly the light in the lamp post went out, so we dashed back inside. The next morning on the way to school we passed the houses a half mile north of us where the roofs were laying in the yard. Later when I replaced the burnt out bulb, I was surpised to see the filament pulled to the side the tornado passed on and the tip fused into the glass. That meant we were outside just as the tornado passed a half mile away.
A few years ago, another tornado passed along almost the same track. This was the tornado that hit Lambert airport. My mom was still living at our old house. The tornado kept skipping about, so it damaged houses a few blocks east, west and south but jumped over her house. Only damage was a medium-size tree branch that went through the roof. Fortunately she wasn't home but out with a friend so she didn't have to experience it.
Cincinnati also gets them once in a while (we get a lot of watches but they always seem to hit further south in Kentucky at a trailer park somewhere). One time we had a warning that a tornado was on the ground in the county and so we went to the basement until we got the all clear. It was night, so my wife and I went back to bed. Suddenly there was this huge roar like a vacuum cleaner that sounded like it was directly overhead. My wife and I both jumped out of bed shouting "tornado" as we were dashing back down the stairs. But then all went quite and we looked out and nothing seemed amiss. Not sure what it was, but based on how people describe tornado sounds, I'm guessing it was a funnel cloud that lasted only about 10 seconds and was still high in the air. That's as close as I want to come. I like seeing videos of tornadoes but not being in or near them.
You've been heard. Response re: 4.9 and EncryptionHaving worked in the electonics field in the past, (15 years before moving on), I can confirm you don't want to let the smoke (or stench) out of capacitors either. Who knew a 22pF disk Capacitor (about the size of a cherrio) could also contain a 10" flame as well....
Oh yeah...those tiny things sure do pack it in...but you really want to be impressed...cook off one of the BIG ones. You measure it in feet...and the flame is several of those!
In electronics class in the '60s we ran a test-to-destruction on a new mini vacuum tube - the last gasp of vacuum tube tech before they got replaced by transistors. IIRC, the peanut-size tube used a 1 volt filament and 5 volt plate; we had it pumped up to 9 volts on the filament and 200+ on the plate, glowing bright as a 100 watt bulb. And then the glass melted. It was MIL-spec, intended for some kind of communications gear.
Must have been fun to watch... However, as mjc1016 says, Tubes aren't dead... in fact most industrial furnaces still use Vacuum (even if most people don't realize it) as sensors. I worked for Fireye (part of Kidde,plc, now part of UTC.) and we made furnace burner controls for industrial boilers. We used 3 different sensor types, depending on the fuel being used. Coal/Wood/Heavy Oil Soot up quickly, and required a IR sensor, Natural gas used a UV sensor. They tried to at one point switch the UV sensor from Vacuum tube to Solid State, but quickly dropped it, as nothing worked as well as a simple Ionization of gas by UV in a glass tube... (ok, not a transisor type, but still a vacuum tube.)
However, I'm starting to think this thread, at least for the topic it was started for, is dead (or close to it)..
.
You've been heard. Response re: 4.9 and EncryptionHaving worked in the electonics field in the past, (15 years before moving on), I can confirm you don't want to let the smoke (or stench) out of capacitors either. Who knew a 22pF disk Capacitor (about the size of a cherrio) could also contain a 10" flame as well....
Oh yeah...those tiny things sure do pack it in...but you really want to be impressed...cook off one of the BIG ones. You measure it in feet...and the flame is several of those!
In electronics class in the '60s we ran a test-to-destruction on a new mini vacuum tube - the last gasp of vacuum tube tech before they got replaced by transistors. IIRC, the peanut-size tube used a 1 volt filament and 5 volt plate; we had it pumped up to 9 volts on the filament and 200+ on the plate, glowing bright as a 100 watt bulb. And then the glass melted. It was MIL-spec, intended for some kind of communications gear.
Where in the World has the Forum Gremlin gone Now? Complaint Thread...most likely. The design I have is more suited to long haul passenger and/or cargo operations. As the craft works on a hybrid neutral buoyancy/lifting body concept, removal of helium cells would not be advisable. Buoyancy is adjusted by compressing helium into lightweight spherical filament wound cells rather than bleeding it off into the air. When helium is compressed, it loses it's lifting capability.
The main propulsion is provided by hybrid turbine/electric ultra high bypass engines.that switch to fuel cell power for cruise.
The cargo version could easily be fitted with water tanks.
Yeah this is what happens to an aeronautical designer who spent years of study, never made it into the field, but still follows the technology.
Wish I had a scanner, I'd attach some of the drawings. Need to get much better at modelling to create a 3D version.
VolcanoRight. It takes practice.
With your above comment, I'd just like to add some ideas, please forgive me if you already know this stuff:
Animate using many video renders
In TV shows and movies, everything might seem like a single, smooth stream of vision. But if you look closer, the shot taken from a single camera rarely lasts longer than a few seconds - often even only one second, sometimes even less! This works great for keeping the drama and also keeping the audience from getting bored.
Trying to animate a volcano in a single shot might be possible, but it will look much, MUCH better if you make it up of many shots from many different angles. To save time doing this, here is a technique I use a lot to give additional mileage to the work that goes into an animation:
Let's use the lava flow work that you've already made as an example
Since you already have stuff moving, let's film some of it. I have a feeling that you already have a camera in your scene. We're not going to stop there. Insert > Conical to get another camera into the scene. Select your volcano and type "0" (zero) to center it in view. Now scroll in and get a nice, dramatic view of the moving lava. Now skip to the end of the timeline that you're using for your animation. For starters, let's try and keep that to no more than six seconds, but one to three seconds would be better. Now change the camera, either climbing up the mountain against the flow of the lava, or perhaps rotating around the mountain... something that shows off your handy work in the best way possible.
Before making any more changes, select that camera and give it a name, if you haven't already. After that, duplicate it and change the name of that new camera. Duplicate it one more time, just for giggles.
Now go back to looking through that first camera that you've just animated. Find it in the sequencer and select the space between the two keyframes and set that to "Bezier" in the tray on the right. While looking through it, scrub through with the time scrubber and have a look at the motion. Sometimes it can be really nice to select the first keyframe for the camera, hold the Alt key while dragging it out to, say, a half of a second... perhaps a whole second if it's more like six seconds long. This copies and pastes that key along the timeline. Now, if those tweeners are set to Bezier, even though the positions of the camera for those keys are the same, if the following key takes the camera somewhere else, the bezier will add at least some movement between those two identical angles, which adds a bit of human feel to the motion. That's a very basic example, but even those simple techniques can really improve a shot! I'll often do the same thing at the end, with the last keyframe for the camera as well. This will give a short pause at the beginning before the major camera movement begins, and then holds the ending position a bit before the render is done. And like I said, with those Bezier curves as a tweener, the steadiness will not be purely steady, which is nice, and can even be tweaked out to be quite dramatic, if you wish.
Now set your view to the next duplicate of that camera. For something just a little different, try swapping the two keyframes, the start to the end, end to the start, and then apply the technique we've just practiced - perhaps even with different timing for the pause distances.
Take your next camera and set up an entirely different animation.
Continue doing this for any angles of animation that you think might look really cool. Even set up at least one camera that almost doesn't move at all, except for some subtle motions due to the person holding the camera shifting weight or dodging a spark or loosing footing, etc., For action movies, they often even move the camera so much that it's impossible to make out details of anything, just to illustrate rampant motion going on.
The problem with Backdrops is that they remain exactly as they were filmed, no matter what the camera does. Now, with some anticipation and practice, we can change that from a problem to an advantage. Just film the backdrop footage to be how you want the camera which is using it to be moving. For examples, see the camera animations we've just set up above. But if those don't work for this, say... too close up, too much motion, whatever... set up another camera or set of cameras just for use as backdrop footage. When doing this, save the scene with those moving backdrop cameras set up so that you can use them in the next step. Just hide the volcano in the scene, add the new stuff, set the Backdrop to video, and use those same cameras to film the new stuff!
For rendering what you have now, without having your particle smoke yet, try popping in a volumetric cloud (Tip: Don't close (X) out the volumetric cloud modeling window or you'll get Carrara stuck forever! Instead, just switch to the Assemble room)
Try setting the underside flatness to 0% unless you want flat, lower the density to get more chunks here and there, increase sharpness a bit while lowering the scale modifier if you want it to be more of a harsh filament-like smoke - raising the scale modifier and/or lowering the sharpness makes it more cotton-like. Change the brightness setting, perhaps try changing the color to a dark dirty grey or reddish orange for more fiery plumes, bright yellow-white with high-intensity lights to creat fiery explosion appearance, etc.,
Back in the assemble room, with the cloud selected, go Edit > Center Hotpoint, then scale the thing down to the right size that you need. The centered hotpoint helps when it comes to moving it around while in camera too. Give it a bit of rotation and scale change to animate it. Do some test renders to see how it looks. If it's too bright, go through your lights and set some of them to not include the cloud(s). In the cloud's settings in its model room, you can set it for Sunlight Only or All Lights. No other options. If you're not using a Sunlight, it will automatically use all lights in ther scene. But it won't use lights that are told not to affect it! ;)
Example, the bright fiery substance in this image is a bright volumetric cloud with an intense bulb and other intense lights on it, surrounded by another cloud that doesn't have much lighting at all
 Surface Selection Script
Rob and I both have scripts with the ability to select by any criteria you would like. The script can select all materials with a particular tag across the entire scene, or it can select only the materials with a tag from selected node(s). I've been testing against i13 Modern Loft since it has heirarchies of both nodes and surfaces. What I wanted to be able to do is select all the "Emissive" materials in a given part of the loft.
I assume you still want to select by tag. I believe that's more appropriate than selecting by name. That way (using the lighting example) the surface name can be "flame," "filament," or "tube," while the material is tagged "Emissive," or "Light."
This script traverses the heirarchy of the currently selected nodes and selects all the surfaces with the specificied tag. It also selects the node for the newly selected surface such that the selections are displayed properly in he surface pane.
If you start off with the scene selected like this,
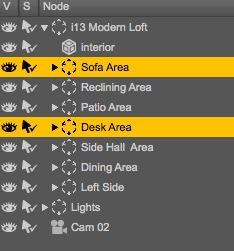
then run the script, you end up with your scene like this,
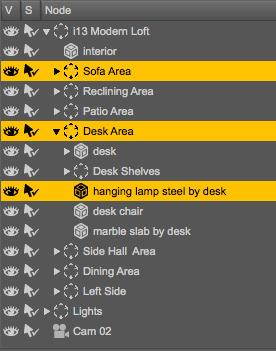
and your surfaces tab like this.

Is this what you're after, or something else?
How to transform Daz 3d file to sculpture?You can print your own
i have used this process for my XYZ DaVinci printer but sadly the printer itself has some serious limitations regardless of the mesh, I am going to have to do some geeky hacking to solve this and putting it off for now, the issue is the software itself largely made to stop you using filament from other companies.
Iray and the Single Light SourceSzark said:Iray is a Photoreal render engine and not what we see with our eyes so you need to be a photographer and learn about real world camera settings i.e. Tone Mapping. Set up your lights as per real world settings, either Watts and Lumen Efficiency https://en.wikipedia.org/wiki/Luminous_efficacy or Lumen Output https://en.wikipedia.org/wiki/Lumen_(unit) and Kelvin scale (colour temp) http://www.seesmartled.com/kb/choosing_color_temperature/ then set your Tone Mapping.Added to this nearly all photographers add additional fill lights. I use an emissive Plane, big soft shadows, small sharp shadows.
The night image below as the table lamps set up as 40 w GLS (tungsten Filament) lamp and the candles set to 25 lumens, should be 12 but I had to compensate for the size of the mesh. Added to this I had two mesh light plane behind, either side of the camera. Can't remember what the Tone mapping but ISO was at 3200.
The daytime render relies purely on Tone mapping and use the Sun/Sky mode, using the Sun Dial for the Sun's position. Tone Mapping ISO was at 1600 and again without looking (which I can't as I am rendering) I cannot remember what the other tone mapping setting were.
You don't need tone mapping ISO that extreme if you drop shutter speed and/or f/stop down really low.
HDRIs or Sun/Sky will not work for a totally enclosed room in Iray or any other unbiased render engine like we can in 3delight.
Ah - you caught me just as I was giving up ;) Thanks Pete - The day-time render is especially interesting to me. Is that purely just sun-sky lighting? I tried something similar with a room that had skylights and I got a really nice image like yours with just sun-sky light. However, as soon as I dropped a figure into the room, facing away from the light, they were in proper darkness again.
Could you do me a favour please and put a figure into that scene, somewhere between the bed and the camera, and render it to see how well lit they are?
Iray and the Single Light SourceIray is a Photoreal render engine and not what we see with our eyes so you need to be a photographer and learn about real world camera settings i.e. Tone Mapping. Set up your lights as per real world settings, either Watts and Lumen Efficiency https://en.wikipedia.org/wiki/Luminous_efficacy or Lumen Output https://en.wikipedia.org/wiki/Lumen_(unit) and Kelvin scale (colour temp) http://www.seesmartled.com/kb/choosing_color_temperature/ then set your Tone Mapping.
Added to this nearly all photographers add additional fill lights. I use an emissive Plane, big soft shadows, small sharp shadows.
The night image below as the table lamps set up as 40 w GLS (tungsten Filament) lamp and the candles set to 25 lumens, should be 12 but I had to compensate for the size of the mesh. Added to this I had two mesh light plane behind, either side of the camera. Can't remember what the Tone mapping but ISO was at 3200.
The daytime render relies purely on Tone mapping and use the Sun/Sky mode, using the Sun Dial for the Sun's position. Tone Mapping ISO was at 1600 and again without looking (which I can't as I am rendering) I cannot remember what the other tone mapping setting were.
You don't need tone mapping ISO that extreme if you drop shutter speed and/or f/stop down really low.
HDRIs or Sun/Sky will not work for a totally enclosed room in Iray or any other unbiased render engine like we can in 3delight.
Tips & Tricks for Iray for newbies......
Yes there are chandeliers, 3 of them with ten candles each and 4 candles on each end of the roomdhmohr said:Szark said: If the room is totally enclosed the Dome or Sun/Sky isn't going to help. Yeah HDRI in this case wouldn't be any good either.Here is a scene that uses Scene Only. The background colour you see is just a background colour provided by the Environment Pane > Backdrop > Colour. The candle light is pretty much set up as real world lumen output...almost I had to tweak it a little. The table lamps have the Lumen output of 40 watt GLS (Tungsten filament) lamps. I have two mesh light planes either side, behind the camera to provide some fill light. I had ISO at 3200, F/stop 2.80 and Shutter at 60 and it was still too dark without the fill light. Yes I could have increased the fill light intensity and reduced the Tone Mapping.
I referenced some Photography sites to get an idea what settings are good for what situation.
If you were standing in this bedroom when it was lit by those 2 table lamps and a candle, that's probably what you would see. If you photographed it with a fast lens, your photo would probably look very much like this, too. When there isn't a lot of light in the scene to begin with, the image will naturally be dark.
Even so, it's a great "mood" image! Very nice! I would say it's...photo realistic!
You could put a camera on a tripod to reduce shake. This would allow you to use a lower shutter speed, thereby making the image a bit brighter. You could up the ISO a little bit...6400, maybe. That would make it brighter, too. But expect grainy images...especially if you make large prints.
In the 1st image, I notice there is light up high on the ceiling. Is that from the chandeliers?
The 2nd image looks very nice, too! The sun provides a lot of light! It bounces all over the place!
What I know about photography helps me some, but the aperture setting is a bit of a mystery. In a camera, one of the main functions of the aperture settings is to determine the depth of field focus. But from what I understand, the tone mapping in Iray doesn't use it for that. Focusing and depth of field are in the camera settings.
If that's true, what's the aperture setting for? Allowing in more light? To what end? You can already control that twice over with the shutter speed and ISO settings.
There has to be a difference between ISO controlling the light, shutter speed controlling the light, and aperture settings controlling the light in Iray, and what I am used to in photography.
Anyway...very nice renders! Thanks for taking the time to set these up!
"D"
Aperture Setting: No idea it's there maybe for the future.
Tips & Tricks for Iray for newbies......Szark said: If the room is totally enclosed the Dome or Sun/Sky isn't going to help. Yeah HDRI in this case wouldn't be any good either.
Here is a scene that uses Scene Only. The background colour you see is just a background colour provided by the Environment Pane > Backdrop > Colour. The candle light is pretty much set up as real world lumen output...almost I had to tweak it a little. The table lamps have the Lumen output of 40 watt GLS (Tungsten filament) lamps. I have two mesh light planes either side, behind the camera to provide some fill light. I had ISO at 3200, F/stop 2.80 and Shutter at 60 and it was still too dark without the fill light. Yes I could have increased the fill light intensity and reduced the Tone Mapping.
I referenced some Photography sites to get an idea what settings are good for what situation.
If you were standing in this bedroom when it was lit by those 2 table lamps and a candle, that's probably what you would see. If you photographed it with a fast lens, your photo would probably look very much like this, too. When there isn't a lot of light in the scene to begin with, the image will naturally be dark.
Even so, it's a great "mood" image! Very nice! I would say it's...photo realistic!
You could put a camera on a tripod to reduce shake. This would allow you to use a lower shutter speed, thereby making the image a bit brighter. You could up the ISO a little bit...6400, maybe. That would make it brighter, too. But expect grainy images...especially if you make large prints.
In the 1st image, I notice there is light up high on the ceiling. Is that from the chandeliers?
The 2nd image looks very nice, too! The sun provides a lot of light! It bounces all over the place!
What I know about photography helps me some, but the aperture setting is a bit of a mystery. In a camera, one of the main functions of the aperture settings is to determine the depth of field focus. But from what I understand, the tone mapping in Iray doesn't use it for that. Focusing and depth of field are in the camera settings.
If that's true, what's the aperture setting for? Allowing in more light? To what end? You can already control that twice over with the shutter speed and ISO settings.
There has to be a difference between ISO controlling the light, shutter speed controlling the light, and aperture settings controlling the light in Iray, and what I am used to in photography.
Anyway...very nice renders! Thanks for taking the time to set these up!
"D"
Tips & Tricks for Iray for newbies......
If the room is totally enclosed the Dome or Sun/Sky isn't going to help. Yeah HDRI in this case wouldn't be any good either.dhmohr said:Thanks, Szark.I didn't even attempt to tackle the "camera settings", even though I understand them. Off the top of my head, the default settings seem like they're suited for an outdoor scene in bright or moderate daylight: ISO 100, Aperture F8.0 and shutter speed 1/250. These settings will ensure that most of the scene is in focus, anyway.
I just left all that for another time. Trying to wrap my mind around properly lighting a scene first..at least the technical aspects. I guess my next steps should be trying to light a scene with a "dome", or "dome and scene", or the sun settings.
I think I need to get a good grip on what type of conditions these settings are best suited to. Why would someone chose one setting over another? Would my render have been more realistic if I had used "dome and scene"? It's a completely enclosed indoor scene. Sun settings don't seem to be indicated, unless there are windows (which there aren't in Level 19). Dome settings allow for HDRI images to be used as light sources, right? Again, that would seem to indicate an outdoor scene
I understand I could probably tweak any lighting setup, and make it look decent. I would just rather avoid quick and easy setups that work, and have to unlearn bad habits later.
I'll keep you posted.
"D"
Here is a scene that uses Scene Only. The background colour you see is just a background colour provided by the Environment Pane > Backdrop > Colour. The candle light is pretty much set up as real world lumen output...almost I had to tweak it a little. The table lamps have the Lumen output of 40 watt GLS (Tungsten filament) lamps. I have two mesh light planes either side, behind the camera to provide some fill light. I had ISO at 3200, F/stop 2.80 and Shutter at 60 and it was still too dark without the fill light. Yes I could have increased the fill light intensity and reduced the Tone Mapping.
I referenced some Photography sites to get an idea what settings are good for what situation.
Show off your Iray Lighting Scenes [tip & tricks]DzFire™ said:The presets are based on real world sizes, so, for example, if you apply the 40 Watt Bulb setting to a mesh bigger then a normal 40 Watt Bulb, it will be brighter or if you apply a 60 watt setting to something smaller then a normal 60 watt bulb, it'll be dimmer. If this is the case, the settings will need to be adjusted up or down in the 'Luminance' drop down in the 'Surfaces' tab.
For a while, I was going to use the setting for the filament itself but, realistically, how many filaments are modeled out there compared to just the bulbs? :PWhat would be great would be a preset or two for larger surfaces; like your regular light strip. For example
"40W Surface up to 10cmx10cm"
"40W Surface up to 30cmx30cm"
"40W Surface up to 50cmx50cm"
"40W Surface up to 100cmx100cm":-)
Of course, I can manually tune them down, but that would be just guesswork, not 40W. Also, for convienence reasons, it would be nice.(That said, I love the lights. :-))
Show off your Iray Lighting Scenes [tip & tricks]DzFire™ said:The presets are based on real world sizes, so, for example, if you apply the 40 Watt Bulb setting to a mesh bigger then a normal 40 Watt Bulb, it will be brighter or if you apply a 60 watt setting to something smaller then a normal 60 watt bulb, it'll be dimmer. If this is the case, the settings will need to be adjusted up or down in the 'Luminance' drop down in the 'Surfaces' tab.
For a while, I was going to use the setting for the filament itself but, realistically, how many filaments are modeled out there compared to just the bulbs? :PNot many...it took me a lot of searching to find a bulb with a filament.
Show off your Iray Lighting Scenes [tip & tricks]The presets are based on real world sizes, so, for example, if you apply the 40 Watt Bulb setting to a mesh bigger then a normal 40 Watt Bulb, it will be brighter or if you apply a 60 watt setting to something smaller then a normal 60 watt bulb, it'll be dimmer. If this is the case, the settings will need to be adjusted up or down in the 'Luminance' drop down in the 'Surfaces' tab.
For a while, I was going to use the setting for the filament itself but, realistically, how many filaments are modeled out there compared to just the bulbs? :PTutorial Uber Area Lighting: The BasicsSzark said:I am here finally. Oh PDF yes that can be done when I get some time.
One thing that strikes me of your two posts is the thinking that in 3delight you will have the benefits of having a shiny reflector to push the light forward. This would be true if you were using some sort of Global Illumination that would provide such a light bounce effect but generally you won't get that type of material and light relationship.This would be true of Iray but not 3delight.
What I would do is to use a Area Light Disc behind the lens, as far back as the disc will go, to provide the light. The sides of the torch head will help constrain the light spread The Max Raytrace Depth is dependent on the Lens that the light has to pass through. If the lens has a thickness, having two sides then your starting Max Ray Trace depth would be 2.
I wouldn't go as far as a filament if using 3delight. Iray yes but in my experience small objects and area lights in 3delight don't work as well as I expected.
Thank you for that info and the suggestion. My lens does have thickness, and is slightly convex, like a lens that focuses a beam of light to make it shine further in real life. An example of what I want to achieve is a flashlight known as a Maglight. It has a way to widen or narrow its beam. I have owned a few of them and have always loved the performance they gave. As for the transparency of the lens, I can make it fully transparent if needed. As long as the refraction index is right though, I think a 2% opacity value will work fine and it will give a sense that there is a lens when viewing it from a less than direct angle. So my question now is how far can I make the falloff for the Area Light Disc? I am hoping it will be a good distance.One thing I don't know is whether the refraction works as well as it does in Bryce 7.1 Pro. I have created a working telescope in Bryce that actually magnifies distant objects in my scene. The same principles that govern that telescope in Bryce should also work in DAZ Studio for this purpose of creating a good flashlight. Of course in Bryce there are textures provided in the Materials Library that can provide different refraction index values for different effects. I am also able to create my own glass textures with different values for refraction. For a 32 bit application, that is a fantastic ability.
Unfortunately though, SSS for human skin materials does not at all work well in Bryce, plus any figure I use in Bryce would need to be posed first in DAZ Studio, and then sent to Bryce. This is what I call a hit and miss way of working between the two applications, and the DAZ to Bryce Bridge is not working with DAZ Studio 4.8, making the process slower to achieve due to having to export from DAZ and import to Bryce.
So doing my flashlight in DAZ Studio is the best option I have; and if I can make a working model for DAZ Studio, it will be worthy of putting up for sale. That is my goal for this product. I have not seen anything like it anywhere on the internet, so I think it would be something people would really want to buy.
Tutorial Uber Area Lighting: The BasicsI am here finally. Oh PDF yes that can be done when I get some time.
One thing that strikes me of your two posts is the thinking that in 3delight you will have the benefits of having a shiny reflector to push the light forward. This would be true if you were using some sort of Global Illumination that would provide such a light bounce effect but generally you won't get that type of material and light relationship.This would be true of Iray but not 3delight.
What I would do is to use a Area Light Disc behind the lens, as far back as the disc will go, to provide the light. The sides of the torch head will help constrain the light spread The Max Raytrace Depth is dependent on the Lens that the light has to pass through. If the lens has a thickness, having two sides then your starting Max Ray Trace depth would be 2.
I wouldn't go as far as a filament if using 3delight. Iray yes but in my experience small objects and area lights in 3delight don't work as well as I expected.
Tutorial Uber Area Lighting: The Basicsmjc1016 said:Mage 13X13 said:I started a thread of my own here in the DAZ Forums to try and find help with that problem, and another member directed me to this thread. I am planning to revisit the model and try your method of using the area light base to convert my light bulb to an area light, and I will be using your other instruction the make the lens have refraction. Also, I will set the raytrace depth up so that the light will pass through the lens. It will need to be set to at least 6 to allow for the reflection off the inner dome to pass through as well.
I thank you for providing your tutorial, but I do have a question for you. Would it be possible to get a pdf document version of your tutorial?
It's always a good idea to go one more than you think you'll need for raytrace depth. And if you are turning the filament (if you modeled one) into the emitter, then you will need at least a depth of 8.
Actually I did not model a filament inside the light bulb, although if this method works I will definitely be looking at doing so. My flashlight model was made specifically to test my idea of creating a working model that behaves like a real one. So the surfaces for the rays to either bounce off of or pass through are as follows: The inner dome, which is what I'm using for my reflector cone, the inside surface of the lens, and the outside surface of the lens. That makes a total of 3; however, I got a hunch that the backs of the surfaces may be treated as separate surfaces, and if that is the case, the total would 5. So a maximum ray depth of 6 will likely do the trick. Of course it may be better to have more than 1 over the needed maximum ray depth, because the light will need to bounce off of objects in the scene that the model is pointed at. If I do model a filament in the advanced model I have planned, I will need to increase that to at least 10, and more than likely to 12.Thank you for mentioning a filament, as I nearly forgot that I wanted the final version to have that.
Daz 3D is part of

Connect
DAZ Productions, Inc.
7533 S Center View Ct #4664
West Jordan, UT 84084Licensing Agreement | Terms of Service | Privacy Policy | EULA
© 2026 Daz Productions Inc. All Rights Reserved.