-
How to adding bones to strand based hair?
The SBH you made with SBH Editor ? If so, you have no way to add bones to it no matter with Joint Editor or Transfer Utility. You have to generate PR hair firsly then export it to a static mesh OBJ. Import the hair mesh then rig it. But after these process, the hair is not an SBH anymore.
Repackaging(?) Morphs in character product saved as injectable Properties PresetThe "Morph Call" mechanic in a Character preset does allow morphs to be added from outside the figure's "Morphs" folder, I've done it and even explained how to on here, it has to be manually edited to allow it as DS can't see the morphs to create the preset naturally.
Not sure about Scene/Subsets as they have a differant "call mechanic".
Let me guess, it shows up in the Parameters tab either under their name, or under "morphs/morphloader".Sadly that is all to common in 3rd party/freebie content, basically it wasn't assigned to a "Region" when it was being created, and it needs a region before it'll show in the Shaping tab.
Genesis series figures all have "Regions" coded into them, "Actor" is the main region with a selection of sub regions below it, as an example G8F has 14 sub regions.
Face and morph swap after I reload a savebarbult said:
Richard is making an important distinction between name and label. We suspect that you are confusing the two. The label is the thing that a user sees when selecting and applying a morph, but the important thing for distinguishing different morphs is the internal name that is assigned to the morph. You can see the name by selecting the morph by label in the Parameters pane, and clicking the gear icon. It will show you both the label and the morph. If you do that for both morphs with the same label, you can see whether they also have the same name.
How can I see the label. my model name is Andromeda (ROMFX) and when I load the save, it loads another androemda's face (Colm Jackson). Same with cammy, I have 3 cammy models, and I want to load one cammy model in the slider, yet it loads the other cammy's model in the slider, How do I fix it??
can I import curve based hair from blender to daz(particle or extrapolated)Im not sure what PAs can/cannot do or the extra functions they have (and maybe i was wrong to say their only tool is the dForce Hair modifier), all I can address is the things we can do as non PA. We can:
- add morphs to polylines/splines/curves
- export SBH made in SBH Editor (anyone can export at any Render Tesselation Sides value)
- import SBH that was made in SBH Editor (exported at any Render Tesselation Sides value)
- import Curves from other software
- Import mesh from other softwaare and convert to lines
- rig polyline hair using transfer utility
with those functions available to all users, it is sufficient to make polyline hair.
you said we can import curves from other spftwear but after that can you use the curves for hair?or just render directly works?
Expressions poses not working with 8.1Making the G8 base expressions (and any expressions that are using them) work on G8.1 requires removing dummy/placeholder expressions that are installed to G8.1 morph folders - These dummy/placeholder expression files have no other function than to prevent the base G8 expressions from loading.
The dummy/placeholder files are located in;
...\Data\DAZ 3D\Genesis 8\Female 8_1\Morphs\Daz 3D\Base Pose Head\ (255 files, can be more if you have additional DAZ expression packs)
...\Data\DAZ 3D\Genesis 8\Female 8_1\Morphs\Daz 3D\Expressions\ (24 files, can be more if you have additional DAZ expression packs)
...\Data\DAZ 3D\Genesis 8\Male 8_1\Morphs\Daz 3D\Base Pose Head\ (255 files, can be more if you have additional DAZ expression packs)
...\Data\DAZ 3D\Genesis 8\Male 8_1\Morphs\Daz 3D\Expressions\ (24 files, can be more if you have additional DAZ expression packs)Please make sure you are removing the files from G8.1 morph folders and not G8 morph folders.
Note 1; If you are logging in to DS and letting DAZ Connect (within DS) to install/update your content, you may have these also in an other location that has "\Data\Cloud\" in it's path
Note 2; Do not remove any files from "FACS" or "FACSExpressions" foldersCreate or transfer "Open Fly" morph for G8 Male Mega Wardrobe JeansAnxious3102 said:
crosswind said:
Ah, great ! You're welcome ~ I just updated the tutorial 'cause I found I didn't parent the jeans to G8M before I proceeded... haha ~ But that didn't impact the morph. Only after loading Jeans to the figure, Jeans is not parented to G8M.
Now the tutorial is correct, if you followed the updated one, everything should be fine. Have fun !
Like I really REALLY do appreciate it! Your instructions were super easy to follow, and I just appreciate the generosity of you being willing to help me figure it out and then teach me :D
No problem !
 Create or transfer "Open Fly" morph for G8 Male Mega Wardrobe Jeans
crosswind said:
Ah, great ! You're welcome ~ I just updated the tutorial 'cause I found I didn't parent the jeans to G8M before I proceeded... haha ~ But that didn't impact the morph. Only after loading Jeans to the figure, Jeans is not parented to G8M.
Now the tutorial is correct, if you followed the updated one, everything should be fine. Have fun !
Like I really REALLY do appreciate it! Your instructions were super easy to follow, and I just appreciate the generosity of you being willing to help me figure it out and then teach me :D
Create or transfer "Open Fly" morph for G8 Male Mega Wardrobe JeansAh, great ! You're welcome ~ I just updated the tutorial 'cause I found I didn't parent the jeans to G8M before I proceeded... haha ~ But that didn't impact the morph. Only after loading Jeans to the figure, Jeans is not parented to G8M.
Now the tutorial is correct, if you followed the updated one, everything should be fine. Have fun !
Create or transfer "Open Fly" morph for G8 Male Mega Wardrobe Jeanscrosswind said:
Okay, pls :
1) Carefully follow the steps in the attached Screenshots 1 ~ 7.
2) Extract the "data" folder in the attached Open Fly Morph.zip file to your Daz Library where you've installed this product.
3) Load the Jeans, dial Open Fly morph to check, Screenshot 8.
It worked! OMG you are my daz hero!!!
Create or transfer "Open Fly" morph for G8 Male Mega Wardrobe JeansOkay, pls :
1) Carefully follow the steps in the attached Screenshots 1 ~ 7.
2) Extract the "data" folder in the attached Open Fly Morph.zip file to your Daz Library where you've installed this product.
3) Load the Jeans, dial Open Fly morph to check, Screenshot 8.
Bluejaunte appreciationFirst off, I really liked the those last three releases, June, Isolde and now Cynthia are some of my favorite characters for Genesis 9. Especially the first two really add a lot to the overall variety of Genesis 9 shapes.
That being said, after installing and loading up Cynthia I did stumble a bit over she shape of her chest. I am attaching two images of what she looks like, when I render her in my version of DS (second picture has the 'Nipples Feminine HD' morph dialed in).
Maybe I am just seeing things, but the shape of her breasts looks noticably different from the promo shots in the shop (especially the last three) - although, on second viewing, the promo shots themselves look kind of different from one another.
Is this just me, or is anyone else seeing this?
I am using an older version of DS (4.15.0.2 to be precise), so that might be the reason, although I am not sure if that could even in theory cause something like this.
Anyway, I don't really mind one way or the other, but if this is a bug of some kind, I felt I should point it out

*Edit*: replaced the original pictures with screenshots from 'Smooth Shaded' mode. Added a screenshot that shows the relevant section of the 'Currently Used' window.
Create or transfer "Open Fly" morph for G8 Male Mega Wardrobe Jeanscrosswind said:
Anxious3102 said:
crosswind said:
They have different geometry and vertex positions... even if you transferred Morph Targets by using Transfer Utility from Boxers to Jeans, it wouldn't work. (ss 1)
If making it with dFormer or Mesh Grabber... it'll be cumbersome and you might not get good result as there's no capability of Mask, Smooth, Crease etc. while using these tools in DS.
So better make it in Blender or other sculpting software that you know... (ss 2 ~ 3)
Damn I wish I knew blender because that shot 3 is exactly what I need lol
I could've attached this morph for you, however, there's a defect on the Jeans which is an unused vertex. I had to remove it but then saving the figure asset has to be a must before saving the delta morph asset. I'm not allowed to give you the modified figure asset according to Daz License Agreement...
So if you need this morph I made, you have to first of all correct this Jeans figure yourself then resave the figure asset. If you know how to do it, let me know after you have it done, then I can post you the DSF file. If you don't know how to do it, also let me know. I can show you how to...
I don't know how to do it unfortunately
Create or transfer "Open Fly" morph for G8 Male Mega Wardrobe JeansAnxious3102 said:
crosswind said:
They have different geometry and vertex positions... even if you transferred Morph Targets by using Transfer Utility from Boxers to Jeans, it wouldn't work. (ss 1)
If making it with dFormer or Mesh Grabber... it'll be cumbersome and you might not get good result as there's no capability of Mask, Smooth, Crease etc. while using these tools in DS.
So better make it in Blender or other sculpting software that you know... (ss 2 ~ 3)
Damn I wish I knew blender because that shot 3 is exactly what I need lol
I could've attached this morph for you, however, there's a defect on the Jeans which is an unused vertex. I had to remove it but then saving the figure asset has to be a must before saving the delta morph asset. I'm not allowed to give you the modified figure asset according to Daz License Agreement...
So if you need this morph I made, you have to first of all correct this Jeans figure yourself then resave the figure asset. If you know how to do it, let me know after you have it done, then I can post you the DSF file. If you don't know how to do it, also let me know. I can show you how to...
Create or transfer "Open Fly" morph for G8 Male Mega Wardrobe Jeanscrosswind said:
They have different geometry and vertex positions... even if you transferred Morph Targets by using Transfer Utility from Boxers to Jeans, it wouldn't work. (ss 1)
If making it with dFormer or Mesh Grabber... it'll be cumbersome and you might not get good result as there's no capability of Mask, Smooth, Crease etc. while using these tools in DS.
So better make it in Blender or other sculpting software that you know... (ss 2 ~ 3)
Damn I wish I knew blender because that shot 3 is exactly what I need lol
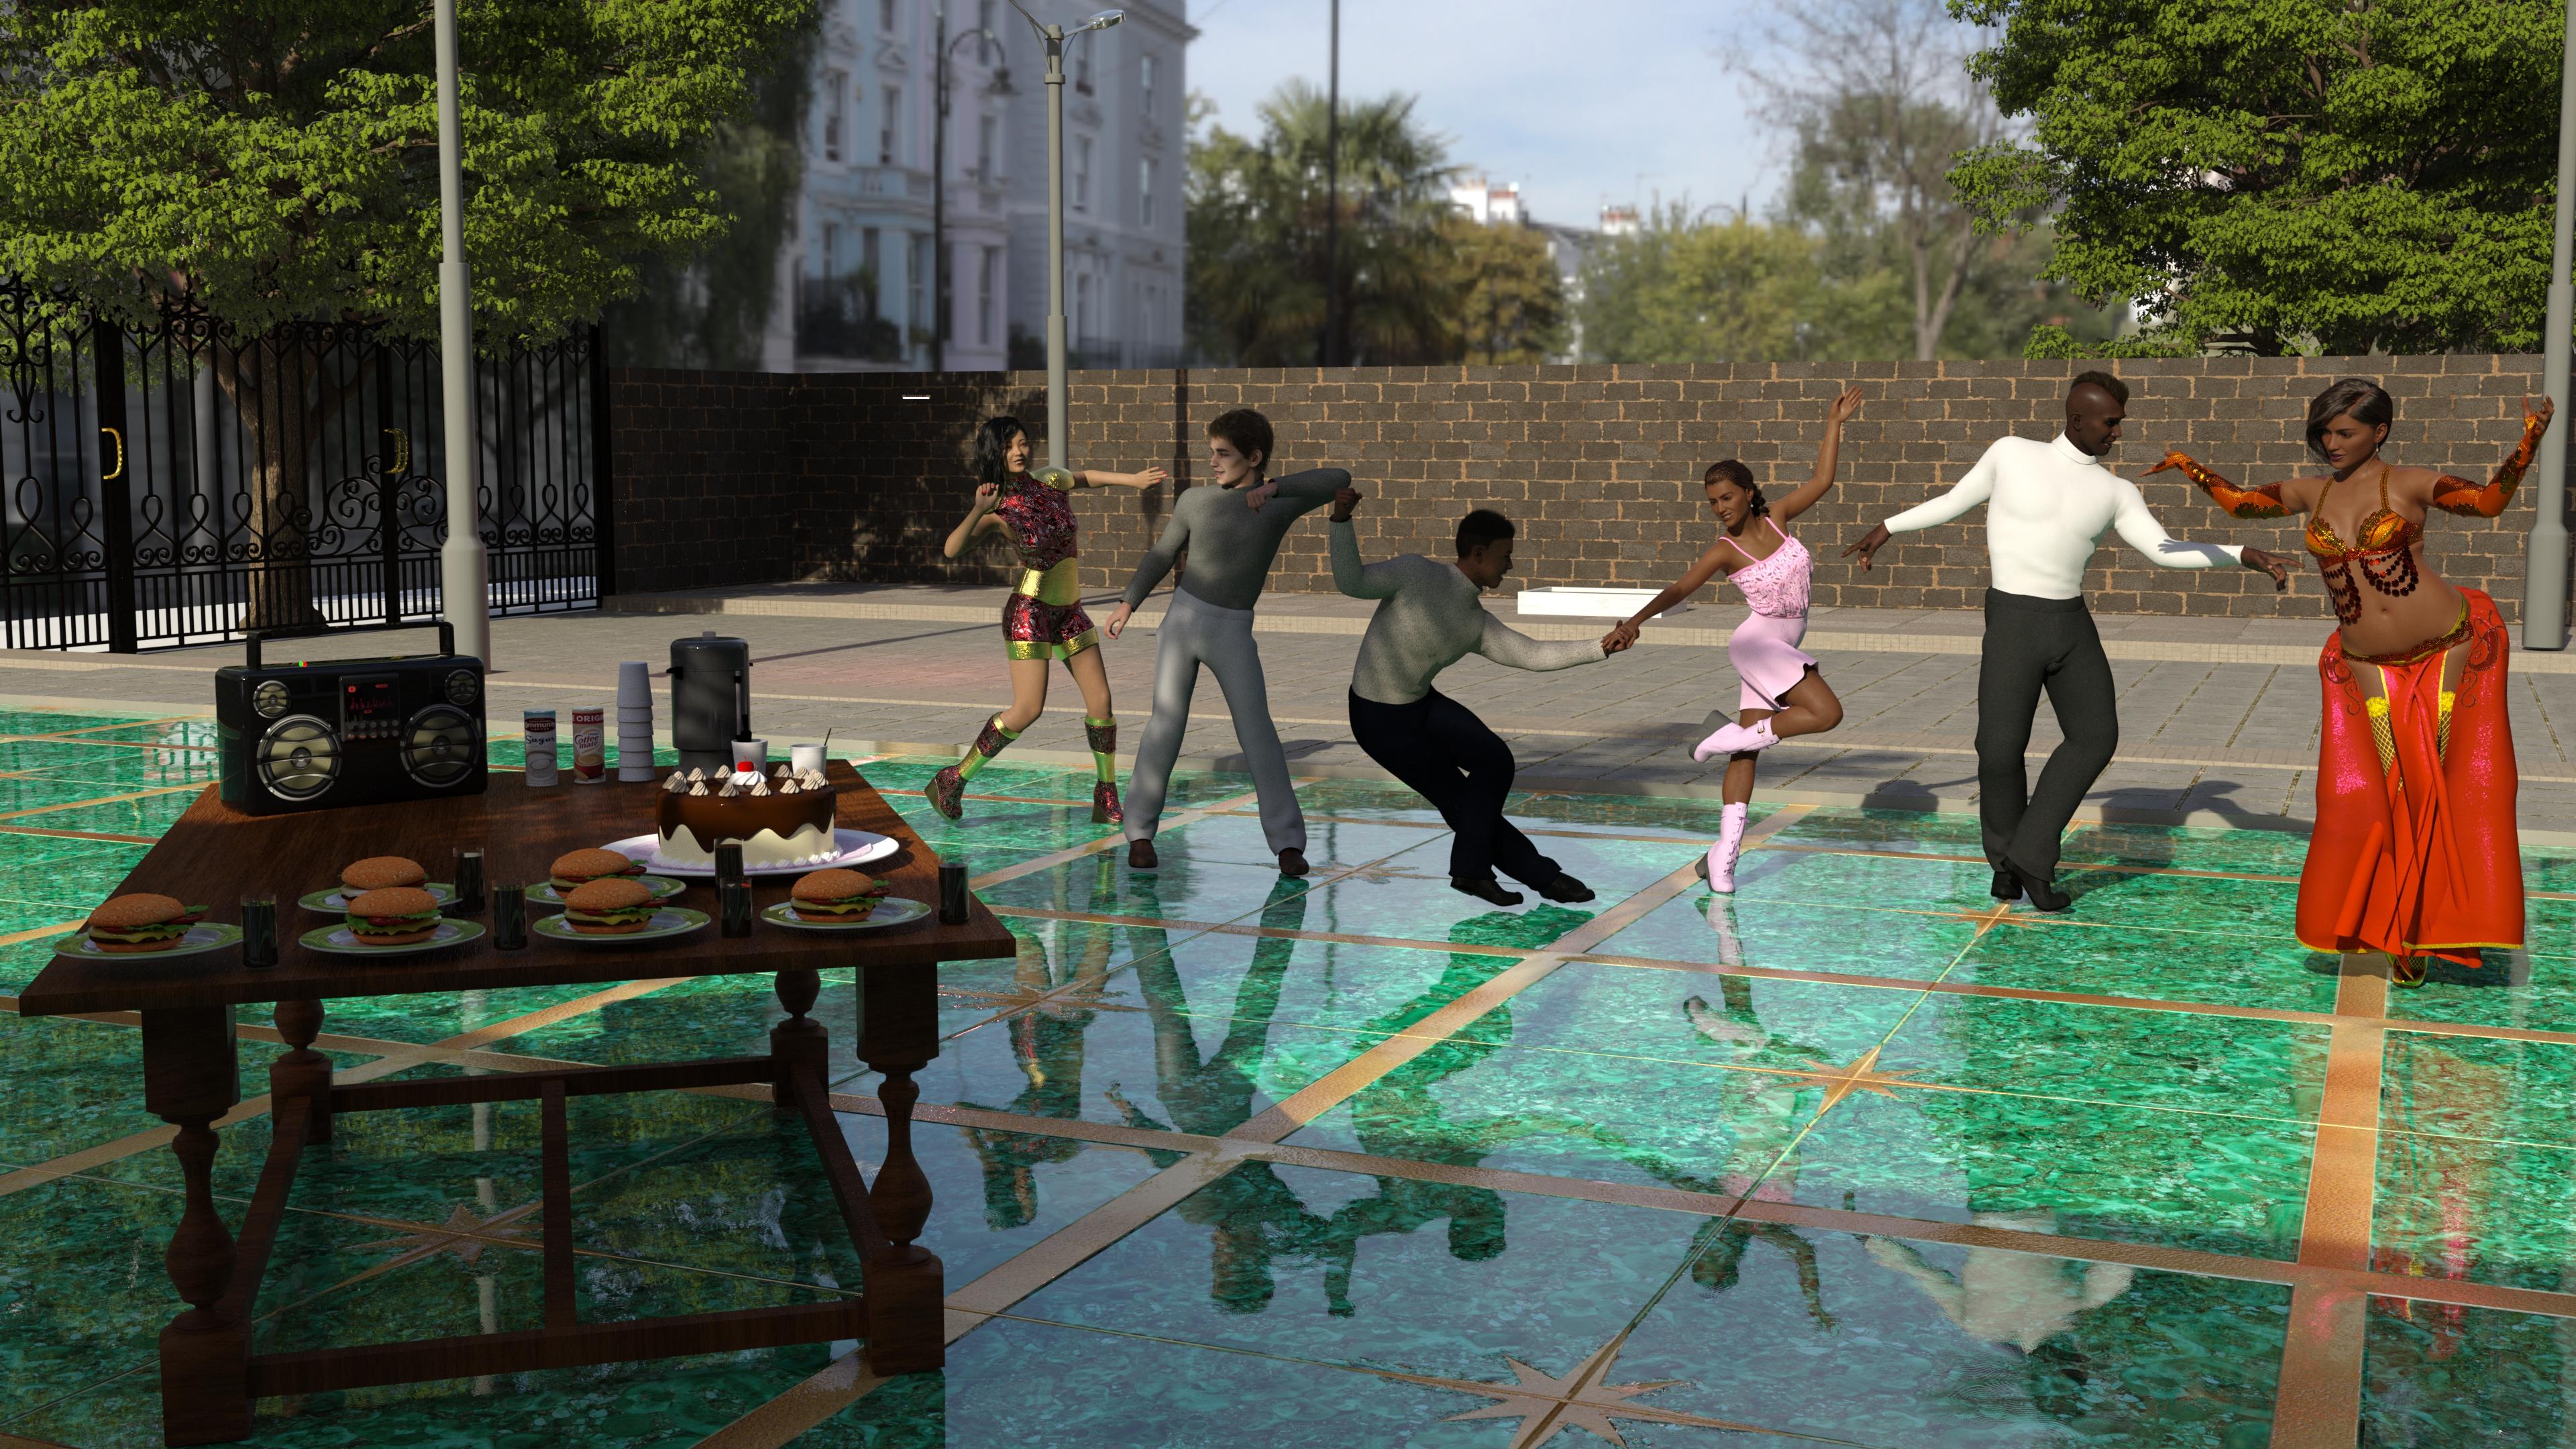
Freebie Challenge July-August 2024 - "Take a Break" - Entries ThreadSix friends work in different business areas, have gathered together on the weekend and started the conversation.
- The office sucks, I have to attend the customers calls, deal carefully with any complaints and give some advice for the services the company provide.
- I am in the same situation like you, I have to go and drink a coffee cup to stay well after too much pressure in the office.
- I am operating a computer, I have to wrestle with lots of information using the spreadsheets, looking for some trends with the charts and dealing with the invoices
- How about the forms entry into a Database, isn’t that too tough?
- Word processing, Desktop publishing and creating PDF documents are taking a toll on me
- My job demands me to deal with some computer components acquisitions and upgrades
- Stop complaining, Take a break, let’s party!
- Yeah, hurrah! Lets do that now!
Items used for the Freebie Challenge July-August 2024 - "Take a Break"
Free Items:
Zhi - Beautiful Chinese Female Character Morph by warloc (G8F)
https://www.renderhub.com/warloc/zhi-beautiful-chinese-female-full-character-morph
G8 Female Sifi Outfit (Simple) by Moonlight001
https://www.renderosity.com/freestuff/items/77682/g8-female-sifi-outfit-simple
Meena For Genesis 8 Female by zaap
https://www.renderhub.com/zaap/meena-for-genesis-8-female
Side Swept ROse Hair (G3F , G8F) Part 1 and 2 by zoro_d
https://www.renderosity.com/freestuff/items/79533/side-swept-rose-hair-g3f-g8f-part-1
https://www.renderosity.com/freestuff/items/79534/side-swept-rose-hair-g3f-g8f-part-2
dForce_Belly Dance Nights Outfit for Genesis 8 Female(s) by zoro_d
Pretty Look for Genesis 8 Female(s) by zoro_d
https://www.renderosity.com/freestuff/items/83823/pretty-look-for-genesis-8-females
Mukta For Genesis 8 Female by zaap
https://www.renderhub.com/zaap/mukta-for-genesis-8-female
Candy Braids Hair for Genesis 8 Female(s) by zoro_d
https://www.renderosity.com/freestuff/items/88062/candy-braids-hair-for-genesis-8-females
(dForce) Nisia's Romper for Genesis 3 and 8 Female by freylaverse
https://www.renderosity.com/freestuff/items/92846/dforce-nisias-romper-for-genesis-3-and-8-female
Leather Boots for G8F by yomiuri
https://sharecg.com/v/94464/gallery/21/DAZ-Studio/Leather-Boots-for-G8F
G8M Walther 2.0 DAZ Studio by Ruslanomar
https://sharecg.com/v/97276/view/21/DAZ-Studio/G8M-Walther-2.0
New Walther 2.0 tanned skin + hair system for G8M by Ruslanomar
https://sharecg.com/v/98463/browse/21/DAZ-Studio/New-Walther-2.0-tanned-skin-%2B-hair-system#cmntL2
Update package for G8M Walther 2.0 by Ruslanomar
https://sharecg.com/v/99012/browse/21/DAZ-Studio/Update-package-for-G8M-Walther-2.0
Scottish Captain Model for Genesis 9 Male by KuraiKya (Mohawk Hair)
https://www.renderhub.com/kuraikya/scottish-captain
Fast Food Set by kalhh
https://www.renderhub.com/kalhh/hamburger-set-for-dazstudio-free
Delicious Cake Prop by Teknology3d
https://www.renderhub.com/teknology3d/delicious-cake-ds-prop
Coffee Urn Set by Richabri
https://www.renderosity.com/freestuff/items/92571/coffee-urn-set
Ghettoblaster by kalhh
https://www.renderhub.com/kalhh/ghettoblaster-for-dazstudio-free
Camilla Table by BoBo3D
https://www.renderhub.com/bobo3d/camilla-table
GTX-Luxury Area by GraphistX
https://www.renderhub.com/graphistx/luxury-area
Urban Street 04 HDRi by Andreas Mischok
https://polyhaven.com/a/urban_street_04
No Count Items:
(*) Esha Small Earrings for Genesis 8 Female and Genesis 9
Obtained free on 2022-12-05 Daz Christmas Freebie
(**) M3D Versatile Short Hair for Genesis 9, 8, and 8.1 Males
Obtained free on 2023-12-31 Daz Christmas Freebie
(*) (**) These items are no longer available
Genesis 8 Starter Essentials
Base figure (Female) used
Fabrice for Genesis 9 Character Preset
Matt for Genesis 9 Character Preset
Included in Genesis 9 Starter Essentials
Paid items:
Chameleon ROse for Genesis 8 Female by zoro_d (Lingerie panty only)
https://www.renderosity.com/marketplace/products/126597/chameleon-rose-for-genesis-8-female
dForce Soho Swag Clothing Set for Genesis 8 Males
Part of “Blast From the Past Bundle”
https://www.daz3d.com/blast-from-the-past-bundle
Belly Dancer Poses for Genesis 8 Female
https://www.daz3d.com/belly-dancer-poses-for-genesis-8-female
Z Ultimate Dance Collection - Poses and Partials for Genesis 3 and 8
https://www.daz3d.com/z-ultimate-dance-collection--poses-and-partials-for-genesis-3-and-8
Genesis 3 and 8 to 9 Pose Converter
https://www.daz3d.com/genesis-3-and-8-to-9-pose-converter
No post work done with any Graphics Software

 Face and morph swap after I reload a save
Richard is making an important distinction between name and label. We suspect that you are confusing the two. The label is the thing that a user sees when selecting and applying a morph, but the important thing for distinguishing different morphs is the internal name that is assigned to the morph. You can see the name by selecting the morph by label in the Parameters pane, and clicking the gear icon. It will show you both the label and the morph. If you do that for both morphs with the same label, you can see whether they also have the same name.
Face and morph swap after I reload a saveSo, for instance, you can see there're two or even more Head / Body morph properties in Parameters pane when filtering by "andromeda" ?
Create or transfer "Open Fly" morph for G8 Male Mega Wardrobe JeansThey have different geometry and vertex positions... even if you transferred Morph Targets by using Transfer Utility from Boxers to Jeans, it wouldn't work. (ss 1)
If making it with dFormer or Mesh Grabber... it'll be cumbersome and you might not get good result as there's no capability of Mask, Smooth, Crease etc. while using these tools in DS.
So better make it in Blender or other sculpting software that you know... (ss 2 ~ 3)
Create or transfer "Open Fly" morph for G8 Male Mega Wardrobe JeansIf the mesh isn't welded, then you can create your own morph.
But you can not copy it from somewhere else. In theori you might be able to do it as a projected morph if the mesh is very similar in the source, but I wouldn't try on that.
You can in DS use Dformer or mesh grabber, but I would go for a modeller, and then import as a morph.
Create or transfer "Open Fly" morph for G8 Male Mega Wardrobe Jeansfelis said:
You can't open a mesh that is welded, as that would mean to rip the mesh, and then it is no longer a morph.
Those jeans are already capable of opening in the right location, as they have several open morphs themselves. But all of the existing morphs undo the top button and open them wide at the waistband before expanding down the zipper line
Daz 3D is part of

Connect
DAZ Productions, Inc.
7533 S Center View Ct #4664
West Jordan, UT 84084Licensing Agreement | Terms of Service | Privacy Policy | EULA
© 2026 Daz Productions Inc. All Rights Reserved.