-
HD does what?
So I think I am starting to understand. The concepts are still not completely clear to me. A Genesis figure is a mesh with about 16k vertices. That is the "base" mesh. The skin material is like wallpaper and can be a hi-res photo.The HD add-on is not just a hi-res photo of skin. It is a version of the mesh with up to few million vertices. This high polygon mesh is not used in place of the "base" mesh. All the morphing is done on the "base" mesh. After the morphing Daz Studios can perform Sub Division on the "base" mesh. The software creates new vertices between the existing ~16k vertices It guesses for those new vertices. So like upscaling a photograph, you add pixels (vertices) but not new detail. This is what the HD add-on is for. It is a morph that is applied after the Sub D process. It tweaks the position of those new vertices to add a layer of textural detail (wrinkles, pores, etc.)?
So base mesh --> morph --> Sub D --> HD morph?
Alexandra 8I'm working on a few renders now and I have to say, really liking Alexandra. The skin is lovely and the body is not as perfect as I thought. In other words, like someone else stated above, she looks like an ex-supermodel who is a vegan and into yoga trying to keep up with the young girls but gravity and age are still making their marks. I'm sure if I wanted to make her less slim and less in shape I could. Good job on this one, not bad at all
I think if it was possible to use Singular Blues morph transfer script of Bethany 7 to G8F that would be a good average body to use with Alexandra, or any of the other G8F characters whose faces aren't too rawboned.
Aluminium Storefront DoorAny chance of a morph or two to change the size of the glass window section? Lots of these kinds of doors have only a small window around head height, or only the upper half of the door is glass. Would make it much more flexible as a prop.
Export DAZ Studio 4.10 G3F + Morphs as Shapekeys to Blender 2.79Exporting as FBX works, if the geometry is merged to the main genesis figure. Sometimes you will get very weird results, so you have to follow this method, it could take a few hours depending on how much morphs you want to export (it took me 30 minutes to export 20 - 30 morphs).
You are going to need Blender 2.78c installed (I haven't used another version), read the documentation how to set it up and export from Daz to Blender (only the 1-5 chapters) - http://diffeomorphic.blogspot.bg/p/daz-importer-version-12.html
After you are done you should know how to export the basic daz file (by saving the scene and then exporting the json file in the same folder where the scene was saved). You export the object + the .json file in a "rest" state and import that into blender. Now you go back to Daz and select one morph you want to use for your animations, for example "bend" and set the value to 100%, export the object in another folder and import that in Blender (where you had the same object in rest state), you are going to have 2 objects in the scene, select the mesh of the one where its using the morphs, hold down shift and select the mesh of the second one, then you have to find the Shapekeys menu and click the little arrow then Join as Shapes, now you delete the morphed object and rename the new shape, if you drag the value from 0 - 1, you will see it actually blending between the two morphs. Repeat that for every morph you want.
If you have a morph that has a negative value like -100 and goes up to +100, I'd split that into 2 different morphs. -100 <-> 0 (left) and 0 <-> +100.
Morphs from G3 to G8Adding details to the posts above:
1) Make sure you have downloaded the latest script from Singular Blues (check his signature).
2) Start Studio.
3) Check your content manager directory (right click on smart content and click on content manager directory...) and make sure you have your main "My Daz 3D Library" path at the very top of the list.
4) Load Genesis 3 Female. Don't move her, don't shape her, don't put clothes on her.
5) Mark a morph(s) as favorite by clicking the heart symbol. Don't dial anything in.
6) Run the script prototype verbose (this is just in case the script doesn't work).
7) Load Genesis 8 Female. Again, don't move her.
8) Deselect both figures.
9) Click to select Genesis 3 Female (source) then Ctrl click to also select Genesis 8 Female (transfer to).
10) Run the script prototype. If it's unsuccessful (errors out), save the log and share it here.
11) Otherwise, a tab should open showing the transfer. (It may only open for a second or so, depending on how many morphs you selected as favorite).
12) Delete both figures.
13) Restart Studio.
14) Load Genesis 8 Female to check if the morphs are there.
Applying a full body morph to only half of the bodyI dont think DAZ does this natively, there might be hidden submorphs for Voluptious that you could dial in the lower body only save the morphed figue as an object and reimport the resulting object as a Morph. To unhide a parameter I believe the method still is, at the top of the parameters tab click the context menu icon (looks like several horizontal lines) and select "Show Hidden Properties". From there you should be able to find it and unhide it (and turn hidden properties back off). (Im not home just now so I can check Vmorph for hidden morphs; but alot of morphs you buy, or get are composites of other smaller regional morphs; so its well worth checking. )
If there are no hidden submorphs, I think your best bet would be via Hexagon, the basic Idea would be to save the morphed Charactor as an Object Eliminate the upperhalf. I believe you could then paste a copy of the morphed Verties on a seperate unmorphed Genesis base Object. The reimport new integrated object as a morph. and create a new morph dial for your combined morph. While there is nothing Super complicated about this process it is fine work because you have to line up your Vertices exactly, if change the number or order, your morph will fail; but I believe it is something with a little care and a few trys you should be absolutely able to do.
https://www.youtube.com/watch?v=Q0DjpiRLHi0
https://www.renderosity.com/mod/forumpro/?thread_id=2855050
I strongly suggest you go over the study material above in order, I think each builds on the last nicely. BB.
sioc's lab@MN-150374 : mostly it's dial-up, some texture editor, a little L.I.E. a few custom morph done thru dform, or silo and injected thru obj as morph.
I did more texturing stuff lately.
Applying a full body morph to only half of the bodyJust to reformulate my question:
I want to create a morph that would equal applying the Voluptuous morph to only the lower body, while leaving the upper body un-affected (ie in its zero state).
Or, again, how can I apply the Voluptuous morph to a base character, and then zero the upper body in its original state.
How to replace default UVs?How did it ruin the model? Loading a new UV set would be the usual method. You could also try loading the new OBJ and using the Transfer Utility to rig it if you simply want to change the default.
(Free comission) what clothes do you want?No thanks, I see perfectly censored and still historic the way he did
is okay if the product have an extra morph uncensored, thats more right and useful
this how Alarconte managed to do some censorship, and I think works as historical

 Morphs from G3 to G8
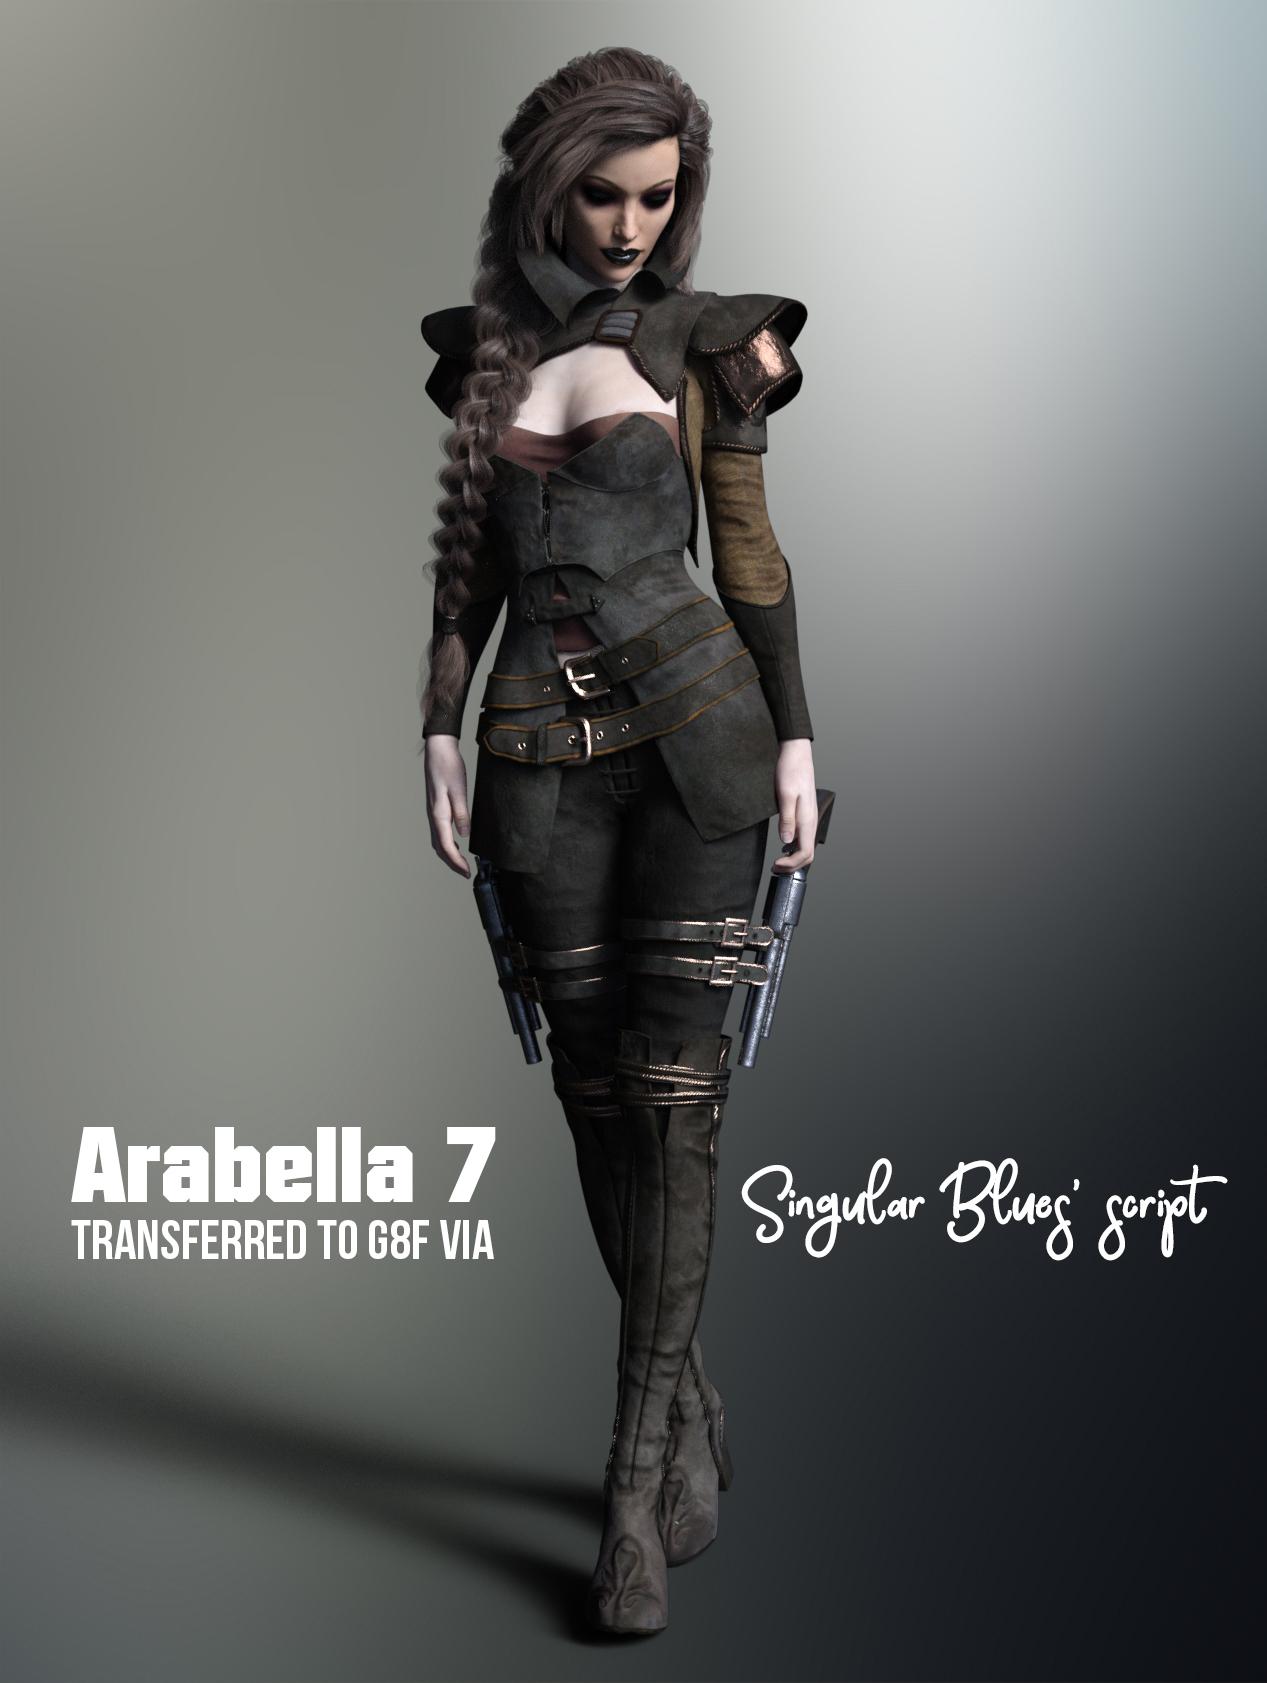
I can confirm I was able to successfully transfer Arabella7 to Genesis 8. Here's a quick render:
Okay, so it seems like a lot of people have gotten this script to work for them. So can someone give like a step by step sequence that could possibly garner the most successful results? Just some very basic steps because everyone system setup is different but similiar. I have tried this script a few times and I can't see the results, even if the log says it was successful.
- Load the source and target figures.
- Select the source figure.
- Locate the morph(s) you want to transfer in the paremeters tab. Mark them as favorite. You'll only need to mark one morph per product.
- Ctrl Select the target figure.
- Run PrototypeVerbose.dse
- Load a new copy of the target figure.
- Post logs in the even of failure.
That oughta do it.
Everyone's system is indeed different, but the script doesn't care, because most of the bits it does care about are always the same. If those bits did change, Studio wouldn't work. But there is one bit that is very important to the script. Where it is installed. The script expects to be installed in the first library listed in the Content Directory Manager under DAZ Studi Content. If it is not there, it won't work because it won't be able to find the data it needs.
Copying the script from one library to another will not resolve this. This was the point behind the statement in the post that it has to be installed correct. The script and its support files must be in the first library.
Other than that, I can't think of any reason it wouldn't work on something. Which is why posting logs is important.Morphs from G3 to G8I can confirm I was able to successfully transfer Arabella7 to Genesis 8. Here's a quick render:
Okay, so it seems like a lot of people have gotten this script to work for them. So can someone give like a step by step sequence that could possibly garner the most successful results? Just some very basic steps because everyone system setup is different but similiar. I have tried this script a few times and I can't see the results, even if the log says it was successful.
I am quite new to the script, I only tried it last week for the first time. After some assistance from the helpful people in this thread here are the steps I now follow successfully. This is to transfer basic shape morphs etc.
1) Start Studio
2) Load Genesis 3 Female
3) Favourite a morph e.g. Gia 7 head morph by clicking on the heart symbol next to the name (under actor-head-people)
3) Load Genesis 8 Female
4) Deselect both figures
5) Click to select Genesis 3 Female then Ctrl click to also select Genesis 8 Female
6) Run the script, always have the latest one
6) A tab opens showing the transfer
7) Delete both figures and restart Studio
8) Load Genesis 8 Female and the morphs are there
Easiest way to rig a new character@ JonSea31
This is quiet easy just parent the prop that should become a conforming figure, like clothes to the right place on the conformer figure aka base mesh of some Genesis figure (conforming figures are the ones that you can 'fit to' the characters and will follow morph shapes by autogenerating them on the fly - this is basicly the same as using the transfer ulility to do this job). For a conforming figure like Hair it would be the head and for clothes in common it would be the hip. Next use the 'Convert Prop to Figure' action and check the option "Inherint Skeleton Of Parent". Once you get it - its so stupid easy that I have thougt of a little tutorial with a few sceenshots to show you how to create a simple cone primitive, place it on the head and create a conforming Cone_Hat for G2F. I will post the link to this tutorial here - as soon it is finished...

So, I'd like to ask, if I can parent certain clothing items, how do I parent a dress in order to conform?
Morphs from G3 to G8I can confirm I was able to successfully transfer Arabella7 to Genesis 8. Here's a quick render:
Okay, so it seems like a lot of people have gotten this script to work for them. So can someone give like a step by step sequence that could possibly garner the most successful results? Just some very basic steps because everyone system setup is different but similiar. I have tried this script a few times and I can't see the results, even if the log says it was successful.
Lucas 8 replaces G8M [solved]i noticed something just now - no idea how long this has been going on, i hardly load G8M base by himself: whenever i want to load G8M or the dev version, the body/mesh is not the base, but that of Lucas 8. no clue why this happens, or if/when/how i did a wonky save at some point...
i first tried to re-save the asset after resetting the morph dials showing Lucas body/head/scale to the normal values 0% and 100% (scale). as i reloaded G8M base again, Lucas was back.
so i went to DIM, deinstalled the G8M starter essentials and reinstalled them again. same thing happens - Lucas 8 appears. urgh. love the guy, but i can't get rid of him :/
and it happens wherever i click the G8M icon, be it smart panel or content/people, just wanted to make sure.
not a big deal to turn the 3 dials down... but i'd like my start G8M neutral if possible... and maybe an explanation why this happens.btw, using 4.10 public beta (mostly when i want to use G8, and also better iray) - i don't want to install 4.10 normal version, i can't use dForce anyways, and some lights like AoA etc still work in 4.9 only, so i run both versions. i mention this, but i don't see how this would influence my issue above anyways...
Morphs from G3 to G8My bad! I thought the face morphs I had for Toon Generations 2 were part of the original package (like with Star 2) but it turns out they were a separate product. Completely disregard anything to do with this, sorry about the mix-up.
Regarding projection morphs, I see the success with Poke-away 2 is not generalized (Sickleyield's Decrackifier didn't transfer, exactly in the way you've explained), though Poke-away 2 remains a strange case: while it is true that it relies on turning auto-follow off for the inward morphs (that is, pulling the skin away from the fitted objects) it seems to have a working projection component (pushing the fitted object away without modifying the figure's mesh, which works when transferred). As both of those behaviors are regulated by the same dial, maybe it is made in such a way that bypasses the scripts inbuilt "don't transfer weird stuff" protocols?
And good luck with the nails' issues when you decide it's time to tackle it. I too know the siren call of "interesting new things" when working on long projects (though, in my case, the sirens don't need to work that hard...).
How about different flavours of (insert character name & generation here) Pro Bundles?The latest addition to the DAZ lineup, Alexandra 8, looks fine. A refreshing change from the usual run of vapid young things, but...
I haven't the slightest interest in elf ears, Olympian goddesses, or warrior queens, so a fair chunk of the present offering would be a complete waste of money for me. Now if there was an "Alexandra Pro Contemporary Bundle", I'd be tempted to pick it up, just as others might jump at an "Alexandra Pro Fantasy" or "Pro Sci-Fi" bundle. The same is true of V8 and any number of other pro bundles. I'll never use V7's so-called Post Apocalyptic outfit, or the Austrani outfit, but I've got them anyway.
With all the bundles already for sale, how hard could it be to offer them in different flavours? (I'm asking; I don't pretend to know.) Even if took a fair bit of extra work, I suspect sales would increase because customers would then have a choice based on their present interests.
While the elf ears may be a turn off for you, they are simply an option. As a character maker, we will usually make ears as an option that you can turn on and off. Plus we usually provide non-fantasy options in the makeup/nails area. We understand that fantasy doesn't work for everyone.
I did see a bunch of contemporary pieces available for Alexandra, I hope you seek those out and enjoy her mature beauty.
@Lyoness, the shaping control to remove the elf ears (Briallen 00d Elven Ears REM) does not work after loading the Briallen figure (Briallen HD). The shaping control to remove the Briallen head shape (Briallen 00b Head REM) and the Briallen body shape (Briallen 00c Body REM) do not work either. I don't think the nails, navel, and eyelash remove controls work either. Only Briallen 00a full body REM works. When I load the Briallen figure, all those load up and I can't get rid of them with the controls you provided
The individual REM controls only seem to work if the individual Apply controls were used on a base G8F first.
Can you please fix this? I will submit a help request.
If you load the character preset figure, the presets cannot be removed via the "off" presets. Those only work if you are loading through the morph presets.
To undo the ears, go to "currently used" and slide the dial down.
dForce, dWeight and dWardrobe. Chronicles of...To date, everything I've written about here has been with older products that weren't made specifically for dForce. But not today.
Kindred Arts released one of the neatest products I've seen, and I was delighted for the opportunity to beta test it. The Ultimate dForce Bed consists of a set of frames that all work with an included pillow and mattress object. And of course, the dForce duvet. This product is as close to push-button as it gets, especially if you load one of the presets. Load a preset, push the Simulate button and moments later there's a nice duvet draping across the bed. For some people, that will be enough. For some renders that will be enough. But there are going to be times when the scene calls for something a bit more creative, and the dForce duvet delivers.
I recently used the Duvet on the Medieval Bed that comes with the MICK Bedroom set. The Royal Bedchamber came first, a scene featuring the shape "square" for Llola Lane's 2018 monthly challenge. I planned from the beginning to have a cat sleeping on the bed much like my own cat does, so I needed a "hollow" on the bed, a place where the cat snuggles into the bedding, rather than laying on top. To make that hollow, I used a cylinder primitive during the simulation, (and used the Timeline, not Current Frame.) I tried to recreate it for this post, and discovered there was another element in play. I got all those wonderful folds because, it turns out, I started with the bed at 150% scale, and ended the simulation with the bed at 100%. I still needed the cylinder for the void, but it was the bed getting smaller during the simulation that pulled the covers up and around the cylnder, as well as adding several wrinkles elsewhere on the bed. Here's the finished result of my recreation, using just the UDB product.
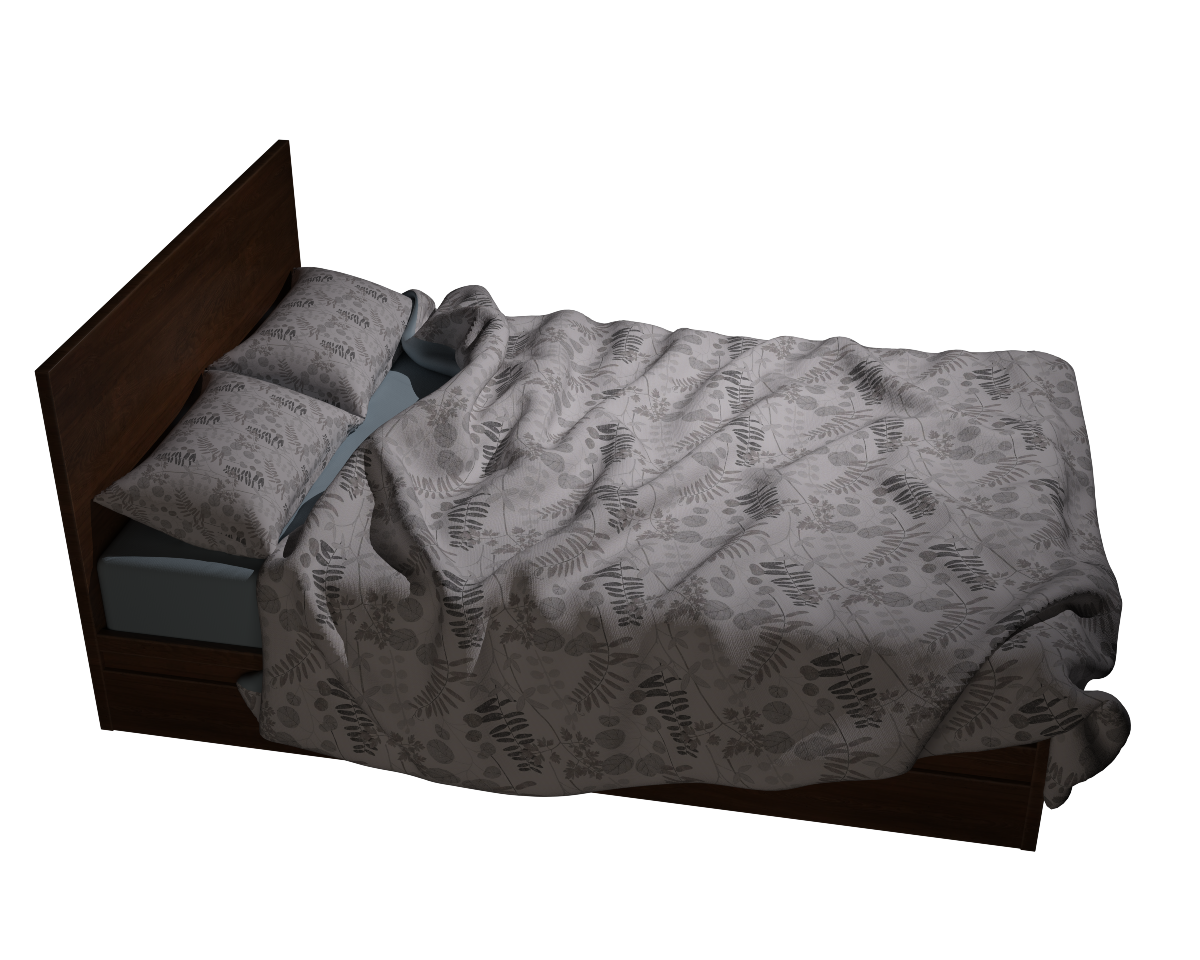
After the simulation was complete, I moved the duvet up slightly using Y Translate, and applied just enough of the Expand morphs to remove any poke through of the bed or the underside of the duvet. I like to combine some of both morphs, one expands just the top of the duvet and the other expands both up and down.The more Expand morph applied the thicker the duvet seems.
Here are some viewport captures to illustrate what goes on during the simulation. (Each image links to its larger counterpart, and opens in a new window.)
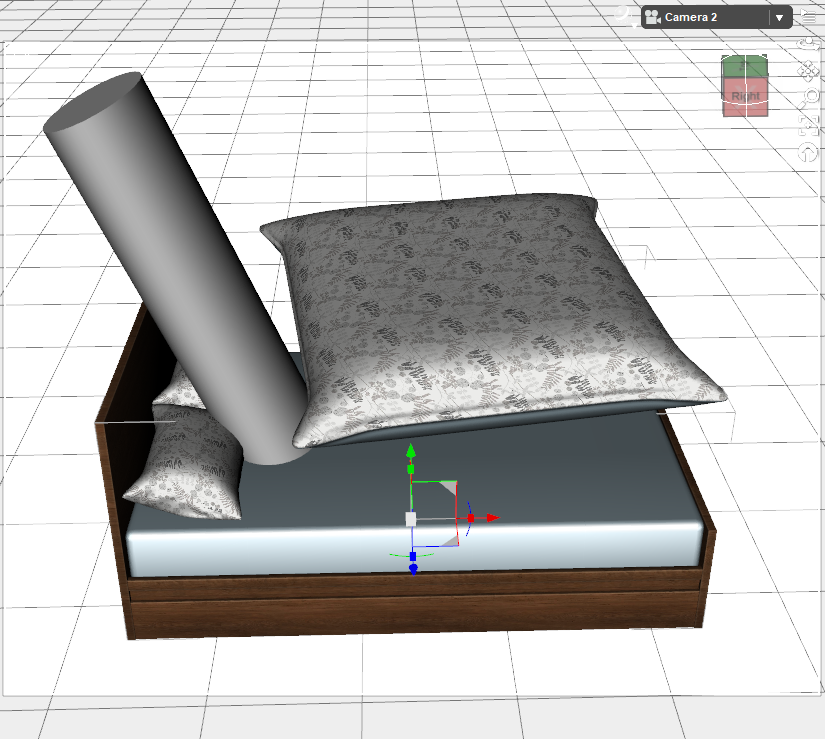
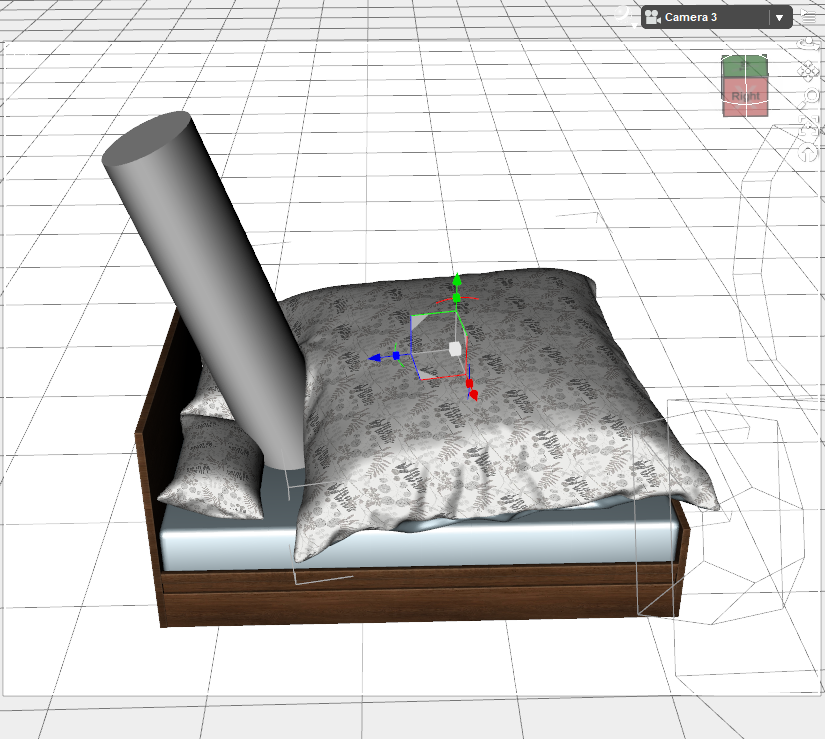
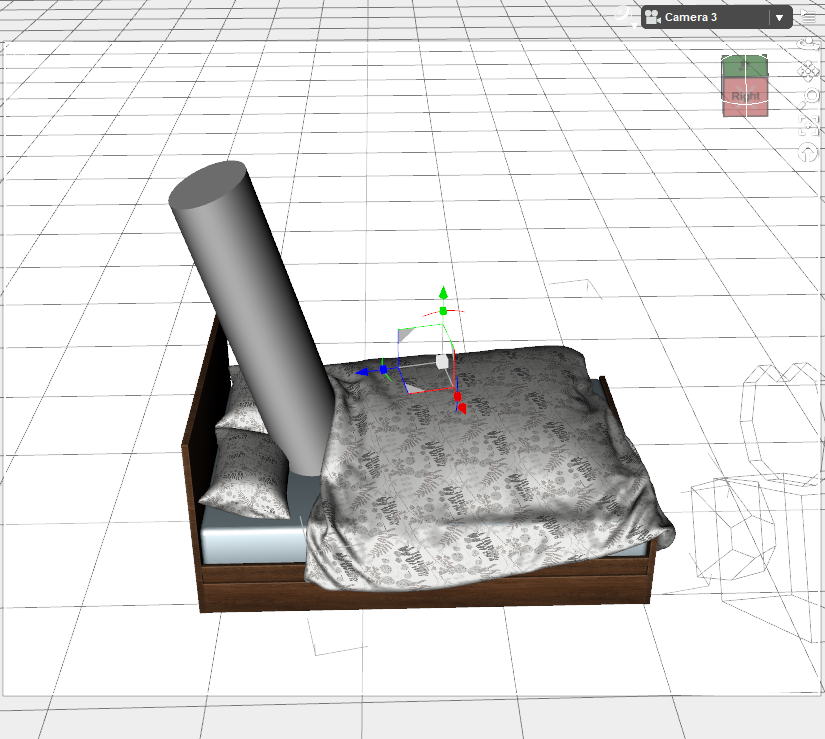
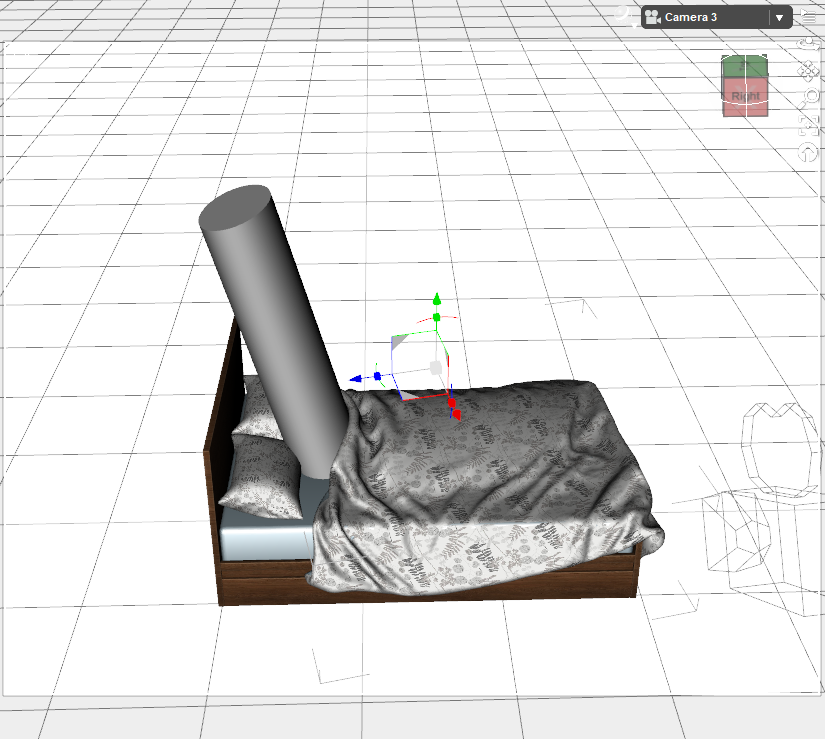
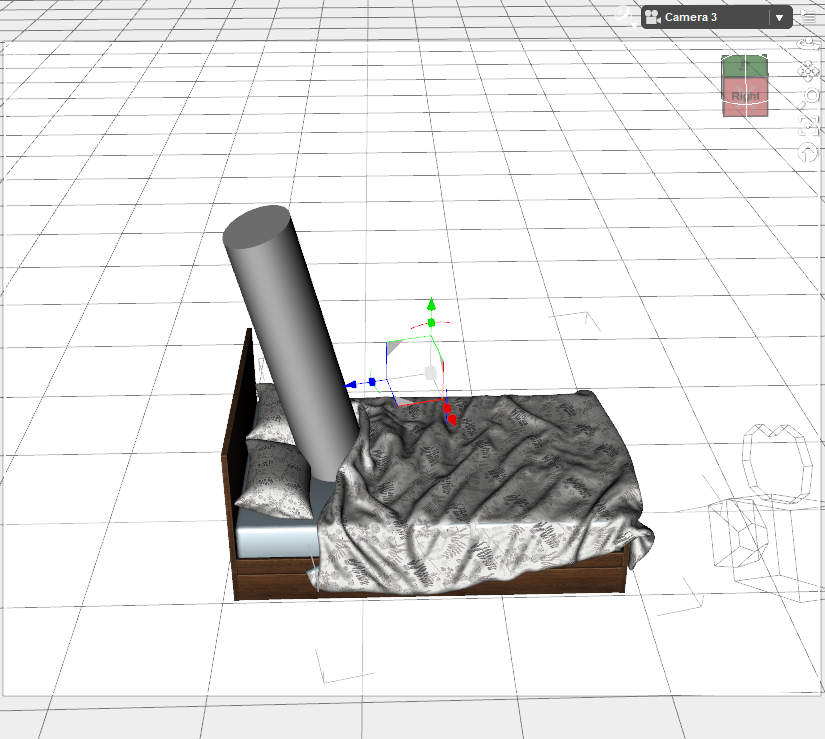
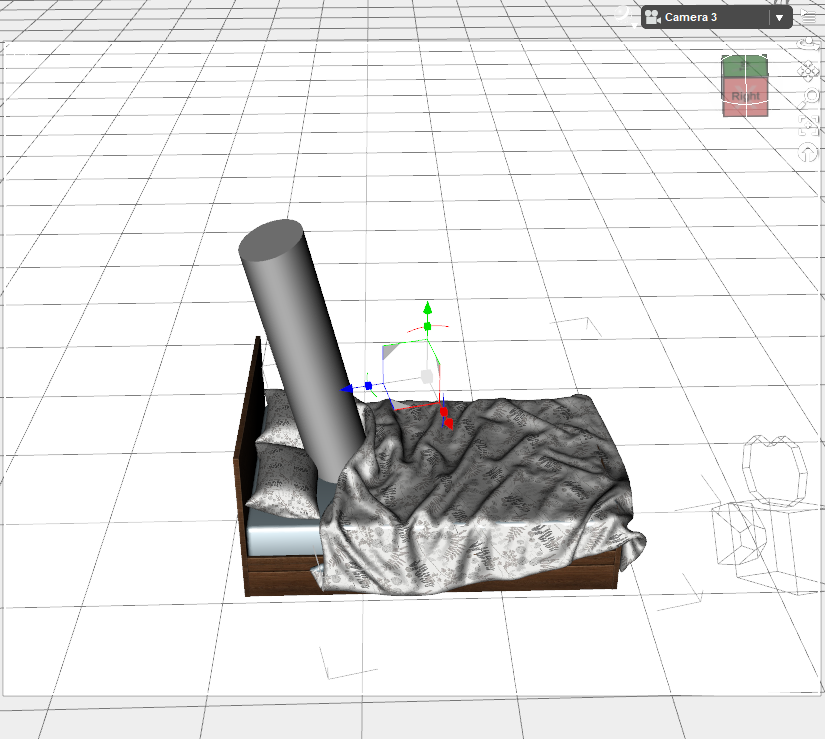
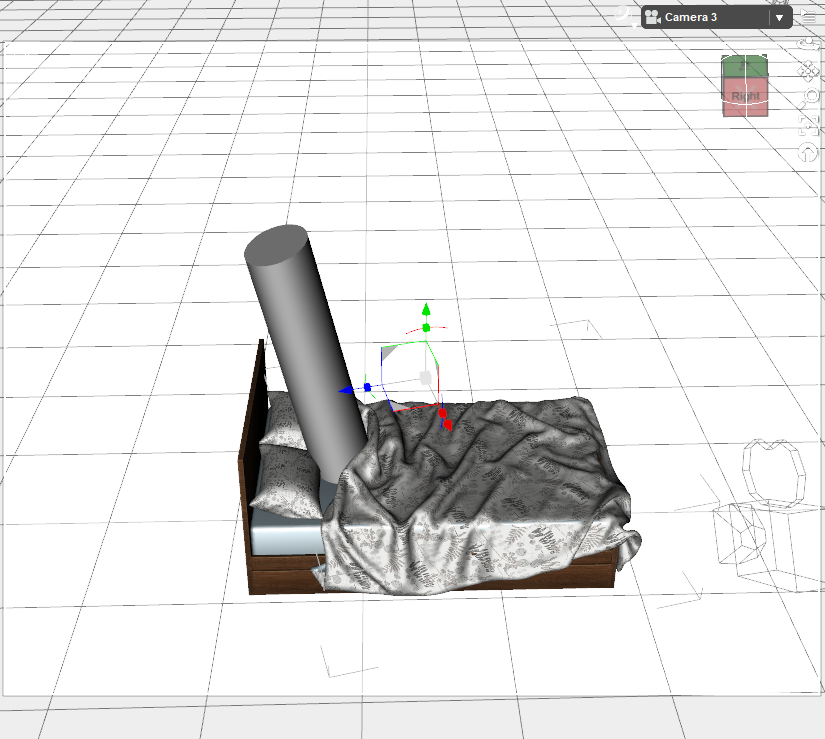
In The Royal Bedchamber, I used the Hivewire House Cat, with the free LAMH preset for long hair from Saiyaness, and had the cat sleeping on the bed. Because the scene was specifically for Llola's challenge and needed the squares to qualify, I used a long shot, but the cat was hardly recognizable. I used a pure white cat, and yet one of the comments on the gallery page suggested the cat would be more obvious "with a red or a white fur." This is because the lighting never reached the cat directly.
Now Newman, my own white, fluffy cat, all but glows in the dark. He "hides" at night, thinking we can't see him, yet that white fur catches even the faintest of light and reflects it nearly as bright as the moon. It's really quite funny to watch him. Anyway, I knew I needed more light on the cat, but with the long shot, it would look odd. So I did a second shot with another camera, added a couple of ghost lights to brighten the area under the canopy a bit, and put a bit more light on the mouse as well. (The mouse was not in the original shot.) The duvet was perfect for the close up, but the rest of the bed was not.
The MICK line of products wasn't created for closeups, and the furniture and other props are relatively low poly. At a distance, there's no problem, but up close, the pillows really showed the lines of the polys. To solve that issue, I applied SubD to the bed. The results were pretty humorous, but I only did a spot render of the pillows, which came out really nice and smooth in high resolution and subD of 3.
For a closer look at the pillows, as well as the folds of the duvet around the void made by the cylinder, check out The Royal Mouser in my gallery.
How to bend a girder...The Transfer utility won't work on legacy rigging. It won't work well on items that don't match the placement in space between source and target, nor where the mesh boundaries on the target don't match the boen centres on the source. Wouldn't this work, mesh resolution permitting, with a dForm?
Okay... I'll bite. How's a dForm going to work like a bending tube? :)
Morphs from G3 to G8Thanks for your promptness. I tried it with the new script (log included) and, while the problems with the nails were the same and Toon Generations 2 only loaded the four previously mentioned properties, otherwise the results were much improved: Toon Generations 2 scale and posture switch worked as intended and poke-away (a hybrid of morph and projection morph) not only transferred but worked (so, a new functionality for the script, and a much needed one--seriously, projection morphs are a must when not using dynamic clothing).
Some of the toon generations 2 morphs did not load? According to the log, everything was done correctly, which (assuming it did not work as expected) implies something should be done and isn't being done. This part of the script is a bit of a juggling act, so that's one possibility, but I think I've nailed all that down, as the main problem was the script including a somewhat invisible assumption about where things would be that laughably wrong in a rather silly way. But it was also a straight forward fix.
If something is being written wrong, I would expect it is happening at a different level of the process. A log of the figure load would be helful here, as Studio is not entirely terrible about logging load problems. You just have understand what causes those issues to begin with to know what it's saying.
About the projection morph thing ... Projection morphs work the way they do because of a combination of factors. The factors being the file name and location. If a morph has the correct naming and is saved in the right place, it will not affect the figure if dialed in but will affect the figure that the base figure has fit to it.
Pokeaway, however, is not in that class of morphs. Poke away is just a standard set of morphs, but with autofollow turned of. Autofollow is projection, so when it is off, the morph is not projected into the fitted figure.
The old script did not care where the files it was pointed at lived. Because of this, it could, in theory, overwrite the target base figure with the source base figure. It was, in a word, dangerous. Thus all the warnings. The new script is dangerous because it's alpha and while it was written with safeguards against everything I was aware of, evidence above shows it didn't cover everything I wasn't aware of (natch). One of the safeguards in place is the script only works in the confines of the Morphs folder. Any other folder will cause it error out.
Projection morphs are not in the morphs folder. To be very specific about what's happening, the script is reading the projection morphs. Reading isn't an issue. It's not writing them to the Projection Morphs folder. My guess is, if you cut and pasted them out of the Morphs folder to the Projection Morphs folder, they would work. I might be wrong, as I've not looked too deeply into it. (If I am wrong, and it saving them to the projection morphs folder--the whole issue hinges around the word Morphs, so there's a way the script could end up writing there--I'd have to have a deep think about where it's going wrong.) However, my guess is it would work just on the basis of knowing how make projection morphs. As long as the morph is valid, has been properly named and is in the right folder, it will work correctly, and by your description of the original issue, the morphs should be all of those things but saved in the right place.
The obvious question is "why don't you take care of that?" Well, because it's a lot more complicated than it might sound, getting from A to B and making sure stuff is tidied up after. There are Studio limitations to work around.The nails are different issue that may or may not have a solution. I don't know if it does or not because testing it is going to involve a whole lot of work and making a lot of small changes to the script. Unfortunately, a bunch of small changes means many opportunities for things to break. So in addition to not wanting to deal with it because tedious, I really need to nail down as much of the other stuff as possible before I go much about it.
well done, singular!
the new version of the script just purred through that problematic morph set. the folder and file structure carried through perfectly, no duplicates or out-of-place anything. everything that was in the root folder transferred beautifully. the values are correct, and the morphs all work.
!
j
As I said, silly mistake on my part. Or rather, a bunch of clever things happening to make things work led to my being too confident in how clever it all was and overlooking something obvious.
Daz 3D is part of

Connect
DAZ Productions, Inc.
7533 S Center View Ct #4664
West Jordan, UT 84084Licensing Agreement | Terms of Service | Privacy Policy | EULA
© 2026 Daz Productions Inc. All Rights Reserved.