-
Edie 8
i see the 50% of Edie and someone else, but my mixes surely don;t seem to come out the same. they still look more like Edie.
I use several different morphs, a lot, so maybe they overpower Edie a bit, but 50% of her is definitely still there!
well 3 characters at 50% means Edie is 33% of the mix:)
Or 16.5% of the total look, technically, I think, since 50% of each applied morph is complimented by 50% G8F base.
Dynamic Clothing Control tutorial? (I can't figure out how to use it)Thank you FSM. Let me try your suggestion.
Meanwhile, I think I found a lenghty workaround for it. I exported the pants as an obj, then imported it and conformed to the figure using transfer utility and seem to have worked. The only problem now is the intersected parts of the pants have been exported as a joint mesh, so lower part morphs like a skirt. I guess I need to do some remodeling.
Edie 8So, Carrie58, did you use the transfer tools to move Toon Generations up to G8? Or move Edie down to G3?
Character Imperfectionatorhttps://www.daz3d.com/forums/discussion/241981/asymmetry-in-character-critique-requested#latest
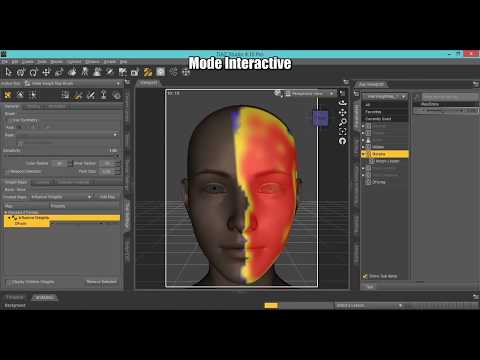
This product can create differences using the weight maps where you want, and although the new morphs do not support HD, the base morph can be in HD.
I think this will be a really cool product, but I'm not sure it will have the sublety/realism I'm looking for. Maybe it will. I hope so. :) Though being incompatible with HD elements gives me more reservations, since realism is what I'm after. We'll see!
Super Natural Brows (Solved)Thank you! It works beautifully now. When I imported the brows they placed beneath the chin but fixed when I did the steps you gave me again and hid all the objects in the scene before export/import/transfer except for the brows and they placed correctly. Was able to fit the brows without a problem.
Diomede's Notepad, Sketchpad, and Chilling PadThanks, Sonja. I am very happy with the way the wet hair morph turned out. The hair is prop hair because of the toon look, but it was created with strand-based dynamic hair. There is a dynamic hair conversion plugin that makes creating morphs a breeze.
Super Natural Brows (Solved)This did work but I have another question. The brows will no longer morph once imported but Is there a way to get them to follow the expression morphs built into the genesis base or will the brows always remain static? Thanks for your reply.
Are you fitting the brows to the original Genesis figure, or to Genesis 3 or 8?
In order to have the brows follow expressions it’s important when performing the transfer utility to choose ‘none’ as the type in the dropdown menu. This should be sufficient for Genesis 3 and 8.
The older figures don’t have autofollow enabled for expressions, so to have the brows follow on Genesis or Genesis 2, it’s first necessary to tick autofollow for the expressions in the parameters tab, before fitting the brows.
I hope this helps. Redz.
Thank you for the reply Redz. I am enjoying your product very much. It's very unique and adds realism. I followed your instructions. The drop down area of the menu is grayed out for me but I can see the word 'none' is already selected. I have exported/imported the brows. Posted images to show the settings. Once the brows are imported and I right click on them the only option is change parent, no fit to is listed.


Okay, it looks as though your source and target are mixed up in the transfer utility. G3F should be the source and the brows the target, not the other way around. Then leave the projection template at ‘none’ and it should, hopefully work. You will likely need to apply the Iray uber base also as objs load with default Daz shaders.
Super Natural Brows (Solved)This did work but I have another question. The brows will no longer morph once imported but Is there a way to get them to follow the expression morphs built into the genesis base or will the brows always remain static? Thanks for your reply.
Are you fitting the brows to the original Genesis figure, or to Genesis 3 or 8?
In order to have the brows follow expressions it’s important when performing the transfer utility to choose ‘none’ as the type in the dropdown menu. This should be sufficient for Genesis 3 and 8.
The older figures don’t have autofollow enabled for expressions, so to have the brows follow on Genesis or Genesis 2, it’s first necessary to tick autofollow for the expressions in the parameters tab, before fitting the brows.
I hope this helps. Redz.
Thank you for the reply Redz. I am enjoying your product very much. It's very unique and adds realism. I followed your instructions. The drop down area of the menu is grayed out for me but I can see the word 'none' is already selected. I have exported/imported the brows. Posted images to show the settings. Once the brows are imported and I right click on them the only option is change parent, no fit to is listed.
Diomede's Notepad, Sketchpad, and Chilling PadWow. That is ambitious and I can't wait to see the finished result. LOVE the wet hair morph! Its going to be a bit of a shock when she get to the modern world! She might be safer with the tiger lol
Creating a MorphHello, i hope i'm in the right section since i'm a beginner but this is not a beginner section XD
Well, i know a little Zbrush and i would lIke to make a Morph of Sakura, i'd like to stretch a bit her eyes and put her nose a bit lower (something like Dragon ball Face)
But i really don't know how to do it, i mean, i know how to import the model in zbrush, i know what tool to use but i don't know how it works when i import her back in Daz, if i stretch the eyes, i think i will have to stretch the eye ball too or it's gonna look weird.
When i change face's expression will the bone follow correctly my new morph or not ?
thank you for your reply and if you know any good tutorials about this with zbrush it would be awesome !
Character Imperfectionatorhttps://www.daz3d.com/forums/discussion/241981/asymmetry-in-character-critique-requested#latest
This product can create differences using the weight maps where you want, and although the new morphs do not support HD, the base morph can be in HD.
Double DeformationMake sure you are working on the base shape, if you model around a morphed figure and rig then you will get the morph projected into the mdoel as well as baked into the base shape. If you must model around a shape, when using the Transfer Utility set the Source Shape to the morph used (or to Current if it's multiple morphs), then check Reverse Source Shape from Target in the extended options (click the button at the bottom of the dialogue to show more options).
TransPond's Saguaro Cactus into Animated Character?Couple recommendations - not essential but I find helpful
- before creating the bones, select the cactus model, create a morph area, and create a placeholder fix morph. Resave the model.
- Create bones in the directional cameras (front, left,...). Select the model and click zero to zoom to your model in directional cameras. Use View menu to reset directional view.
- Once bones skeleton created, use the edit menu to create a regular group with both the bones and the cactus model (with a blank fix morph). Save this with nothing attached
- Select your regular group and then use the top animation menu tab and create an animation group. Yes, I call the animation group the supergroup. It contains the regular group. The supergroup has a tab for NLA clips. The regular group does not. I find if I just use the animation group witout a reguar group then when I save a retrieve the model, sometimes the scale of the bones skeleton is distorted.
- Save a version of your animation group without the bones attached et. Easier to edit or create multiple versions later.
- Select the cactus odel and the bones skeleton and use the top animation menu to attach skeleton.
- You can now use the bone joints to pose the cactus.
- Because you created a morph before attaching, you can edit the morph even after you have posed the model.
- Because you created an animation group, you can save and reuse poses and animations usig the NLA clips tab.
Old poser stuff compatibility. What will the future bring?There is another form of "INJection morph" that Studio can't use, a PZ2 that has the correct actor and targetGeom data, regardless of the channel name, will be slotted directly into the figure in Poser 9+, Studio needs the channels to exist in the figure before it will even look at the file.
While there isn't a one click solution, getting most of the things mentioned in this thread into Studio can be done, it just takes time, effort and knowledge to do it.
hiding / deleting geo from clothing?There are a few possibilities depending on how that item is made:
- if the pieces has its own material zones you can simply set those surfaces completely transparent using opacity slider in surfaces tab
- If you can't use material zones directly you can create a custom opacity map to set that part invisible
- you can use Geometry Editor to edit the mesh in DS and hide or remove some parts
- you could create a custom morph for that item to make that part small enough to be hidden inside the character
Character searchThe skin looks like Mei Lin 7’s, but I’m less certain about the morph.
That's right.
Morph is Josie 8, and a mix of other daz girls but i don't remember which....
Character searchThe skin looks like Mei Lin 7’s, but I’m less certain about the morph.
Super Natural Brows (Solved)This did work but I have another question. The brows will no longer morph once imported but Is there a way to get them to follow the expression morphs built into the genesis base or will the brows always remain static? Thanks for your reply.
Are you fitting the brows to the original Genesis figure, or to Genesis 3 or 8?
In order to have the brows follow expressions it’s important when performing the transfer utility to choose ‘none’ as the type in the dropdown menu. This should be sufficient for Genesis 3 and 8.
The older figures don’t have autofollow enabled for expressions, so to have the brows follow on Genesis or Genesis 2, it’s first necessary to tick autofollow for the expressions in the parameters tab, before fitting the brows.
I hope this helps. Redz.
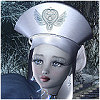
Edie 8Okay, I'm a little late to the Edie 8 party, but here is my first render. This is using Dora for Edie 8. With her paler skin, I think she'll do great for something a little more gothic. I like her morph though.

Very nice, Knittingmommy!
 Welcome to the Edie 8 party!
 Is that background an HDRI, a backdrop, or post work?
Edie 8Okay, I'm a little late to the Edie 8 party, but here is my first render. This is using Dora for Edie 8. With her paler skin, I think she'll do great for something a little more gothic. I like her morph though.
Daz 3D is part of

Connect
DAZ Productions, Inc.
7533 S Center View Ct #4664
West Jordan, UT 84084Licensing Agreement | Terms of Service | Privacy Policy | EULA
© 2026 Daz Productions Inc. All Rights Reserved.