-
Introducing the AI Character Shape Generator by Yellow
I wouldn't say I'm excited as the video shows it, but I'm incredibly curious to try it out. What would be most useful to me is the ability to adjust small parts of existing characters without needing to fiddle about with dozens of, for example, nose morphs for half an hour.
I'd like to know more about how this works. Is it generative or is it parametrised using your morph library? Or some combination of both? It mentions fixing the topology of the mesh, which is incredibly neat, but does suggest at least some degree of generation or deviation from morphs. Not a bad thing in and of itself as a problem with using a lot of morph packs is you may get the shape you want but the mesh can end up with unwanted artifacts. If it somehow traces or wraps the results of applying several morphs onto a clean topology then that would be a game-changer for me.
AIUTO...CHI CONOSCE L’ITALIANO? PARTE QUATTORDICIUno strumento che interpreta e mixa i morph per ottenere il personaggio "che vuoi"? Non fai prima e risparmi soldi facendo da te?
 Things I Learned The Hard Way
[I've changed the title of this post and the first paragraph because I think it was subject to misinterpretation. This wasn't meant to be a laundry list of complaints, it was meant to be a "here's some things I learned, share yours."]
Things which I have had to learn by stubbing my toe on them (sometimes repeatedly) over the last three-plus years, inspired by my comment in a different thread. Add your own to the list!
- Photometric lights (mostly spotlights and pointlights) work differently in just about every way from mesh lights (emitters), and since having even one photometric light in your scene will trigger special "photometric mode" behavior and calculations from the renderer, and sometimes photometric and mesh lights don't play well together, it may be better to go all or nothing. (I use photometric lights less and less because I'm tired of dealing with them.)
- You will probably not see that HD feature because the figure or item loaded with the subdivision set low enough that it doesn't come into play and you'll need to bump it up. Many HD surfaces load with the HD effectively turned off because you have to bump up subd yourself.
- The more shape/morph sliders you have for a particular generation/gender of figure the slower the load times for those figures will be because when you load one it must also load and parse ALL the shape sliders for that generation/gender. I have a LOT of G8F figures, and there are times when I use G3Fs for background characters etc simply because I have fewer morphs for them and they take about a fifth of the time to load.
- You can use a G8F morph on a G8.1F but not vice versa, so if you're mixing characters and you know you're going to want a mix of 8.0 and 8.1 stuff, use an 8.1 base. (Obviously applies to the men too but I don't use men much.)
- Studio does not do garbage collection; when you delete an item from a scene, it is not deleted from memory. It's taking up space and your scene is getting slower and slower to work with. Save your work periodically, use New (which does do garbage collection -- that's that ten-minute wait while it's "deleting items"), and reload the scene. This will usually give you an immediate performance boost, especially if it's a scene you've been working in for hours, adding and then removing sets, etc.
- Emitters are affected by mesh density. Basically (I may be oversimplifying) each cell of the mesh is one emitter. This is only ever really a problem if you make human surfaces emissive, where you have suddenly made a LOT of emitters. Unfortunately I do this all the time.
- Instances are the greatest thing ever but when you make instances of human figures--especially dressed, becoiffed human figures--expect additional overhead on cleanup. Say you make ten instances of a human. Then you don't need them in the scene any longer. You delete the instances first because you're not a monster (actually, it doesn't matter; if you delete the parent first the instances will just become invisible since they no longer have content to clone), and then you delete the real figure and it takes FOREVER. This is, unfortunately, normal behavior and I don't know why it does it, but it happens every time. If you make even a single instance of a base figure, that base figure will then take longer to delete, and the more instances you make of it, the more the deletion time increases. (This does not seem to be the case for instances of objects like furniture!)
- You can add smoothing modifiers to clothing that doesn't have it. DO YOU KNOW HOW LONG IT TOOK FOR ME TO LEARN THIS
- You can add dForce modifiers to things that don't have it--though it may not work out as well as you hope.
- Sometimes there is legitimate reason to show hidden properties and mess with them, especially if you do a lot of grotesque special effects like I do that depend on weird scaling and distortions. Ditto for removing limits.
- There are an awful lot of hidden things in Window|Panes on the menu. Not all of them are useless. Some of them may be things you want to dock (make a tab for) once you realize they're there.
- Studio has not yet switched over to making a geometry shell have Iray surfaces by default. If you buy kits that have geoshells in them and those geoshells load with Iray surfaces, it's because the PA has switched them to Iray surfaces for you. A fresh geoshell from the menu will always have "Default Shader" surfaces, which means what you're trying to do will probably not work. Keep the basic "Iray Uber Base" icon on speed dial, select all surfaces in the geoshell, and apply it to them before doing anything else. Alas, this also goes for Edit|Duplicate Node Hierarchy, which I use all the time. You make a copy of the figure but the new figure's geoshell(s) are NOT IRAY and have probably lost the effects you were using them for. AND this goes for accidentally deleting a figure and undoing that; when the figure is restored to the scene, the geoshell will have lost its Irayness.
- Control-D is "drop to floor."
- Zero is relative. If you zero a figure (I mean XYZ zero, not zeroing the pose, though I often use an icon that does both) that's just out in the scene, it will indeed be the true 0/0/0 in the middle of your world ... but if your figure is in a group, "zero" is the zero location of THE GROUP. If you group two figures who are standing near each other, the group will be created with a bounding cube that encompasses both figures and "zero" will be the zero of that bounding cube. This is INCREDIBLY USEFUL because usually you've grouped the figures because you're about to apply a two-person pose, and you can fully zero both figures so the pose will apply properly, without moving them to world 0/0/0 which may be halfway across the scene somewhere. This is also helpful for poses in a vehicle (or on a horse) which only apply right if both the vehicle and the person are fully zeroed.
- You can lock X Y and Z on a figure before applying a pose to deal with those pesky poses that insist on moving a character to a certain location in the world. If you're using a pose kit that has both "Go-To Poses" and "Use Anywhere" poses (or equivalent, some PAs call them different things), the "use anywhere" poses are the ones which just pose the figure in place, without moving the figure somewhere. (If you never use poses that were made for a particular set without using that set, you probably never have had this problem.)
- The overall scale of a figure has a "factory set" default and it may not be 100%. If you change the scale of the character and then use certain zero-pose tools, it'll reset to default scale for that figure and you'll be sad. I have one set of characters I always load at 110% and I finally gave up and locked the scale slider in the saved bases I use so that zero-pose wouldn't mess with it.
- Speaking of factory settings, G9F figures tend to load with Eye Look Out Left and Eye Look Out Right set to 10% (which will show as an altered parameter in "Currently Used") and their right eye set Side-Side 3.0 and their left set Side-Side -3.0 (which will not). I do not know the reason for this; I just know it's annoying to have to manually turn off every time I load a fresh G9.
- Eyeballs in general seem more prone than other body parts to be a little sticky when poses are loaded and changed and unloaded and reloaded and so on, and it's a good idea to periodically check both the pose sliders (Look Side-Side, etc) and the sliders for the eyeballs themselves to make sure they're not utterly haywire.
- And speaking of going haywire, if after repeated poses your character's legs start to look REALLY WEIRD, go find the two Flex Quad sliders and reset them.
Let's appreciate/discuss today's new releases - more ongoinger threadThe potential benefit of a stand-alone figure is that the weight maps are made for that shape - a morph can have the joint centres changed but not the weight.
Let's appreciate/discuss today's new releases - more ongoinger threadon clones, I find the easiest thing to do is model a bodysuit around one figure then shape and fit it to another creating morphs for both, I edit the morph dsf in notepad to make it a modifier/clone instead of morph and fit clothing to it then to the figure
I have fitted clothing to Vyusur's Catoon this way, humanoid figures this is not too difficult but it's only a loose clothing fit not an exact clone, fingers and toes beyond me
Eden Character for Genesis 9nightwolf1982 said:
Quick 'n dirty
Used Base Smile Open Full Face Expression, Teeth Lower and Teeth Upper Depth morphs and the Mouth Cavity Depth morph from the 200+ for Genesis 9 pack by Zevo
Thanks for the tip. & Thanks to Barbult.
Now a bundle with Eden is on sale:
https://www.daz3d.com/eden-bundle-for-genesis-9
I suppose you would need Zev's 200+ product to use this modification. Fortunately I did get it in the sale. If I'm not happy with the result, I will return it!
Eden Character for Genesis 9Catherine3678ab said:
I bought this after reading the first post.
That's because you are a master of modification. I made a morph for the mouth to match the name of the head morph, so now it dials in automatically. That should have been provided, of course. Mine is probably less than perfect, but serviceable.
Eden Character for Genesis 9The teeth aren't being pulled forward to the front of the mouth when the head morph is applied, so any open mouth pose or expression will have that huge gap between the teeth and the lips. Hopefully my quick fix can help until the product is updated.
Eden Character for Genesis 9Quick 'n dirty
Used Base Smile Open Full Face Expression, Teeth Lower and Teeth Upper Depth morphs and the Mouth Cavity Depth morph from the 200+ for Genesis 9 pack by Zevo
Problem with Zander HairZander hair is strand-based, meaning that it won't transfer over with FBX. I don't remember if I've used SBH with Unity, but with Unreal (and other programs I've used), you have to export the hair as an OBJ, then import it separately and convert it to whatever Unity's hair system is. In this post, I explain to another user how to get SBH working in C4D, so steps 5-7 will differ according to however Unity does things, but steps 1-4 are the same for any program that I've used.
A question about clothes on a child figureDo a timeline simulation, starting from the base figure, ending with the child morph.
Eden Character for Genesis 9I wonder if the character's morph teeth are not auto-following her head.
Edited to add: I just looked at the file list and there is no morph listed for the teeth, so I'm afraid I'm stumped.
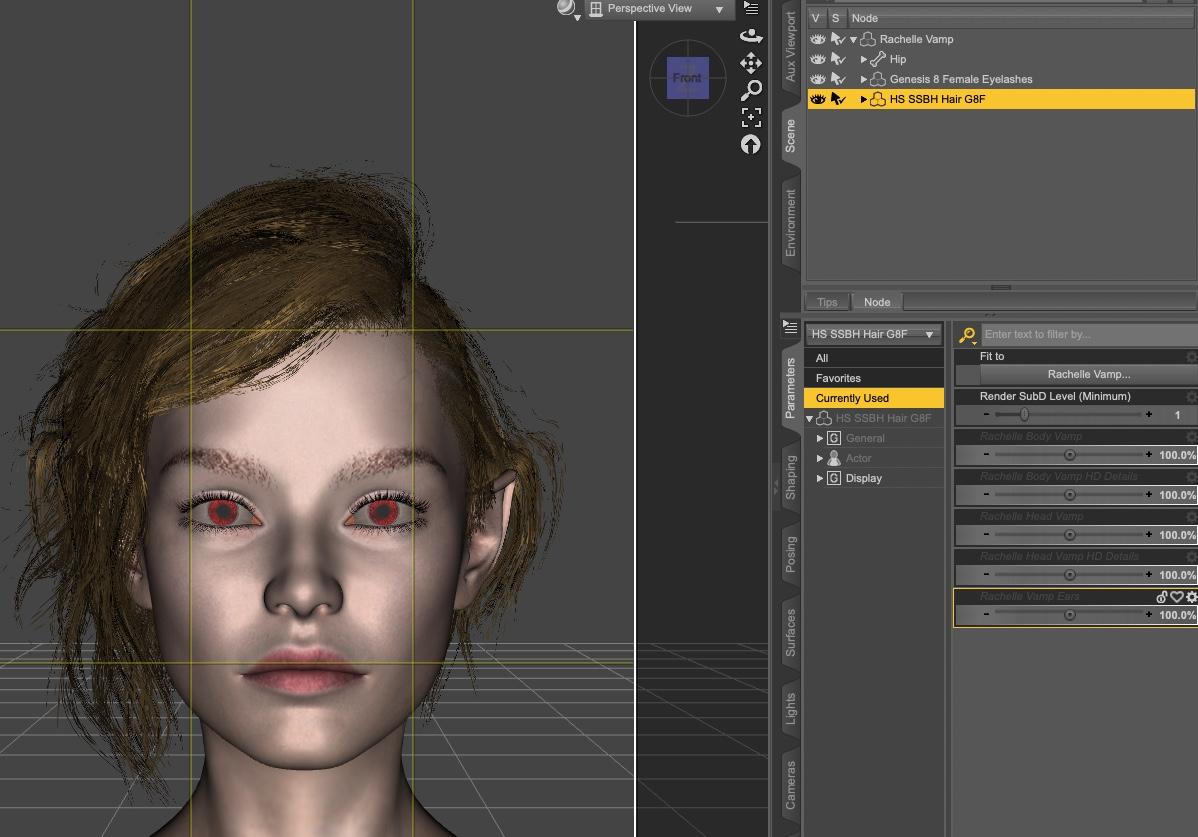
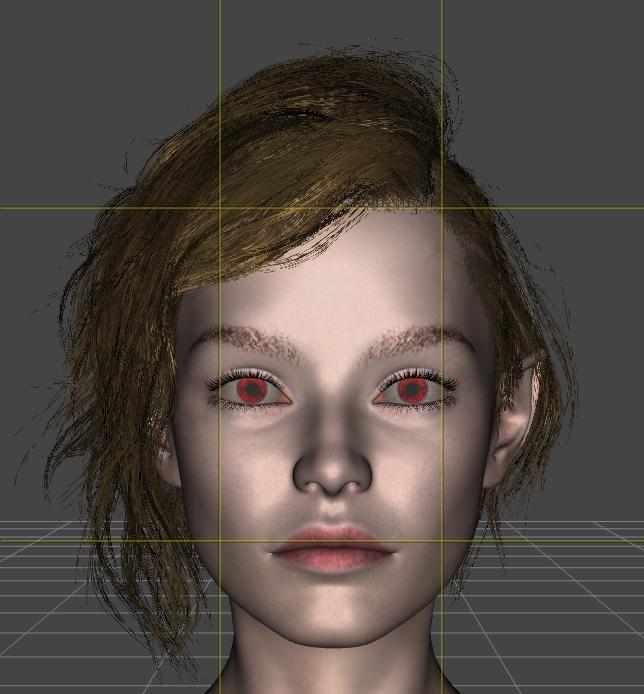
Hair deforming over ears G8F (solved)With the hair selected, if you show the currently used morphs with Show Hidden Properties, you'll likely find a morph automatically created to take into account the ears. If it's the case, just dial it back to 0% and the hairs will stop following the ears.
An example, first with the hair just fitted on the character, showing the Rachelle Vamp Ears morph (the name will depend on the ears morph you're using):
now, how the hair looks when the hidden morph dialed at 0%:
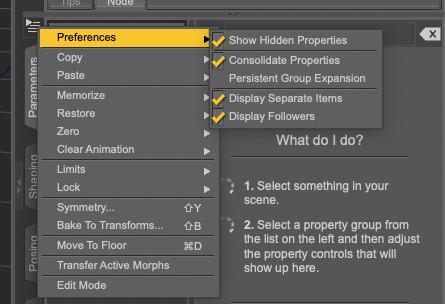
If you don't remember how to show the hidden properties, you get this menu by clicking on the three lines icon:
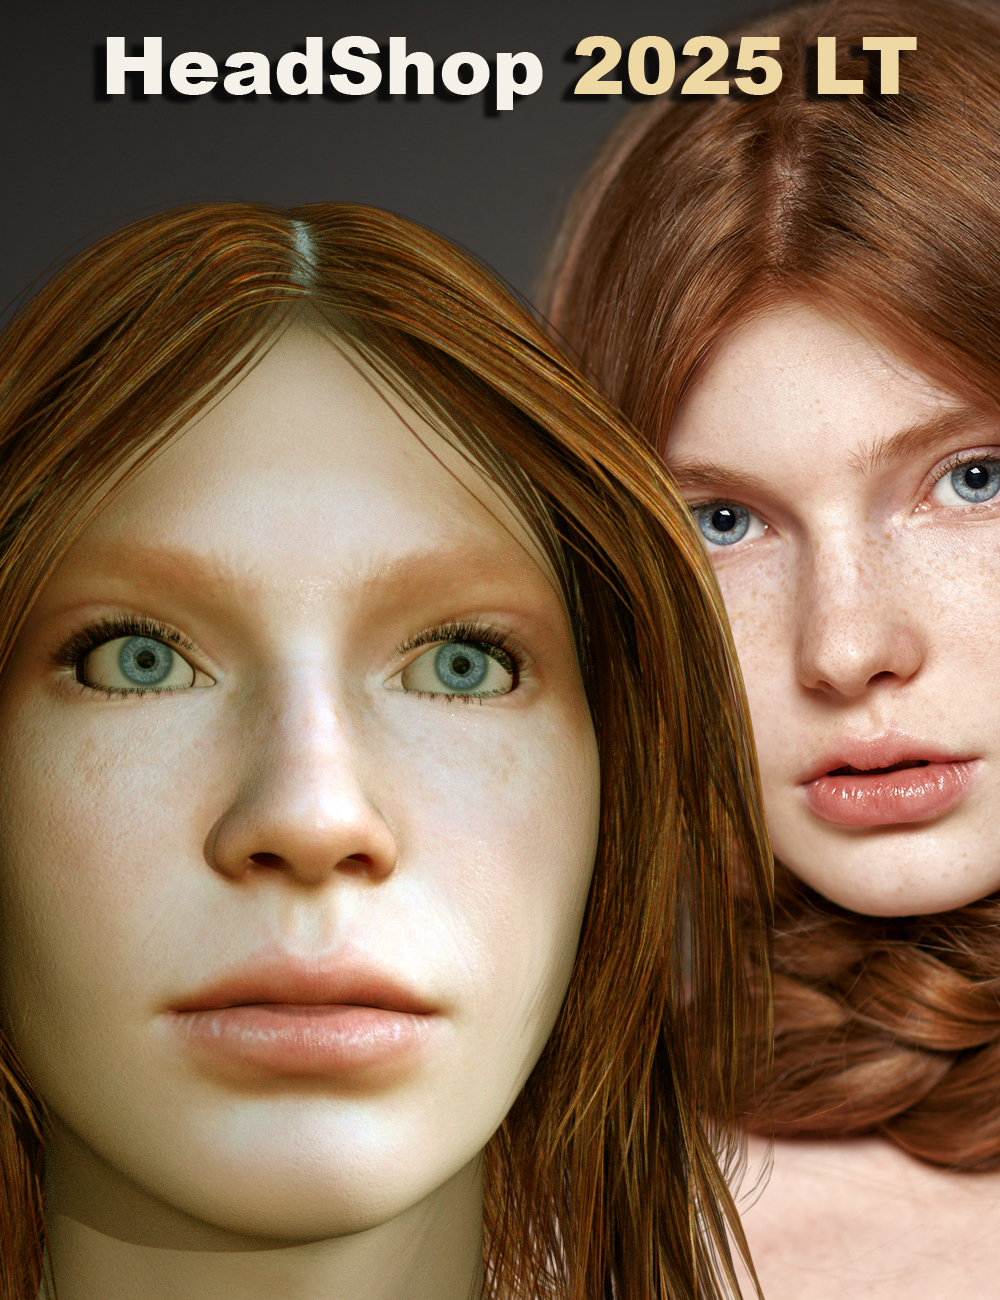
 HeadShop 2025 LT at DAZ this Friday (9/13)
To address our artists needs better, for 2025 we have reworked our entire product line into modules, enabling our users to pick and purchase only the features they really need.
-
- HeadShop 2025 LT – the Core Product. A DAZ plugin that converts photo-to-3D with auto point recognition, auto gender detection, auto smile detection. Rotates heads into frontal, allows texture mirroring, texture retouch.Also: Choose add-ons as needed:
- PoliceArtist 1 is a library of 120 shapes (noses, creases, etc.) that are DSF shape morphs, adding topographic details to any Genesis 8 figure. It also works with FaceTransfer1 and FaceGen.
- PoliceArtist 2 is a library of 70 shapes (noses, creases, etc.) that are DSF shape morphs, adding topographic details to any Genesis 9 figure. It also works with FaceTransfer2 and FaceGen.
- PhotoPrep is a standalone app that converts photos with rotated heads or open smile into frontal “passport style” photos that can be used with FaceTransfer1 and 2 and FaceGen. It also includes LoveChild to morph 2 photos into one.
- https://youtu.be/0KZuzlJTZdc
help fix eyelshases in blenderThe transparency map, which breaks that plane up into separate lashes, has not been applied by the transfer (how did you do that)? You should be able to reapply it in Blender.
HDR notification not displaying from 4K UHD HDR on YTThanks @Padone, I will give it a try.
This last attempt was to use ffmpeg once again to make sure that it was an HDR-10:
ffmpeg -i input.mp4 -c:v libx265 -preset fast -x265-params "crf=15:vbv-maxrate=50000:vbv-bufsize=250000:colorprim=bt2020:transfer=smpte2084:colormatrix=bt2020nc:master-display=G(13250,34500)B(7500,3000)R(34000,16000)WP(15635,16450)L(10000000,1):max-cll=475,385:ref=2" -pix_fmt yuv420p10le -c:a ac3 -color_trc smpte2084 output.mkvBTW, that only works on my pc, but I receive a lot of errors on my old 2015 mac - even though, ffmpeg is the same version
Anyways, once I have done this, then MKVToolNix recognizes that it is a file that it can add info to the headers, which I follow the instructions on another forum, which they suggest the following settings, but in my opinion it made the file look TOO vibrant.
-s colour-matrix-coefficients=9 -s colour-range=1 -s colour-transfer-characteristics=16 -s colour-primaries=9 -s max-frame-light=300 -s max-luminance=1000.0 -s min-luminance=0.0001 -s chromaticity-coordinates=0.68,0.32,0.27,0.69,0.15,0.06 -s white-colour-coordinates=0.3127,0.3290It finished with zero errors, but it YT still uploaded it and converted it to a BT.709, instead of a BT.2020
I will try Blender compositor, but I do not know if my issue is producing an mkv file that is HDR-10. My issue is that YT does not read it as a BT.2020, then it converts it to a BT.709, which makes all the work for nothing, because this was the goal, that I keep missing for some unknown reason
Old-fashioned headscarfOK, no problem ! I tweaked it ~~ That is a real knot which was tied in MD, so I adjusted it to be tighter and closer to the neck. There's a Knot In morph, you can dial it if it's still not tight. I made 10 morphs on it, more or lesse enough. And it's dForce ready.
I just provided two set of texture maps that were generated by AI in MD. Pls feel free to use any shader products that you like. It's a freebie, for G8F, and can be auto-fitted to other Genesis figure. Any problem, pls let me know ~~ Have fun !
Package: https://mega.nz/file/iGJUQI4I#g_eGv8nrzXYHNLB6luMDrT7dBIZMqbygh02mrIsLnYM
Is there any "Daz 3D video gallery website"?Magic Dragon 3D said:
hansmolleman33 said:
Not alot of people are using DAZ for animation when there are better and easier to use softwares for animation.
DAZ is way too complicated to use for animation, all video tutorials are just awful and out of date.
A long time ago I did a video using DAZ assets, all the animations were done in Blender
Is Blender compatible with most assets made for Daz? I didn't have a good experience in general with Blender because the interface is a little complicated for me, although that was in terms of modeling and maybe animating is easier.
Yeah, most of the things in Daz you can use in Blender, the diffeomorphic add-on is better than Daz to Blender. Some hair shaders don't transfer well, but you can always use a different shader in Daz to export and it should work alright.
Ankle jewelryYou could try just parenting them to the gensis 8 shin, without fitting. Morphs won't transfer that way but in most cases that shouldn't be an issue. just make sure not to apply any poses to the jewellery figure, and bear in mind that hierarchcial presets won't work (apply them to the item fitted and parebted to G9, then save a regular preset for use on the G8 version).
Genesis 1 head shapes to Genesis 9...Leana said:
Catherine3678ab said:
Leana said:
Catherine3678ab said:
https://www.daz3d.com/mmx-genesis-9-clones-for-all
It was on sale just the other day so may appear again if there's a repeat day. Or it may come on sale during next month's sale.
That product is used to convert G9 clothes back to earlier Genesis figures, not to convert shapes to G9.
I don't think there's a shape converter to go directly from G1 to G9. If you have GenX2 and its various add-ons, you could convert it to G3 and then use figure converter to go from G3 to G9. But that would be quite an investment for 2 shapes if you don't have any of those products.
I don't know if this tutorial to convert G8 morphs to G9 could be adapted to G1, but it might be worth a try since G9 includes a G1 clone: https://www.versluis.com/2022/11/how-to-convert-genesis-8-characters-to-genesis-9-using-the-fit-suit-method/
The auto-fit clone can be used to help create a "clothing figure made of G9's base mesh" that looks like Genesis. The "clothing figure" can then be used to transfer a morph of Genesis back into G9.
Indeed, autofit clone shapes can be very useful for manual conversion. Just installing the clones won't provide you with a shape conversion tool though.
Beside, those are G9 clones for the older genesis figures. So they probably would be more useful to convert from G9 to older figures.
Agreed, alone it is not a shape conversion tool, not aware of any available either.
Exactly, in order to make the shape in a G9 mesh, one needs to make "clothing" of the G9 mesh for Genesis to wear. For that one requires the auto-fit clone. Seems to me somewhere in the forums I have a rather detailed tutorial and/or an actual tutorial loose in the wilds [Renderosity or DeviantArt] which goes through the step by step details. However since Mattymanx released G9 autofit clones I kinda figured maybe I should push those rather than explain the entire procedure all over again in thread.
However:
https://www.daz3d.com/forums/discussion/599231/making-clones-of-g9-tutorial
https://www.daz3d.com/forums/discussion/comment/8169796/#Comment_8169796 For the link to the Character Splitter.
https://www.renderosity.com/users/id:961196
Scroll down to Oct 27 for .pdf tutorial link.
https://www.daz3d.com/forums/discussion/598141/bringing-a-shape-from-g8-over-to-g9-tutorial
Basic concept is the same for each generation.
Daz 3D is part of

Connect
DAZ Productions, Inc.
7533 S Center View Ct #4664
West Jordan, UT 84084Licensing Agreement | Terms of Service | Privacy Policy | EULA
© 2026 Daz Productions Inc. All Rights Reserved.