-
MORPH MY FRIEND! SOLVED!
Hey Richard. This post has nothing to do with Sheila's clothes, they are working perfectly. But rahter with my mistake.
Afer a big success about the Sheila clothing morph, now happening something that it's getting me nervous.
Everytime I load default G3F, Daz load the Sheila morph.
I tried everything, from deleting morph to overwrite the G3F package in DS. Nothing to do! Indeed, if I delete completely the Sheila morph and I quit DS, when I start again DS and load default G3F it regenerate Sheila morph! Question is, it depend from the my DSF morph shape or from a file overwritten inside a misterious place in DS? Incredible!!!!
If I edit manually the DSF, what file to search for set to 0% the dial?Thank you!
Getting priced out of this hobby..and if you have skin creation/building as well as morph kit merchant resources, the need for different character skins and morphs is not as great unless they are very unique.
When Beautiful Skins and Skin Builder Pro3 were released that was when I finally was able to do something with G3F. Now with Slosh's G3 M/F UV swapping tool I can use skins I create on G3M.
Is it possible to delete body parts/anatomical assets from the base model?Thank you for the detailed, step by step, guide and for your time.
I'll try it on a real morph tomorrow, to see if I can get it to work.I've tested it on "scale" which isn't a real morph per se, and it didn't seem to change anything.
Also once I hit 0% on "scale" the body part simply stretched upwards for various meters (at 0.01% it still appeared attached, albeit very small).
I've attached a screenshot just for showing the funny result.Aging Morphs for Genesis 8 (Commercial)While I purchased both the G3 and G8 versions,... Yes, I am working with G8. The images below will show the model being used and the slider names.
Actually, while the wrinkles are great on the Shape Morph Present icon, they aren't really that noticeable when I change the viewport mode.
Hi. Wrinkle visibility depends on roughly 2 things. 1, your lighting (directional or even 360), and 2, how strong your tranclucency weight is on your skin. If too high it will eliminate a lot of HD details. Are you looking at the right promos? Face Age Controller was only for G3, and the promos for G8 says Aging Head Controller and the slider for G8 is also named that. It was changed for G8.
Thank you for this tip. Lighting is something I still need to work on learning. Changing the Translucency weight of the skin from the default 65 to a lower setting didn't not reveal the wrinkles any more prominently - instead I was looking at a pale face gent looking half ready for the grave.
Is it possible to delete body parts/anatomical assets from the base model?To lock the joint, you need to have your morph that will trigger the lock (obviously).
- Right-click in the Parameters pane and select Edit Mode (assuming it isn't already checked)
- Right-click in the pane and select Create New Property
- I named mine HiddenConstantOne, set the path to Hidden, set the Minimum to 0, set the Value and Default Value to 1, and make sure that use Limits iss et to on. I didn't, at this stage, set the Hidden switch to Yes as it's easier to handle the set-up while the control is visible
- Right-click on HiddenConstantOne Parameters pane and select Show in Property Hierarchy.
- Expand the triangles under the HiddenConstantOne entry until you can see Controllers>1st Stage.
- Find your morph in Parameters and drag it onto the HiddenConstantOne>Controllers>1st Stage
- Click the triangles to expand until you see the list of Attributes
- Click ERC Delta Add to highlight, then a second time to get a list of types and select ERC Subtract
Now, as you slide the slider for your morph up to 100% the value of the HiddenConstantOne property shouldd rop to zero.
- Now, for each rotation (or other transform) that you wish to lock, find its entry in the Property Hierarchy, expand the triangles to get to controllers>Second Stage, and drag HiddenConstantOne in to the list
When your morph is zero the transforms will act as normal, when your morph is at 100% they will be multi[plied by 0 and so effectively locked.
You can now hide the constant by clicking the gear icon on its slider, selecting Parameters settings, and checking the Hidden box.
Workflow; External Morph Targets?Yes, there is a place in the vertex modeling room (wrench) to load morphs.
Here is an example using Hexagon.
- I created a random sample object in Hexagon, cleverly including the word random in the name so I would remember.
- I exported the object from Hexagon as an obj. (Whatever scale presets you use, be consistent).
- I moved some of the vertexes around exported as a second obj. For my own conveniece, I started the name with MOR so I would remember which was the morph.
- I opened Carrara and imported the obj of my random object, cleverly with the word random in the name.
- I clicked on the wrench (upper right) to enter the vertex modeling room.
- I clicked on the morph tab (center right) to open the morph options.
- I double clicked a polygon to select the whole object (or use EDIT SELECT ALL). You can create sub areas for morphs (like head and body) but this is just an example.
- I used the morph menu to make the current selection a MORPH AREA. The default name is Morph Area 0. You can change that name but this is just an example.
- I used the drop down menu next to morph area 0 to create a new empty morph with the default name Morph Target 0.
- An empty morph channel appears.
- I clicked Edit next to my empty morph and the options VALID, SAVE, and LOAD appear. The vertexes capable of being morphed turn green, but you might not see because selection is red.
- I clicked Load and navigated to my Hexagon-exported morph, cleverly labeled with MOR in the name. The object transforms to my morph.
- I clicked VALID to complete the morph. This resets the morph value to zero, so the object returns to its default shape.
- I returned to the assemble room and the morph is a slider under the GENERAL tab in the properties tray (right side)
- I slid the slider to 0.80 and the object morphed.
You can also create morphs in Carrara using the vertex modeler and SAVE instead of LOAD.
Getting priced out of this hobby...yeah but that would only save an extra 6$ which would be more than offset by the price of the second item. As I mentioned, without the head and body morphs the figure is pretty useless. On my budget, no point in putting out the 83$ and change (especially near the end of the month when finances are even tighter) for the bundle and two items (the second one being Monty as he would work for some of my characters as well) if I do not have the other necessary components to use them.
As to the free bundle offer that is included, I already have most of the G3 figures I need and so many of these bundles come with content I would rarely if ever use as like I have mentioned, I am not into high/medieval fantasy or horror. Not even thrilled about the Viking and Wizard content in the Floyd Bundle (which again is why I shy away from Starter/Pro bundles in the first place).
On my fixed income I have to be extremely picky about what I purchase in that it would need to fill a use in my work. That is why I wish there were more BYOB sales.
May just have to wait until G9 comes out and they deeply discount G8 to get him.
what is interesting, I am in same boat. looked at the bundle deal..but...i figured I could just buy a couple items I like and would use..but overall, the price ends up getting pretty close to the entire bundle deal anyway. i ended up doing a bundle awhile back, and even added quarterly PC+ ... the end price was pretty much the same with the PC+ within a couple of bucks.
One deal they had not long ago, buy 2 items and get PC+ 30% off..it actually became more expensive to do the discount. You have to really add and subtract, try different stuff to see how it all plays. Overall way too confusing.That''s a lot of what I've done in the past. I buy the main figure from the bundle and if there's a hair and/or outfit I know I'd use a lot or be able to kitbash with something I already have, I do that.
I did buy Floyd Pro Bundle because he's unusual and can morph into lots of other characters, same with Ollie who I also got. In the case of Floyd, I did buy the living room set cuz I can get tons of use out of that as opporsed to other addons.
But like many here, I have most all the bundles in the 'free' category, or at least some of the items from most of them, so I have no need for any more. I got the Nerdy kids which are ok, and I can use the library for other stuff, and I didn't have the Asian River bundle but always wanted it, And the Breakfast in Bed bundle cuz it has the bed, the food and some poses. You can break these kind of bundles down and use that stuff in any render. Figure bundles...meh....don't need any more of them.
Is it possible to delete body parts/anatomical assets from the base model?Thank you both for your help.
Geografting seems to be still a WIP thing (http://docs.daz3d.com/doku.php/public/software/dazstudio/4/referenceguide/terms/geo-grafting/start), so I'll have to understand how a noob like me can implement it.
It seems that the creature creator morph still hasn't been updated for Gen8 (i can see previous versions for Gen3 and below in the shop), but the idea of shrinking it and moving it inside one of the remaining fingers locking the bends seems like a nice solution.As for the disappear, thank you for that hint. Unfortunately I was not able to locate the bone (as I think they are hidden by default) and went the long way using the "geometry editor", i then manually selected the polygons I didn't want to see and used hide+delete hidden to get a similar result.
After trying this roundabout way, I got a slightly cleaner result on fingers and a better result on the arm.
With time I'll have to figure out how to place a cap on the forearm.
As for the fingers, the "scale" option in the "parameters" tab seems a bit quicker and wouldn't need to use caps on the missing fingers.@richard_haseltine: since you mentioned the "locking the bends" option, I was wondering if there is the possibility to do that without the creature morph addon. If I use the scale option to a negative value (which sends the finger inside the plam of the hand) I end up with the seams/rims you see in the sideways hand picture from my previous post.
Thanks again for your kind help.Workflow; External Morph Targets?I guess my question is... "How can I import morph targets created outside of carrara "into" my model in the carrara scene so that I might create blendshapes and such within Carrara." Is there an 'import morph target' function? Hope this is clear...Workflow; External Morph Targets?Hi Selina. "why not model everything in wings3D and manipulate the meshes there prior to importing of model and morph targets?" I have been doing that. However, I've found (from my work with morphs in Poser), It's nice to be able to create a large series of varied morphs, stored within the model in the scene, that can be mixed at varying intensities to arrive at results that otherwise might not have happened during linear modeling. A creative, lateral, morphing process. If that makes sense....Any way to transfer dForce weight maps?Fairly late into my rigging process, I discovered that a vert in a cuff was merged with a vert in the sleeve behind it. I went back to my geometry and fixed it, but when I try to update the geometry in Daz, I can't because the geometry is different. I can copy over the rigging and texturing to a fresh mesh import, but I'd really like to transfer the dForce weighting, too, since that was tricky to get correct. Is there a way to do that? The underlying UVs are identical, as is the location of every vert. The only difference is what polys the miscreant vert connects to.
Photo-real characters. A different approach.Well no, hiding inaccuracies while it might trick people into believing you've make improvements doesn't change the fact the inaccuracies are still there and that you haven't made improvements. Sorry, if you want to improve then you need to improve the geometry to be more accurate, not just hide the inaccuracies with lighting and camera angles.
If you don't want to make improvements than I fail to see why you are posting more renders of the same unchanged models you already have extensive opinions on.
if someone else were to download my Christopher Reeve morph from ShareCG themselves and play around with it a bit.
I honestly don't think your main problem is the morph, but the main issues that I see are with the textures/skins.
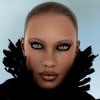
Here's your Chris Reeve morph on G8M. The texture is Edward 8's and adjusted with Altern8. His expression was created with PowerPose.
While the morph is a little extreme, and with less realistic textures those extremes stand out a bit more, the main issue I see (and this is just my opinion), but your skin needs a lot of work before it approaches realism.

Again, that's just my opinion, and these things are probably pretty subjective. :)
I love EVERYTHING that you do, Diva!! Seriously amazing. I think the thing I find least convincing is the lighting. Can't quite put my finger on it but the skin itself looks darned awesome to me.
Thanks. :) That's a sweet thing to hear!
As for the lighting, it's an HDR. Maybe I should add some fill lights or something?

No I love it; I was seeing symmetry tho, that had more of an effect than the lighting, which is great.
That render reminds me of John Grey from the English Beat but I think his eyes are brown.
Workflow; External Morph Targets?Hi. I'm using carrara to render various .obj format models I've made. I'd like to be able to create morph targets for these models in an external modeler (not carrara) and import these into Carrara for use. I've looked around and haven't been able to find any clear, concise directions about how to do this. I'm using static models. No body parts. Not .cr2. Not Carrara rigged figures. I'm not using Poser or DS. I prefer not to use Carrara's vertex modeler for morphing. I use wings 3d and a couple of other softwares for modeling. I have years of experience with Poser and have created figures and props for that app... I no longer use or have Poser installed on my work computer, nor DS. Anyone have a workflow they'd like to share?Photo-real characters. A different approach.Well no, hiding inaccuracies while it might trick people into believing you've make improvements doesn't change the fact the inaccuracies are still there and that you haven't made improvements. Sorry, if you want to improve then you need to improve the geometry to be more accurate, not just hide the inaccuracies with lighting and camera angles.
If you don't want to make improvements than I fail to see why you are posting more renders of the same unchanged models you already have extensive opinions on.
if someone else were to download my Christopher Reeve morph from ShareCG themselves and play around with it a bit.
I honestly don't think your main problem is the morph, but the main issues that I see are with the textures/skins.
Here's your Chris Reeve morph on G8M. The texture is Edward 8's and adjusted with Altern8. His expression was created with PowerPose.
While the morph is a little extreme, and with less realistic textures those extremes stand out a bit more, the main issue I see (and this is just my opinion), but your skin needs a lot of work before it approaches realism.
Again, that's just my opinion, and these things are probably pretty subjective. :)
I love EVERYTHING that you do, Diva!! Seriously amazing. I think the thing I find least convincing is the lighting. Can't quite put my finger on it but the skin itself looks darned awesome to me.
Thanks. :) That's a sweet thing to hear!
As for the lighting, it's an HDR. Maybe I should add some fill lights or something?
No I love it; I was seeing symmetry tho, that had more of an effect than the lighting, which is great.
Is it possible to delete body parts/anatomical assets from the base model?It can be done, but it's tricky 9and likely to leave seams in the maps). The old creature creator morph eliminated one finger by shrinking it and moving it inside one of the remaining figners, locking its bends (by multiplying them by 1-the morph value) so that it couldn't mess the look up. On recent figures you could also use a geoGraft to replace the unwanted body parts with a cap or other concealer.
dForce exploding content - possible work around?I've noticed that if there are orphan or stray vertices, which I usually notice after exporting to morph, this seems to be one possible reason for explosions.
How to make extreme bends more naturalYou would have to create a MCM (Morph Control Morph) and ERC it to that joints movement for that particular character.
Custom cloth morph ( MD ) - How to follow figure "without" autofittingI was looking exactly what this guy had made ... but i cant find a similar morph anywhere:
 daz to maya to daz, whith daztomay plug in.
Hi Bryan,
Thanks a lot for answering.
It's a very interesting thing you've written : do you successfully create a daz caracter animation in motion builder an be able to apply it in daz studio as a pose preset ?
At this point i'm just trying to find what it could be done (with a less of work
 ). To do that i'v made a very simple animation : genesis 8 is standing, crouching, then standing again, and to add more realism breast are bouncing.
with some different test and to go further of my first need here is three important conclusion to understand why i want, first done the animation in maya an then, re-import in daz :
- daztomaya plugin doesn't import the daz morph you want.
- jiggle maya's defomer for breast boucing made a really good job, but fbx doesn't export any maya's deformer, excepting blendshape, to daz. so it will be preferable to use daz morph, in daz, to do this
- the arnold texture conversion is good but not as well as a direct iray render : better render in daz
To answer your question, i'd like effectively to animate both body and facials. you said that daz add some prefix to morph, is there a script to correct this ? to understand the duf an fbx file structure do you know some tutorials ?
i'd like to share my duf file, but the upload failed in daz forum, i don't know why ? (file's to bigger ?)
Again, thanks for your help
Changing G3F default T-pose, morphing & extracting to BlenderHi,
I'm trying to get the default G3F T-pose to stay in A-pose when it gets exported to blender. In the past i would just take the G3F figure in Daz3ds and go to the pose & animate tab and lower the arms a bit. But when i exported the figure to Blender it would revert back to the T-pose. I do have the G8F figure but i have almost no morph kit products for it, while i have a bunch of morph kits for the G3F. Is there a way to transfer the pose from the G8F to G3F and make it so that when exported to Blender the pose stays the same? or is there a way i can just pose the G3F with its arms down in Daz3d and then export the figure to Blender and have the pose stay in the A-pose?
Daz 3D is part of

Connect
DAZ Productions, Inc.
7533 S Center View Ct #4664
West Jordan, UT 84084Licensing Agreement | Terms of Service | Privacy Policy | EULA
© 2026 Daz Productions Inc. All Rights Reserved.