-
2021 Sales thread cont: Report Issues Here "There's Always Another Sale™"
Ugh, got the Libra Bundle but missed the $20 off the michael and victoria stuff. Any hope that support is answering quickly or should I just buy the bundle again to get the other deals and try to get a refund on the first purchase and just consider the 20% coupon I used as a loss? Just don't want to wait a week for them to get to the ticket and be told it's too late to fix it.
Every pose is distortedRichard Haseltine said:
Some are expected, yes - they are there to make the bends look better. Of coruse there could be others that shouldn't trigger unless a particular shape is applied, which is why it is helpful to work out the minimum amount of posing that will show the issue so that you don't have as many potential issues to check.
Thank you. Just wanted to be sure these morphs are expected and they're not causing any problems. As for the main problem, I deleted all my basic models (Charlotte 8, Victoria 8 etc.) and after reinstalling they aren't distorting anything anymore. Don't know what happened in the first place and why daz' own models caused problems, but glad it was fixed.
Best tool for UV mapping/changing? (goal is M3/V3/H3/A3 UV to Genesis)richardandtracy said:
Jonstark said:
Well dang it, Blender seemed like it would be such an easy and quick fix. However the V3 comes in with a slightly different Tpose than Genesis makes, even with the V3 morph applied. If only the clone had matched exactly, I think Blender baking would have been an instant solution... Guess I'll have to find another way.
It is possible to transform V3 poses, including the 'zero' pose, to & from G8, as well as doing Genesis & Genesis 2 to/from G8. This way it's possible to get V3 into a T pose very similar to G1 or G2F. It isn't perfect, but fairly good. You'd need to start with G1->G8F or G2F->G8F transfer scripts then G8F->V3 to transfer the G1/G2F 'T' pose to V3.
(V3->G8F: https://www.renderosity.com/freestuff/items/86661/two-victoria-3-to-g8f-pose-scripts Not really needed for this, listed for info. )
G8F->V3: https://www.renderosity.com/freestuff/items/86762/g8f-to-victoria-3-aiko-3-pose-transfer
G1->G8F: https://www.renderosity.com/freestuff/items/88726/victoria-5-g1f-pose-transfer-to-g8f
G2F->G8F: https://www.renderosity.com/freestuff/items/89255/g2f-pose-transfer-to-g8f
There are other scripts around for moving between the Genesis generations, but I simply can't remember where. I bookmark them & loose them, sorry.
Hope this helps.
Regards,
Richard.
Wow, thanks Richard! No time to try it now as I have to run off to work, but later today I'll give it a try. I appreciate it :)
Best tool for UV mapping/changing? (goal is M3/V3/H3/A3 UV to Genesis)Jonstark said:
Well dang it, Blender seemed like it would be such an easy and quick fix. However the V3 comes in with a slightly different Tpose than Genesis makes, even with the V3 morph applied. If only the clone had matched exactly, I think Blender baking would have been an instant solution... Guess I'll have to find another way.
It is possible to transform V3 poses, including the 'zero' pose, to & from G8, as well as doing Genesis & Genesis 2 to/from G8. This way it's possible to get V3 into a T pose very similar to G1 or G2F. It isn't perfect, but fairly good. You'd need to start with G1->G8F or G2F->G8F transfer scripts then G8F->V3 to transfer the G1/G2F 'T' pose to V3.
(V3->G8F: https://www.renderosity.com/freestuff/items/86661/two-victoria-3-to-g8f-pose-scripts Not really needed for this, listed for info. )
G8F->V3: https://www.renderosity.com/freestuff/items/86762/g8f-to-victoria-3-aiko-3-pose-transfer
G1->G8F: https://www.renderosity.com/freestuff/items/88726/victoria-5-g1f-pose-transfer-to-g8f
G2F->G8F: https://www.renderosity.com/freestuff/items/89255/g2f-pose-transfer-to-g8f
There are other scripts around for moving between the Genesis generations, but I simply can't remember where. I bookmark them & loose them, sorry.
Hope this helps.
Regards,
Richard.
ISO Football ("Soccer") uniform in Kickabout poses (Solved - Custom, Not for Sale)Matt_Castle said:
CHWT said:
https://www.daz3d.com/soccer-form-and-shoes and https://www.daz3d.com/soccer-set-for-victoria-4 (really old gen4 stuff though, but you may have luck autofitting them to G8)
I'm looking for something much more up-to-date than that. (In fact, it seems the outfit in the promos is dForce).
The closest thing I've thus found is https://www.daz3d.com/rugby-uniform-for-genesis-3-male-s but this doesn't fit to females very well, and isn't happy with dForce.
Try the boxers & t-shirt (for G8M / G8.1M) that come with the DAZ Genesis 8 Starter Essentials free and retexture them.
ISO Football ("Soccer") uniform in Kickabout poses (Solved - Custom, Not for Sale)CHWT said:
https://www.daz3d.com/soccer-form-and-shoes and https://www.daz3d.com/soccer-set-for-victoria-4 (really old gen4 stuff though, but you may have luck autofitting them to G8)
I'm looking for something much more up-to-date than that. (In fact, it seems the outfit in the promos is dForce).
The closest thing I've thus found is https://www.daz3d.com/rugby-uniform-for-genesis-3-male-s but this doesn't fit to females very well, and isn't happy with dForce.
ISO Football ("Soccer") uniform in Kickabout poses (Solved - Custom, Not for Sale)https://www.daz3d.com/soccer-form-and-shoes and https://www.daz3d.com/soccer-set-for-victoria-4 (really old gen4 stuff though, but you may have luck autofitting them to G8)[Solved] 8.1 actor loading with troublesHi everyone !
I have a problem with 8.1 actors, they are loading with misshapen issues !
Look at the attachment, on the left it's the G8 character, on the left the G8.1...
I already had problems with 8.1 before, like popups when loading to indicate duplicate formulas, I unistalled the problematic assets and don't have the popups anymore. I uninstalled and reinstalled Victoria 8.1 too.
But those misshapen are still remaining...
Any solutions ?
Thanks !
Character converter (is there question)You'll need this to use V4 textures on G8F: https://www.daz3d.com/legacy-uvs-for-genesis-8-victoria-4
Best tool for UV mapping/changing? (goal is M3/V3/H3/A3 UV to Genesis)repaint in Ultimate Unwrap3D using clones
Blender baking using clones
Blacksmith3D
Zbrush Zprojection
If you have a UV product DAZ studio Map transfer is also a possibility, I do recall there being one using geografts for Genesis 3 or 8 but don't think there was one for Genesis
https://www.daz3d.com/legacy-uvs-for-genesis-3-special-edition-victoria-3
it could be awkwardly transferred from 3 to 1 afterwards though, due to different surfaces and geografted bits one would need to combine maps in an image editor.
V3, M3, A3 etc all have the same UV BTW
My trial ended prematurely after 2weeks due to some glitch but I did manage to create a rough V2 UV for Genesis 3 with a couple of shared surface issues in that time, sadly I didn't have time or skill to refine it.
But yes, Maya can project UV mapping from one mesh to another if they occupy the same vertex space even though the vertex counts differ.
Can you identify this Genesis 8 character?I think that's Victoria 8.1 https://www.daz3d.com/victoria-8-1Can you identify this Genesis 8 character?That's Victoria 8.1 and you can browse only G8F if you either use the blue bar at the top of the store page or use the "Figure" dropdown, though obviously in this case searching G8F won't do you any good.
"Why it’s so hard to make CGI skin look real" - VOXJonstark said:
I've never seen this approach used by any other PA in any other texture set I own, so it was a little surprising. I couldn't figure out what those maps were for, until I loaded up the texture in Studio to find out where they go.Well, that by irself is clever. I would have never thought of it.
I 100% agree, Elite maps are terrific and I'm very glad to have them. Shame that DAZ did away with the Elite series. I would argue that some of the flagship characters of Genesis1 were likely made in the same process and with the same quality, such as Philip(Michael 5) and Bree (Victoria 5), likely as well as David 5, Aiko 5, Freak 5Fortunately, there are some other great maps in Genesis besides the flagship ones.
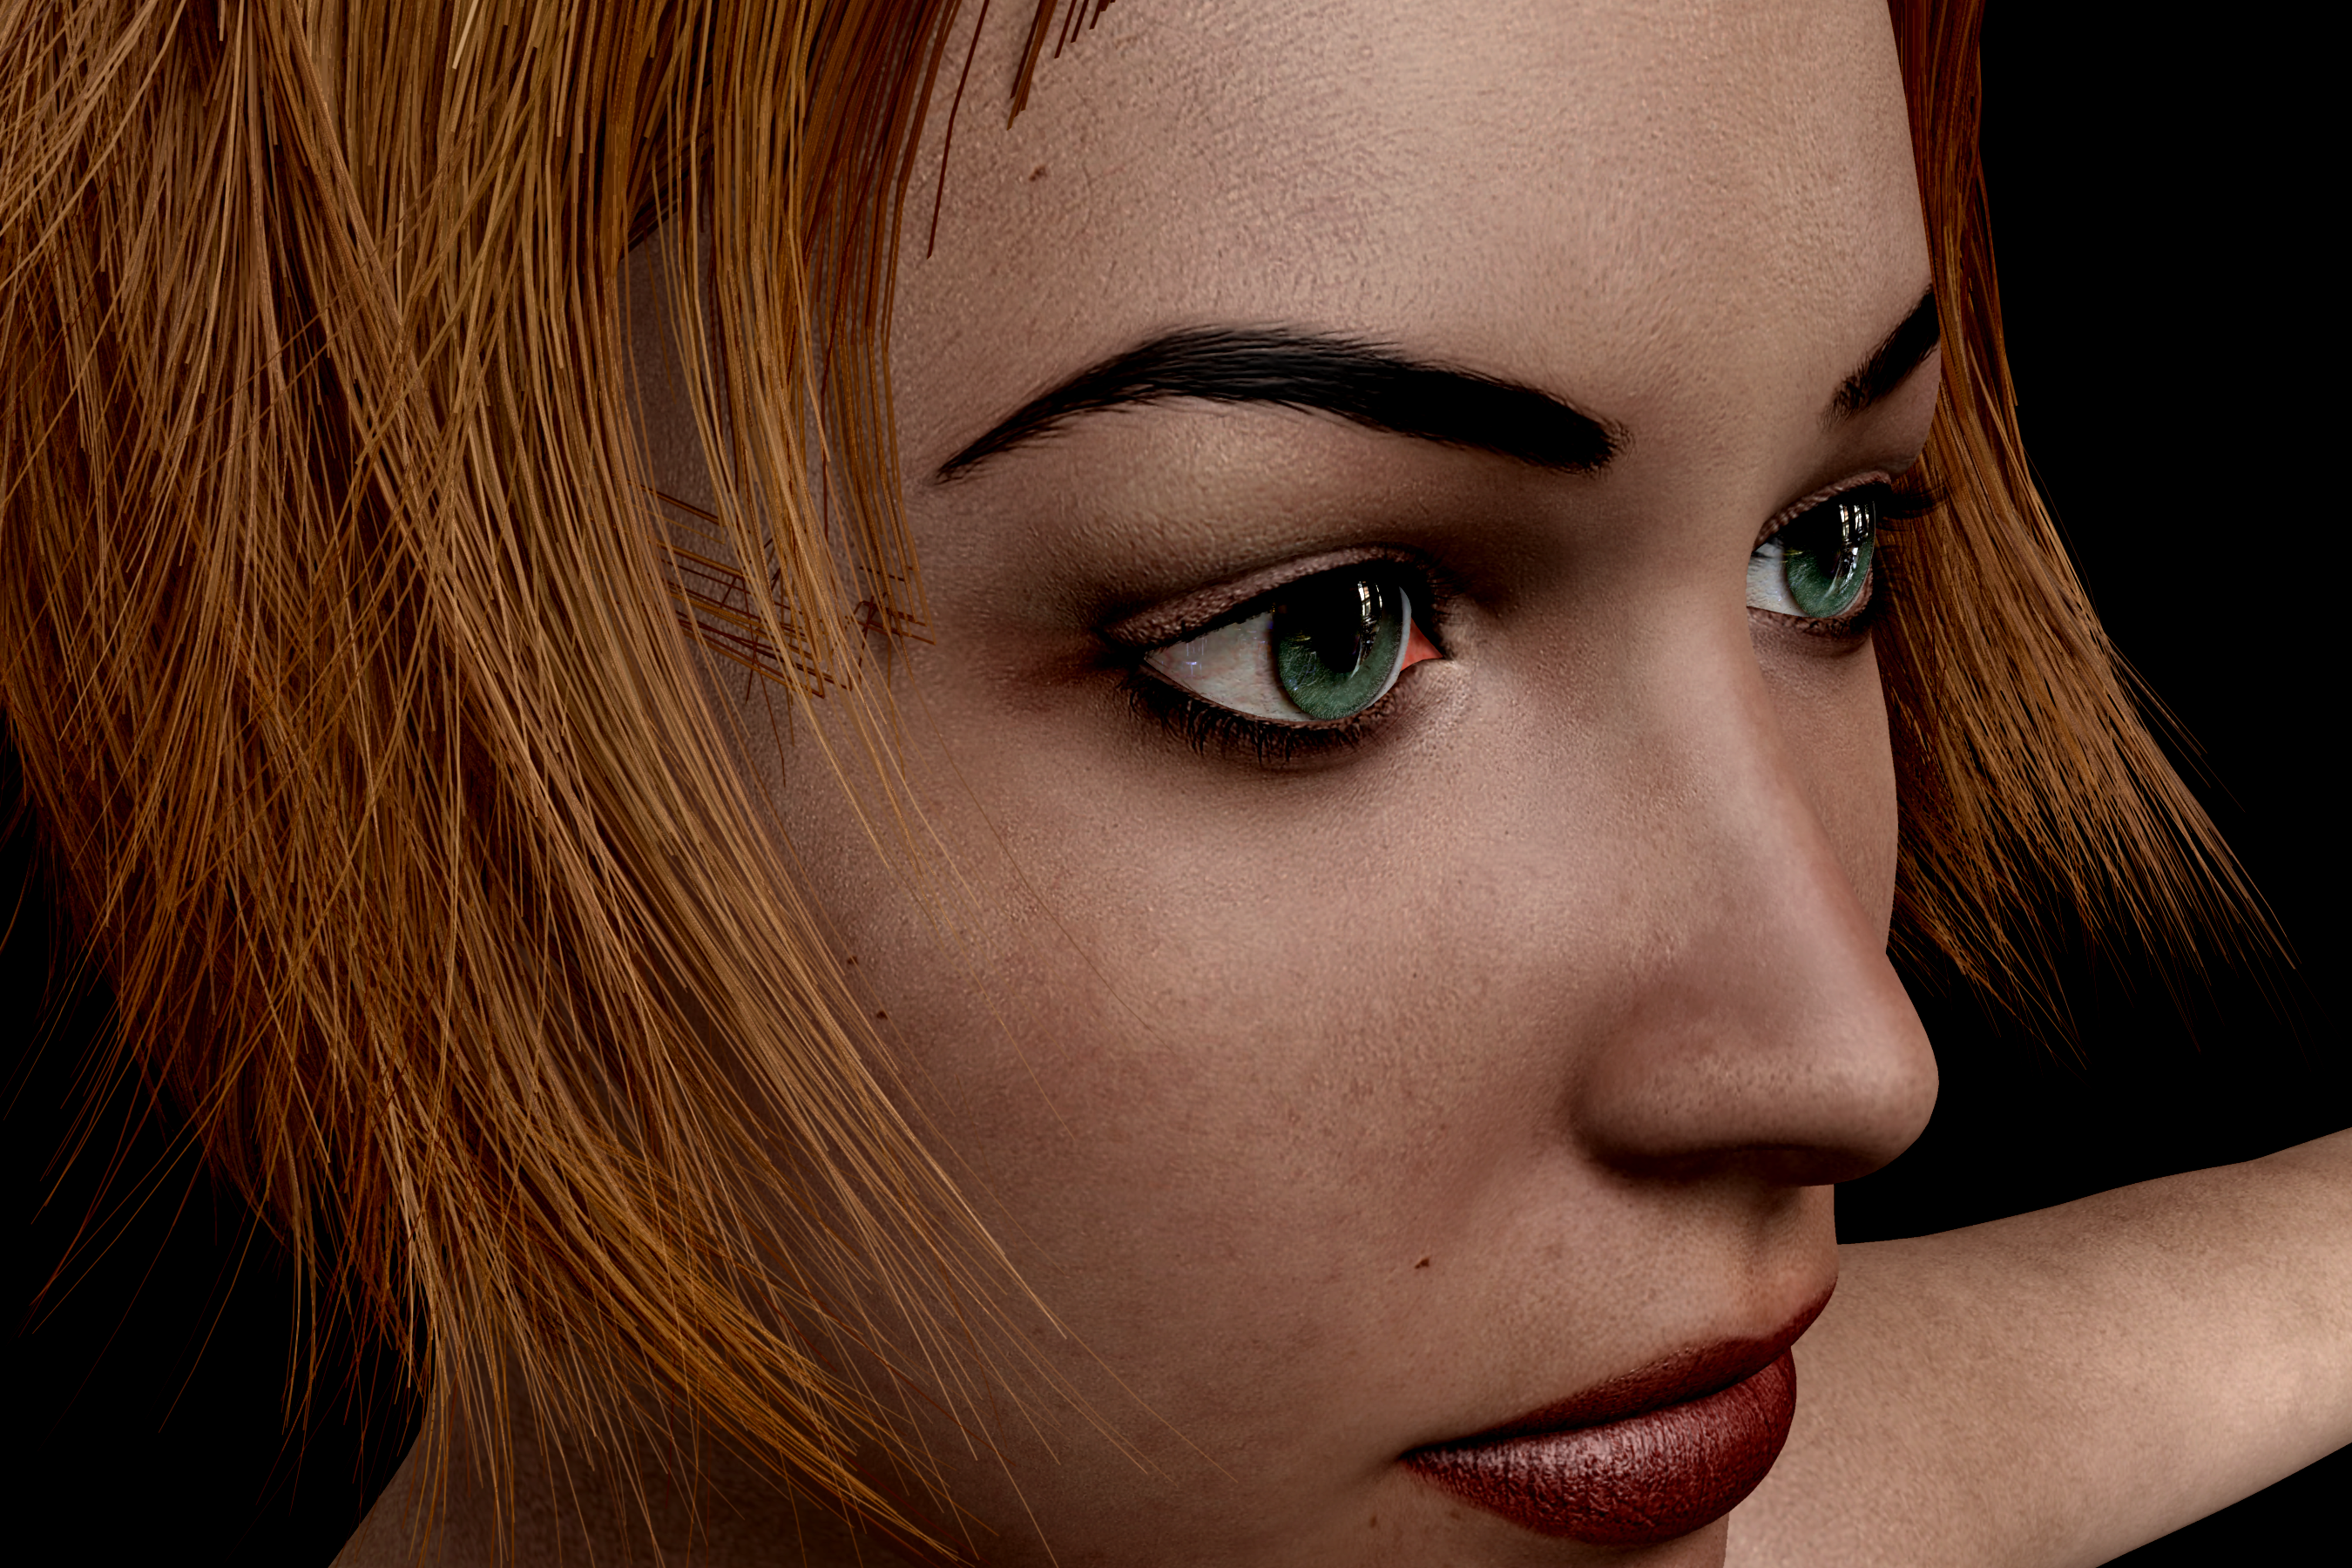
BTW is that Moda hair? There's one 'bob' type hairstyle in the Moda sets that's quite appealing, just needs some loving to add some more segments to the hairs and even them out, so they don't look too jinky at the bends
You have a great eye for Carrara hair! Yes, that is a Modacut. First time I ever loaded it. I just wanted to cover her head, so I didn't attempt to adjust it, other than color.
Regarding rimlights, this is the exact same hair as before (this one's unchanged, I was tinkering with a duplicate version in another Carrara window for my experiments), but this render is without the rimlights:
I like this one better. To my eye the hair is more natural.
"Why it’s so hard to make CGI skin look real" - VOXUnifiedBrain said:
Jonstark said:
Basically instead of putting just the diffuse map into the color channel, the method is to put a multiply operator in, and in the first channel put the diffuse map, while in the second channel put the diffuse multiplier map. The diffuse multiplier map looks mostly white (I mistook it for a displacement map at first). When multiplied by the normal texture map, it darkens the skin (well not just darkens, as it does contain its own colors as well) in specific places, as well as overall. The idea is to enhance the color of the skin.I don't see any color information in the diffuse multiplier map. When I use it, it looks the same as when you used it. It darkens the skin.
I loaded up one of the diffuse multiplier maps in Gimp to take a closer look, and I think you're right. I don't really see any color information (there's probably a way to use Gimp to find out for sure), it looks completely grayscale to my eye, so the purpose must only be to add details by darkenening specific bits of the color map. It's a little bit of a quandry, because for some of the characters I think it goes a little too dark, but without the multiplier it's a little too light. Fenric's Color Balance plugin will let me get to 'just right', if I want to spend the time, I guess.
I've never seen this approach used by any other PA in any other texture set I own, so it was a little surprising. I couldn't figure out what those maps were for, until I loaded up the texture in Studio to find out where they go.
One might ask: why not just make the diffuse map as good as possible in the first place, without needing any other map to enhance it? I don't know the answer for sure, but I did see one of the old timer PAs complaining about how difficult/expensive/time-consuming it was to make the Elite maps, and that was why DAZ eventually stopped making them. So maybe this was an easier/less expensive way to enhance the rendered texture? Not sure, but it does make a difference when using them.
I can believe that those Elite maps where hard to make. They are excellent, and vastly underrated, IMO.
I 100% agree, Elite maps are terrific and I'm very glad to have them. Shame that DAZ did away with the Elite series. I would argue that some of the flagship characters of Genesis1 were likely made in the same process and with the same quality, such as Philip(Michael 5) and Bree (Victoria 5), likely as well as David 5, Aiko 5, Freak 5, and even the ultra-ugly (because of the face shape that not even a mother could love lol) Steph5. Which makes sense, because as far as I know the Elite series ended in that generation, with M5 Elite Dave, V5 Elite Valerie, and S5 Elite Joanie.
I agree 100% that Liquid Rust goes for the airbrushed 'clean' look. Of course lots of other PAs go for that look too, so Rust isn't alone on that. Always reminded me of 'glamour photos' from the 80s and 90s, just a very smooth look, and I'm sure its intentional. Liquid Rust does not give 'good acne', lol.
My main objective is realistic closeups. The LR maps aren't great, but they are better than I thought. I just wasn't pushing the textures enough. Yesterday, I loaded in a LR map from Bailarin-del-fuego, and was able to get some differentiation. The cheeks were good, but It was a little uneven around the nose area. And the ears were weird (blotchy), but I hid them with hair. Nothing fancy here regarding lighting. Lit with a single distant light, ambient on 20, and HDR for the eye reflection.
I just Bailerin del Fuego in that sale, she looks quite good in that render. I'm interested to open it up and give it a whirl, to see the ears like you mentioned. When I zoom in on the bigger picture, I can see the nose is a smoother than I would like. However now that I've got my hands on Materialize thanks to Dart's recommendation, I'm excited about the ability to add normal maps (heck, I think I might prefer to make my own Bump and Specular maps just from the base diffuse textures rather than rely on the whims of the PAs).
Really nice render, actually, proves you don't need to have Full GI and wait 2 hours for calculations to get a decent render. One distant light and 20 for ambient gets the job done, bet it was blink-and-you-missed it quick.
BTW is that Moda hair? There's one 'bob' type hairstyle in the Moda sets that's quite appealing, just needs some loving to add some more segments to the hairs and even them out, so they don't look too jinky at the bends
On the other hand, since I quite like the 'beautified' look, I'm ok with that. Surreality texture sets are the ones I remember seeing so many falling down to compliment on their beauty, and to me most of the Surreality ones are kinda ugly/weird. (Still, I picked up a few last night, the ones that were only $1 in the sale, so I'll give em a try to find out in real life how they perform)
I have a couple of unused Surreality characters, so I will try them out as well.
All of the LR sets I've opened have spec maps though,
Of the 12 I have, 6 don't have specular maps - Brooke 2, Jamie, JM 2, Kittie, Sin, and Wendy.
Yup, those were all ones I didn't own previously, but I just opened up Wendy to take a look. Sure enough, no spec maps. From the render quality of the promos, I'm guessing that all of Liquid Rust's earliest products don't have spec maps. Maybe it goes back so far that spec maps weren't in common use back then? Interesting to speculate. Speculating on specularity, hah. :)
Seriously, though, I'm impressed with Materialize, what a great freebie to play with. For instance my impromtu Achilles, the texture I'm using is from an incredibly old M4 texture set that didn't even come with spec maps, just kinda crappy bump maps, which I used in the specularity channel anyway just to make do. But there's just no real spec detail at all, it looks pretty bad. But now with Materialize I can make my own spec maps, and better bump maps, and add in some normal maps to really tune this shader up.
The mullet you posted above looks good. The outer edge, however, looks outlined. Is there some reason for that?
There's 2 rimlights in the studio that are focused right on the hair, this was from PhilW's setup of the studio product. I wanted to see the edges of the hair, you can also see it edging the specularity on the limbs too. I don't like the rimlights and usually have them off, but I wanted to make sure I could see all the edges of the hair as I was refining it. I'm still not happy with it, ended up spending a few hours last night tinkering with it. Humbling to realize how much I have to learn about hair shadiing sadly.
Regarding rimlights, this is the exact same hair as before (this one's unchanged, I was tinkering with a duplicate version in another Carrara window for my experiments), but this render is without the rimlights:
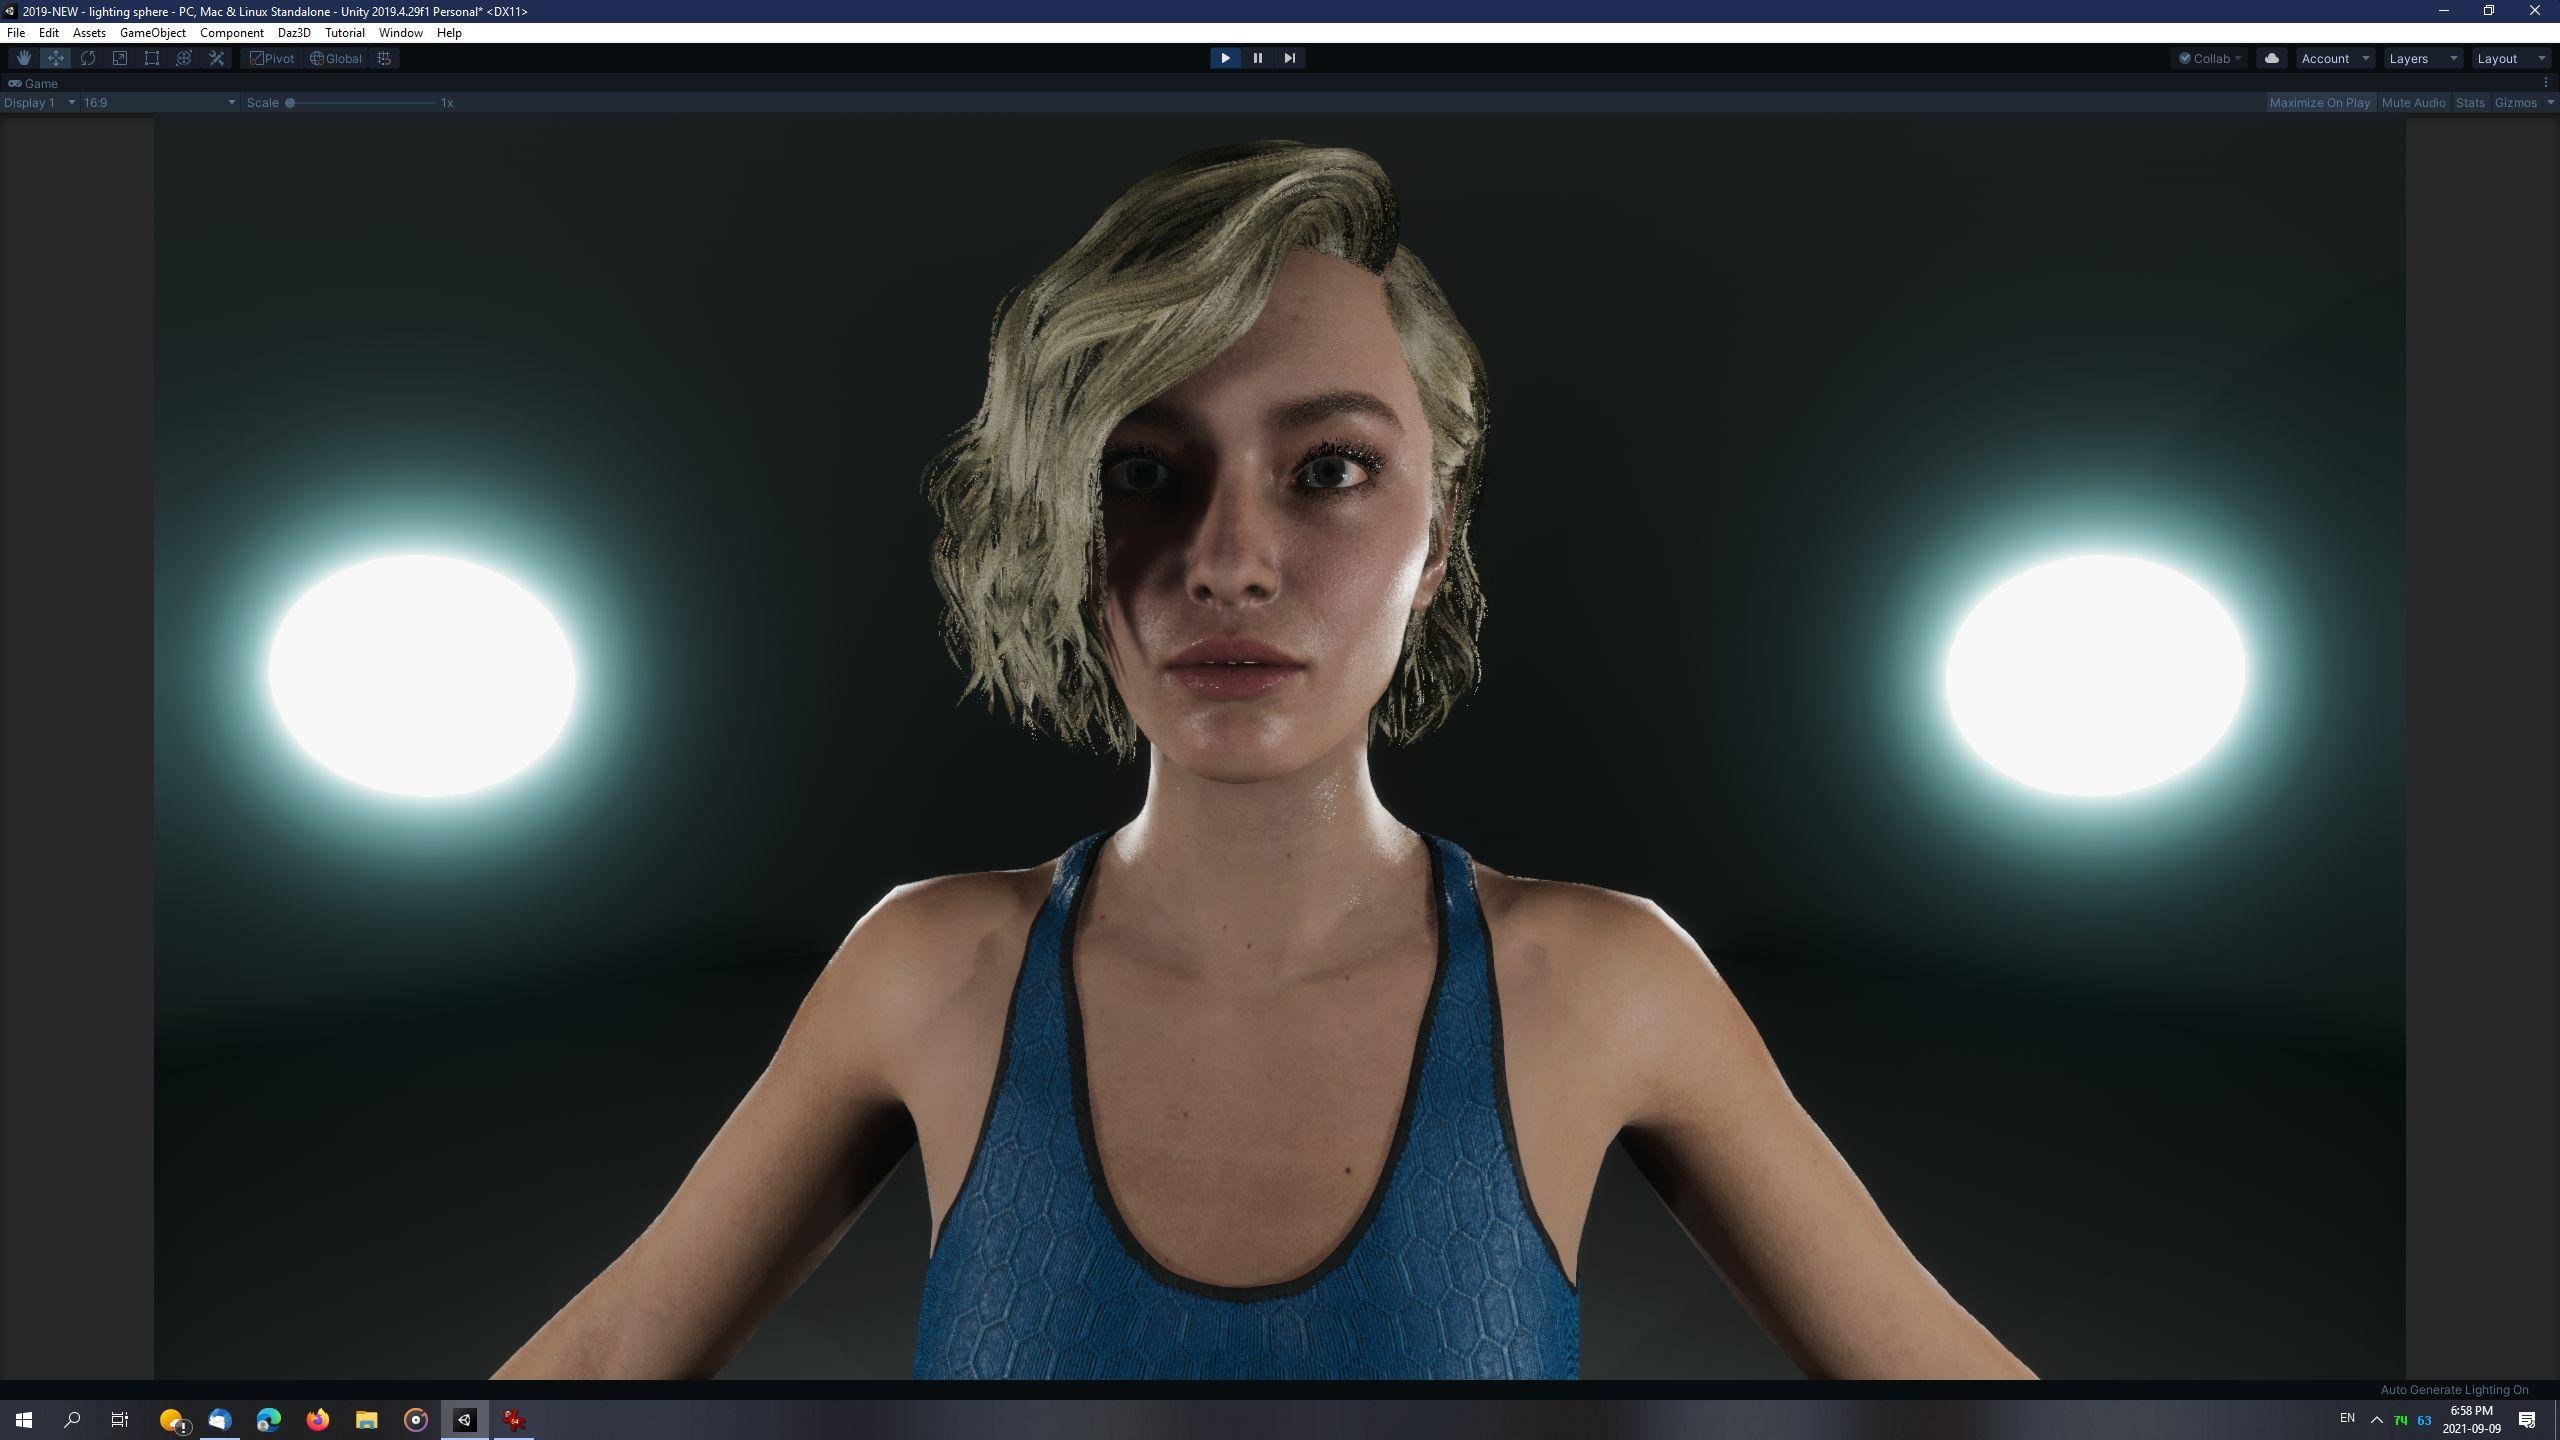
Post your DAZ to Unity rendersVictoria 8.1 with some dramatic indoor lighting and the work-in-progress New Skin Shader.
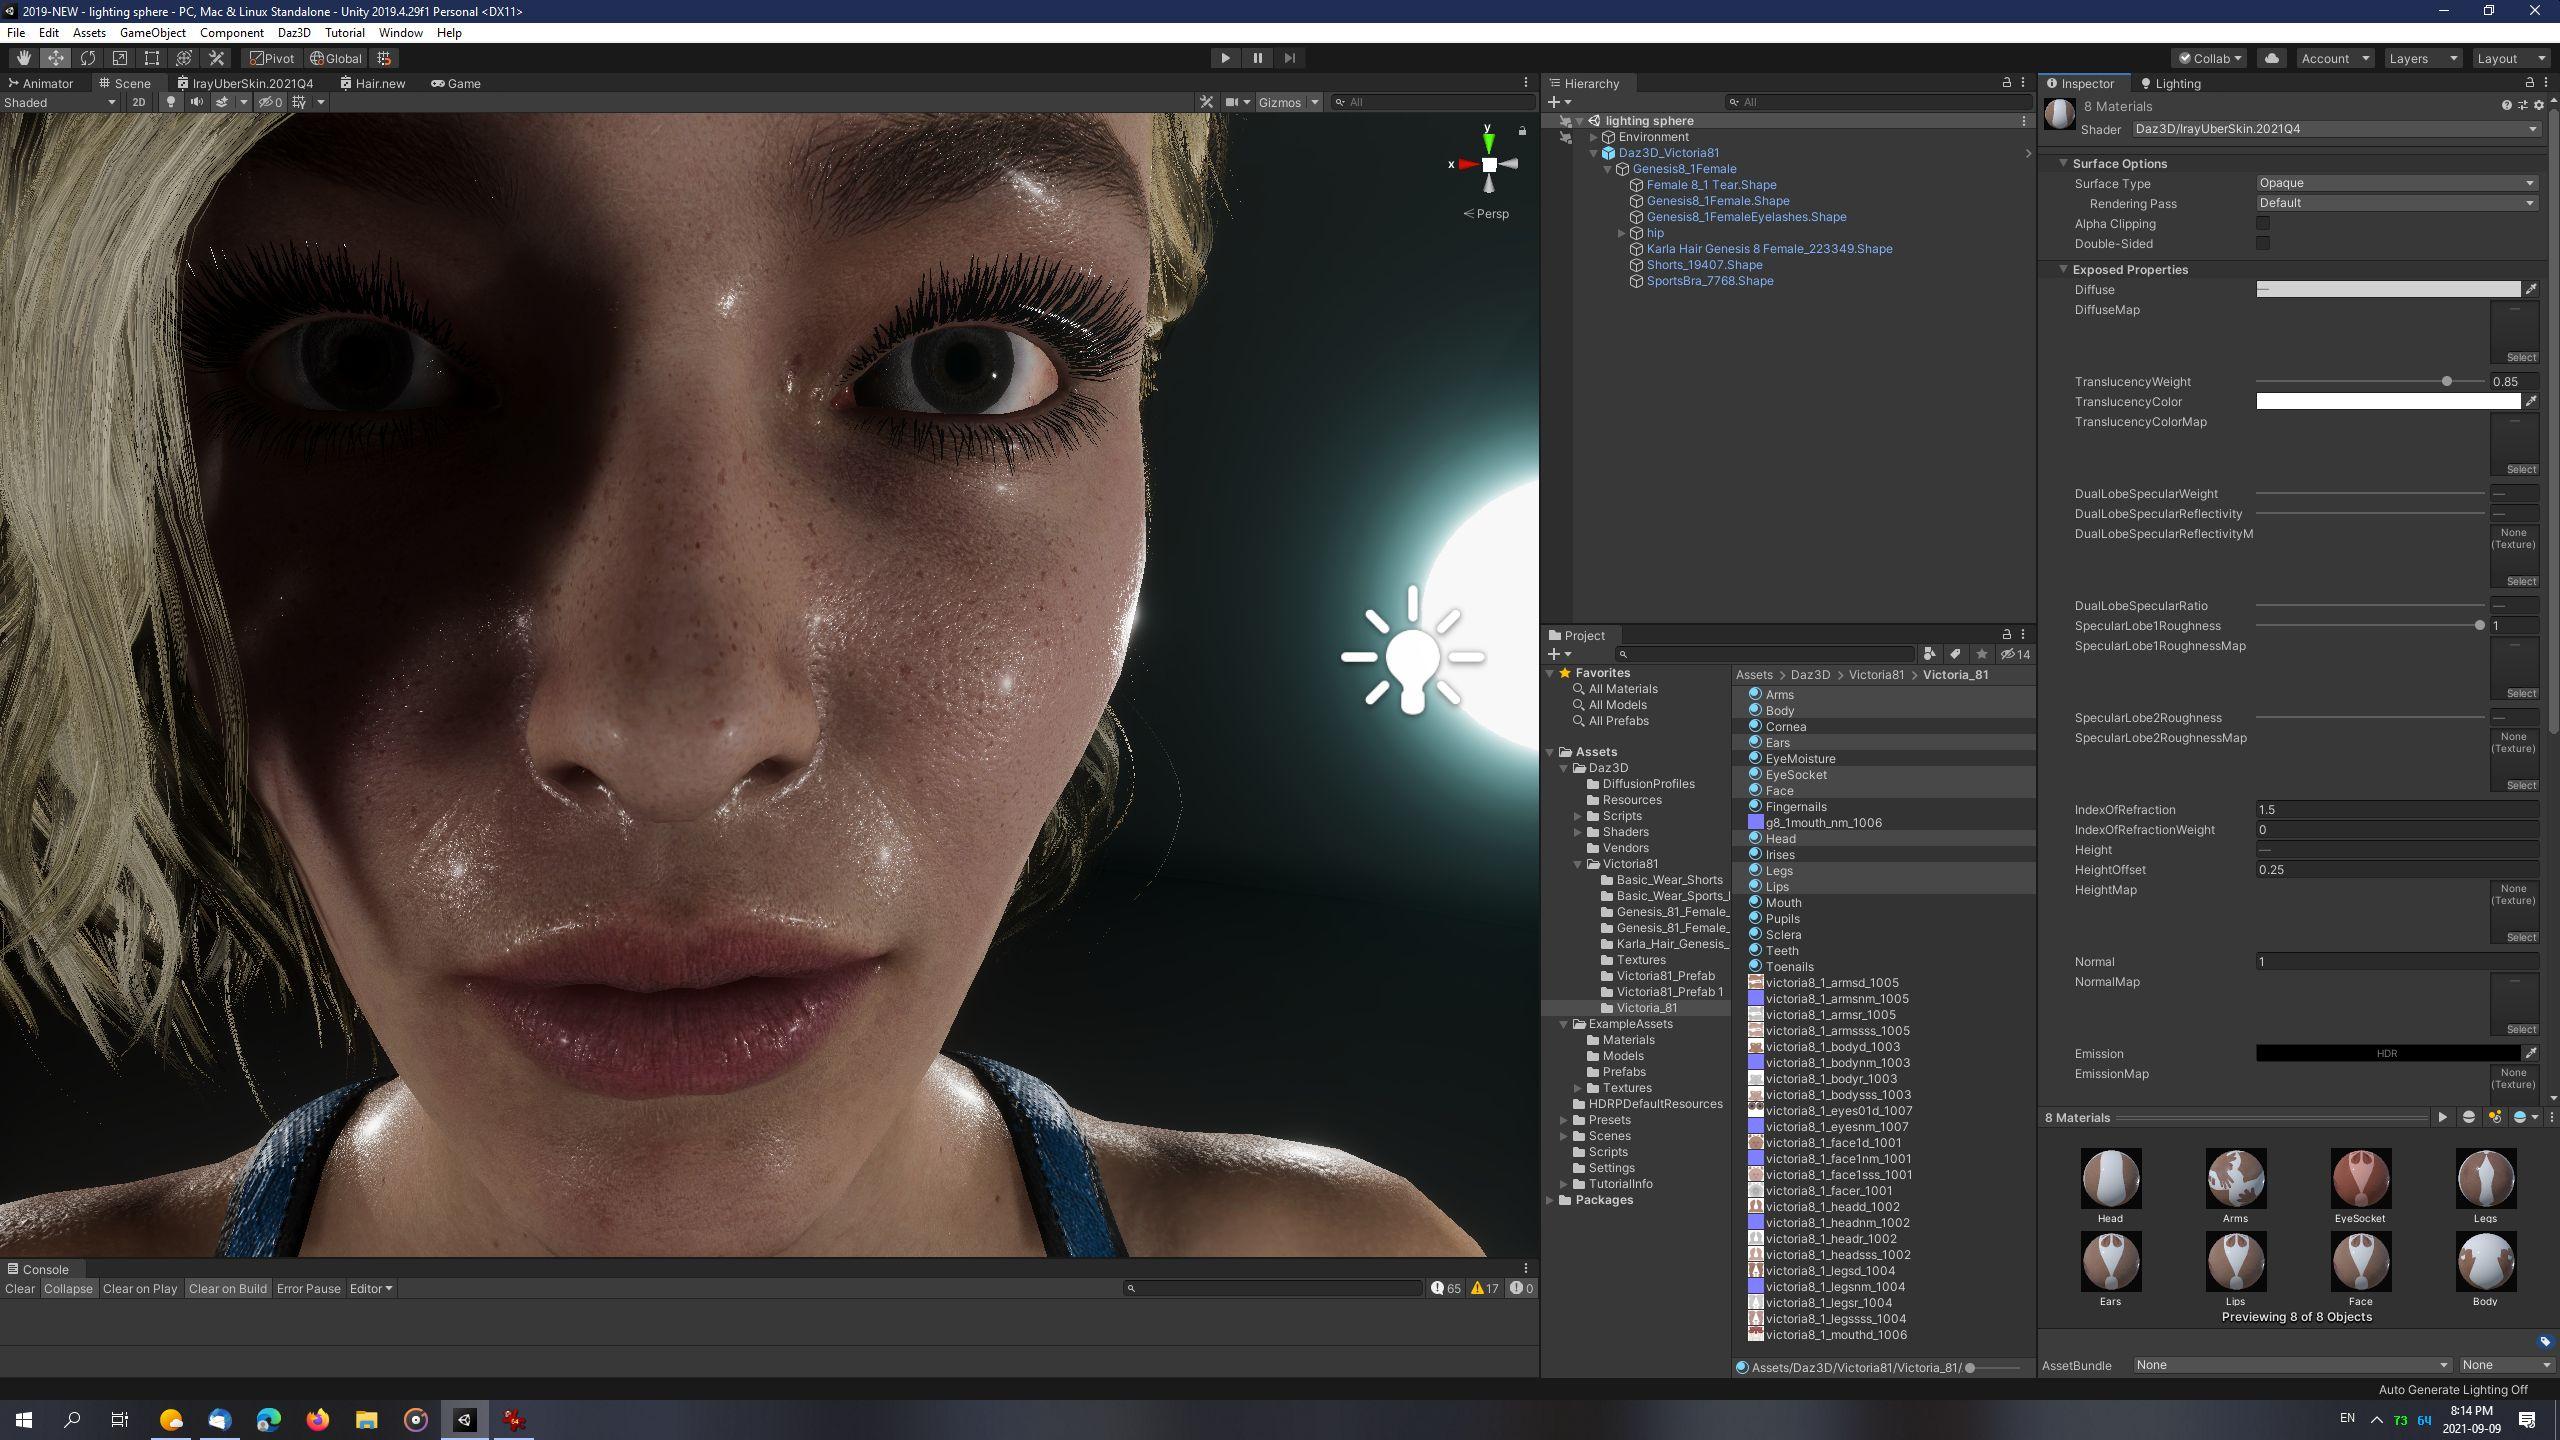
LightBalls recipe:
- Create GameObject -> 3D Object -> Sphere.
- Scale x,y,z of Sphere to 0.25.
- Create new Material and assign to Sphere.
- Material Settings: "Use Emission Intensity" - checked, Emission Color: Hexademical: 469EB0, Emission Intesity: 22 (EV100).
- Duplicate as many times as desired and place in scene.
Point Lights recipe:
- Create GameObject -> Light -> Point Light
- Type: Point, Mode: Mixed
- Intensity: 5000 Lux, At 1, Range 5, Indirect Multiplier 1
- Volumetrics: Enabled - checked
- Shadows: Enabled - checked, Update Every Frame, Resolution: High (1024), Near Plane: 0.001, ShadowMask Mode: Distance ShadowMask, Contact Shadows: Medium
Light Probes:
- Create GameObject -> Light -> Light Probe Group
Reflection Probe:
- Create GameObject -> Light -> Reflection Probe
Project Settings:
- Quality->HDRP, HDRenderPipelineAsset: Shadows: Filtering Quality: Medium (Unity 2019 has bug where High quality causes bad aliasing)
Sky and Fog Volume Settings:
- Visual Environment: Type: None, Ambient Mode: Dynamic
- HDRI Sky: HDRI Sky unchecked
- Exposure: Use Physical Camera
- Add override: Bloom, Shadows-Midtones-Highlights: Shadows 0.54
Camera Settings:
- Clipping Planes: Near: 0.01
- Anti-Aliasing: FXAA
- Dithering: Checked
- ISO: 100
- Shutter Speed: 1 / 60 seconds
- Focal Length: 50, Aperture 8
Ground and walls:
- Plane and Sphere
- Plane scaled to x: 2, y: 1, z: 2, position set to 0
- Sphere scaled to 10.5 and position set to 0
- Set Sphere Material to double-sided, Flipped Normals
- Both:
- Lighting: Cast Shadows On
- Contribute Global Illumination - checked
- Receive Global Illumination: Light Probes
- Static - checked (found on same line as GameObject's name, at the very top of the Inspector tab)
Light Baking recipe:
- Click Menu: Window -> Rendering -> Light Settings
- Environment (HDRP): Profile: Sky and Fog Settings Profile, Static Lighting Sky: None
- Lightmapper: Progressive CPU
- Lightmap Size: 1024
- Compress Lightmaps - unchecked
- Ambient Occlusion - checked
- Auto Generate - unchecked
- Manually click "Generate Lighting" after setting up all lights, ground and walls of scene.
New! Novica & Forum Members Tips & Product Reviews Pt 14AgitatedRiot said:
What about Blakely for Victoria 8.1?
If a character is for a specific Daz named character then using it wothout that character will not yield the intended shape. With Genesis 8 that is likely to be the only issue - with older generations it is possible that the textures use the UV set from the named character and so won't apply correctly to the plain base.
[Released] LSF Hornet [Commercial]The Griffin finally has some cover for landing operations when the LSF Hornets have now arrived to the scene!
The LSF Hornet is a light space fighter that can operate both in and outside the atmosphere, thanks to its 2 sets of engines. It's fast and agile and can outmaneuver heavier opponents with the aid of its several maneuvering and braking thrusters. Hornet is armed with 4 cannons, and it can be equipped with up to 6 heavy missiles designed especially against capital ships. The set also includes ladders for the pilots. Pilot and climbing ladders poses are included for Genesis 8 Male, Genesis 8 Female, Michael 8, and Victoria 8.
Out now!: https://www.daz3d.com/lsf-hornet
New! Novica & Forum Members Tips & Product Reviews Pt 14What about Blakely for Victoria 8.1?New! Novica & Forum Members Tips & Product Reviews Pt 14mayfield_deltic said:
Do you need to own Victoria 8.1 to use any other Gen 8.1 Female product (e.g. Bonnie 8.1) or are any prerequisites to use 8.1 already in Daz3d or Bonnie? I have only been using Genesis, Genesis 2, 3 and 8 as they are so far.
No, Gensis 8.1 Female is the base for the other characters, none of which depends on any of the others.
New! Novica & Forum Members Tips & Product Reviews Pt 14Do you need to own Victoria 8.1 to use any other Gen 8.1 Female product (e.g. Bonnie 8.1) or are any prerequisites to use 8.1 already in Daz3d or Bonnie? I have only been using Genesis, Genesis 2, 3 and 8 as they are so far.
Daz 3D is part of

Connect
DAZ Productions, Inc.
7533 S Center View Ct #4664
West Jordan, UT 84084Licensing Agreement | Terms of Service | Privacy Policy | EULA
© 2026 Daz Productions Inc. All Rights Reserved.