-
Fixing the kids 4
You can get kids the can pass for 4 - 5 years old and on up just by using the DAZ Originals products that morph the head, body, and expressions. Do a search on child vs adult proportions for artists on the internet to guide you on how to adjust the morphs in those products.
Casual Spikes Hair for Genesis 3 and 8 by RedzStudio [ QUESTION ]I'm hoping someone can help with this problem I have had when buting this product this morning.
Product in question: https://www.daz3d.com/casual-spikes-hair-for-genesis-3-and-8
First off, the product took an AGE to download, and now that it has, the hairbase (skin texture) loads fine, but the actual hairs don't. They show as being present in the scene tab, and all of the preset shapes and materials are present, but the actual hairs are definitely not to be found anywhere. Not in viewport, and not in an actual render.
With the DL taking so long, I thought it may be an issue with a corrupted transfer or similar, so I completely uninstalled via DIM, and deleted the package. I have re-downloaded (still took a while but nowhere near as long!) and I am having the exact same issue.
Any help would be greatly appreciated! :)
Lee 8I’m not sure what the marketing dept was thinking here. This supposed “ deal” is really NOT a deal at all if you already Lee 6 and Lee 7. I would rather have the price discount that has previously been offered with pro bundles when you own previous generations than a discounted gift card. The selections of possible free items has been offered before to the point that I already have the ones I was interested in.
Right now there’s very little incentive to get the pro bundle and that’s really sad because I usually snap up the male pro bundles ASAP in order to increase the amount of male content in my library and also to show support for future development of male content. This time I really cannot justify doing that.
Being as it’s a holiday weekend for everyone in the US, I don’t think waiting until tomorrow is going to bring any favorable changes to the offer either.
At this point, I may just pick up the base figure and HD morph and call it good. Later on the other items I like be be discounted in some sale or other and I will pick them up then.
Lee 8I bought Lee 8 and Yong within minutes of release, but passed on the bundles and freebies. I look forward to testing them out and seeing how they blend with the other morph packs.
How do I persuade Raiya to make Brooklyn HD for Genesis 8?Doesn't look masculine at all to me. Just follow one of sickleyield's morph transfer tutorials to move Brooklyn HD to Genesis 8. I agree she is one of my favorite 'realistic' Genesis 3 characters too.
Altering G3 or G8 mesh in BlenderThank you, andya_b341b7c5f5, Syrus_Dante, marble, nicstt
Thanks for your valuable inputs.
The specific issue for me was that the cheek area of Daz models. Almost all of them has some volume muscles either side of the nose, and cheek bone morph. But this is not sufficient to relfect some South-asian faces. (Daz has some East-asian face figures- e.g Mei Lin has some volume in this area).
Thank you all again.
Just Released - Fully Rigged Vintage Electric Organ [Commercial]Another masterpiece! I sure am happy to see you getting back to instruments after all those autos. I definitely want the upcoming guitar and amp (hope the axe is solid body). I have loved working with your other guitars and bass freebie. Very thoughtful and flexible.
Thank you xyer0. Just love this render/image. So glad you have enjoyed my products. Yup, Those autos (which I loved creating) were my catchup after losing a whole lot of stuff due to a comp crash. But yes back into the swing of instruments. The guys here at Daz3D are currently testing the next addition as I write this. Have been working on the mother of all guitars for something very cool in the new year also - Hendrix/Zappa might give you a hint :) And yes, the new one,you're waiting on, is a solid body with a new morph system created for even better string posing (my hollowbody freebies was my testing ground). It worked fine on them, so I took it all the way to give you ppl somethng even cooler to work with. It'll be a standard feature on any guitar I make here-on.
I'd like to reproduce some of my real-world custom guitars next year. Like the Stellacaster, they were pretty special and took a whole lote of time on a chisel and rasp. We'll see what the new year brings. That carved 6-string was for a chick who now takes it all around the world with her. These basses are just my pride and joys. Both fretless and both very sweet sounding. Be nice to see them in the 3d realm.
Stay creative... love your work. Thanks for suppoting mine. :)
(edited - darn typos!)
From Victoria 3 to Genesis 2GenX2 with the Genesis 2 and V3 add-ons would work to transfer a V3 morph to G2F.
For the texture, Texture Converter 2 with V3 and V4 add-ons would enable you to convert the maps to V4 UVs, then with V4 for G2F you can use those converted textures on G2F.
String to windows clipboard [solved]The only scripts I know which pass to (or get from) the clipboard use a text box, and rely on the user doing the copy/paste operation from/to that.
Thank you very much for the reply Richard. I have made a script that reads any pJCM that fired up when a figure node is translated. I would like to auto copy the name of the pJCM to the windows clipboard in order to use it to the morph name that will be created in the external program like ZBrush when we create the corresponding pJCMs. (The script also batch load all pJCMs and FBMs using the morph names). It would be convinient to auto pass the name of the JCM to the clipboard, but if I can't find any other solution I will make a text box. I have also thought to use the text box, as you said and than use an action to copy it, but the 'DzCopyNodeAction' is the closest I could find, and I don't think that it would do the work .... If nothing else will work then I will give the script to the other PAs with the instruction to copy the name from a text box.
Thanks again for your reply!
Waited Too Long – 1080ti UnavailableI would not be too afraid of buying used if they are the right price. That is because most of the board makers allow warranties to transfer. I got a used 1080ti for $500 and it still has 2 years left on its warranty. I've had it a couple months now and no regrets. That was right before the prices jumped again, but you might find some at good prices if you look.
Another thing to keep in mind, if you live in the US, new prices will jump again when new tariffs kick in. The first 10% has already kicked in as of Oct 1. But the big 25% tariff will kick in on Jan 1, 2019. These will effect almost every video card out there because they all use parts from China. The only way around the tariff is if the card was shipped to a warehouse before the tariff kicks in, but that will only last so long. So if you live in the US, you probably should decide before the new year. 25% on a $1,000 card would $250. Yikes.
Getting iRay Shaders onto DAZ Figures with Poser ShadersThe Smart Converter should still work on poser made characters. I do not have Poser at all, but I do have a number of V4/M4 characters from the Poser era that I converted to Iray. Most of them were done with Smart Converter. I did things differently, though. I use the Smart Converter for Genesis 2. I rarely actually use V4/M4, instead I transfer these to Genesis 2 with the the V4 for Genesis 2 product that allows G2 to use V4 skin, and the Batch Converter (this automates the process.) THEN I use the Smart Converter on them. It does not always give a great result, there are some character skins that do not agree with the settings the Smart Converter uses.
I also have NGS2, and I like it well enough. But it has a tendency to be too dark and harsh for my tastes. Of course you can always tweak things to your liking.
I actually have a few test renders of NGS and Smart Converter in my gallery, so you can compare them. I think I used the default HDRI settings when I did these. These were also done in Daz 4.8, so there may be some variance to how 4.10 handles them. I used the default convert settings.
This is danae Dublin for V4. NGS first

ISC. Note there is a flaw in ISC that can cause eyes to blow out like a camera flash. This only happens when looking at a direct light. To fix simply set the glossy layered of the pupil and iris to 0. At the time I made this, I did not know that fix.

So you can see a difference here, and it really comes down to preference. Both of these products have options to fine tune things, and you can certainly fine tune the settings manually. While I like to detail of NGS, it has a tendency to turn some parts of skin blue, and can make some characters look like they have been bruised or have rashes in certain spots. ISC is much softer in my opinion, and thus more natural. That is kind of a trend regardless of model, but they can look different from model to model.
Here is another V4 character, Lil Flower. NGS first

ISC

While you mention V4, I also did a Genesis 2 character, Belle 6, again NGS first

ISC

While the other two can be a matter of preference, in Belle's case, I think ISC comes out the real winner. Her skin just comes out too blue looking in NGS. With ISC it really coes to life, and looks like a young woman's skin would. It has just the right amount of gloss in the places you expect it, I think it is truly special.
I will say I much prefer how NGS does the eye gloss out of the box in every case. But over all I prefer ISC for most of the skins I use it with.
Basically, the better the texture maps are, the better your results will be. You can use either one as a jumping off point to further tune skin to Iray. NGS is pretty unusual in how it handles skin settings, so using it as a starting point might be a bit confusing. ISC on the other hand uses more "traditional" methods that you may see discussed in the forums. One thing you can try is to load up a newer character that is Iray and see how their surface settings compare.
It is also possible that the model uses textures that neither NGS or ISC will understand. If that happens, those textures are not used in the conversion, and that might be why some things look off. You can try looking at the skin surfaces and see if anything looks out of place. Both may also discard texture maps depending on what choices you make before converting.
Hope this helps.
From Victoria 3 to Genesis 2What products would help me transfer a Victoria 3 model to Genesis 2 level?
Any recommendations regarding textures, UVs, and shapes is much-appreciated.
Celebrity Look-a-Likes for 3D figures Part 2Sometimes I feel like trying a look-a-like...
Head morph and face texture (on a G2F) = Facegen
Who's the look-a-like suppose to be?
The outfit reminds me of Karen Gillian (aka Amy Pond, Doctor Who). And I might see a resemblence??? But not strong enough for me to say that is what you were amying for? (Pun Intended)
Celebrity Look-a-Likes for 3D figures Part 2Sometimes I feel like trying a look-a-like...
Head morph and face texture (on a G2F) = Facegen
No Lee 8?Just use a no breast morph on ML.Creating Morphs for Zbrush Fibermesh HairYou can read my post like a checklist of common pitfalls. What you are trying to do is not an easy task and I don't know how skilled you are in DazStudio or ZBrush. Its something the experts like the content creators knows best. But I guess everyone has its own workflow and technics. I can only give you hints to avoid common mistakes, and a bit of what I know about this so far.
Actualy I gave up on my fibermesh experiments with ZBrush and Daz Studio. First I had problems with the distortions caused by the character shape morphs. Second a head full of fibermesh hair can be very recource heavy depending on the length and if you turn up the hair density to get some volume. Also the more vertices you have to deal with in the hair geometry the more work it takes to create fitting or styling morphs. Use an additonal scullmap so the head dosn't look too bald and turn down the hair densety to a proper vertex count. Actualy you could tweak the fibermesh settings to an extend that you get traditional strands hair out of the fibers. I saw some youtube video on that. Maybe start with some simple example like eyebrows and see if you get it to 'fit' and follow expressions.
To create such conforming "wearable" items out of these props, for what ever figure or character moprh, you first need to use the Transfer Utility. Set the current figure as the Source and the fibermesh hair or whatever as the Target and choose what to 'transfer' with the Projection Options. As the result the static prop mesh you have imported becomes a conforming figure 'fitted' to the source figure. If you don't use the Reverse Deformation setting and you don't dial the genesis figure back to base shape that would work for the current character shape.
I quickly found a good starter tutorial on youtube
ZBrush : FIBERMESH : How to easily groom hair in ZBrush : PART 1
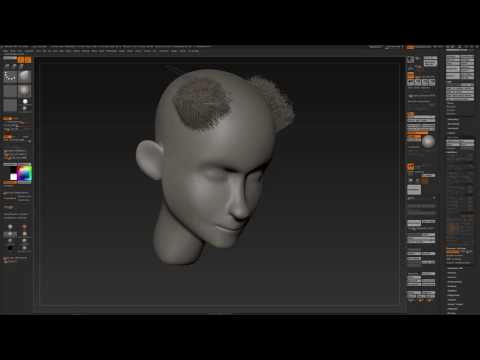
ZBrush : FIBERMESH : How to easily groom hair in ZBrush : PART 4
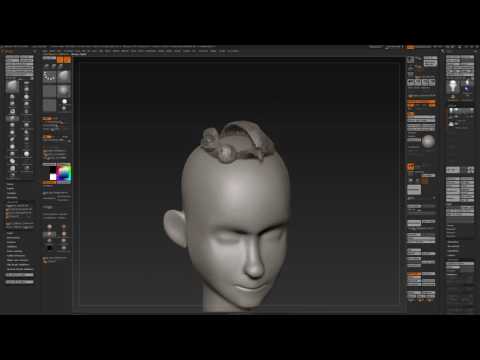
Use the Move Brush press B-M-V and Elesticity lol his accent makes problems to pronounce it, he means some Brush Stroke setting called Elasticity or I would try the Move Elastic Brush press B-M-E. With those brushes you can style the hair. To have more control with the brushes it would be best to create various patches of fibermesh 'sub-tools' for different parts of the hair like the bangs. Another thing I maybe would use are the Layers for different shapes. Open the Layers in the Tool pallet and press the New button, the new layer appears as Untitled and is immediatly in record mode. Anything you sculpt with the brushes now is saved to this morph layer. Finaly I would see how to merge all the fibermesh sub-tools. If you had used moph layers this could get complicated. I would first turn up the desired layer duplicate the sub-tool and export the merged subtools idealy you could get seperate Polygroups / Face Groups for the different hair parts. This will make it easier to create morphs in DazStudio lateron.
Transfer Utility settings
If you have a character shape applied to the base shape figure choose Source: Item Shape: Current.
In general I would also use the Reverse Deformation setting in this case for clothing items made for another character shape. In most cases this will produce unwanted distortions that you have to deal with by additional sculpting in ZBrush for example with Mesh Polish, Relax, ect. So its better to start with modeling fitting items around the figure base shape, even you are not a content creator and plan to fit it to other characters.
Under general options you can uncheck almost everything except Weight Maps and Morph Targets. In the Morph Targets: Extended Options: From Source: you can choose Shaping and Pose for the first test to shorten up the transfer process and to see if you can get a conforming item.
Lateron you could also transfer selected morphs that first have to be set to Favourits in the Parameters pane on the Source Figure. But as soon as the Target Item is 'Fit To Source Figure' (see Post Transfer Options) or if you manualy fit it to the Source Figure, Daz Studio will try to project any extra morph that you dial up in the source figure to the conforming figure. Those moprhs are called autogenerated because they got generated on the fly as needed and they are nowhere saved as morph assets, you need to do this manualy from the main menu File...Save...Morph Asset.
 Altering G3 or G8 mesh in Blender
Shape keys, are in affect, morphs.
I think what I remember is that I could export the figure and a garment, make a morph and associate that with a shape key and export that back to DAZ Studio. Then, with the objects still loaded in Blender, create another shape key and continue morphing and export that as a second/third/etc., importing each back to DAZ Studio with Morph Loader.
This was more convenient than re-exporting the figure/clothing for each individual morph. Without searching for the original tutorial, that's how I remember it.
Genesis 9 delayed until at least 2020. Will you be buying it?If g9 is backward compatible, I'll use it. But, I'm definitely not interested in rebuying every morph package and utility. I spend more time shopping than rendering as it is.Bones of geograft displaced when character shape appliedSyrus_Dante, thanks for the input.
I am pretty sure I did memorize the rigging for the geograft at several points before using the Transfer Utility, because I was paranoid about losing all the work I had done getting the bones positioned exactly as required. I've tried again after unfitting the geograft, then refitting it - no joy.
The bones of the geograft don't follow any morph. The full body Height morph is a good example, at least a simple one. With that dialed to 100% for G3F, the figure gets a bit shorter (oddly, not taller...negative is taller, huh). The bones of the geograft stay exactly where they were before dialling the morph, the mesh does not - see attached image. You can see the projected FBMHeight morph that is projected on to the graft on the right, dialled to 100%.
The same effect happens if load a default G3F, dial the Height morph to 100% and then load the geograft. The geograft mesh is in the correct position, but the bones are above it at the same level as they would be on a default G3F.
In the property hierarchy, the projected FBMHeight morph has no sub-components or controllers - none.
If I use Adjust Rigging to Shape on the geograft, the bones of the geograft still don't move. Instead, the mesh of the geograft moves up (in this case) to where the bones are - the opposite of what I would expect this option to do! It is adjusting shape to rigging, definitely not desirable. The same happens if I set the projected morph to 0% - mesh moves up, bones stay put.
The Ultimate Super-Hero Freebie List!So I'm trying to do Darkseid but I can't find a good mask/helmet for him. ANyone have any ideas or know where I can look?
If you're willing to go back to the original Freak, there's this: http://heromorph.com/hmdownload/index.php?main_page=product_info&cPath=67&products_id=192
I have no idea whether it might work well enough with another 3rd Millennium character.JoeQuick has an older set of props/morphs/kit to accompany this set, and designed for the same figure. Michael 3 is the only other figure that can use Freak3 morphs.
https://sharecg.com/v/44938/gallery/11/Poser/Morph-Tunic-and-Helmet-for-F3
Daz 3D is part of

Connect
DAZ Productions, Inc.
7533 S Center View Ct #4664
West Jordan, UT 84084Licensing Agreement | Terms of Service | Privacy Policy | EULA
© 2026 Daz Productions Inc. All Rights Reserved.