-
Genesis 3 Female Morph for Bending Knees while dancing?
What do you see in that video that cannot be done with the current rigging and requires a morph?
Scroll to about 0:20 in the video, and you'll see an example of the knee movement I am referring to.
I wonder if there are any morphs for Genesis 3 Female that can allow me to bend the figure's knees like at 0:20 in the video?
G2F AND MYSTERIOUS JCM!Here the pic of the weight maps parameters I get when I use Transfer Utility.
Natural Eyes for Genesis 8 [Commercial]I'm definitly still doing this wrong, lol. I got some crazy zombie/demon eyes going on (which are actually pretty cool TBH, but pretty sure not the effect these are supposed to give). I used the sweet HD morphs for the eyes, my character is at sub-d 4, used cornea buldge morph, and the Green 9 iris color. Do I need to change the sclera as well? Or use the other settings? Maybe more lights, I only used two emissive lights and no HDRI. I attached some pics to show what I used for render settings, and also the finished render.
I'm not an expert, so I hope I don't come off as arrogant or anything.
For "Thin Wall Off" here is what I did to eliminate "Zombie Eye" iris & sclera. Be interested to see if works for others, or just something on my end. DS version 4.10

After changing them:

If my workaround is disruptive to your topic or in error... Just tell me to mind my own business and I'll edit it out.

best
--Bruce
Morph and Deformation HelpHi. I've been planning to make my own expressions using Blendshapes in Maya for the genesis 2 model. But I think I'm going to need to apply morphs before I apply facegen or other existing deformation like fat/thin which will change where the points are and effect the deformation too much. Also, I'd really rather not have to retarget the blendshapes for every character I make. Ideally I'd like to do it once for a gen 2 male and once for a gen 2 female and be done with it. I don't mind making them in Daz though I don't think there's soft selection or the alphas I'd like to use. So a Maya or Zbrush or Cinema 4d solution would be ideal.
I'd like to get rid of the facial deformers as a whole (except for the phonetic ones) and just use my own which would be more basic stretching and squooshing.
1 Anyone ever do that? If so what wisdom can you give me.
2 How do you delete deformers. I obviously want to have them on my default gen 2 model.
3 Is there a way of doing it without retargeting a finished model that I've facegened and applied other deformation to.
Also...what's the Daz term for the face expression change things? Morphs? Deformers? Blendshapes? Poodles? I went to a Daz website where they called them morphs (because of Franz Kafka evidently). But they were also sprinkling around other terms. Cinema calls them polymorphs which I thought was an evil alien in Red Dwarf. Maya, Zbrush, and 3D coat call them blendshapes. It's just confusing. Why didn't I decide to do 2D animation?
G2F AND MYSTERIOUS JCM!Hey Richard, seems Genesis 2 has less propertirs than Genesis 3 cause the only JCMs I found are the X Rotation, Y Rotation, Z Rotation, so I think the way to load JCMC is to use that parameters. This make confusion also to rig props to the character. For instance I need to rig my holster to the leg of Jenny, to get the leg bending without distortions of the prop. From pic 1 (left) to pic 2 (right) as you see.
So, If I use Transfer Utility I get distortions like pic 2. Also to paint maps seems to do nothing to get a bit of rigidity. I see in the weight map tool setup the X, Y, Z Rotations and Bulges, obviously different parameters from Genesis 3. Have you an idea how to get less distorion as possible in G2 with weight maps as well?
Note: after rigging via Transfer Utility I got General maps each bones of the leg,also if is enough the R thigh bone. I don't remember the effects of red and blue paint and what influence have the clear painting (grey paint)
Creating Big City Scenes in DAZ StudioI am wondering if the slow saving of the River Front base with city blocks attached to it is due to having too many big files, such as big video files, cluttering my hard drive?
Either way, I am going to transfer many of my video and large audio files to my external hard drive and/or CD-ROMs in the coming days.
Art & Animations By Ivy SummersClick to play
Description:
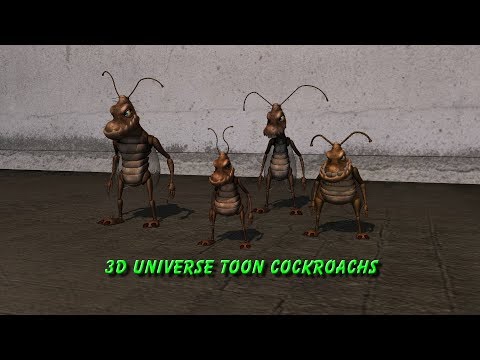
These aniblocks and poses where made specially for the Bugsy 3du toon cockroach character,
And made to work for Bugsy gang characters as well using just one preset.
Instructions:
"Keep Limits Off" when applying poses.
Aniblocks are drop & drag onto the animate2 timeline.
the walk cycle can be looped.
Added Squish morph built into the squish pose and Bug size scale added as a preset for easy scene set up.
Note:Animate2 timeline is required for aniblocks. https://www.daz3d.com/animate2
Usage Rights:
This set is free to use in commercial and non-commercial renders & animations only.
Do Not resell or redistribution. these poses or aniblocks,
Do Not include them in other pose & aniblock sets to be given or sold as a bundle.
Please do not use them in scripts for game engines without my consent.Happy Rendering
Download hosted at sharecg.com Link https://sharecg.com/v/92372/browse/21/DAZ-Studio/Poses-and-AinBlocks-for-the-3DU-Toon-Cockroach
Poses and AinBlocks for the 3D Universe Toon CockroachClick to play
Description:
These aniblocks and poses where made specially for the Bugsy 3du toon cockroach character,
And made to work for Bugsy gang characters as well using just one preset.
Instructions:
"Keep Limits Off" when applying poses.
Aniblocks are drop & drag onto the animate2 timeline.
the walk cycle can be looped.
Added Squish morph built into the squish pose and Bug size scale added as a preset for easy scene set up.
Note:Animate2 timeline is required for aniblocks. https://www.daz3d.com/animate2
Usage Rights:
This set is free to use in commercial and non-commercial renders & animations only.
Do Not resell or redistribution. these poses or aniblocks,
Do Not include them in other pose & aniblock sets to be given or sold as a bundle.
Please do not use them in scripts for game engines without my consent.Happy Rendering
Download hosted at sharecg.com Link https://sharecg.com/v/92372/browse/21/DAZ-Studio/Poses-and-AinBlocks-for-the-3DU-Toon-Cockroach
suggestions for Genesis 9Another thing, this generation should merge Female and Male again.
Honestly the most of the content is for the Female figures but several items could be unisex, the PA never or rarely release a Male version due to the low sales.
Just the shop need to know if the item is designed for female morph, male morph or both.
DForce questions...I was wondering if you knew if it was possible to make a mesh, parent part of it and make that part of it morph, but leave the rest to DForce?
My interest is making a cape with a flow to the back of it but making the collar/cowl area morph. Anyone?
Natural Eyes for Genesis 8 [Commercial]I'm definitly still doing this wrong, lol. I got some crazy zombie/demon eyes going on (which are actually pretty cool TBH, but pretty sure not the effect these are supposed to give). I used the sweet HD morphs for the eyes, my character is at sub-d 4, used cornea buldge morph, and the Green 9 iris color. Do I need to change the sclera as well? Or use the other settings? Maybe more lights, I only used two emissive lights and no HDRI. I attached some pics to show what I used for render settings, and also the finished render.
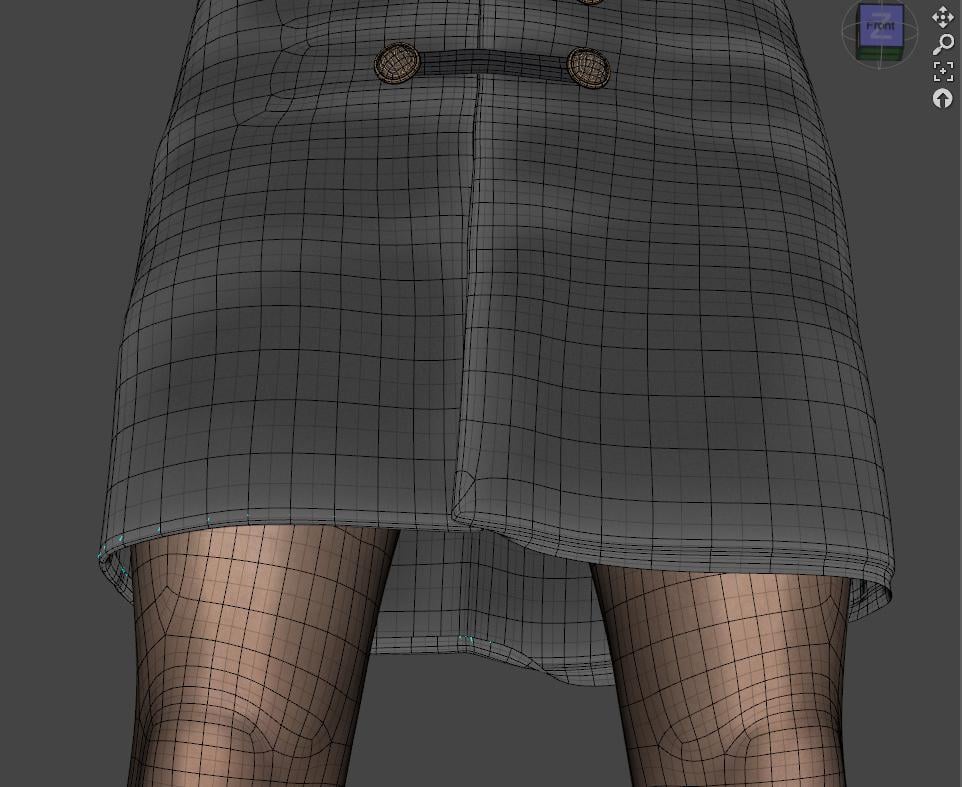
How to Use dForce: Creating a Blanket, Draping Clothes on Furniture, and Much More [Commercial]Polylines should be very useful for keeping things together when using dForce - I used polylines to keep a rounded hem from falling out and to give a bit of thickness to the coat :) Figure right is with polylines, left is without.
Select the vertices in pairs and run the script until done, then use the transfer utility to fit it to the clothing item. Set as a dynamic surface add-on in the dforce dropdown menu and sim.
Indeed!
It's one of the reasons, and a main one, why I don't buy, and/or return Dforce items; cloth needs depth - it isn't infinitely thin.
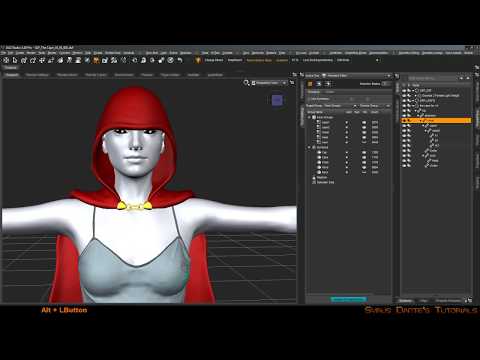
ZDG random Daz Studio discoveries and questions.I've just started to work on The Cape, it took longer than I thought and even after almost two hours video recording it is not finished yet.
In this video series called DazStudio TheCapeV4 G2F I will show you some things about editing the geometry on existing items and how to convert old Poser compatible clothing, hair or whatever conforming item into a DazStudio compatible library asset, fitting it to a genesis figure without using auto-fit to also keep the extra helper bones that control the cape bending. DazStudio crashed two times as I deleted some hidden faces on this Poser imported item, so don't get confused if you see me doing some things twice in the beginning. I think the crashes also has something to do with the way those poser items gets converted and loaded into DazSudio, I remeber this "auto_adapted" folder somwhere that gets filled with the converted poser compatible items - have searched this lately but couldn't find it. First its just a temporary figure item and then I delete some faces and this will crash DazStudio sooner or later - another example wher its better to save the item as an Asset you are working on - this requires it to be converted to TriAx or General Weight map to save it as a Figure/Prop Asset - makes sense you cant edit Legacy rigging anyway.
A few things I've done in the video
Maybe I should add the timecode where you see these actions in the video, but I hope you get my workflow. It is not a linear workflow sometimes I just don't know how to continue and I didn't even planed to change the geometry but quickly did it as I saw the issues with the unsymmetry in the mesh that caused the weight map symmetry painting to stop working. Once I got the "flow" and things start to work or just need some fine tune to do so I forget the time and just experiment - if you are patient enouth to watch it you may learn some, maybe skip or speed up the boring parts.
Loaded the poser compatible The Cape V4 figure, converted it to TriAx weightmapping, normalized the weightmap on the cape, smoothed the weightmaps - found that in TriAx mode you have to smooth the weight map for every axis seperate, then I decided to split up the clothing into three parts the cape, the hood and the scarf.
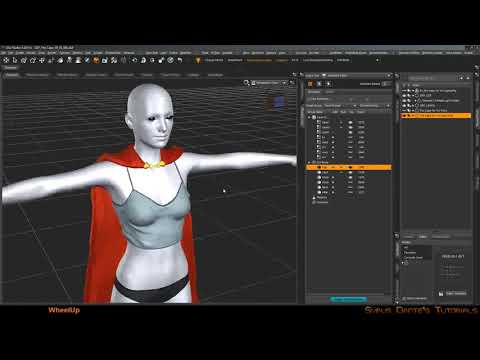
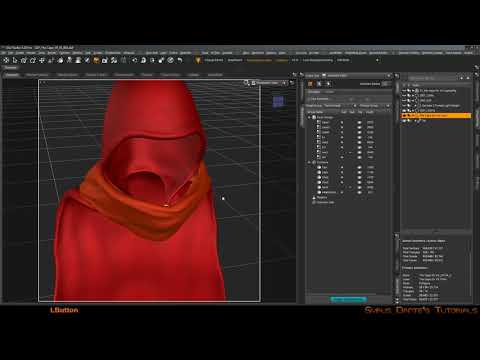
I don't need those spheres as bending handles, there are other ways to do this but thats a thing to show in another video (maybe I replace the scarf with another), used the Transfer Utility with Merge Hierarchies to fit it to G2F while keeping the extra bones (haven't tried this with G3F and later, SickleYield wrote something about Merge Hierarchies dosn't work well with G3F), then I've tried to fix and smooth out some harsh weightmap transitions on the G2F projected maps for the collar and shoulder bone. While doing this I realized that the weightmap symmetry dosn't work because the mesh isn't symmetrical.
So I took the mesh and loaded it into Blender and then I fought with the spiral edgeloops and the strange topology to get a edge loop exactly in the center - a seperate plane helped me with that, the command Knife Project didn't worked like expected but finaly I was able to fix the center edge loop, deleted one half, added Mirror Modifier merged the center edge loop exported the OBJ, didn't take care of the UVs but there are mirror options as well.
Back in DazStudio you see how the imported mesh in white and the original red cape interfers with each other showing this flickering faces that is only the case if the faces are exactly in the same spot and its ideal for the Transfer Utility because the points are so close the projection will have no problem to transfer the data like weightmaps and morphs. Also I almost forget to mention I defined two Rigidity Groups in the Geometry Editor to prevent the front cape chain to deform with morphs - also a Rigid weight map was created to prevent deformations in the cape with character shapes.
In terms of "save a figure does crave too much in stone" it does not! Saving the asset for the first time saved me from DazStudio continues to crash and its just another intermediate step towards the final asset you just have to rename the item before you save another version of it to the library. I usualy count up some version number in the item name - for the final versoin you could save it once more without this number - but thats just how I manage this.
I also used Duplicate Node more often this time, to have a earlier stage backup version right within the scene, I just want to mention that by using Duplicate Node it seems to add another item with the same name but with another label so internaly its handled as the same item, if you for example edit something in the Geometry Editor all other duplicate nodes will inherit those changes - not if you renamed the node name first with Joint Editor - Rename Node that will split it up to a new independent item.
DazStudio TheCapeV4 G2F 01
[Edit1]: Now even better with SubTitles! Finaly I found the settings how to edit those.
My videos will be more or less subtitled in the future, still I wouldn't count them as tutorials but we are getting closer.
DazStudio TheCapeV4 G2F 02
[Edit2]: This one is also SubTitled now. The next one and a half hour will take some time to subtitle.
DazStudio TheCapeV4 G2F 03
 Toon Boy is Adorable!Adjust pupils size with the Dilate morph. Negative values make the pupils smaller.*closed* RRRR - Muddled Maxims Render Contest
Luci 3
Hee. Surreal. ; ) Poor guy looks like he might’ve taken too much cold medicine. Great expression on him.
What’s the little green goblin guy? Just curious. There really is a monster under the bed and he wears a nice sleevless sweater. I'd want to go there and talk with him. Or maybe take a ride on the bird. From old Bogart movie: "What's that black bird statue? -- The stuff that dreams are made of."
Thanks, Tynkere. The little goblin has the Skullcrusher Ogre textures and a mixture of morphs from Creature Creator heads, Face Weight and Child morph. Here are the dials. (I like making creatures.)
How to Use dForce: Creating a Blanket, Draping Clothes on Furniture, and Much More [Commercial]Polylines should be very useful for keeping things together when using dForce - I used polylines to keep a rounded hem from falling out and to give a bit of thickness to the coat :) Figure right is with polylines, left is without.
Select the vertices in pairs and run the script until done, then use the transfer utility to fit it to the clothing item. Set as a dynamic surface add-on in the dforce dropdown menu and sim.
Genesis 2 Male pectorals corrective morphsThanks so much Zev0, when I had heard about the morph, all of the links were already expired. I was so pleased to find this thread. I've attached my first trial with them!
V4 Skins Auto Converter for Genesis 2 Female(s) helpI don't have that so can't help there, but there is an alternative; I use Blacksmith Pro to convert, however, it is not needed.
I manually convert as I need them from V4 to G2F; then convert them to G3/8 using Blacksmith Pro
Manually, you do it via Surfaces Tab > Map Transfer
It isn't a texture converter, it's for covnerting Poser Mat poses to DS Materials presets, since those are needed to apply the materials to Genesis 2 Female with the V4 UV set. You can convert individually by apply the mat pose to Victoria 4, then using File>Save As>Materials preset, the script just automates the process (but as I don't have it I can't give any instructions).
ahhh.ty for the info.
V4 Skins Auto Converter for Genesis 2 Female(s) helpI don't have that so can't help there, but there is an alternative; I use Blacksmith Pro to convert, however, it is not needed.
I manually convert as I need them from V4 to G2F; then convert them to G3/8 using Blacksmith Pro
Manually, you do it via Surfaces Tab > Map Transfer
It isn't a texture converter, it's for covnerting Poser Mat poses to DS Materials presets, since those are needed to apply the materials to Genesis 2 Female with the V4 UV set. You can convert individually by apply the mat pose to Victoria 4, then using File>Save As>Materials preset, the script just automates the process (but as I don't have it I can't give any instructions).
Can someone explain base characters vs pro bundles vs add-on characters?Each generation of Genesis figure has a free base that comes with the download of Daz Studio. It's called the Starter Essential bundle.
You can buy morph packages to alter these Genesis base models. The official ones are Head morphs and Body morphs for each generation.
You can also buy offical Named characters. These are Daz Originals. They tend to be distinct, well defined characters suited for a specific genre or stereotype in the broad sense. These usually sell as part of a larger bundle, either starter or Pro, also following the theme. Gia8 for example is a character that uses the Genesis8 base. These character sets come with skins, hairs, outfits. They are official characters.
You can also purchase other smaller character packages. Usually a morph (either custom or just simple dial spin) and a skin texture (either unique or a reused merchant resource) So when they sometimes need additional products like head morphs or body morphs, those are simple dial spin characters you could do yourself. And sometimes they build the morph on top of another morph. Example, the base genesis8 has been morphed to Victoria8, and then a product offers a morphed character on top of that Victoria8. The product description would note that the character needs Victoria8. Now without the V8 morph you might still be able to use the character set, but there woud be differences. The other thing to be aware of, some of the skin UV maps require that intermediate character. This was a bigger problem with older generations. Look for the statement "This product uses the "Base" UVs
Always read the description of what is included. Never assume anything about a product. Most PAs have a commercial thread and will answer question prior to purchase.
Daz 3D is part of

Connect
DAZ Productions, Inc.
7533 S Center View Ct #4664
West Jordan, UT 84084Licensing Agreement | Terms of Service | Privacy Policy | EULA
© 2026 Daz Productions Inc. All Rights Reserved.