-
Shape Splitter - Divide, Combine and Save (The new version is already available. 1.2.1)[Commercial]
Because many expressions are not really morphs, you must create the morph using the Tab Combine.
That is, loads Genesis 8 (Base), and you move the dial (Nostril Flared) that you want from Shape or Parameters, and you execute X-Morphs, and in the Combine tab, click Spawn Morph, and this creates a morph, which you can already divide with the tool.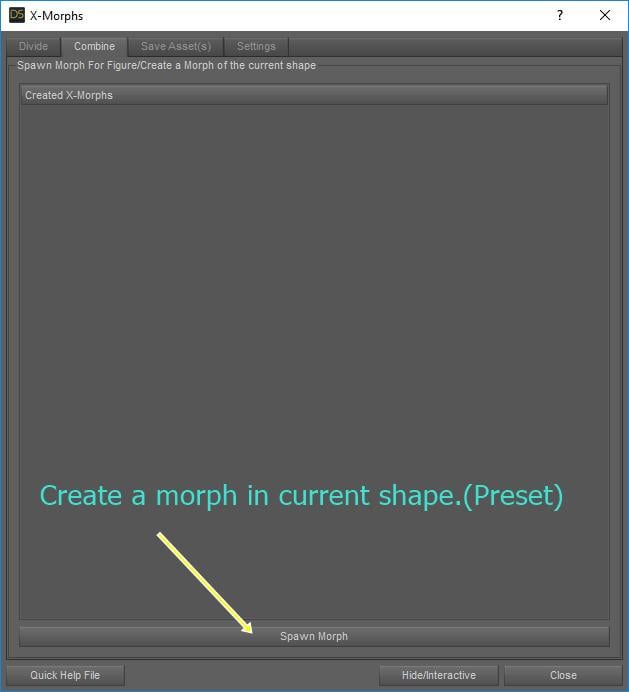
It is important that it is always done from the base figures, so that the morphs do not duplicate in some cases.Shape Splitter - Divide, Combine and Save (The new version is already available. 1.2.1)[Commercial]Just purchased as in trying to split face morphs into left and right (as many are symmetrical) and thought this would be perfect. However most of the face morphs are missing from the x-morph drop down list. Here is an example trying to use nostril flared morph. Any ideas on how I can achieve this? Thanks
FIX THE PELVIC DISTORTIONS - SOLVED -I think Richard brought it to the point. Its the essence of what I tried to explain far more complicated.
I suggest just turn around point 3 and 4 and it should work. The bend is the Controller the JCM is the SubComponent. Funny fakt in Poser they called the ERC links Master-Slave in modern DazStudio they disestablished slavery and called it Controller-SubComponent.
3. Find the "bend on the bone" (eg. ZRotate) in the Parameters pane, Right-click on the bend property and select Show in Property Hierarchy
4. Find the new corrective JCM for the bend in the Parameters pane and drag it into the Property Hierarchy into the 1st Stage (Add) group of the "bend on the bone"
That is the easy part, the thing that I never understood is what gets saved with what. So you save the ERC formulars within your Morph Assets and not with the figure properties (eg. the bend properties).
You can right click the SubComponents in the Property Hierarchy pane and choose to "Save With..." or something. To check that I usualy open the final Morph Asset DUF files with a text editor and look if the ERC formulars got written there.
Who's Next to Join the G8 Family?Vladimir, a Nosferatu-style vampire
That sounds... interesting? He could be eerily handsome, or he could be hideous as sin.
Why not both? For example, Anneka comes in Cute and Hideous varieties (or, as they're called in the text, Demon and She Devil).
There is a Vladimir for Michael 4 model, which is a pretty nice figure; I remember making some good monsters by applying the Vladimir morph partially to M4.I hope that an M8 Vladimir will be similarly versatile.
FIX THE PELVIC DISTORTIONS - SOLVED -OK, try this (using the Property Hierarchy, from memory):
- Open the Property Hierarchy pane
- Put the Parameters pane in Edit mode (right-click menu)
- Right-click on the new corrective JCM and select Show in Property Hierarchy
- Find the bend on the bone in the parameters pane and drag it into the Property Hierarchy into the 1st Stage (Additive) group under attributes for your corrective
- Find the morph (Toned Edna) and drag that over to 2nd Stage (Multiplicative) under your corrective.
- Now exapnd the options under the rotation and you want set the scalar to 1/max angle - so if the corrective should be 100% at a bend of 85 you want 1/85 as the scalar.
- Make sure the ERC link is set to save with the corrective morph
Linwelly's GroveNo, the wings extended outward a bit to reveal the guns in the center of the'wings'.
The flapping is probably from the episode where Starbuck and Apollo stole a cylon raider and the crew noticed the enemy cylon was 'flapping its wings' (a remark made earlier in the episode) and that let them know- one of their own was flying it. Old, old memory pull, but I think that was it.
She definitely did that with the stolen cylon in the newer version, but it was really only a tilt of the flyer.
And I think the gallery is more like a blog now, where it matters WHEN you post. Like, when there is maximum traffic.
I used to look at the gallery for inspiration when I first discovered Daz, but I really don't check it out anymore.
That's probably most people now.
--
Your best bet is going to be LINKING the products used in your render so that people looking at the product see your image ,,,,and that's a better method to get eyes on your work, I would think...
I gues you're not lacking inspiration by now :D
I used to put a lot of links on my images but by now its such a mix and match that I have a hard time listing things. The character image I named Jadzia has for the character alone one for the skin, plus putting it through skinbuilder and some changes in the surfaces afterwards, three other characters for the morph plus morph dials, the jair is one product with new colour from Phil and more adjustments after, the environment I took the texture into gimp to change the colours from beige brown to that turqoise. etc And that's one of the more simple renders ;) Now when I think about my comic renders LOL. It would take hours ;)
Well nothing to be done about that I guess.
Isadora the Witch [commercial]Isadora for Genesis 8 Female
https://www.daz3d.com/isadora-the-witch-for-genesis-8-females
The life of a witch has many phases. Isadora started her path as a beautiful woman, but a darkness grew in her and ultimately lead to a tragic fiery end. This set includes a beautiful morph and texture set, with many witch face variations to fill any fantasy scene. There is also a burnt ash texture variant that can be used for more than the end of a witch. Let your imagination be your guide.
The set comes complete with custom crafted High Definition Morphs, and Highly detailed Textures for the utmost realism.
Product Includes:
-
- One Isadora Character Preset
- One Isadora Full Body HD Morph
- One Isadora Shaping Morph
- Six Isadora Full Body Material Preset
- Pentacle glow On/Off Presets
- Six Eye Material Presets
- Includes both Iray and 3Delight Material Presets


 Model in Marlene Bob Hair promo?
Texture could be Misumi. Is the morph Misha??????
SimonWM 's Facial Elasticity Morphs Where art thou?I did, I even opened every tab as well as scrolled through every body part besides the face. I browsed to folder location - opened the content folder and it has a morph folder, but there's nothing under the morphs tab. Thanks for the help! It looks like a fun product. Maybe I'll wait a day to see if anyone knows. Otherwise I will have to send a help request. They usually want me to check the forums first haha, I did it, whew!
FIX THE PELVIC DISTORTIONS - SOLVED -Syrus Dante that's fine! Ok! I load my JCM corrective esactly as you written in your post. I did it the same with the catsuit for my Reiko character with the help of Richard and I got a great success. If you seen the previous thread about to solve the JCM corrective you see I attached lot of pics in many incredible extreme pose. No error also if you search with a lantern. About the Reverse Deformations I use athem anytime need the use of that! In the previous of this thread you can see my workflow from when the character is modelled to the load in MLP and activate it. You say that is visible a trace of the corrective in G3F when is back to zero morph. This is just what I want to solve. No Toned Edna, no JCM corrective of her! Simple. I will give a look to your tips! Thanks!
Richard what you say it seems spin perfectly! This is exactly the goal I want to achieve! I try this and if it finally solved as always I'll build you a statue! Lol! Jenny wait for the same solution along with my other characters, to break down the Daz error wall!! My characters I want them to be bug-free!
Going to try that tips! Keep updated! You are great guys!
 SimonWM 's Facial Elasticity Morphs Where art thou?
I don't own it, but you will probably find morph sliders in the Parameters pane.
Also, the readme file says:
-
You can find new icons for loading this product in the following DAZ Studio Folders:
-
“People:Genesis 8 Female:Genesis 8 Female Facial Elasticity Morphs”
-
-
You can find new icons for this product in the following DAZ Studio Categories:
-
“Shaping:Remove:Head”
-
Time to clean the hard drive ... suggestions for archivingme, i have a transfer cable to transfer things onto one of my older computers as backup - if you do not have an old computer i guess that would not be an option for you - if i were trying to create space on my hard drive i would start by deleting about 50 or so game programs i have not played in years before i touched my daz or poser files - if yo go to your control panel and click it you will find an option "unistall programs". then you can list your programs in order of size and spot large ones you do not use to uninstall.
just a suggestion - it may be easier to delete games or other programs you never plan on using again or the near future than it is to delete daz or poser and the content files
Celebrity Look-a-Likes for 3D figures Part 2I know how cameras can shift perspective. Remember the swimming pool in the TV show Dallas? I visted the location once and that pool is nowhere near as big as it looked on TV, LOL. Wide angle lenses can do amazing things. But Pam Grier has been photographed a lot and in a lot of movies, and her look is consistant enough. The pic I linked is a portrait photo, and I believe an accurate image of her from that time. Though B&W, it shows her facial structure well, probably better than a color photo would. You can see the shape of her lip, which no camera trick can alter, her nose, and the roundness of her face.
How Sahana's similarities to Grier may compare to those from the 'celebrity series' is not relevant. That's like telling the policeman who pulled you over for speeding that you have seen other drivers go faster than you. That is not going to get you out of a ticket (actually it might make things worse.) While some models in the celebrity series are instantly recognizable, some are pretty lacking. The Jennifer Lawrance they have is...really something. She looks like something FaceGen would make, with her eyes being shifted way higher than they should be and the skin uneven in color. I have noticed that FaceGen has a tendancy to push the eye height up beyond what is normal. A basic rule of facial structure is the eyes should be located in the middle of the face, and the JLaw character breaks this rule badly. That's not the only thing it gets wrong, but that is the most glaring.
Making a good likeness of a person is not an easy task.
Somehow I guessed that pool wasn't as big as it looked lol.
I agree that the comparison might have not be the best but what I meant was simply that model immediately made me think of Pam Grier while others look a like would take ages to guess... and yes I will still get the ticket lol
I agree that Jlaw eyes are too high and also agree that the texture looks a bit messy (at least in the picture I have seen but it can probably be changed with a better one... and the face is still recognisable whilesome others are not.
I found although FaceGen is not able to give you a perfect morph on its own it can still give you a starting point to work on with dials to get somewhat closer. Of course if you want perfection I suppose modeling with zbrush or hexagon is the only way.
I totally agree is not easy
FIX THE PELVIC DISTORTIONS - SOLVED -If you need a diffrent correction for Toned Edna from the stock Daz JCM then you create that, then use Morph Loader Pro to load it with a unique naem and with Reverse Deformations so that you are left with only the modifications needed. Then you hook that up so that it drived as normal by the rotation, but so that the result is multiplied by the value of Toned Edna. That way, if you apply the bend without Toned Edna you get the basic Daz JCM, if you apply it with 100% Toned Edna you get the Daz JCM plus your changes, and if you apply it with 50% Toned Edna you get the Daz JCM plus 50% of your additions.
Hiring Daz3d Artist To Create Character TemplateWelcome brokenegg!
The question is what do you want to do, you want to dial the character from one of the existing figures like the base genesis (1,2,3,8) using morph dials and/or spin in the daz orignal figures like Victoria, Michael etc, or do you want to make your own sculpt with some modelling software like Blender Zbrush or the like.
That adresses different folks.
As well you need to know that you cant just transfer the dialed in character, you would need to own all used morph dials and figures and on the information can be transferred
So you might think about learning some more about daz and seeing what you can do yourself?
Character Creation (Genesis 8) Export/Import settingsAs long as they match it doesn't matter - but this is not a good idea as you will lose any corrections (JCMs linked to both a bend and a morph, adjusted rigging) from the constituent morphs (and you won't be able to sahre the resultant character with others, which may not be an issue). A better way to do this, if you want a single slider to bring up your character and vary its strength, is to create a new slider (right-click in the Parameters pane to set it in Edit mode, if it isn't, then right-click in the group you want for your Proeprty and Create New Property), set that to 1 with t your character applied, and fianlly right-click on the new slider and select ERC Freeze (at which point the slider should be listed as the controller and the various shaping sldiers as sub-components - check that a click Accept). You can then save your new slider as a Morph Asset if desired.
Photoshop - where do you install your purchased brushes etc?I am almost halfway through reinstalling everything, I am working my way through genesis to G8 products that are studio library only and iray, these types of products are fairly well organized, also only iray shaders and light sets, as I haven't used 3delight since Iray came out. Once I get that done I will move on to product that have been updated with iray as I will probably have to make categories for some of that and anything pre genesis will definitely need to be categorized. After that it will be utilities, scripts etc that I will actually use as I have acquired several that all do the same thing. Hopefully then I will be able to transfer older pregenesis characters up to at least G3 and convert my clothes to G8 with Riversoft arts scripts. All the while attempting to use all the products I have purchased ( well over 6000) to make the "art" which was my goal when starting out :)
Thanks to everyone who posted suggestions as to how and where they install their brushes for Photoshop,
The Status of Scripts, Lights, and ShadersFor personal reasons, I havent been able to enjoy using DS for several years. Those obstacles are behind me now. Anyway, I've downloaded the latest version, and have been wrapping my head around some of the new features. I installed one character -ball joint doll- to experiment, but now feel comfortable enough to migrate the entirety of my old content/runtime into the newest version of DS 4.10. Ive tried to search for this issue, but can only find references to it or other offhand remarks in forum threads that primarily address other issues. Im sure I'll find a few issues with some older content, but right now I was trying to clarify the status of the older commercial shaders, lights, and scripts. More specifically, which ones are exclusive to 3DL, iRay, possibly, functional in both, or entirely non-functional. There are the Omnifreaker shaders, lights, and Uberenvironment. I see those included now, and will discard the old versions from my content before migrating. It seems that they work with 3DL, but not Iray. Is that correct? Also, I frequently used some of the Deltax15 scripts- Morph to CR2 and MirrorD-Form. Is it possible those scripts are still functional? Im sure just trying them wont break anything, but I try to avoid problems when possible. Also, when I migrate my old content/runtime, Id like to clean-out the old, non-functional things.
Character Creation (Genesis 8) Export/Import settingsRichard,
Thanks for your response. What I am trying to do is create my own characters using Genesis 8 Male & Female (lets leave out Zbrush for the moment) using Morph dials in DAZ. Once done, I want to export the Character out from DAZ I've created using the dials and then bring it back into DAZ using Morph Loader Pro. I want to know what the EXPORT/IMPORT settings are in order to do this. Then using your comment above, save it to my library. Sorry for any confusion.
Thanks!
How to Use dForce: Creating a Blanket, Draping Clothes on Furniture, and Much More [Commercial]Thanks to Mada for the tips on polylines. Here is a more detailed explanation on using polylines in Daz 4.11 beta.
59. Polyline Dynamic Add-On. A new feature coming in Daz Studio 4.11 is the use of polylines. These are linear, non-rendering geometry which can be used as a dForce dynamic add-on. Unlike the polygon add-ons, these do not have to be hidden at render time to make them invisible.
a. To use polylines, you must first install the Daz Studio Beta product, 4.11.0.231 or later. The beta does not replace your current Daz Studio general release (4.10 or earlier), both can coexist on the same computer.
b. Daz has released a script that makes adding polylines much easier. You can find it here. Save the .dsa file to My Daz3D Library/Scripts Folder. You can also create polylines in some 3D modelers or by hand, but using the script is the easiest.
c. If the Script IDE pane is not already open, select from the main menu Window/Panes (Tabs)/Script IDE.
d. From the Script IDE pane’s menu, choose File/Open Script… and choose the downloaded script: Generate_Polyline_Dynamic_Surface_AddOn.dsa
e. Create a primitive cylinder in Daz Studio: two foot length, two foot diameter, 20 segments, 32 sides. Y-positive.
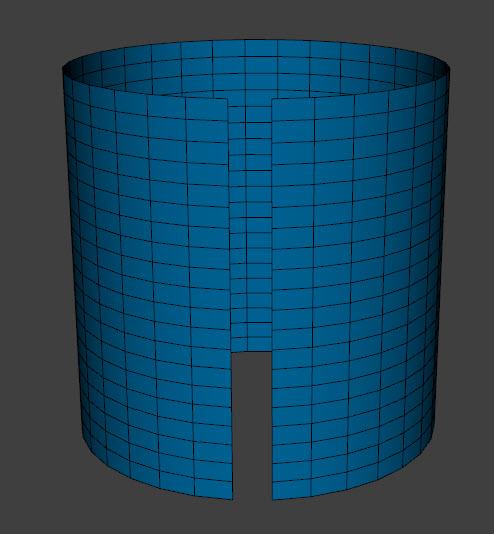
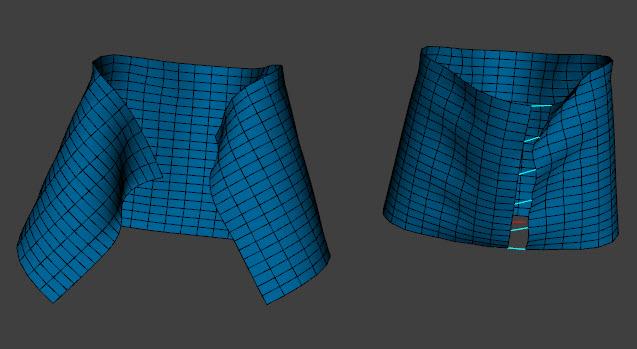
f. In the scene pane, select the cylinder. From the Tool Settings pane, select the Geometry Editor and the Polygon selection tool (left icon in upper row of the pane). Select the top faces then right-click in the viewport and hide them (Geometry Visibility), repeat for the bottom faces. Next select a column of faces on the front and hide them. Then delete all the hidden faces (Geometry Editing). You should end up with something like this:
g. Select the cylinder and from the main menu choose Edit/ Object/Geometry/ Add dForce Modifier: Dynamic Surface.
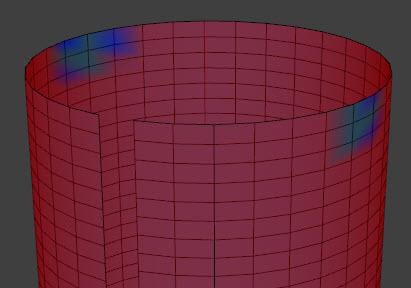
h. From the main menu, choose Create/New dForce Modifier Weight Node. Go to the Node Weight Map Brush in the Tool Settings pane. Add the influence weight map. Paint a bit of blue on the upper left and right edges (remember to hold down the Alt key to remove the full-strength red). This will be enough to hold the cylinder in space during simulation.
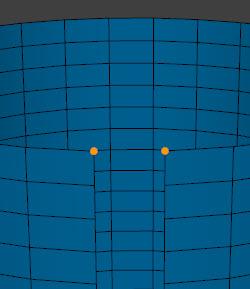
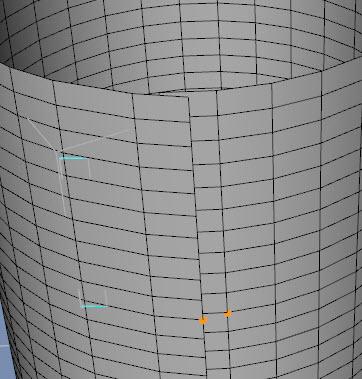
i. Continuing to use the Geometry Editor, choose the third icon at the top of the pane, the Vertex Selection tool. In the viewport, select two vertices on the prop. I picked one on either side of the split on the top row. Select one with the mouse, then hold down the Ctrl key and select the second.
j. Click on the Execute button at the top of the Script IDE pane. You will find that Daz Studio has added a new line between the two vertices.
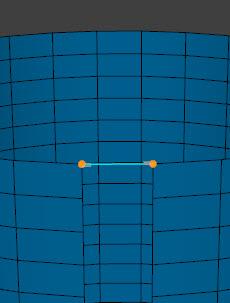
There will also be a new item with the word AddOn parented to the object whose vertices you selected.

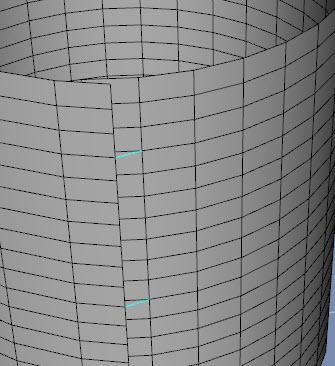
k. You can stop here, having made one polyline. Or you can select two new vertices 4 rows down, click on the Execute button again, and add another polyline to the addon. You will not see any change in the scene pane, as the new line will be added as part of the same object. You can repeat this as often as you like, adding as many polylines as needed.
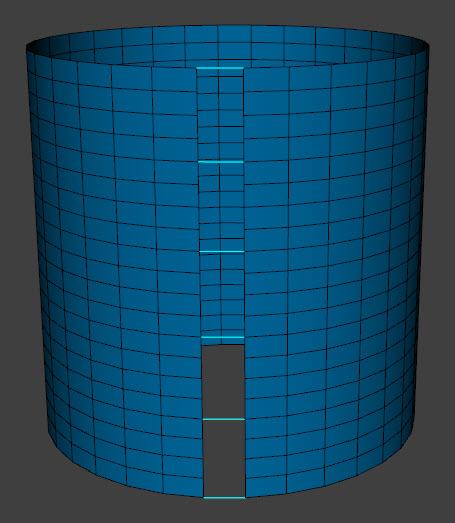
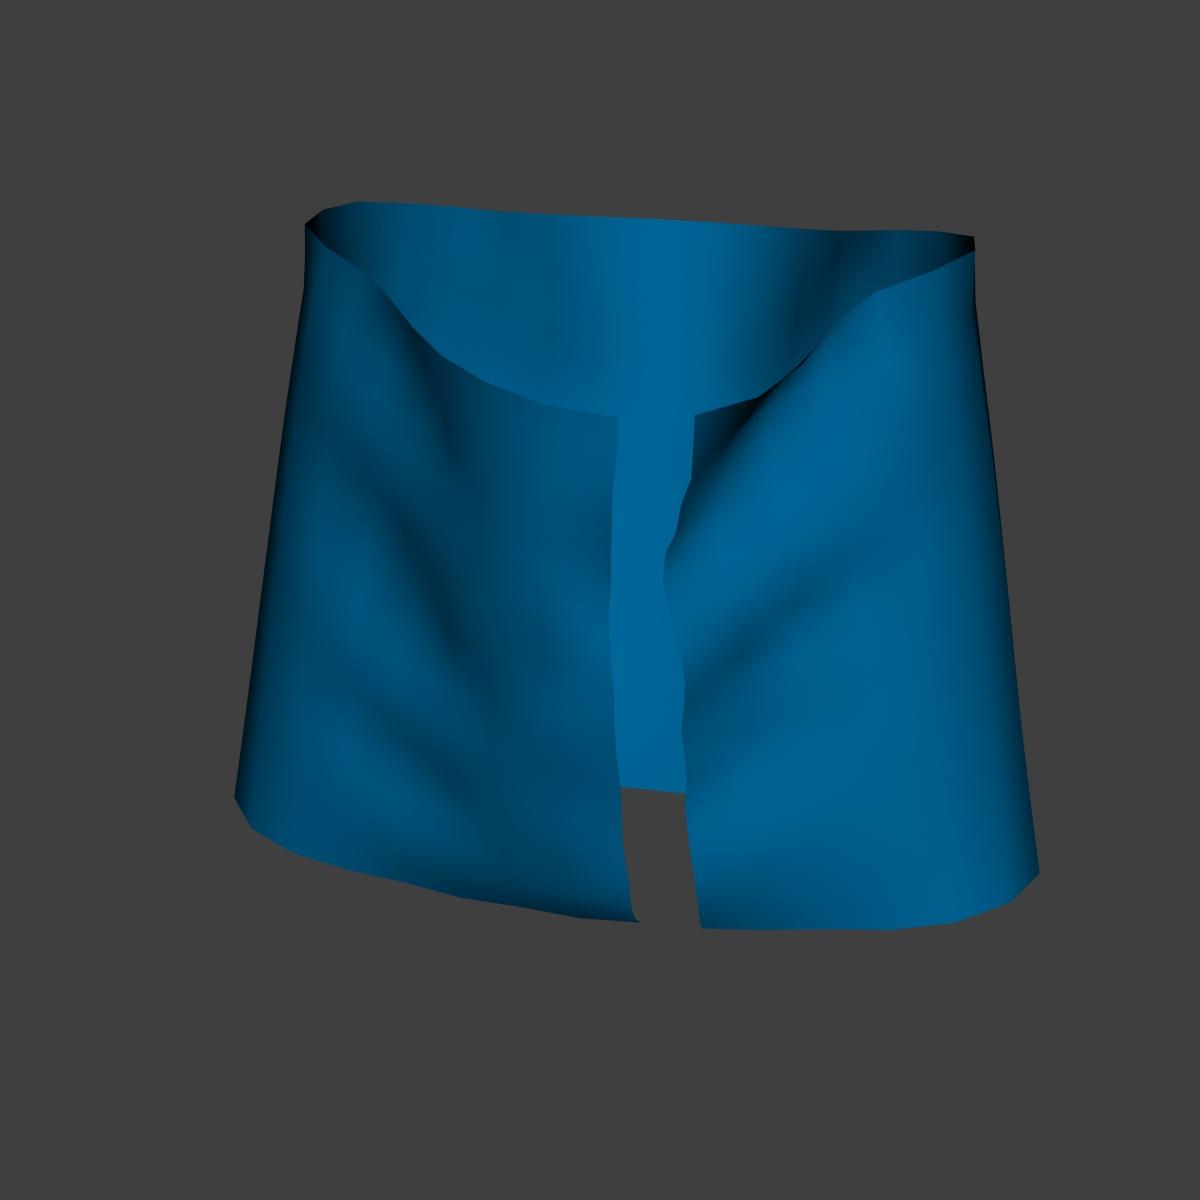
l. After creating the polyline, you need to select the Cylinder AddOn in the scene pane and from the main menu choose Edit/Object/Geometry/Add dForce Modifier: Dynamic Surface Add-On. After doing this, run the simulation. You will find the polylines hold the gap closed (see below).
m. Although you can see the polylines in the viewport, they will be invisible in the render. That can be an advantage or a disadvantage, depending upon what you are trying to do.
n. As another example, I will use the split cylinder I made in Silo for section 55. See that section for the initial steps.
- Import the cylinder into Daz Studio (use From: Silo to import it with the right dimensions).
- Select the cylinder and add a dForce dynamic modifier.
- Select the cylinder and add a dForce weight node. Add the dynamic strength map. Paint a bit of blue on the upper left and right edges (remember to hold down the Alt key to remove the full-strength red).
o. This cylinder shows up one oddity when creating the addon. The split I made in Silo is on the side of the cylinder. To center it in the scene, I rotated the cylinder 28 degrees. When you add the polylines, they do not appear where the selected vertices were located. Instead, they are rotated 28 degrees whether you parent them in place or not.
p. In spite of the misposition, you can go ahead and go to the main menu and choose Edit/Object/Geometry/Add dForce Modifier: Dynamic Surface Add-On. Run a simulation and the polyline(s) will pop into place and act as desired. Or do as I did, and rotate the AddOn 28 degrees. (on some other models, you may find you need to zero put X, Y, and Z translate as well).
After creation of polylines: After rotation:
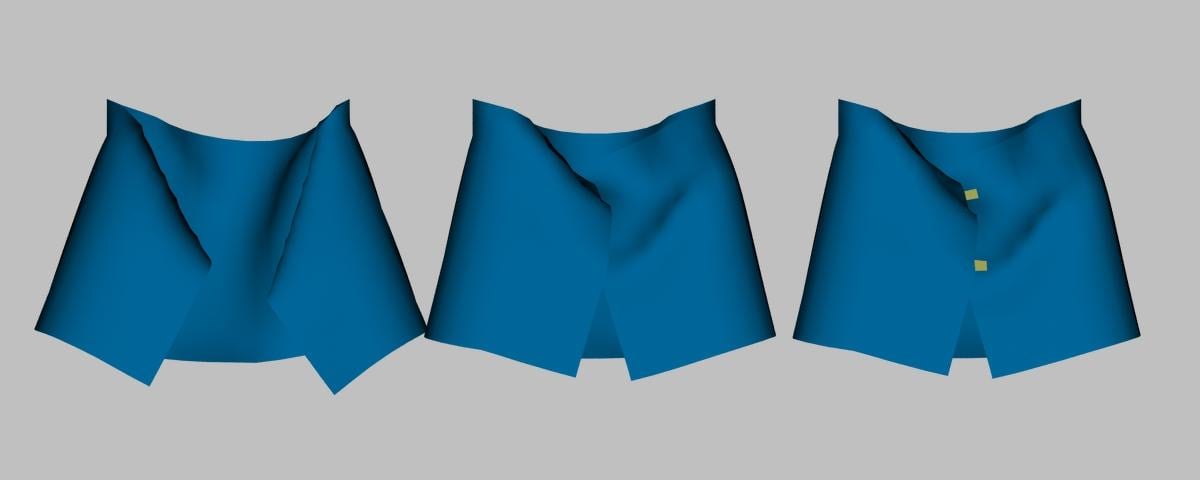
q. Below is the viewport after simulation, with the split cylinder without any add-on at the left, the polyline add-on in the center, and a polygon add-on at the right. The polylines and the polygon give similar results as they are in the same position.

After rendering, you can still see the polygons (until you hide them), whereas the polyline is not visible.
r. In section 55, I showed how you used the Transfer Utility after creating and before using the Add-on. I have found this was not really necessary. You can still do so, but the dForce add-on will work without it.
Daz 3D is part of

Connect
DAZ Productions, Inc.
7533 S Center View Ct #4664
West Jordan, UT 84084Licensing Agreement | Terms of Service | Privacy Policy | EULA
© 2026 Daz Productions Inc. All Rights Reserved.