-
How can I add bones to Genesis8 and transfer the weight smoothly from the bones nearby?I want to add 2 bones around g8's hip and transfer some skin weight from hip bone.Question: 1.How to add new bones? 2.How to transfer skin weights only near the new bones(other bones not affected) 3.How to make all the clothes suit the new bones' skin weight?Can I save the morphs from morph loader to a file that can load them later on any new scene?
In DS version before 4.23, Save Morph Asset(s)... In DS 4.23, Save as Modifier Asset(s).
How can I combine two Meshes to One and maintain their weight?What high heel morph ? I don't see any issue on the heels.
Though the welded boots are purely new figure, there shouln't any issue with A-pose. Then if there's any distortion with posed applied, you have to fix pJCMs.
Can I save the morphs from morph loader to a file that can load them later on any new scene?I've imported some morphs to a figure. They located under the figure's morph loader.But when I start a new scene,the morphs disappeared. How can I save the morphs and load them in a totally new scene? Thank you very much!HD leg, Arm, Torso pressure morphs G8M/F, G9Since normies don't get access to make HD morphs ourselves, I'd like an all in 1 package of HD pressure morphs along arms, legs and torso for gen8 male and female and gen 9. Trying to find a pressure morph for gloves or stockings that didn't come with one is anoying so I just want a set of morphs that go all the way up arms and legs, both genders, without also deforming other areas as some HD morphs do.
Face Transfer 2 eyelash problem with eyes closedThe eyelashes on a Face Transfer are more like make-up....there doesn't seem to be a way to delete them....they are texture on the eye.
Face Transfer 2 Missing [SOLVED, Menus Merged into one]Richard Haseltine said:
Deecey said:
One more question .... I've reformatted my hard drive and am reinstalling. I can't remember where to enter the Face Transfer 2 serial. Can someone help? TIA!
Help>About Installed Plug-ins - though theya re not stoed with the DS code, so if it was only a content drive that you reformatted you may not need to reenter the serial.
You'd think that this info would be available at plugin "please register" info panel.
Thank you!
How can I combine two Meshes to One and maintain their weight?
Thank you! I have tried the method before.The problem is the heel when applying the high heel morph, the heel becomes weird.crosswind said:woyodo said:
....Thank you very much for answerring my question!
The Transfer Utility Transfers the weight from Genesis 8.1 F to Boots, that may cause some Weight Changes comparing with the original Separate Boot, such as Left/right Foot Tip Toes Poses for High heel.
So how to Transfer weight PERFECTLY from the original one?
They almost have the same weight, you don't need to worry about that at all. You can compare the weight on them, as below:
Edit: The copy / paste weight functions won't work on them... as well as transferring weight from original boots to new welded boots, because they have different geometry ...
What products are in the promos for BW Maramidgard229 said:
Heya; im the promo artist; the morph is my own; the tail is tara 9, the wings are succubus wings for genesis 8; horns arent normally from daz. Hope that helps!
Out of curoisty where can I get the horns from?
So... Aiko 9...Josh P. said:
TesseractSpace said:
yeah, I noticed we're not seeing a thread full of renders for Aiko 9, like we'd usually get. I don't even think she's shown up in the Filatoon threads, and some folks'd dash off a render in seconds if they felt like it. For that matter, I don't think I've seen any with the dark elf either.
Dark Elf is a bit... odd. I'd rather just mess with dials to achieve the same effect.
Dark Elf is pretty well endowed. O_O; She has never seen her feet when standing up.
Attached is a picture and another one I did with Aiko. She's definitely growing on me. Note-I didn't morph Dark Elf Vicky at all, just added makeup.
Edit-Replaced the Dark Elf picture. Completely messed up the lighting.
DAZ premier character conversion toolCan this tool work with morph dials created by Zev0's Dial Fusion?
MimicMolly's Renders & WIPsI have transferred Girl 7 for Genesis 8 Female to Genesis 9. (I will try to transfer Girl 8 too.) This is a WIP, as I plan to find a suitable background for her. I also have to tweak the FilaToon outlines because I prefer the "no black/lineless" look.
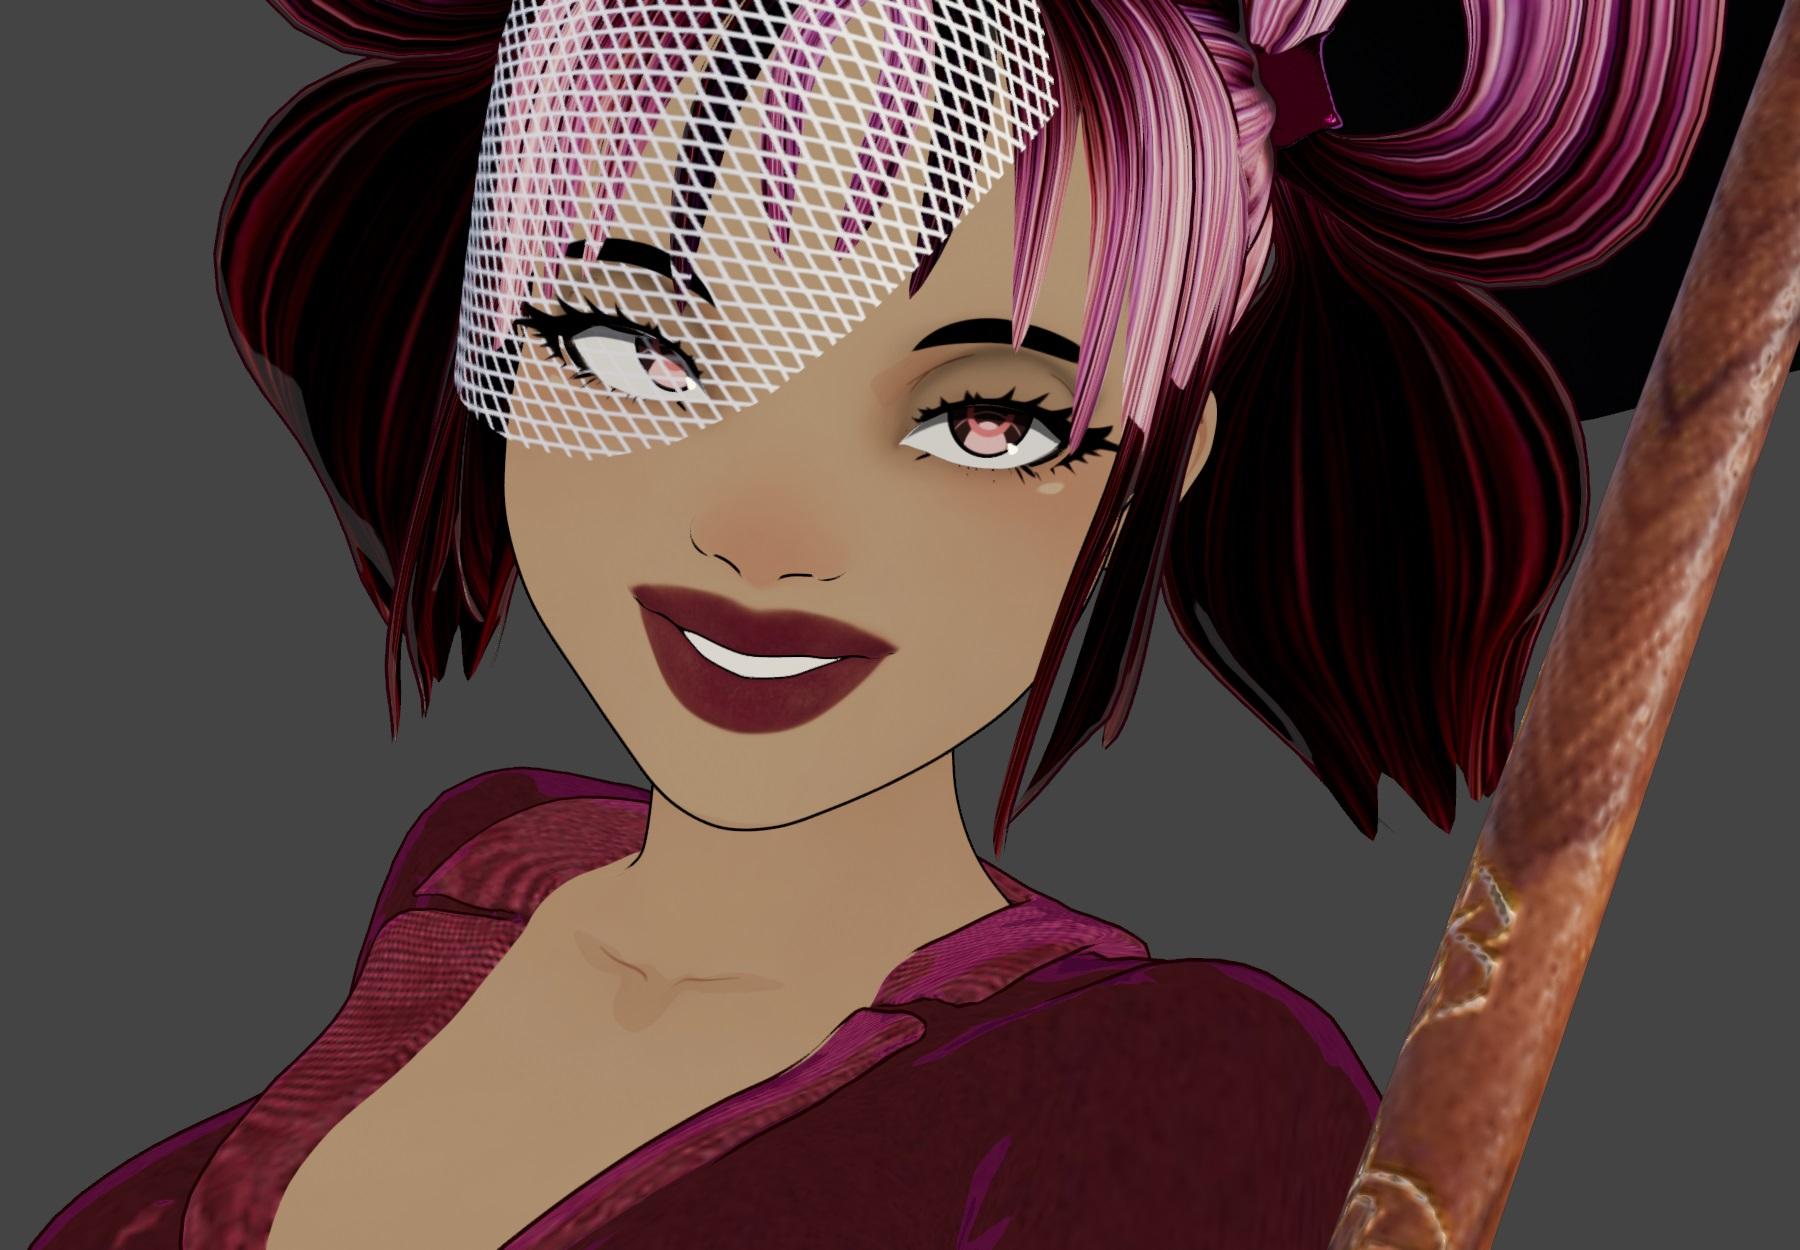
As you can see, the lines under her eyes are off. But a lot of the transferred toon characters tend to have issues with their eyes. So I've been hesitant to transfer them over, but with the toon eyes and FilaToon shader, they look passable. I'd love to get MallenLane's Hitomi for G1 over, as well as Smay's G1 Nata. But because of the eye distortions, I may just keep them as FilaToon-only characters.
Edit: Oh no! Girl 7 will live as a FilaToon-only character. Her eyes are horrid!


Maybe if DAZ releases her shape and it's not subscription locked, I may buy it. RIP.

I am still planning on rendering my freckled guy, but I'm unsure if I should make him Iray, as I originally planned, or with FilaToon. He'd probably look similar to the Pantless Mad Hatter from earlier.
What products are in the promos for BW MaraHeya; im the promo artist; the morph is my own; the tail is tara 9, the wings are succubus wings for genesis 8; horns arent normally from daz. Hope that helps!
Issue with some poses after creating a new face morphThank you very much!
crosswind said:
In Property Hierarchy, set Eyes Closed as its 1st Stage Controller, set the character's head morph as its 2nd Stage Controller.
I think I didn't understand how to work the Propterty Hierarchy pane: I openned the controller part of my corrective morph, but when I click on its 1st stage or its 2nd stage, nothing happen. How can I set them? I oppened the Property Hierarchy pane from Windows -> Panes (Tabs), maybe it wasn't here?
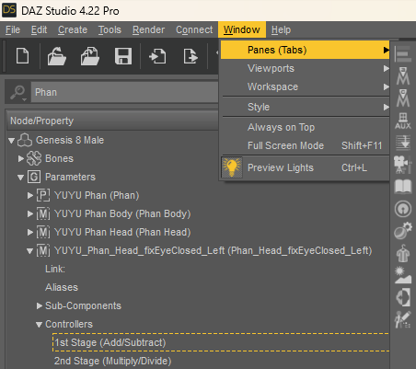
In another tutorial, I saw about a Proterty Editor in Panes (Tabs) too, but I didn't find it...
Thank you in advance for your help!
FilaToon / Cell shaded rendering with FilamentMy pretty prince character makes an even prettier anime guy. I added the anime preset at about 70%, then fiddled with his nose a bit (it looks fine normally, but comes out a bit weird with the anime morph) and removed his HD morphs. The only real down side is that I'm supposed to be writing about him, not rendering him...
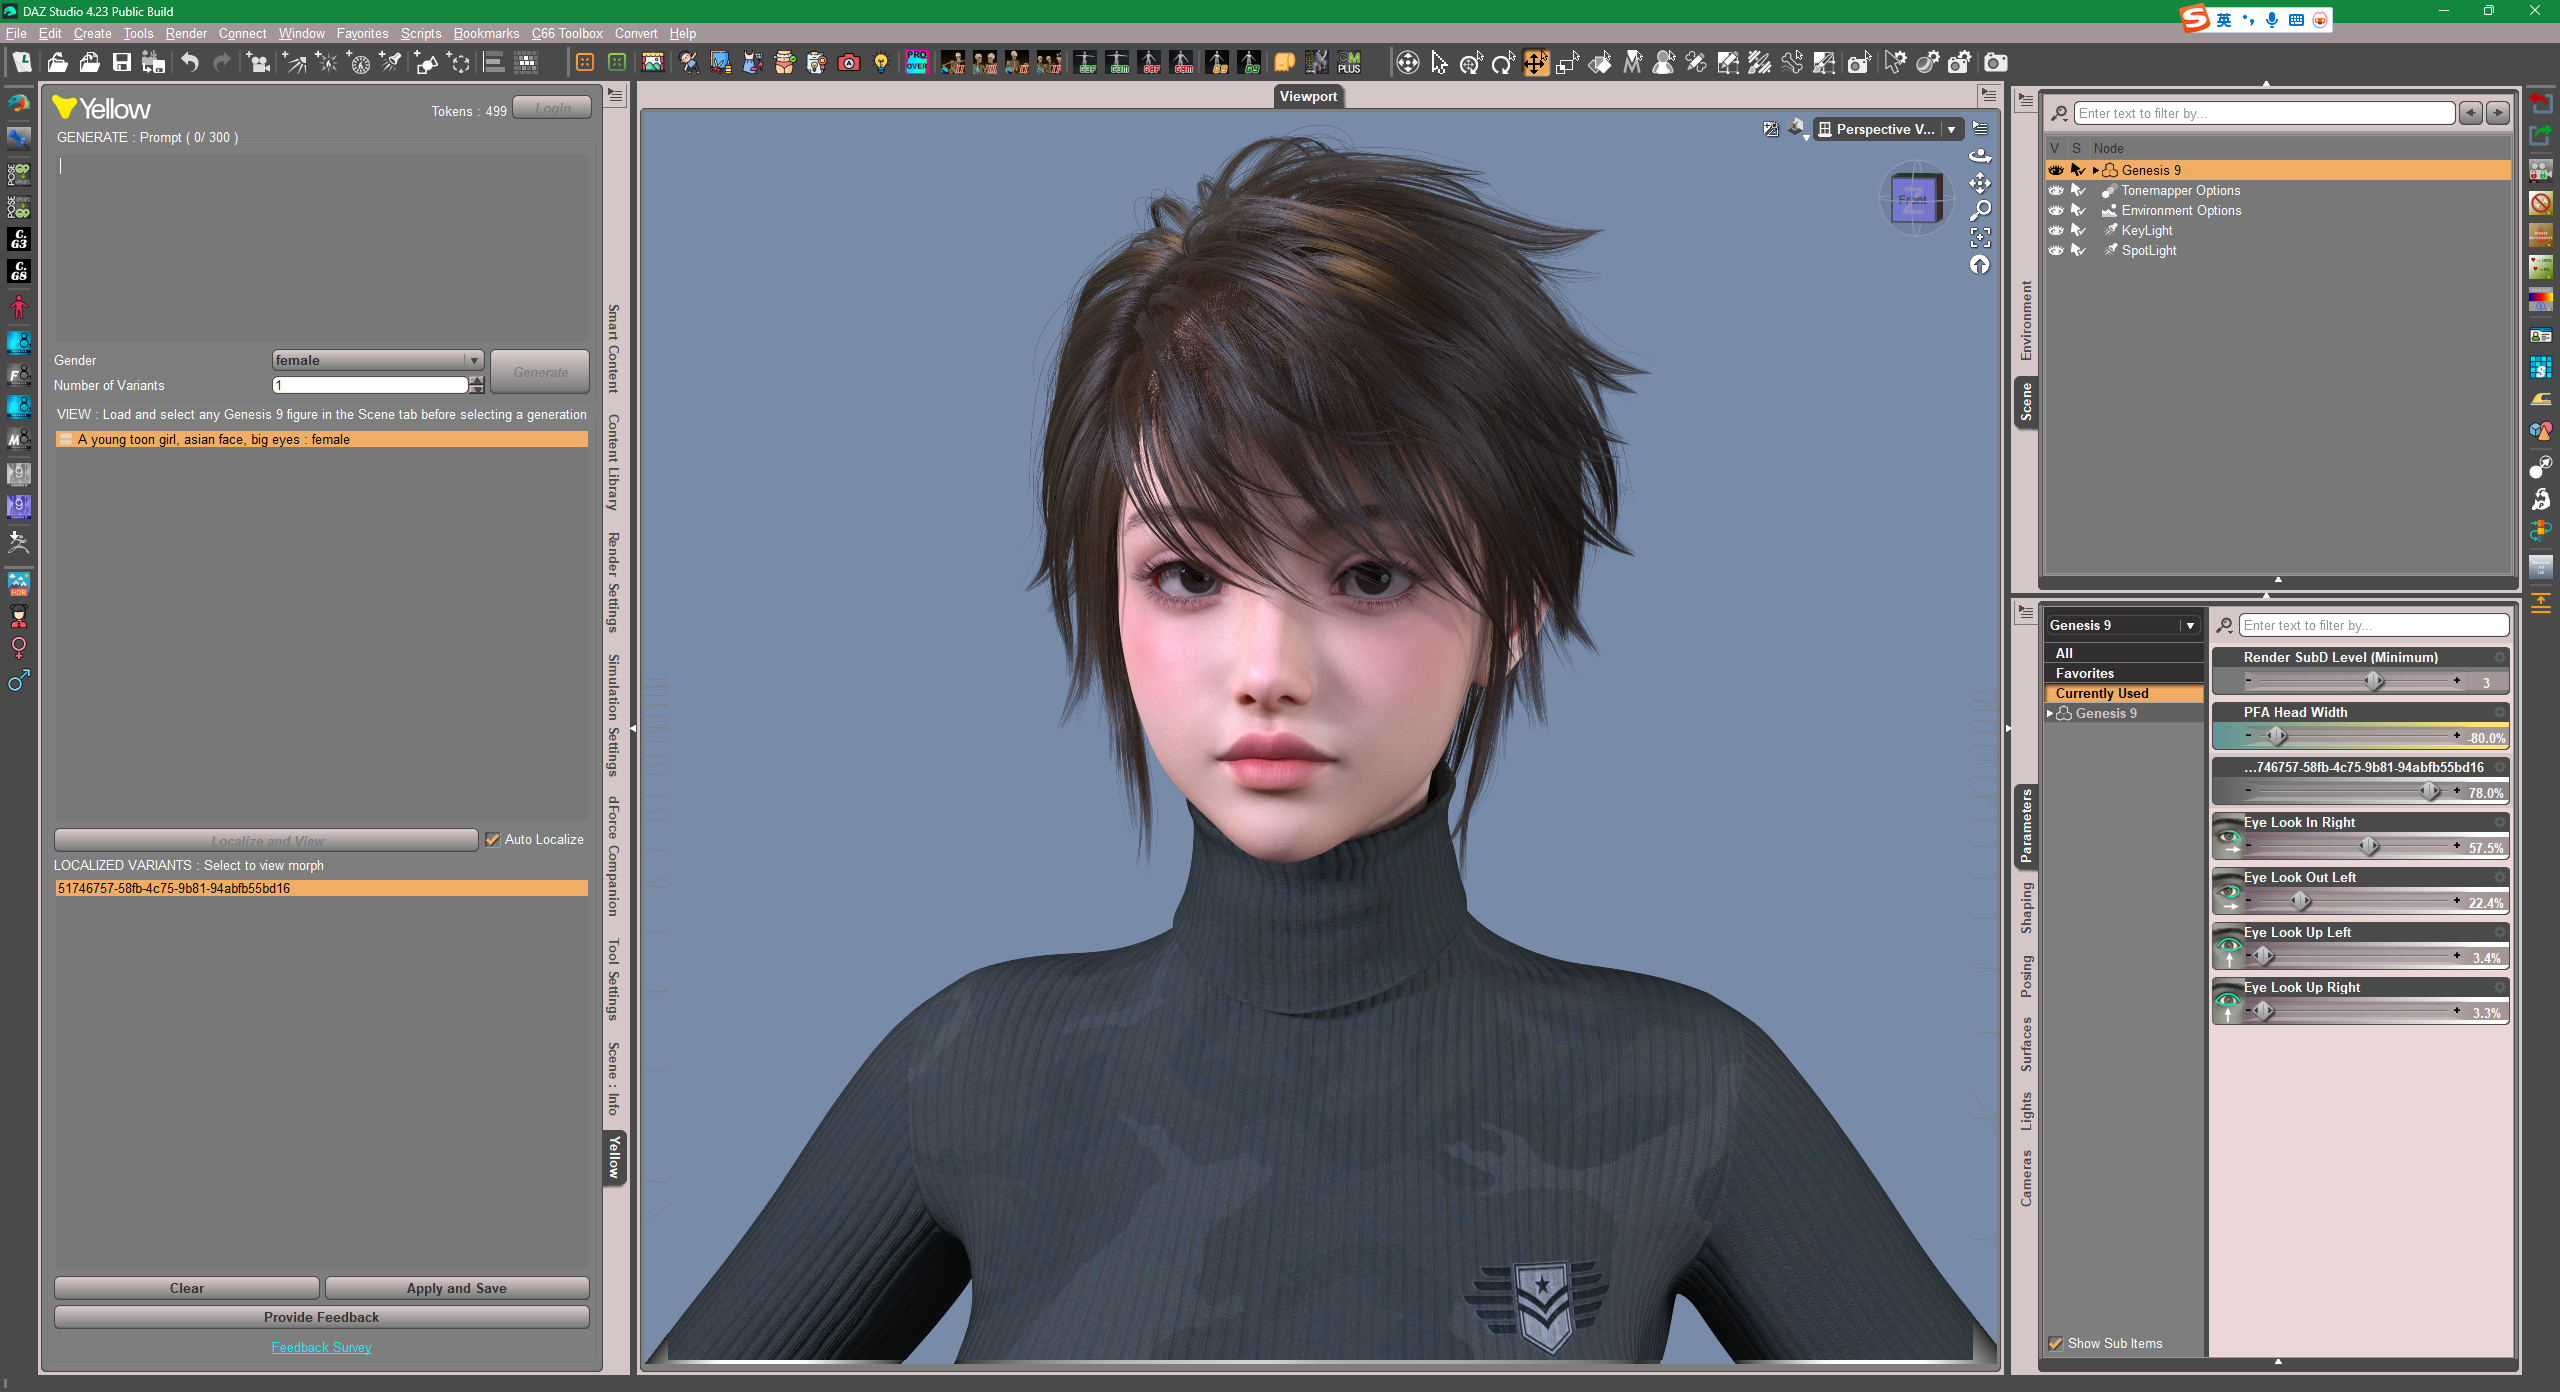
Yellow AI Character Shape Generator for Daz Studio - Official Beta Launch!First try - with one simple prompt (I wrongly typed in a "toon"
 ) . Not bad... as below:
- Figure has to be G9 Base
- Time: nearly 5 mins
- The generated morph better be downloaded to local
- 100% dialed ? not really suggested. Head is too wide... has to be narrowed.Preview is with skin textures from Mousso.
Edit: Personally I think it could be a pretty good Base for sculpting to make a nice character and/or tweaked with PHMs.
 How can I combine two Meshes to One and maintain their weight?
woyodo said:
....Thank you very much for answerring my question!
The Transfer Utility Transfers the weight from Genesis 8.1 F to Boots, that may cause some Weight Changes comparing with the original Separate Boot, such as Left/right Foot Tip Toes Poses for High heel.
So how to Transfer weight PERFECTLY from the original one?
They almost have the same weight, you don't need to worry about that at all. You can compare the weight on them, as below:
Edit: The copy / paste weight functions won't work on them... as well as transferring weight from original boots to new welded boots, because they have different geometry ...
How can I combine two Meshes to One and maintain their weight?crosswind said:
woyodo said:
crosswind said:
Right, why do you want do do so ?
Technically, yes, you can weld the boots as an OBJ and re-rig it to the figure, however, the defininatio of their surfaces, face groups will be broken. Then you have no way to copy weight map from the original separate boot to the welded boots since they're already different in terms of geometry. And you'll lose all morphs on them as well, yada yada ~~
So... that'll be almost a rework ~~
I want to export them as a single object so that I can import it to ue5 with materials not separately.
If I import them one by one, it's not as optimized as I wish.
If so, that'll be much easier:
- Select both boot, export them to OBJ file via File > Export... (ss1)
- Import OBJ file, rig it to G8F with Transfer Utility via Edit > Object > Transfer Utility (ss2)
- Select the boots, import OBJ with Morph Loader Pro via Edit > Object > Morph Loader Pro , as a fixbase morph, and dial it. (ss 3 ~ 4)
- Switch to Geometry Editor, combine surface with suffix "R" to the original surface one by one (ss 5 ~ 8)
- Change Node Name to HBoots6R_29201 or HBoots6L_29201 via Edit > Object > Scene Identification... Then load a material preset to test (ss 9 ~ 10)
- You don't need to tweak Weight at all ! Just bend boots to check distortion, fix them if you want to (with external software like blender) then simply importing fixed mesh to update one or two pJCMs will do (ss 11 ~ 12)
Finally, save the figure asset with your Vendor Name and export to UE with Daz to Unreal bridge for testing.
Thank you very much for answerring my question!
The Transfer Utility Transfers the weight from Genesis 8.1 F to Boots, that may cause some Weight Changes comparing with the original Separate Boot, such as Left/right Foot Tip Toes Poses for High heel.
So how to Transfer weight PERFECTLY from the original one?
How can I combine two Meshes to One and maintain their weight?woyodo said:
crosswind said:
Right, why do you want do do so ?
Technically, yes, you can weld the boots as an OBJ and re-rig it to the figure, however, the defininatio of their surfaces, face groups will be broken. Then you have no way to copy weight map from the original separate boot to the welded boots since they're already different in terms of geometry. And you'll lose all morphs on them as well, yada yada ~~
So... that'll be almost a rework ~~
I want to export them as a single object so that I can import it to ue5 with materials not separately.
If I import them one by one, it's not as optimized as I wish.
If so, that'll be much easier:
- Select both boot, export them to OBJ file via File > Export... (ss1)
- Import OBJ file, rig it to G8F with Transfer Utility via Edit > Object > Transfer Utility (ss2)
- Select the boots, import OBJ with Morph Loader Pro via Edit > Object > Morph Loader Pro , as a fixbase morph, and dial it. (ss 3 ~ 4)
- Switch to Geometry Editor, combine surface with suffix "R" to the original surface one by one (ss 5 ~ 8)
- Change Node Name to HBoots6R_29201 or HBoots6L_29201 via Edit > Object > Scene Identification... Then load a material preset to test (ss 9 ~ 10)
- You don't need to tweak Weight at all ! Just bend boots to check distortion, fix them if you want to (with external software like blender) then simply importing fixed mesh to update one or two pJCMs will do (ss 11 ~ 12)
Finally, save the figure asset with your Vendor Name and export to UE with Daz to Unreal bridge for testing.
[Fisio SB addOn released] Fisio: Physics Simulatorillmiimusic said:
Alberto said:
mazinkaiserzero said:
Hellboy said:
Hi.
I'll be that person...
Will this work to properly animate breasts or male anatomical elements?
Thanks.
Came here to ask this, so I'll second it.
I already bought it and have been trying to do a simple animation with a G8F figure moving up and down, I'm using springs with the active facets only option to select only the mesh for the breasts. Sadly, they deflate completely. I tried using the skin young presets and same results. I did notice increasing density helps a bit in keeping the shape but then gravity affects them even worse. Also, the selected mesh now doesn't seem to follow the figure at all. Turning off the gravity stops the breasts from deflating but then the breasts just stayed in the same place while the figure moved up and down. Then I tried doing a collision with a rigid body and I just couldn't get any bouncing back effect, it almost just feels like a regular dforce sim.
So I'd like to ask if you could show how to do it like in the nose press promo picture and if this can actually be used for bouncy animations with figures (and how)
Thanks!
Use Shell instead of Spring. There are some presets for the Fisio Materials (in Smart Content - Props - Fisio SB - Materials (they're not surface material for renders, but properties preset applicable to the Fisio Materials.
If you use Spring, use the Stiffness of the Spring property to control the stiffness.
You can't animate with keyframes the Soft bodies, but you can transform the simulation into morphs and then disable the soft body (or unsign it as a soft body) to use the morphs.
The soft bodies and the rigid bodies can collide, but when using the Non Smooth contacts System type, the objects tend to stick. What are the settings of the bodies and the system you used?
How do I transform the simulation into morphs?
Click on the button Create a morph... in the Pane, and select the initial and last frame for the calculation of the transformation.
Daz 3D is part of

Connect
DAZ Productions, Inc.
7533 S Center View Ct #4664
West Jordan, UT 84084Licensing Agreement | Terms of Service | Privacy Policy | EULA
© 2026 Daz Productions Inc. All Rights Reserved.