-
PC upgrade
I'd also like to say I was shocked when viewing videos on the coolers for the sTR4 sockets. I learned when I first started piecing together pcs back in the mid to late 90's that you should only ever use a super thin layer of thermal paste as putting too much on hinders the heat transfer from the chip to the heatsink. Yet in these videos people were using like half a tube of thermal paste! :O
It's a very large package. The standard small dot of paste won't come anywhere close to fully covering the heat spreader.
On gaming the issue is the default memory access model, UMA, creates very high latency which negatively impacts game performance. Add in that many games, even more back when TR 1000 came out, choke very badly when run on a high core count CPU (simply put most games are terribly coded and would get the developers sued in the business world) and you have the makings of abysmal performance. I don't think there were any games that wouldn't even launch on the 8 core part but there were more than a few that crashed long before you got to the main menu on the 16c chip. Games that are still receiving updates or have come out since deal with lots of cores better now but many older games still struggle on even the 1900X.
PC upgradeI'd also like to say I was shocked when viewing videos on the coolers for the sTR4 sockets. I learned when I first started piecing together pcs back in the mid to late 90's that you should only ever use a super thin layer of thermal paste as putting too much on hinders the heat transfer from the chip to the heatsink. Yet in these videos people were using like half a tube of thermal paste! :O
What features would you like to see appear in dazstudio 5?Export high division/resolution/poly characters to Zbrush via GOZ. Currently it only exports the lowest subdivision level.
It already does this - you should be asked if you want to send the mesh across at the current resolution. If not check the setting in Edit>Preferences>Bridge tab. What you cannot do is bring the modified model back as a morph.
I'd like to be able to GOZ the maximum resolution for the character, then add a bunch of detail like musculatures, veins, micro details, etc,
As noted above, creating HD morphs is a PA-only feature. You can of course create normal or displacement maps for the details in ZBrush and use those in DS.
Problem with weightsHi.
I need to modify Genesis 3 Male and Female.
i am looking for a Tutorial where is shown hów to Weight the Legs of the Chars.
Male and Female have 4 joints for each Leg. I have Problems to Paint the Weights who are connected to the Pelvis. If i let sit my Char on a chair I got Hard edges.
Is there a Tutoial, or maybe the Possibility to get a education in any Company ?
We don't normally mess with the rigging of the figures, we make morphs for adjustments such as sitting on chairs. One can either morph the figure or the chair, or both.
The Marvelous Designer ThreadI can only attest to what I've done using my own products, so I'm not sure what would happen with other clothing products (welded, unwelded, etc). I transferred my Pilot Harness from Daz to MD (female Daz version to male MD avatar) to create a morph...worked great. I show and explain what I did in the new tutorial.

Another good reason to buy it. I do have it wishlisted (sorry but I have to spin-out my spending carefully).
I bought the new tutorial, but I haven't started it yet.
Iray only on cpu, is it stupid?And I am really anxious to see what AMD can pull out of the hat with Navi 20. They will have their "NVidia Killer" to show, probably at that conference, whose name I can't remember, in January. The reason I'm really excited is because rumor has it that it is meeting performance expectations, but the power consumption was unacceptable. But then just a few days ago, AMD released the new 16/32 Ryzen 9 CPU (it's a Ryzen, not a Threadripper) which is absolutely clobbering Intel offerings at more than twice the price, and at the SAME TDP. Apparently, they've made a breakthrough on Ryzen. That doesn't necessarily transfer to Navi, but it is encouraging... hopefully they've developed a general design technique.
Competition is always good.
The Marvelous Designer ThreadI can only attest to what I've done using my own products, so I'm not sure what would happen with other clothing products (welded, unwelded, etc). I transferred my Pilot Harness from Daz to MD (female Daz version to male MD avatar) to create a morph...worked great. I show and explain what I did in the new tutorial.
Another good reason to buy it. I do have it wishlisted (sorry but I have to spin-out my spending carefully).
The Marvelous Designer ThreadI can only attest to what I've done using my own products, so I'm not sure what would happen with other clothing products (welded, unwelded, etc). I transferred my Pilot Harness from Daz to MD (female Daz version to male MD avatar) to create a morph...worked great. I show and explain what I did in the new tutorial.
More Non-photorealisitic Renders (NPR II)I've been working on the next iteration of the book cover. I just sent this to the editor to get his reaction on this one.
This is based on two treatments I created in Topaz Studio 1. These are the filters/settings I used:
- Tarnished Air (0.80 strength)
- Photo Painting I (0.50 strength), and the in Photoshop I set the layer opacity to 52% (normal blending mode)
It's okay, but I think the background aliens are too cheesy. And I'm not sure the sky is the right color (which one do you like better: lighter sky or darker?). And then the sand needs editing, as does the horizon (needs some blur). And then we have the tall alien's face, which is NOT working at all for me.
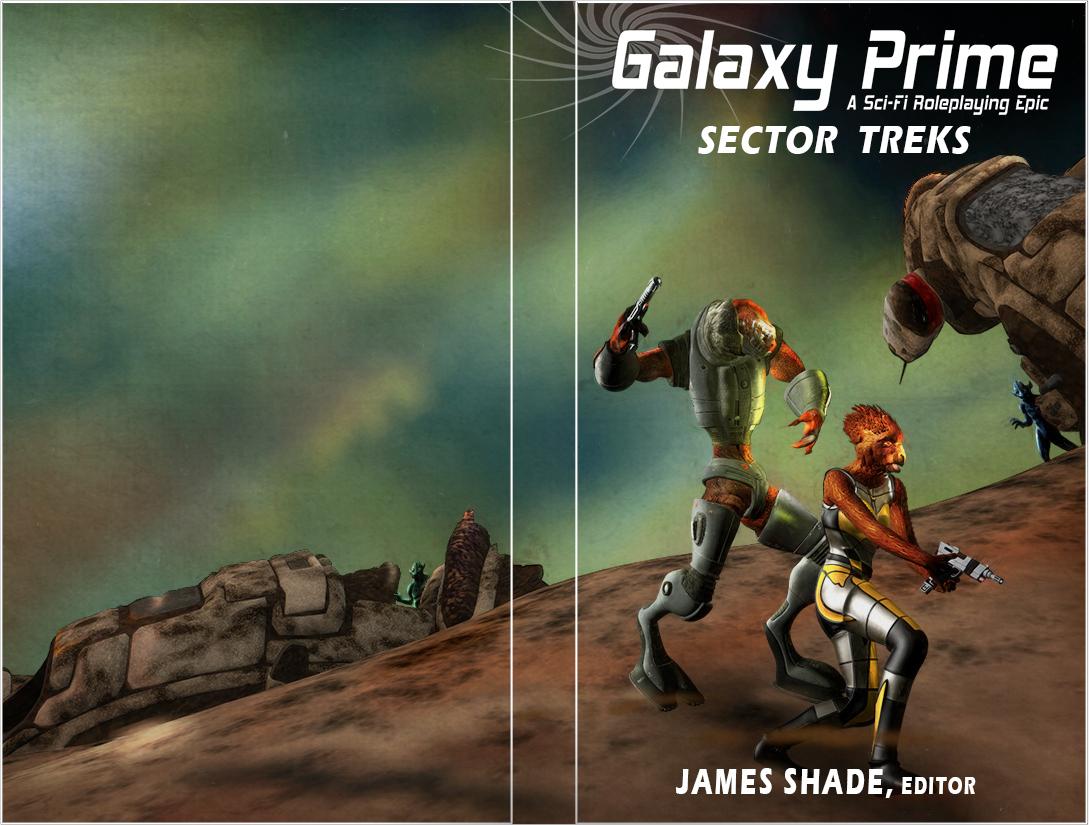
I think both skys are good. I think the background aliens are fine. The tall alien's face bothers me as well, I should've said something about that before. You could try a different expression (maybe mouth open) or modify the morph you are using.
I think, logistically, the darker sky will work better because I can darken it a little more and put white type over it. I'm not 100% sure the tall alien has an open mouth morph. If not, I will have to fix it in post work.
I also think that little "antenna/rod" sticking off the wreck needs to go (or bend it). We'll see what the editor thinks.
I like the blue-toned sky best because there's some really good color contrast going on with the aliens in the foreground. It's also got interesting color variation that picks up tones from the rest of the image, so overall it makes the piece feel more balanced to me.
I think setting the wreck on the front cover back a bit more or even bringing it further behind them would help with the readability (or adding depth of field to it if you're doing that in post). Especially with the antenna, it looks a little like it's moving in from above to threaten them.
The aliens hiding behind the wreckage are cool; I used to look for details like those when I'd pick up sci fi books at the library as a kid.

I can't really use depth of field blur with this type of post processing. I'm going for an illustrated look, not photo realistic. And I have been playing with the idea of moving the wrech a bit frather back (i.e. making it smaller) so that the logo could breath more. I'll probably try that in the next iteration. BTW: I think you are spot-on about why I like the darker sky better; I hadn't even realized consciously that it was pulling in other colors, but once you mentioned it that clicked with me. I hope this one makes the cut, but the editor is leaning more toward the birther sky. We'll see how it all looks for the next pass. Thanks for the detailed comments.
Novica & Forum Members Tips & Product Reviews Pt 12Going through my PC $1.99 for-a-day sale items. Here's how Sahana G8F looks without makeup, dialed head down to 50% as the lip morph was too extreme for my taste.
ETA: funny, I chose the exact same hair that is being used on the promos, without knowing it.
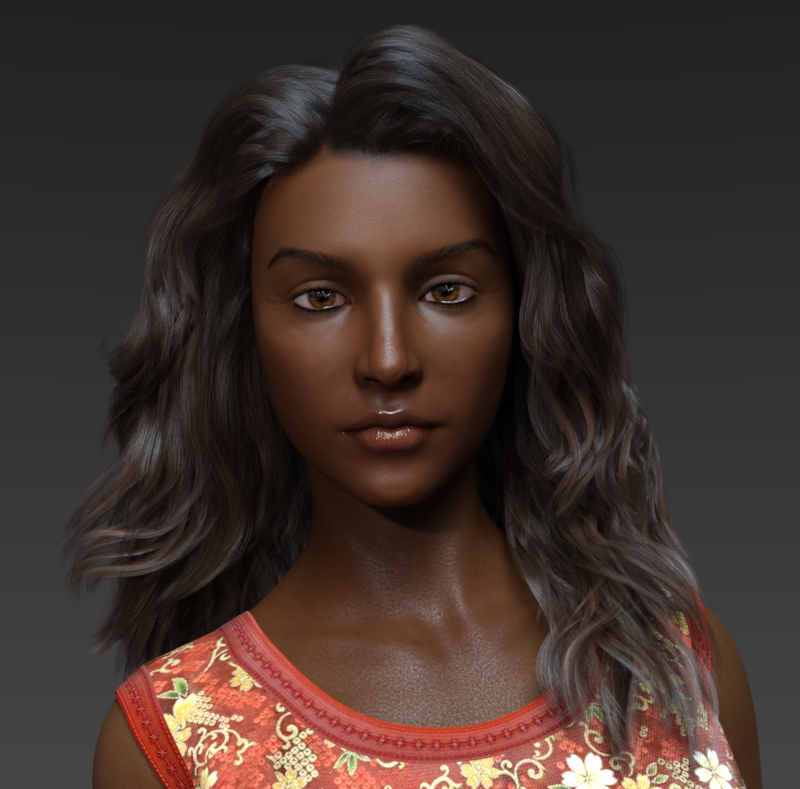
I like it dialed down, agree with you. Her skin is pretty, and the eyebrows appear natural looking. Nicely lit, too!
The lights are from one of Colm's Pro Studio HDR sets (add-ons to Render Studio), they all have individual HDRI/backgrounds which make them very versatile.
Novica & Forum Members Tips & Product Reviews Pt 12Going through my PC $1.99 for-a-day sale items. Here's how Sahana G8F looks without makeup, dialed head down to 50% as the lip morph was too extreme for my taste.
ETA: funny, I chose the exact same hair that is being used on the promos, without knowing it.
I like it dialed down, agree with you. Her skin is pretty, and the eyebrows appear natural looking. Nicely lit, too!
Novica & Forum Members Tips & Product Reviews Pt 12Going through my PC $1.99 for-a-day sale items. Here's how Sahana G8F looks without makeup, dialed head down to 50% as the lip morph was too extreme for my taste.
ETA: funny, I chose the exact same hair that is being used on the promos, without knowing it.
How do I actually open this Jacket?Normally you need to apply a dForce "open" garment, apply a pose to the figure/character and run a dForce simulation to see a dForce ready garment "open".
1. Load the Onyx Hoodie Open.duf garment on a G8M figure/character.
2. Apply a pose to the G8M figure/character.
3. Run a dForce simulation.Applied body hair figures can interfere with garment draping, so hide it via the Scene tab during the simulation. I have the HoodBack1 open morph applied in my test render.
formerly male content creation threadI've previously released some free merchant resources geard towards content creation. I figure they're relevent to this thread, so I'm posting them here for those who may have missed them:
InTheFlesh Merchant Morphs for Genesis 8 Male
This is a free set of morphs which will be updated over time. Primarily consisting of morphs I have created for use during product creation, these are being released as a free merchant resource.
These morphs can be used as a base for your own creations, correcting morph issues with other products or distributed for free or sale. The only restriction is you cannot sell these morphs as part of a morph pack.
__________________________________
InTheFlesh Merchant Morphs Vol. 1 includes:
- Daz Install Manager (DIM) compatible install.
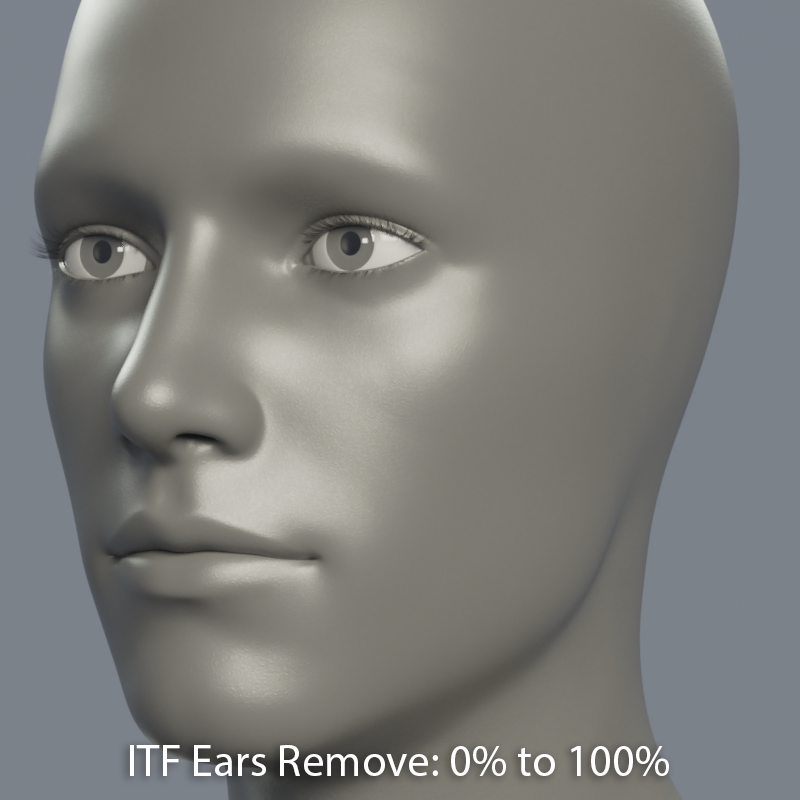
- ITF Ears Remove: Completely removes Ears, resulting in a smooth flattened surface. Intended as a base for further sculpting, this morph only works well with the default Genesis 8 Male base shape.
- ITF Eyes Remove: Completely removes Eyes, resulting in a smooth flattened surface. Intended as a base for further sculpting, this morph only works well with the default Genesis 8 Male base shape.
- ITF Nose Remove: Completely removes Nose, resulting in a smooth flattened surface. Intended as a base for further sculpting, this morph only works well with the default Genesis 8 Male base shape.
- ITF Cornea EyeMoisture Scale: Enlarge or shrink just the Cornea and EyeMoisture. Useful for correcting instances of the Sclera poking through the EyeMoisture.
- ITF Teeth Scale All: Enlarge or shrink just the Teeth. Useful for correcting morphs that cause the Teeth to shrink.
Morphs are located under Actor/Head, or simply search for ITF Merchant Morphs to find morphs from all current and future volumes.
https://gumroad.com/intheflesh?sort=page_layout&tags=free
https://sharecg.com/v/94004/view/21/DAZ-Studio/InTheFlesh-Merchant-Morphs-for-G8M-Vol.-1
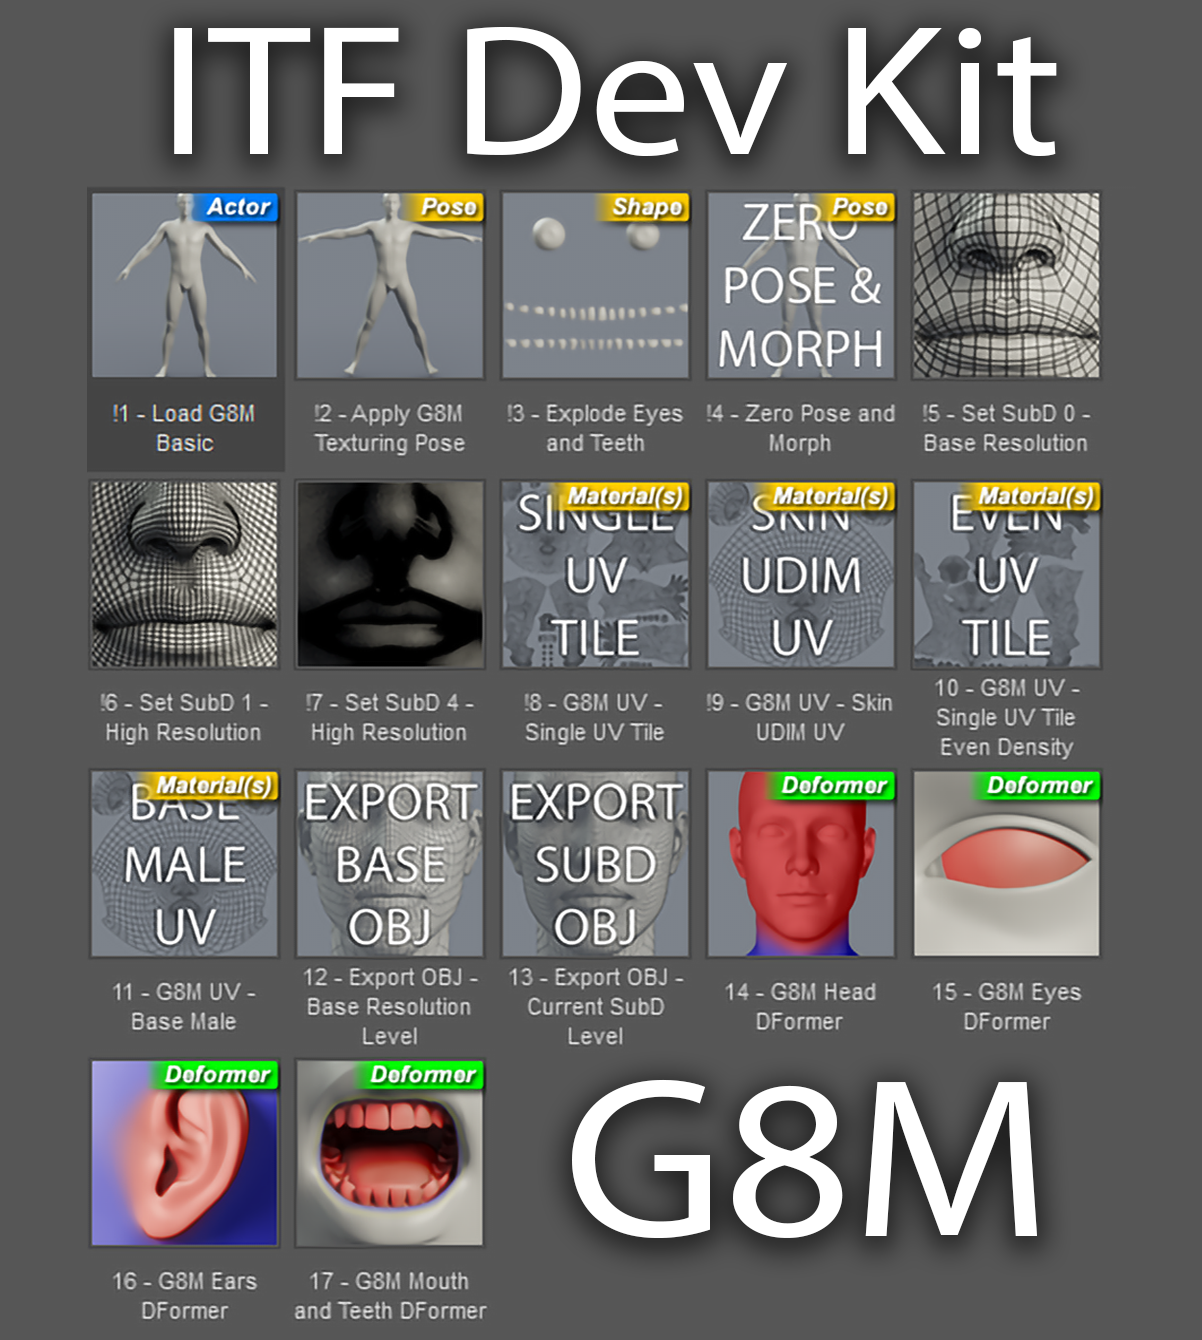
ITF Dev Kit for Genesis 8 Male by InTheFlesh
A collection of useful tools to speed up your workflow when creating content for Genesis 8 Male.
Make sure watch the tutorial on Youtube for a full walkthough of all the tools:
Created in Daz Studio Pro 4.11
__________________________________
Once installed, you will find the ITF Dev Kit folder under People -> Genesis 8 Male -> ITF Dev Kit.
1. Load G8M Basic loads Genesis 8 Male at Subdivision Level 1 with a grey Iray shader I use for test renders. The eyelashes have been removed and the Maximum Subdivision Level has been unlocked to level 4.
2. Apply G8M Texturing Pose is a custom pose to allow for easier texturing. The fingers and toes have been spread apart and straightened, the legs are spread apart for increased access and the arms have been raised and straightened. I tend to texture the eyes and mouth separately, so the mouth is partially opened to reduce texture distortion when compared to having the mouth fully open but still allowing you to get and and texture the lips. The eyes are also mostly closed to give better access to the eyelids. You may need to make some adjustments when working with more extreme character morphs, so just go to Currently Used under parameters to tweak the eye and mouth opening.
3. Explode Eyes and Teeth is a custom morph that moves the eye and teeth geometry out to the left of Genesis 8 Males head. The sclera, pupil and iris have been separated from the cornea and eye moisture. The teeth have been aligned and spread out for easier access during texturing. This morph is also useful for extracting texture maps because it reduces overlapping areas of the mesh.
4. Zero Pose and Morph simply does as stated: it restores the default Genesis 8 Male pose and removes the Explode Eyes and Teeth Morph.
5. Set SubD Zero, One and Four are one click options to set your desired Subdivision level without having to drill into the Parameters.
6. Single UV Tile is a custom UV set that moves all the UV shells into a single non-overlapping layout. It is optimized for texture painting and baking in applications that don't support multiple UDIM tiles. Again, I usually texture the eyes and mouth separately so the UV's for those parts have been scaled down and placed into blank areas of the Torso and Legs UV's. If you use this UV set, you can convert the created textures to be compatible with the default Base Male UV Set by cropping them into 4 equal square textures.
7. Skin UDIM UV is similar to the Single UV Tile in that the eye and mouth uv's have been scaled down and placed into blank areas of the Torso UV's. But instead of the UV's being on a single tile, the Face, Torso, Legs and Arms UV's are still in their original UDIM tile locations. This layout is my preference when working in Mudbox because it supports full UDIM texture painting and baking. Nothing needs to be done to the textures using this UV set to be compatible with the default Base Male UV's, but you can paint out the eye and mouth textures if you'd like.
8. Single UV Tile Even Density is a custom UV set that moves all the UV shells into a single non-overlapping uv tile while scaling the parts to ensure even pixel density across the surface. This is especially useful when projecting full body photographs or extracting texture maps to reduce seams due to differences in UV scale. For example, the difference in pixel size between the face and torso textures. This UV set is also good for using tileable or procedural textures with consistent detail resolution across the mesh. The downside to this UV Set is that if you want to make the textures compatible with the Base Male UV Set you will need to project the textures which can result in a loss of fidelity. I'd recommend baking 16K maps if your hardware can handle it when using this UV Set.
9. Base Male UV simply restores the default Genesis 8 Base Male UV Set.
10. Export Base OBJ changes the selected figure to Base Resolution 0 and SubD 0 and prompts for a location to save an OBJ file. The settings used are designed for exporting to Mudbox and Maya, but may work with others.
11. Export SubD OBJ exports the selected figure at the currently set Resolution and SubD Level. Again, it prompts for the save location and uses the same settings as before.
12. Head, Eyes, Ears and Mouth DFormers load preset weight-mapped D-Formers. These are mostly used when importing morphs to define which parts get morphed or not. The Head D-Former has a soft falloff and can be used to split head and body morphs into separate parts. The Eyes D-Former can be used to ensure the eyes aren't affect by imported morphs. This has no falloff, so only the eye geometry is affected while the eye socket is still morphed. The Ears D-Former has a soft falloff, and the Mouth and Teeth D-Former also has a slight falloff for a smoother blend between the mouth and lips. By default, the imported morphs will be applied to the selected area. To prevent morphs from being applied to the D-Former selection, just set the Strength to minus one in the Attenuate By options.
__________________________________
Download at Gumroad FOR $0 to get notified of updates and new freebies: https://gumroad.com/l/qAEQn
Download at ShareCG: https://sharecg.com/v/94141/browse/21/DAZ-Studio/InTheFlesh-Dev-Kit-for-Genesis-8-Male
Hope this helps with people creating their own content for Genesis 8 Male
Cheers!
Daniel
Wacky Modelling ~ In Carrara ~a wacky ring pull can of tuna ~ with a lid pulling morph
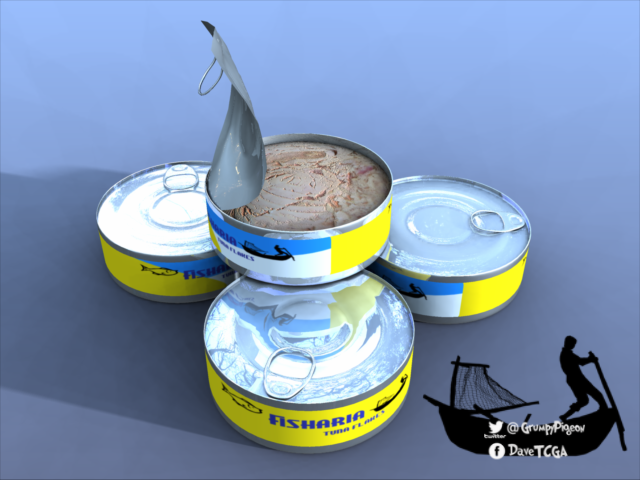
A terrific model! Still, you have done many outstanding models. Who would have thought that a can of tuna would garner so much attention.
First the tuna can, then the world!
Victorian Pram Add-on - baby monsters?I was curious if anyone know what products were used for the baby vampire, wolf, and Frankenstein in the promos? I figured maybe it’s just a morph to make them young and an adult morph on top. I don’t know, but they are so cute.
More Non-photorealisitic Renders (NPR II)I've been working on the next iteration of the book cover. I just sent this to the editor to get his reaction on this one.
This is based on two treatments I created in Topaz Studio 1. These are the filters/settings I used:
- Tarnished Air (0.80 strength)
- Photo Painting I (0.50 strength), and the in Photoshop I set the layer opacity to 52% (normal blending mode)
It's okay, but I think the background aliens are too cheesy. And I'm not sure the sky is the right color (which one do you like better: lighter sky or darker?). And then the sand needs editing, as does the horizon (needs some blur). And then we have the tall alien's face, which is NOT working at all for me.
I think both skys are good. I think the background aliens are fine. The tall alien's face bothers me as well, I should've said something about that before. You could try a different expression (maybe mouth open) or modify the morph you are using.
I think, logistically, the darker sky will work better because I can darken it a little more and put white type over it. I'm not 100% sure the tall alien has an open mouth morph. If not, I will have to fix it in post work.
I also think that little "antenna/rod" sticking off the wreck needs to go (or bend it). We'll see what the editor thinks.
I like the blue-toned sky best because there's some really good color contrast going on with the aliens in the foreground. It's also got interesting color variation that picks up tones from the rest of the image, so overall it makes the piece feel more balanced to me.
I think setting the wreck on the front cover back a bit more or even bringing it further behind them would help with the readability (or adding depth of field to it if you're doing that in post). Especially with the antenna, it looks a little like it's moving in from above to threaten them.
The aliens hiding behind the wreckage are cool; I used to look for details like those when I'd pick up sci fi books at the library as a kid.
Chubby shortiesHi MAJourney,
Hope all is well.
In the (Formerly) Male Content Creation Thread, I go through the steps of creating a custom full body morph that changes proportions. The step-by-step example is to make someone taller, the steps are the same to make shorter. I did a shorter character using the same method.
Tutorial starts here, provides background, then continues quite a few posts from there. https://www.daz3d.com/forums/discussion/comment/2394546/#Comment_2394546
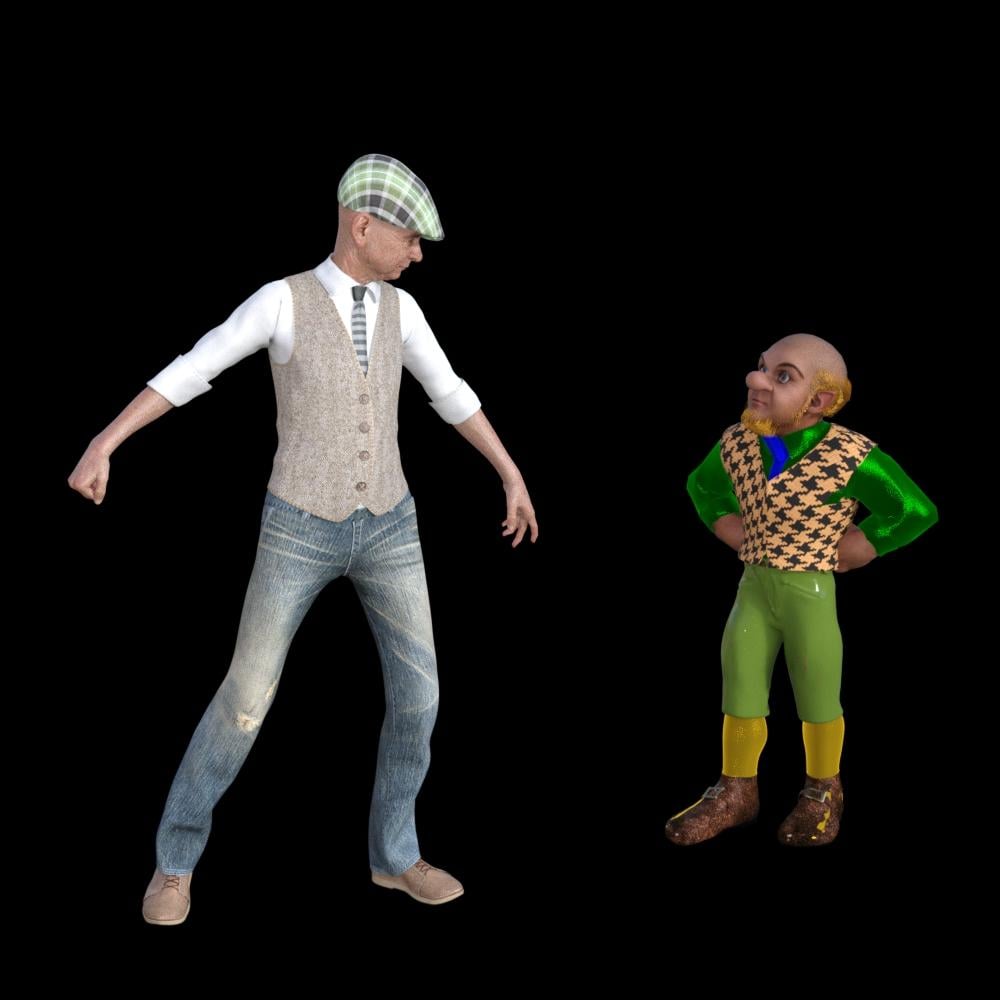
Leprechaun made combining that method with face mophs.
 Merge Problem
Were the modifications amde from version 1 to version 2 just sliders changes, or had you used any of the content creation tools (Joint Editor, Geometry Editor, Morph Loader etc.)?
Wacky Modelling ~ In Carrara ~Here's Stezza's tuna can, with functioning lid morph, rendered in Studio iray, along with the Toon Roach, enjoying his seafood dinner :)
As always, thanks Stezza for making ideas transform into reality with your modeling skills :)
Daz 3D is part of

Connect
DAZ Productions, Inc.
7533 S Center View Ct #4664
West Jordan, UT 84084Licensing Agreement | Terms of Service | Privacy Policy | EULA
© 2026 Daz Productions Inc. All Rights Reserved.