-
More Non-photorealisitic Renders (NPR II)
We started an image in the class I taught yesterday. After it ended, I completed my post work and this is what I came up with. Figure is V4 with the Bettie Page morph and hair. Can't recall where I got the devil wings and horns, though.

Congrats for your class !! your approach really cool
This was done using Poser's Real-Time Comic Book feature. The line-work and shadows were rendered in Poser. I did touch ups and coloring manually on my iPad. I did some post-work in Photoshop as well. Its not perfect, there are some micro mistakes I'm sure. I'm just trying to see if I should bring Poser into my work-flow. That do you all think of the Shadows? I know my highlights suck, I'm working on that.
Like Always ..you always bring awesome to epic type NPR
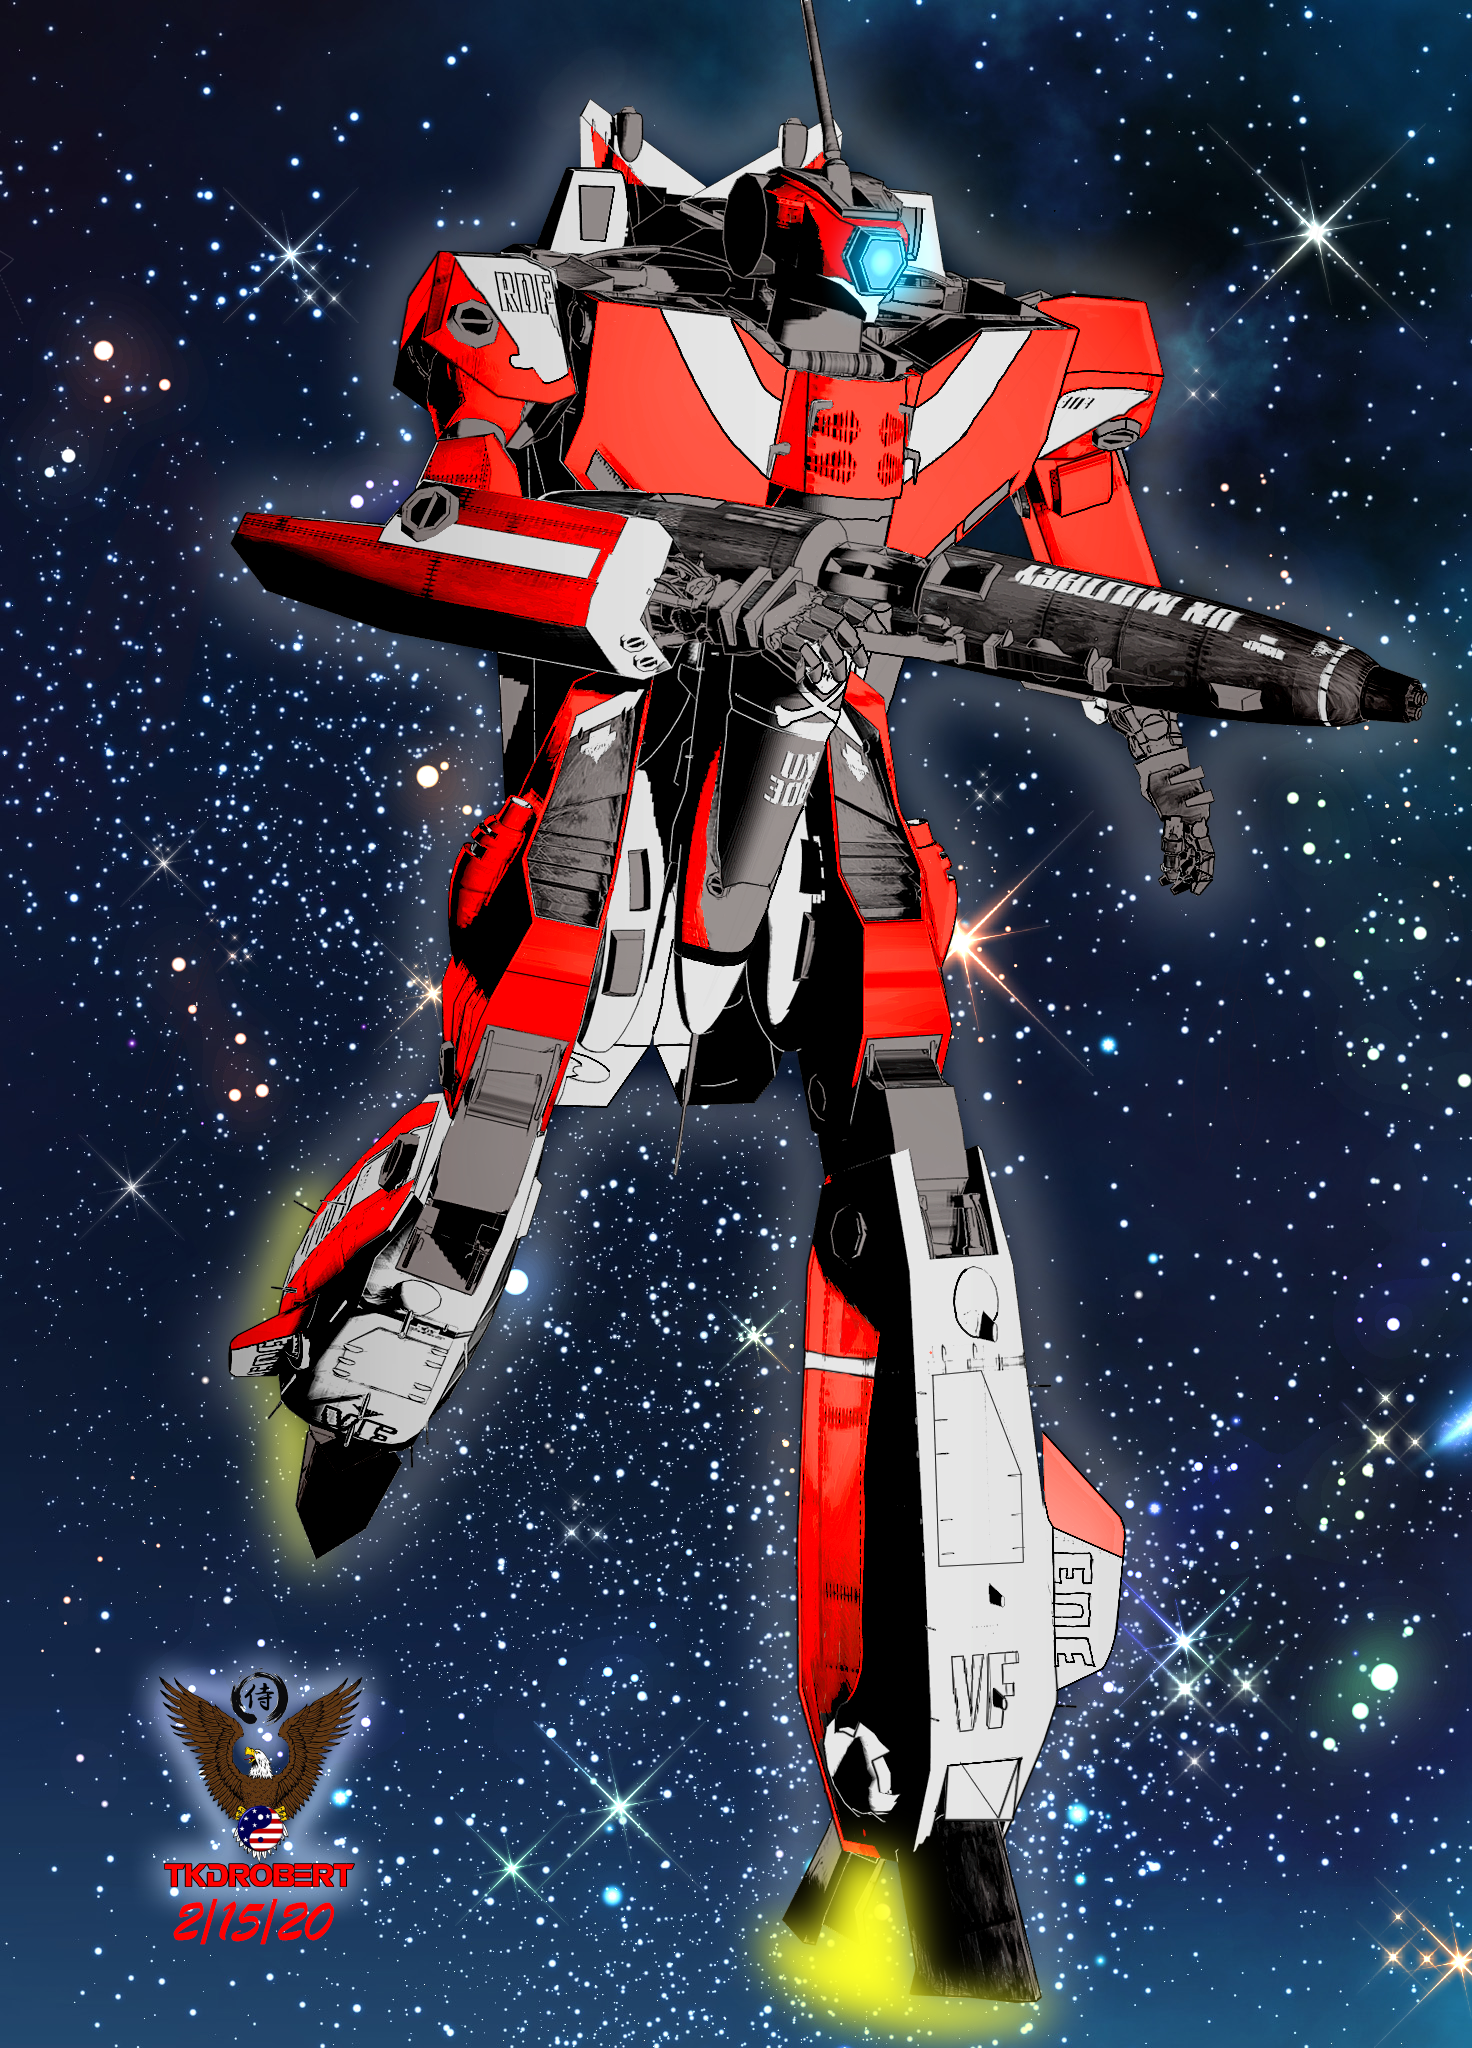
Yasss! Feed us more Robotech!
Here's a scene featuring both of the anime-style G2 characters I threw together today.
Cool , yeah G2M surprisingly still good for stylized type render
And this is my last experiment using IRAY and Photoshop . Waiting for Outline work
mat or texture files Face Transfer and HeadshopI use FaceGen, Face Transfer and Headshop and old FaceShop 8 to create new characters. FaceGen actually specifies a path for accessing and applying the mat or texture files to the model. Do Face Transfer and Headshop create similar files and if so, where do I find them?
Roger the old guy in Tucson.
photosIf you are wanting to take a photo and animate elemnts of it, that isn't what Daz Studio does - it is a 3D staging and rendering application, starting from 3D models and (mainly) producing 2D output in the form of images or animations.
Don't forget, there's a few face transfer tools available which may be what they're after.
Note to OP, there's a couple face transfer tools available, though I don't have any experience outside of the free-but-limited one that appears to be included by default, so you're mileage will vary depending on which one you decide to use.Cloud renderingSince searching these forums is about useless, I'll ask maybe a repeat question. Any info about cloud rendering would be nice. Recommendation, sites, pricing, is it worth it, other alternatives, those types of things. Thanks!check out this site it has a whole list of render farms, https://rentrender.com/all-render-farms-list/ just look for the icon to match the software your looking to use. some of the farms will work with daz studio .
Also you might try contacting a PA here. his named is Jack Tomalin He has a render farm as well though, i am not sure fo his requirments or prices though.
Thank you for this, I've been looking into render farms too, but none of these have the Daz logo that I can see. Does anyone know if any of these work with DS? I will try contacting Jack too.
Related question. Could I do the same thing from home, for instance if I have 2 computers? can I render on one without having to have all but daz information and products equally on both computers? Just being able to transfer the sceen file like one would to a cloud server.I can't speak for anyone else here. But for my work flow I use external Hard drives and external GPU's connected a usb3 super hub. so I can connect 2 desk top pc's and 1 lap top. to the hard drive hub. I use the big system with 120 gig ram for rendering, which allows me free so I can make and test render new scenes on another computer, I use another hard drive as a shared project drive, By using external hard drives it allow me to access my main daz content folders with as many computers as I have connected to the main usb3 super hub I am up to 5 -2tb HDD content hard drives and 2- 1TB SSD shared project drives that I can access with 3 computers all at the same time.. each computer has their own, but the same versions of daz studio on them. that is how use my system for creating and rendering daz animation on a home computer system. not really a rendr farm more like a storage farm. for my usb3 hub I just use a simple Anker 7-Port USB 3.0 Data Hub with 36W Power Adapter for the hard drive you connect to it
Most of those render farms on the list use a virtual desk top app which pretty much connects any software anyway, it really depends on how much you want to spend. I have used rev render render farm a few times for large projects and they work well with daz Studio4. because you connect daz to their iray servers using a virtual desktop app , they give you to download & install. which will virtually allow you to connect any 3d software that uses iray not just daz. the best thing all the daz content remains on your system so no fear of violating the daz TOS. plus Revrender support is very good kind of expansive though at a $1 a core hour, when you need 80 cores for 3 or 4 hours.
Thanks Ivy. I have all my Daz content on a external drive, but I've heard you can't actually connect multiple computers to the same harddrive. At least that's what searching the internet has suggested, I know nothing about computers besides how to use Daz.lol. so I can just switch the drive to my other computer, load scene and render, but it's kinda a pain. If we pretend money isn't an issue, any help setting up a home system would be great. Right now I have a sinker MSI stealth, i7-8759 1060 geforce laptop. It works fine as a hobbyist, but I'm way past hobbyist at this point. Thanks again!I have a similar setup at home - I do the scenes on my i7 laptop with 1050ti and render them on a desktop-ish computer (a NUC with a 2080ti eGPU connected to it). In order to do that, you'll need to either attach your external drive to the rendering machine, share it on the network and mount it as an network drive on your laptop or you can get a NAS (I have the most basic Synology box at home - cost me around 100 euro) and put your daz library on it and mount it both on the laptop and the rendering machine. I did some research on iRay servers but it turns out there are many restrictions regarding what you can render on those (e.g. you can't render animations), so I gave up on the idea of running a iRay server on my NUC. I do the scenes on my laptop, connect to my NUC via remote desktop, start DAZ and either schedule a batch rendering for the static scenes, or if it's an animation, just open it and start the render. This way I can continue to work on my laptop while the renders are running on the NUC, effectively saving time which otherwise would be wasted waiting on the render to complete.
Poser figures in DAZI thought most legacy Poser content worked perfectly well as is loaded from a runtime library
just pmd morphs an issue in DS4
you certainly can save duf versions, scene subsets for convenience
doing Genesis 8 versions is another matter but with Blender Shrinkwrap and Zbrush Zproject a morph shape would not be impossible just a fair bit of work, you can even transfer textures abd fit clothes that way once you have your shapes
Lana for Genesis 8 Femalehttps://www.daz3d.com/forums/discussion/comment/4946356/#Comment_4946356

Nope. Already checked. I've checked the "currently used", hidden, non zero values. Nothing is activated except for the intended morphs.
Did you really checked not only the "currently used" section, but all morphs for non zero values? And did you check for "Erevan Airy"? I bet that's the active morph. And it will NOT be shown under "currently used".
Genesis 8 to Maya not exporting favorite morphs as shapesI just got this product and am having the same problem. I have a morph that's a combination of like four characters, I favorite everything but when it gets brought into Maya, she looks just like a Gen 8 character. I tried with two characters, one was with Girl 8 and I exported in the girl 8 section of the script, but the other had Kanade and she's not listed so I clicked gen 8 female, so I don't know what to do. I posted on his website my question, hopefully I can get a response, or if you've figured it out, please let me know.
Dumb IM Download Question (Asking for a friend ????)Sorry, this basically true of the newer products, if you are buying something "vintage" back when Daz3d mainly produced content for Poser and pre-Genesis, you might need both. I problably would only download the Studio version if it is post Genesis. Something I will point out is that every product (with some few exceptions) has an item number (SKU) associated with it; you can look up the product in daz3d.com > Help > product read me's . There you should find a page that has the product information including any instructional pdf, a file list which is wonderful if you are trying to figure out where a morph is or whether the hair is included, sometime detailed instructions and videos etc... You can check to see via the file list if the poser files just duplicates the studio files (lacking a data folder element for example).
3D Art Freebie Challenge-February 2020-"Natural Love" -Main Thread OnlyAwesome render @Hylas! Really beautiful!
But I wonder (and not for the first time) why the G8M Head Morphs (https://www.daz3d.com/genesis-8-male-head-morphs) and G8M Body Morphs (https://www.daz3d.com/genesis-8-male-body-morphs) are listed under No-Count items? Or do you mean the Body and Head morphs that come with the Genesis 8 Male base figure? (The (paid) Genesis 8 Male Body Morphs are required by the Rex for Genesis 8 Male character...)
Thanks!
As I understand it, the basic morph packs are No Counts... when I use further morph packs (such as SWOLE or 200 Plus) I list them under purchased.
3. Base figures (All Gen 2,3,4, and Genesis 1,2,3) as well as their general morphs packs (Morphs++ and similar) do not count as a purchased item or a freebie and may be used as needed
The Victoria 4.2 and Michael 4 Shapes++ (Head and Body Morphs++) have been freebies occasionally, as well as the Victoria 4.2 and Michael 4 Creature Creator Morphs but I'm not sure whether they (the C.C.M.) fall under 'similar'. I also own the Genesis Evolution: Head Morphs and the Genesis Evolution: Body Morphs but they came with the Michael 5 Pro Suite so they are purchased. What I am saying is that none of the Head or Body Morph packages for Genesis, Genesis 2, Genesis 3 and Genesis 8 has ever been a freebie and therefor I think it's very strange that they do not count as purchased. @Saphirewild, can you please clarify on this?
I wanted to answer this question first before I checked over your links @Hylas!
To answer this question I went to a higher rank then myself and here is her answer:
Chohole8:02PM
occasional freebies will only count if they are free during the month of the contest.
Thank you @Saphirewild and @Chohole!
The actual (first) question is, are purchased/paid-for Head or Body Morph packages for Genesis, Genesis 2, Genesis 3 and Genesis 8 like the Genesis Evolution: Head Morphs and Genesis Evolution: Body Morphs or the Genesis 8 Male Head Morphs and Genesis 8 Male Body Morphs, which are all additional to the Head and Body Morphs that come with the base figures, No-Count or Purchased/Paid-For items? And why? :)
Second question, do the Victoria 4.2 and Michael 4 Creature Creator Morphs fall under 'similar' (Morphs++ and similar) and therefor are No-Count items?
More Non-photorealisitic Renders (NPR II)We started an image in the class I taught yesterday. After it ended, I completed my post work and this is what I came up with. Figure is V4 with the Bettie Page morph and hair. Can't recall where I got the devil wings and horns, though.
interactive license, model assembly and riggingInteractive licences specifically mention that the "User may not in any case: publish, market, distribute, transfer, sell or sublicense any renderings, animations, software applications, data or any other product from which any CRT Content, or any part thereof, or any substantially similar version of the CRT Content can be separately exported, extracted, or de-compiled into any re-distributable form or format".
What you wish to do is in breach of that - you would be providing something that is a substantially similar part of the content in a re-distributable format.
Short answer: No, you may not do that.
Auto Face Enhancer [Commercial]So my project with some 2000+ scenes must all be reloaded one at a time and resaved? WTH? I Rely heavily on batch processing and automation, I'll have to write a new script to either open each and resave or go in and parse out each reference. I already wasted all last night trying to get this corrected. I am looking for original morph set and just downgrade to it, which would be the easiest thing to do.
Hi Charles.
If I were you. I would keep 2000+ scenes. If it is working keep it and let it go on.
Are you saying a 2000+ frame of the same file? if 2000+ scene then that is way too much work.
let me know if you need the old AFE. send me a private message and give me a dropbox to get it to you.
Note: The AFE old and the AFE new is much the same. I have updated the geometry to the AFE to capture HD SKIN Details.
Thus the morphs on the geometry are different. It is a new set.
3D Art Freebie Challenge-February 2020-"Natural Love" -Main Thread OnlyAwesome render @Hylas! Really beautiful!
But I wonder (and not for the first time) why the G8M Head Morphs (https://www.daz3d.com/genesis-8-male-head-morphs) and G8M Body Morphs (https://www.daz3d.com/genesis-8-male-body-morphs) are listed under No-Count items? Or do you mean the Body and Head morphs that come with the Genesis 8 Male base figure? (The (paid) Genesis 8 Male Body Morphs are required by the Rex for Genesis 8 Male character...)
Thanks!
As I understand it, the basic morph packs are No Counts... when I use further morph packs (such as SWOLE or 200 Plus) I list them under purchased.
3. Base figures (All Gen 2,3,4, and Genesis 1,2,3) as well as their general morphs packs (Morphs++ and similar) do not count as a purchased item or a freebie and may be used as needed
The Victoria 4.2 and Michael 4 Shapes++ (Head and Body Morphs++) have been freebies occasionally, as well as the Victoria 4.2 and Michael 4 Creature Creator Morphs but I'm not sure whether they (the C.C.M.) fall under 'similar'. I also own the Genesis Evolution: Head Morphs and the Genesis Evolution: Body Morphs but they came with the Michael 5 Pro Suite so they are purchased. What I am saying is that none of the Head or Body Morph packages for Genesis, Genesis 2, Genesis 3 and Genesis 8 has ever been a freebie and therefor I think it's very strange that they do not count as purchased. @Saphirewild, can you please clarify on this?
I wanted to answer this question first before I checked over your links @Hylas!
To answer this question I went to a higher rank then myself and here is her answer:
Chohole8:02PM
occasional freebies will only count if they are free during the month of the contest.
Auto Face Enhancer [Commercial]Hi DMaster I get these messages in my log file:
..
2020-02-17 14:17:07.737 WARNING: ..\..\..\..\..\src\sdksource\fileinput\dzassetdaz.cpp(5818): Could not find target property for formula: Genesis8Female:/data/DAZ%203D/Genesis%208/Female/Morphs/Mousso/Zsazsa/Zsazsa%20Head.dsf#Zsazsa%20Head?value in file : /data/DAZ%203D/Genesis%208/Female/Morphs/D.Master/Auto%20Face%20Enhancer%20Female/G8Female%20Character%20Links/AFEG8F_184.dsf
2020-02-17 14:17:07.742 WARNING: ..\..\..\..\..\src\sdksource\fileinput\dzassetdaz.cpp(5818): Could not find target property for formula: Genesis8Female:/data/DAZ%203D/Genesis%208/Female/Morphs/PedroFurtadoArts/Zoey/Zoey%20Head.dsf#Zooy%20Head?value in file : /data/DAZ%203D/Genesis%208/Female/Morphs/D.Master/Auto%20Face%20Enhancer%20Female/G8Female%20Character%20Links/AFEG8F_183.dsf
2020-02-17 14:17:07.742 WARNING: ..\..\..\..\..\src\sdksource\fileinput\dzassetdaz.cpp(5818): Could not find target property for formula: Genesis8Female:/data/DAZ%203D/Genesis%208/Female/Morphs/N2/Linh/Linh.dsf#Linh?value in file : /data/DAZ%203D/Genesis%208/Female/Morphs/D.Master/Auto%20Face%20Enhancer%20Female/G8Female%20Character%20Links/AFEG8F_182.dsf
2020-02-17 14:17:07.747 WARNING: ..\..\..\..\..\src\sdksource\fileinput\dzassetdaz.cpp(5818): Could not find target property for formula: Genesis8Female:/data/DAZ%203D/Genesis%208/Female/Morphs/gravureboxing/Eunju%20G8F/G3F_ABC_Eunju_Face.dsf#G3F_ABC_Eunju_Face?value in file : /data/DAZ%203D/Genesis%208/Female/Morphs/D.Master/Auto%20Face%20Enhancer%20Female/G8Female%20Character%20Links/AFEG8F_179.dsf
2020-02-17 14:17:07.747 WARNING: ..\..\..\..\..\src\sdksource\fileinput\dzassetdaz.cpp(5818): Could not find target property for formula: Genesis8Female:/data/DAZ%203D/Genesis%208/Female/Morphs/3D%20Universe/ToonGenerations8/ctrl3duG8FTG_Base.dsf#ctrl3duG8FTG_Base?value in file : /data/DAZ%203D/Genesis%208/Female/Morphs/D.Master/Auto%20Face%20Enhancer%20Female/G8Female%20Character%20Links/AFEG8F_178.dsf
2020-02-17 14:17:07.751 WARNING: ..\..\..\..\..\src\sdksource\fileinput\dzassetdaz.cpp(5818): Could not find target property for formula: Genesis8Female:/data/DAZ%203D/Genesis%208/Female/Morphs/Pixeluna/Pix%20Zharien/ctrlZharienHD.dsf#ctrlZharienHD?value in file :
...Is these normal? I don't own the characters mentioned in the Log, like Pixeluna, Zsaza,gravureboxing, Zoey
This is normal. These are morph files that only load if you have the character. These morphs help smooth out the AFE.
Cloud renderingRelated question. Could I do the same thing from home, for instance if I have 2 computers? can I render on one without having to have all but daz information and products equally on both computers? Just being able to transfer the sceen file like one would to a cloud server.You don't just transfer the scene file to a iRay server. The scene file basically just tells DS where to find everything the file contains.
To do rendering on one machine qand scene setup on another you need the same content at the same path on both machines. You can do this by sharing your content directories over the network or having a NAS where all your content is stored.
Also you're not looking for a server farm that supports Daz Studio but one that supports iRay. DS knows how top connect to an iRay server and transfer all the data required.
@Ivy once you're storing 11Tb of data on external drives and a powered USB hub it might be worth looking at building a NAS. It will be far less hassle than your setup and not nearly as failure prone, Plus USB 3 is 5 Gbits/sec while 10Gbit ethernet is, obviously, twice as fast.
good advice . I will look into that set up :)
Cloud rendering
Thanks Ivy. I have all my Daz content on a external drive, but I've heard you can't actually connect multiple computers to the same harddrive. At least that's what searching the internet has suggested, I know nothing about computers besides how to use Daz.lol. so I can just switch the drive to my other computer, load scene and render, but it's kinda a pain. If we pretend money isn't an issue, any help setting up a home system would be great. Right now I have a sinker MSI stealth, i7-8759 1060 geforce laptop. It works fine as a hobbyist, but I'm way past hobbyist at this point. Thanks again!Since searching these forums is about useless, I'll ask maybe a repeat question. Any info about cloud rendering would be nice. Recommendation, sites, pricing, is it worth it, other alternatives, those types of things. Thanks!check out this site it has a whole list of render farms, https://rentrender.com/all-render-farms-list/ just look for the icon to match the software your looking to use. some of the farms will work with daz studio .
Also you might try contacting a PA here. his named is Jack Tomalin He has a render farm as well though, i am not sure fo his requirments or prices though.
Thank you for this, I've been looking into render farms too, but none of these have the Daz logo that I can see. Does anyone know if any of these work with DS? I will try contacting Jack too.
Related question. Could I do the same thing from home, for instance if I have 2 computers? can I render on one without having to have all but daz information and products equally on both computers? Just being able to transfer the sceen file like one would to a cloud server.I can't speak for anyone else here. But for my work flow I use external Hard drives and external GPU's connected a usb3 super hub. so I can connect 2 desk top pc's and 1 lap top. to the hard drive hub. I use the big system with 120 gig ram for rendering, which allows me free so I can make and test render new scenes on another computer, I use another hard drive as a shared project drive, By using external hard drives it allow me to access my main daz content folders with as many computers as I have connected to the main usb3 super hub I am up to 5 -2tb HDD content hard drives and 2- 1TB SSD shared project drives that I can access with 3 computers all at the same time.. each computer has their own, but the same versions of daz studio on them. that is how use my system for creating and rendering daz animation on a home computer system. not really a rendr farm more like a storage farm. for my usb3 hub I just use a simple Anker 7-Port USB 3.0 Data Hub with 36W Power Adapter for the hard drive you connect to it
Most of those render farms on the list use a virtual desk top app which pretty much connects any software anyway, it really depends on how much you want to spend. I have used rev render render farm a few times for large projects and they work well with daz Studio4. because you connect daz to their iray servers using a virtual desktop app , they give you to download & install. which will virtually allow you to connect any 3d software that uses iray not just daz. the best thing all the daz content remains on your system so no fear of violating the daz TOS. plus Revrender support is very good kind of expansive though at a $1 a core hour, when you need 80 cores for 3 or 4 hours.
Cloud renderingRelated question. Could I do the same thing from home, for instance if I have 2 computers? can I render on one without having to have all but daz information and products equally on both computers? Just being able to transfer the sceen file like one would to a cloud server.You don't just transfer the scene file to a iRay server. The scene file basically just tells DS where to find everything the file contains.
To do rendering on one machine qand scene setup on another you need the same content at the same path on both machines. You can do this by sharing your content directories over the network or having a NAS where all your content is stored.
Also you're not looking for a server farm that supports Daz Studio but one that supports iRay. DS knows how top connect to an iRay server and transfer all the data required.
@Ivy once you're storing 11Tb of data on external drives and a powered USB hub it might be worth looking at building a NAS. It will be far less hassle than your setup and not nearly as failure prone, Plus USB 3 is 5 Gbits/sec while 10Gbit ethernet is, obviously, twice as fast.
Cloud renderingSince searching these forums is about useless, I'll ask maybe a repeat question. Any info about cloud rendering would be nice. Recommendation, sites, pricing, is it worth it, other alternatives, those types of things. Thanks!check out this site it has a whole list of render farms, https://rentrender.com/all-render-farms-list/ just look for the icon to match the software your looking to use. some of the farms will work with daz studio .
Also you might try contacting a PA here. his named is Jack Tomalin He has a render farm as well though, i am not sure fo his requirments or prices though.
Thank you for this, I've been looking into render farms too, but none of these have the Daz logo that I can see. Does anyone know if any of these work with DS? I will try contacting Jack too.
Related question. Could I do the same thing from home, for instance if I have 2 computers? can I render on one without having to have all but daz information and products equally on both computers? Just being able to transfer the sceen file like one would to a cloud server.I can't speak for anyone else here. But for my work flow I use external Hard drives and external GPU's connected a usb3 super hub. so I can connect 2 desk top pc's and 1 lap top. to the hard drive hub. I use the big system with 120 gig ram for rendering, which allows me free so I can make and test render new scenes on another computer, I use another hard drive as a shared project drive, By using external hard drives it allow me to access my main daz content folders with as many computers as I have connected to the main usb3 super hub I am up to 5 -2tb HDD content hard drives and 2- 1TB SSD shared project drives that I can access with 3 computers all at the same time.. each computer has their own, but the same versions of daz studio on them. that is how use my system for creating and rendering daz animation on a home computer system. not really a rendr farm more like a storage farm. for my usb3 hub I just use a simple Anker 7-Port USB 3.0 Data Hub with 36W Power Adapter for the hard drive you connect to it
Most of those render farms on the list use a virtual desk top app which pretty much connects any software anyway, it really depends on how much you want to spend. I have used rev render render farm a few times for large projects and they work well with daz Studio4. because you connect daz to their iray servers using a virtual desktop app , they give you to download & install. which will virtually allow you to connect any 3d software that uses iray not just daz. the best thing all the daz content remains on your system so no fear of violating the daz TOS. plus Revrender support is very good kind of expansive though at a $1 a core hour, when you need 80 cores for 3 or 4 hours.
Cloud renderingRelated question. Could I do the same thing from home, for instance if I have 2 computers? can I render on one without having to have all but daz information and products equally on both computers? Just being able to transfer the sceen file like one would to a cloud server.Auto Face Enhancer [Commercial]Hmmmm. Am getting this problem though now, since I installed the smoother:

You load a file that is looking for the old AFE morphs. just save the file and reopen to remove the error message.
Yes, Sorry. You will have to redo the animation again.
So my project with some 2000+ scenes must all be reloaded one at a time and resaved? WTH? I Rely heavily on batch processing and automation, I'll have to write a new script to either open each and resave or go in and parse out each reference. I already wasted all last night trying to get this corrected. I am looking for original morph set and just downgrade to it, which would be the easiest thing to do.
Daz 3D is part of

Connect
DAZ Productions, Inc.
7533 S Center View Ct #4664
West Jordan, UT 84084Licensing Agreement | Terms of Service | Privacy Policy | EULA
© 2026 Daz Productions Inc. All Rights Reserved.