-
Genesis 8 Female 30+ minute load time
Credit to the many people that suggested going through the log file
Pretty sure this has been solved for a lot of people, but I have had this problem for the last few weeks, so I tried the log file method to find specific issues when loading a scene. With your scene finally loaded help > troubleshooting > view log file. I first cleared the log file, Select all, then delete on notepad. Then save it, you will have a clean slate. Then load your basic genesis 8 (female) - this is the source of our problem because she has many, many morphs, add-ons, etc.
Now, once she loads - can take upto an hour if things are really messed up - it did for me. Then go to help > troubleshooting > view log file. Then ctrl-F and search "warning" and find your problems, some are bigger than others. If you notice one particular set of morphs keeps cropping up in your ctrl-f search, try uninstalling and re-installing if the morph is important to you. I have also found an instance where I had an hd-add on installed but not the main character. That caused a massive delay even though I never used the character.
Cut my time from G8 basic Female load time from 30 minutes (she has no morphs, nothing) down to about 3 or 4 minutes. Complex scene with 2 G8 Female (each loaded to the brim with morphs and customizations) down to a load time of 20 min > and I'm not done cleaning yet. Small errors are inevitable, so there will be delays, but if it only adds a few seconds, no problem, but when a big morph is messed up, it can add huge chunks of time. I'm happy to go do something else for a few minutes, shower, cook dinner, but 1 hour wait time can erase inspiration and destroy the joy of working with DAZ. And DAZ3d is fun to use and you can do some incredible things with it.
Get the process started and look at it as an investment of a an hour or two to save a chunk of time each time you load a scene. It is painful, but it saves time and frustration long term. Also, you don't have to fix everything in the same sitting.
[Released] Character Converter from Genesis 2 Female to Genesis 8 Female [Commercial]I made a fix for anyone who has this problem. I created separate head and body morphs of the G2F clone. Download and unzip the morph to /My Library or another content location recognized by Daz (it should have the correct directory structure), and dial up the body morph under Actor/Full Body/People/Real World/Genesis 2 Female Body to 100% when using the generated G2F to G8 morphs. There is also a separate G2F head morph, but you won't want to use it for this. Went ahead and included it anyway since there was no reason not to give everyone the complete character.
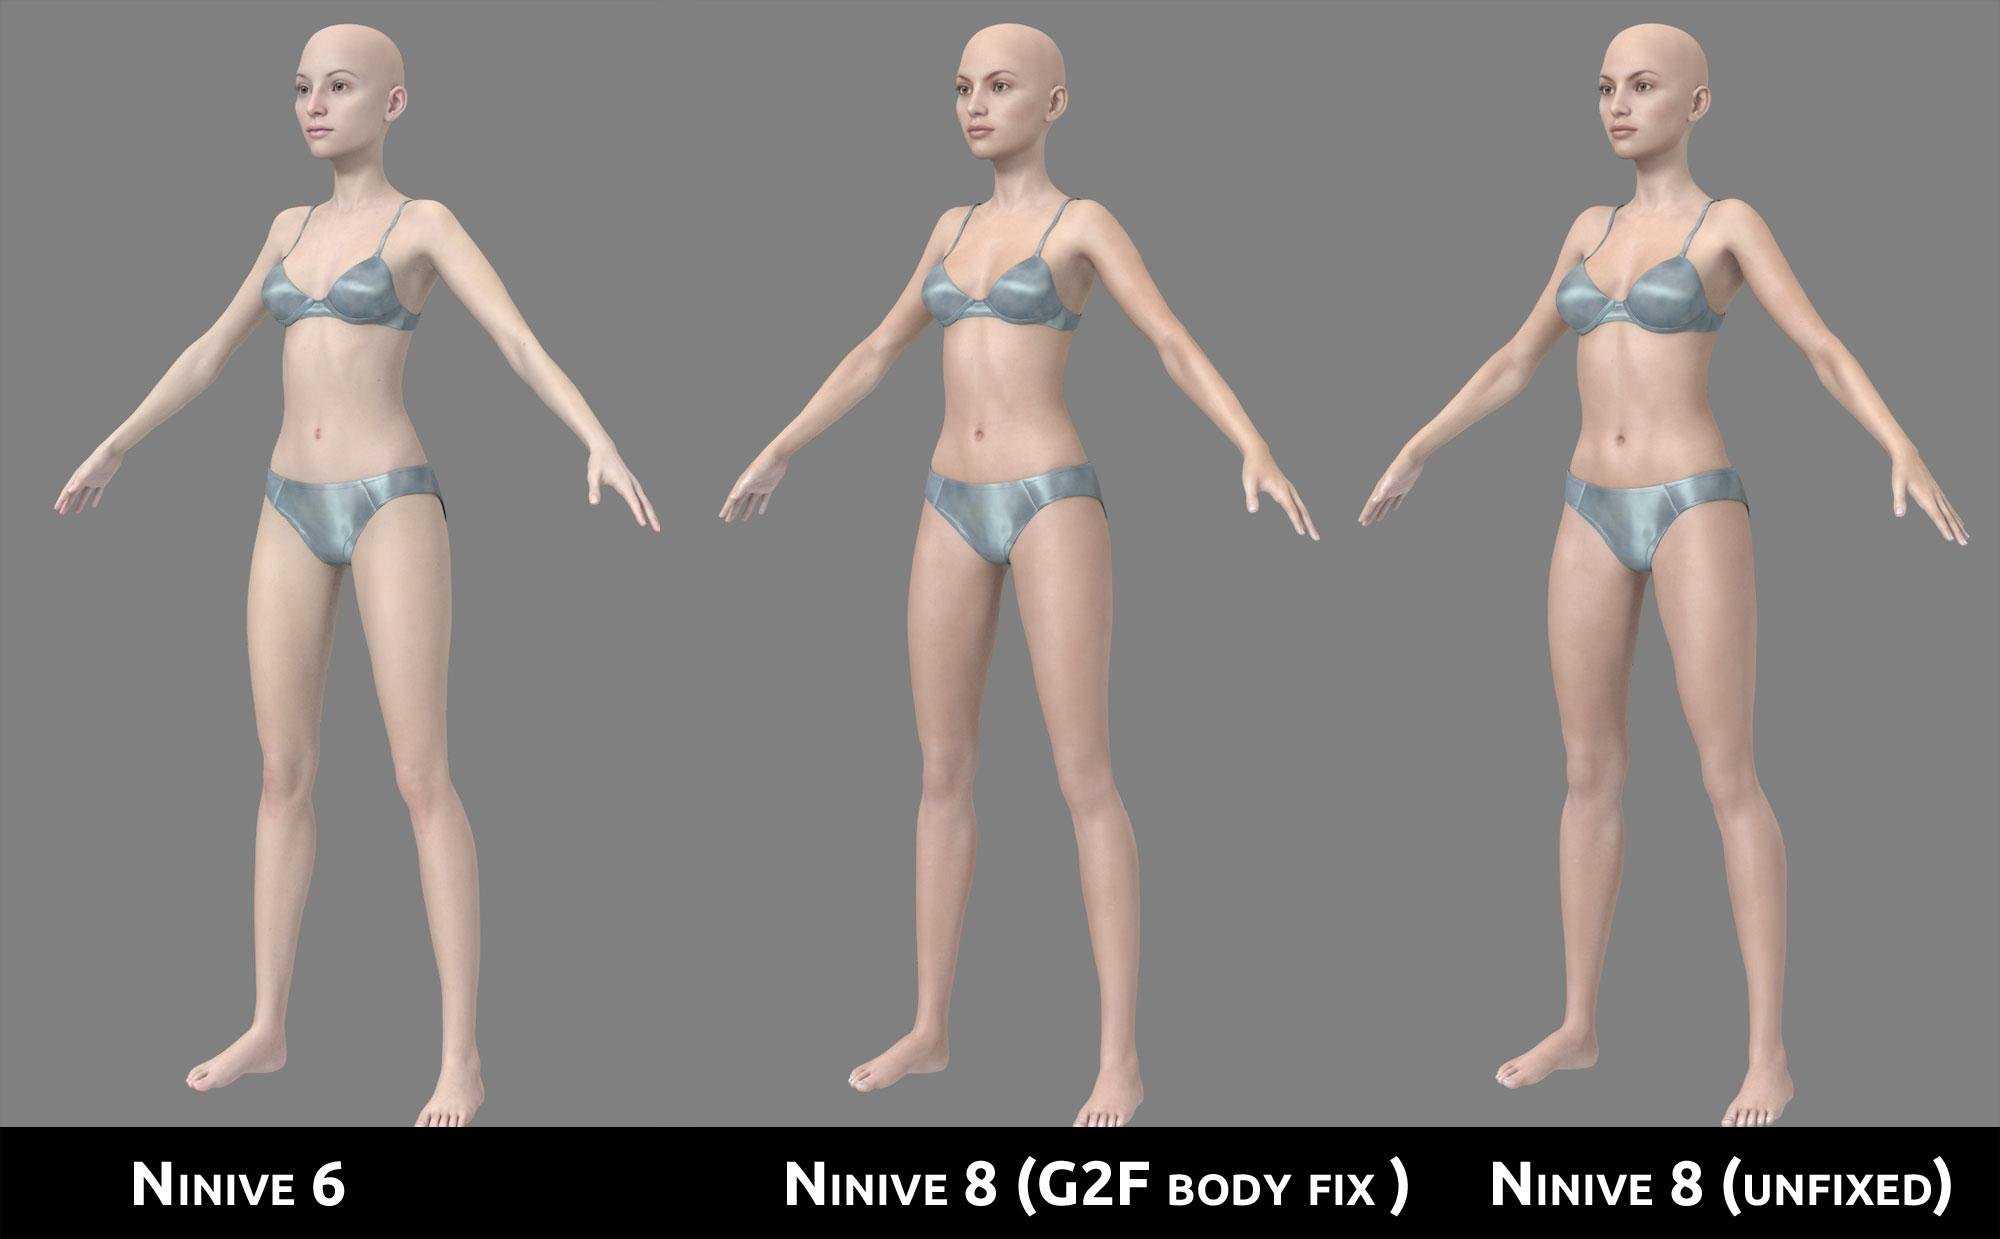
The differences are less obvious at a distance, but if you were to overlay the figures as I did before, the results are basically the same. Only now that I've made a properly separated body morph the fixed version still has a good looking face (tolerance of 0.005 to get decent looking eyes, as Ninive's face is rather extreme). Overall, I'm really happy with the product now. It was an easy fix.
The same thing I had noticed and posted about Belle.Yeah, I remembered your discussion about Belle. I made sure to mention you in my previous post.
I had gone through the same thing and had the same results, and I was attempting Nineve and Belle. I had mentioned it a few times, but at the time I was the only one saying something about it. I'm glad to see I'm not the only one.
Sorry, I missed that while skimming through the thread.
CC Avandrael & CC ZophaelThank you :D I had thought about doing the hooves as a graft instead of a separate morph, but with Mada's wings, the lashes, brows, and tail in there, possible body hairs, that's a lot of polys, and I was pretty certain I couldn't model hooves in with less/same polys with as much detail as I could with the morphs. But the materials for the hooves were done in shape and not in base shape so there wouldn't be any stretching issues.
Interesting, really good work, the thing about the "graft which if i wanted to "mix" maybe others texture maybe would be more easy if it was graft, but keep the good work.
Since you talked about it, you could pass the poly count for the wings horns tails or any other extra anatomic element please? to know how much the full character could cost?
I have the hoof materials on a geoshell actually, so you can put any other texture set with it and still have hooves on top. If it was a graft, you'd have to make custom blends for each skin. I try to make thing as interchangeable as possible.
As far as polycount goes-- for her, at base res it's about 88k with all her hair, tail, horns, wings, anatomical elements (and that hair), and base G8 eyelashes.
His is higher because his brows are denser, chest hair, beard and I think the male elements are higher polycount too.
Edit: All the hairs are shader based with no textures also, so the polygons on them tend not to make a big impact on rendering.
hmm interesting, really thanks, well for me probably the only thing i would not use would be exactly the "hairs' (like any fibermesh hair or too dense hair", since i'm normally using "outside daz" i measn in unreal then the "too high poly" stuffs(like fibermesh or too dense mesh) would be a issue, i gonna still looking for both character to buy and test then when things are "back to normal" and i can be able again to buy stuff by "reasonable values again, this one is on my "wait list".
keep the good work really loved it.
ps: to be clear i'm not demanding or asking anything just pointing out my "way of how i do work with daz stuffs, i only use daz to buy the stuffs and export to my real source of work (unreal 4),
Shoe fitting issueIf you go into the Parameters Tab and click on the "Show Hidden" in the menu you can click on the Currently Used section on the left side of the Parameters tab to show all the hidden morphs that are actually dialed up on the shoes. Try zero'ing out the character morph on the shoes and then scaling the foot/main toe bone as needed to resolve any pokethrough. You can also try adding a smoothing modifier to the shoes (Edit/Figure/Geometry/Add Smoothing Modifier) this will set a smoothing modifier on the shoes with Base Shape Matching and Iterations of 2, sometimes for shoes 2 is too much so I would suggest dropping it to 1, you can also try the smoothing with the Generic instead of Base Shape Matching as well.
Hope this helps!
ElliCC Avandrael & CC ZophaelThank you :D I had thought about doing the hooves as a graft instead of a separate morph, but with Mada's wings, the lashes, brows, and tail in there, possible body hairs, that's a lot of polys, and I was pretty certain I couldn't model hooves in with less/same polys with as much detail as I could with the morphs. But the materials for the hooves were done in shape and not in base shape so there wouldn't be any stretching issues.
Interesting, really good work, the thing about the "graft which if i wanted to "mix" maybe others texture maybe would be more easy if it was graft, but keep the good work.
Since you talked about it, you could pass the poly count for the wings horns tails or any other extra anatomic element please? to know how much the full character could cost?
I have the hoof materials on a geoshell actually, so you can put any other texture set with it and still have hooves on top. If it was a graft, you'd have to make custom blends for each skin. I try to make thing as interchangeable as possible.
As far as polycount goes-- for her, at base res it's about 88k with all her hair, tail, horns, wings, anatomical elements (and that hair), and base G8 eyelashes.
His is higher because his brows are denser, chest hair, beard and I think the male elements are higher polycount too.
Edit: All the hairs are shader based with no textures also, so the polygons on them tend not to make a big impact on rendering.
Exporting FBX to Cinema 4D problems with clothingMorph Loader Pro will add a new morph to the clothes.
CC Avandrael & CC ZophaelThank you :D I had thought about doing the hooves as a graft instead of a separate morph, but with Mada's wings, the lashes, brows, and tail in there, possible body hairs, that's a lot of polys, and I was pretty certain I couldn't model hooves in with less/same polys with as much detail as I could with the morphs. But the materials for the hooves were done in shape and not in base shape so there wouldn't be any stretching issues.
Interesting, really good work, the thing about the "graft which if i wanted to "mix" maybe others texture maybe would be more easy if it was graft, but keep the good work.
Since you talked about it, you could pass the poly count for the wings horns tails or any other extra anatomic element please? to know how much the full character could cost?
[Released] Character Converter from Genesis 2 Male to Genesis 8 Male [Commercial]I'm noticing that nipples and navels are misplaced. In comparing G2 and G8 they are in different places--I was hoping that "fixing" this in the clone object would take care of it (the clone doesn't match in this area), but it looks like the script is bringing in G8M instead of the clone and that throws that idea out the window. Most of the converted males have what look like sagging chests.
FWSA Tomsy has x and z scaling that aren't copying. I had thought at first that the script couldn't handle the thinner body. I started messing the the x and z scaling and realized I could match the body fairly close. Out of curiosity I opend FWSA and saw that there are scaling values for some of the body parts/bones. The head comes close, except for the bottom lip--it looks like the script is extending belowing the lip, making the crease under the lip swell out like it is part of the lip. Also the lower lids are too high. These can be manually adjusted so much with some G8M morphs, except for the eyeballs themselves (see Fiends Forever Male).
Cory 6 transferred well, the only issue being his eyes are somewhat misshapen. I can get smooth irises, but the eyeball itself flalttens at the bottom.
OOT Fiends Forever Male, forget it lol. The head gets close, but the eyes are misshapened, eyeballs are weirdly misshapened, and the bottom lip issue with Tomsy happens here as well.
The really weird thing, though, is that OOT Olly transferred very well... The only issue being the irises are smaller and have to be cranked up size-wise to match the original. I would have thought the transfer would have been similar to Fiends Forever, so I'm surprised. I don't understand why the eyeballs transferred ok here but not with Cory 6, because Olly's eye placement seems more extreme to me.
The iris sizes between G2M and much larger than G8M too... Can adjust with iris size morphs, but you'd think that if the clone had the adjustment already...
What is the clone object being used for? It looks like G8M is being loaded a lot, but not so much the clone.
I'm not able to make any screenshots atm, I have renders running that I've been holding off making.
The transfer utility is... interesting... in its choices sometimes. I can run the same script on the same figure and get different results. I think the same tolerance can sometimes pull in different polygons.
The clone is loaded for the head only. The G8M is loaded for the body or if there is not a FHM-named morph found.
CC Avandrael & CC ZophaelThank you :D I had thought about doing the hooves as a graft instead of a separate morph, but with Mada's wings, the lashes, brows, and tail in there, possible body hairs, that's a lot of polys, and I was pretty certain I couldn't model hooves in with less/same polys with as much detail as I could with the morphs. But the materials for the hooves were done in shape and not in base shape so there wouldn't be any stretching issues.
Exporting FBX to Cinema 4D problems with clothingThanks for helping. I've uploaded a video on Dropbox of the workflow. I've followed all of the steps you mentioned above, but when I export the OBJ and then clear the simulation and Load Morph I assume the imported OBJ then should overwrite the clothes? But it doesn't, it just stays the same. Am I missing something here again?
[Released] Character Converter from Genesis 2 Male to Genesis 8 Male [Commercial]I'm noticing that nipples and navels are misplaced. In comparing G2 and G8 they are in different places--I was hoping that "fixing" this in the clone object would take care of it (the clone doesn't match in this area), but it looks like the script is bringing in G8M instead of the clone and that throws that idea out the window. Most of the converted males have what look like sagging chests.
FWSA Tomsy has x and z scaling that aren't copying. I had thought at first that the script couldn't handle the thinner body. I started messing the the x and z scaling and realized I could match the body fairly close. Out of curiosity I opend FWSA and saw that there are scaling values for some of the body parts/bones. The head comes close, except for the bottom lip--it looks like the script is extending belowing the lip, making the crease under the lip swell out like it is part of the lip. Also the lower lids are too high. These can be manually adjusted so much with some G8M morphs, except for the eyeballs themselves (see Fiends Forever Male).
Cory 6 transferred well, the only issue being his eyes are somewhat misshapen. I can get smooth irises, but the eyeball itself flalttens at the bottom.
OOT Fiends Forever Male, forget it lol. The head gets close, but the eyes are misshapened, eyeballs are weirdly misshapened, and the bottom lip issue with Tomsy happens here as well.
The really weird thing, though, is that OOT Olly transferred very well... The only issue being the irises are smaller and have to be cranked up size-wise to match the original. I would have thought the transfer would have been similar to Fiends Forever, so I'm surprised. I don't understand why the eyeballs transferred ok here but not with Cory 6, because Olly's eye placement seems more extreme to me.
The iris sizes between G2M and much larger than G8M too... Can adjust with iris size morphs, but you'd think that if the clone had the adjustment already...
What is the clone object being used for? It looks like G8M is being loaded a lot, but not so much the clone.
I'm not able to make any screenshots atm, I have renders running that I've been holding off making.
[Released] Character Converter from Genesis 2 Female to Genesis 8 Female [Commercial]I think I've identified the problem: I suspect the script is ignoring/skipping the RS Clone when the script tries to process the body morph, or otherwise processing it incorrectly. But only the body, the face works great. Found and checked the RSClone in /AppData/blahblahblah and it's perfect too. If I dial in the regular G2F Clone, the body is fixed, but the head looks terrible from being applied twice, so obviously that is not a solution.
Here are a couple images demonstrating the issue with a grey G2F Ninive in the same location and a similar pose as G8, overlayed with a blue transparent G8F Ninive, with and without the G2F clone. As you can see, without the G2F Clone dialed in, the breasts are too big, and everything but the face is off. Every character I've converted has this problem, so it's not specific to Ninive.
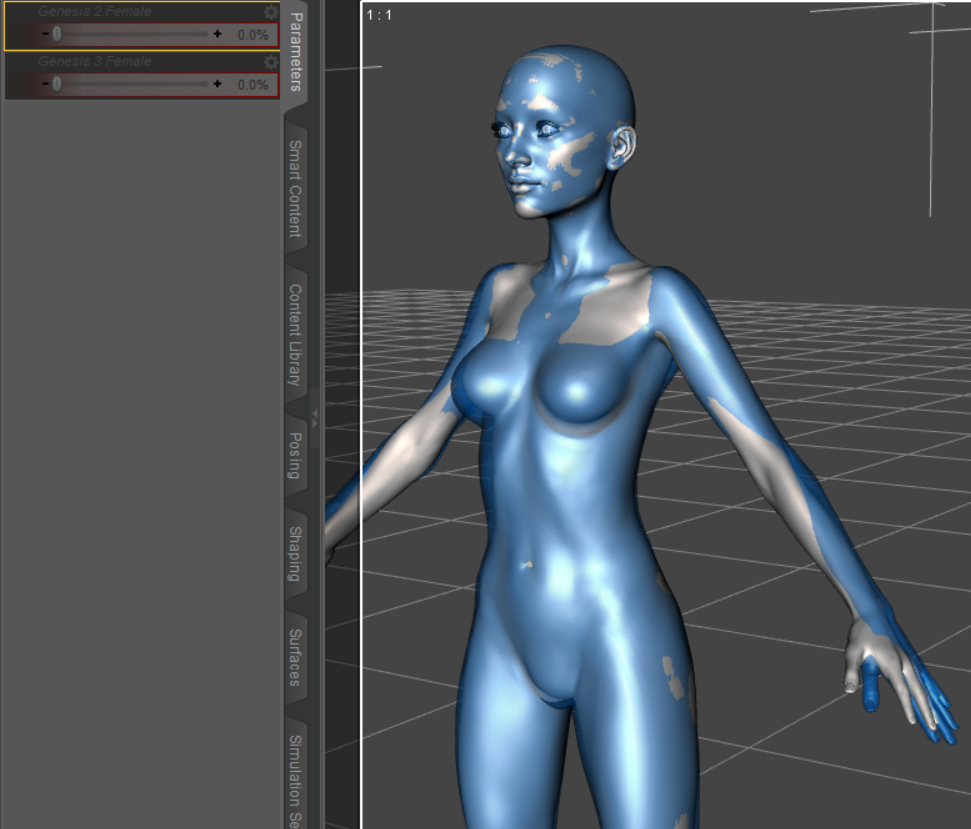
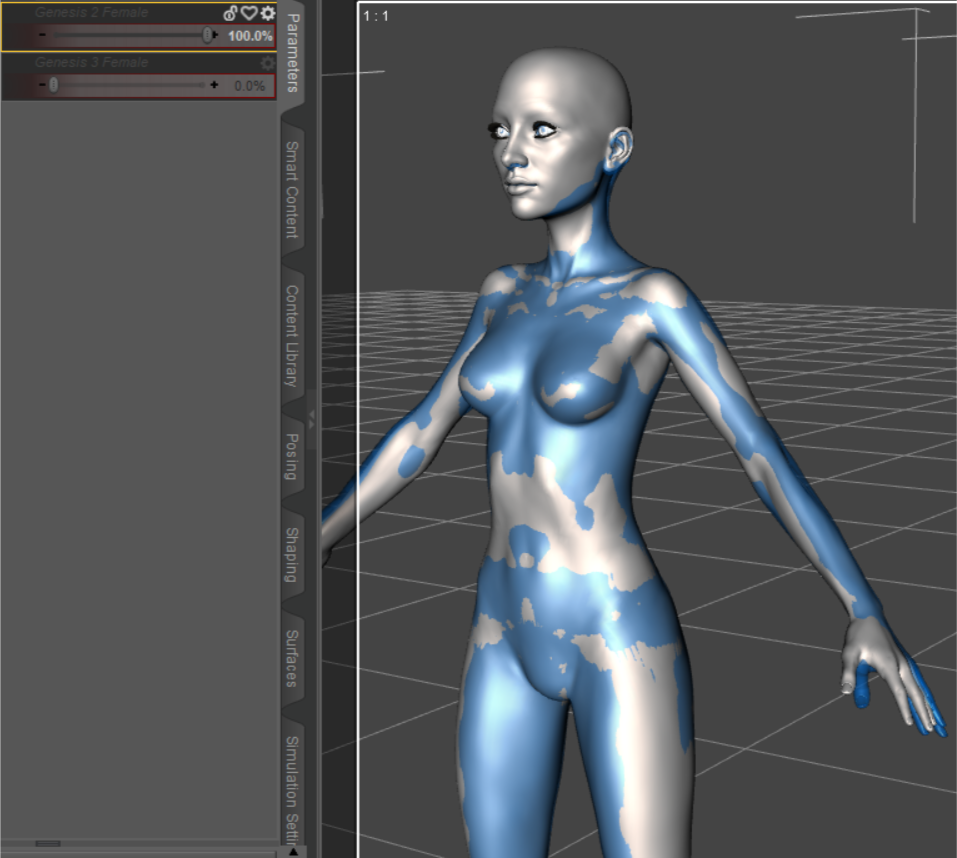
This is with the 2020 method on an up to date Windows 10 machine running an up to date Daz Studio, with similar results regardless of tolerance (several values between 0.2 and 0.005). Eyes checked/unchecked doesn't make a difference (just being thorough). Log doesn't indicate a failure at any point during the conversion, but based on these images, I don't think the G2F clone is influencing the converted body morph creation as intended. I haven't tried deleting the the RS Clone in app data and rerunning the script, but since that clone is a perfect match for G2F, I don't see the point in trying that. I don't know whether this problem is affecting everyone's conversion and but only @Sevrin and I noticed and commented on it, or if this is a glitch affecting only a subset of users.
I will try running the 2019 method on the body morphs, and see if it works properly. If it doesn't produce desirable results, I found a a tutorial on YouTube on how to separate full body G8 morphs into separate head and body morphs, which I'll use to create a separate body morph of the G2F clone, and use that to fix my converted G2F characters.
I had gone through the same thing and had the same results, and I was attempting Nineve and Belle. I had mentioned it a few times, but at the time I was the only one saying something about it. I'm glad to see I'm not the only one.
Exporting FBX to Cinema 4D problems with clothingYou did have the simulation applied when you exported? There were two separate parts to my suggestion - remove sim to see if that was the issue (which it appears not to be, at least not wholly), export as OBJ with the sim still applied (or resim), remove the simulation, and load the morph.
Exporting FBX to Cinema 4D problems with clothingAh, just went through the settings carefully again and this time it did morph, but nothing changed, the clothes now just look the way they looked without the simulation. See screenshot. Is there a next step after this?
Exporting FBX to Cinema 4D problems with clothingThanks for the help. I've attached a screenshot of how the clothes look with the simulation cleared.
Unfortunately when I go through the steps you mentioned it gives me an error message: "Geometry did not match, failed to create morph." when I do the Morph Loader Pro. The preset I used is the same and I set the Reverse Deformations to Yes
I'm having a problem with the Transfer Utility and genesis 8 characters.Basically, I can't get the transfer utility to work the way it should be. I set everything up with the transfer utility and then the clothes i made all attach to the head for some reason.
I made custom clothes in Marvelous Designer and want to attach them to my figures. Both G8 male and female. Now there is an abundance of morphs dialed in and both characters are completely custom characters. The clothing was created around these characters for these characters, so there's no way it will fit the base genesis figure. I have read that not using the base G8 figures can mess up the process, but I currently don't have another choice then to use the custom characters.
Now, in Maya, this process takes less than 10 seconds to accomplish. After uploading the character and clothes and lining them up, I simply use Deform---->Wrap and I'm finished. The clothes now move with the character. That's all I'm really trying to accomplish, and I thought the transfer utility was either the best way or the only way, but no luck with it sofar. I could be very wrong with literally everything I'm trying to do, though, because I'm new to daz and still learning how it all works. Thank you for any help I can get trying to figure this one out everyone.
For me, at least, I find it doesn't really matter whether I choose 'Current' or 'Default'. So, I always leave it on Default.
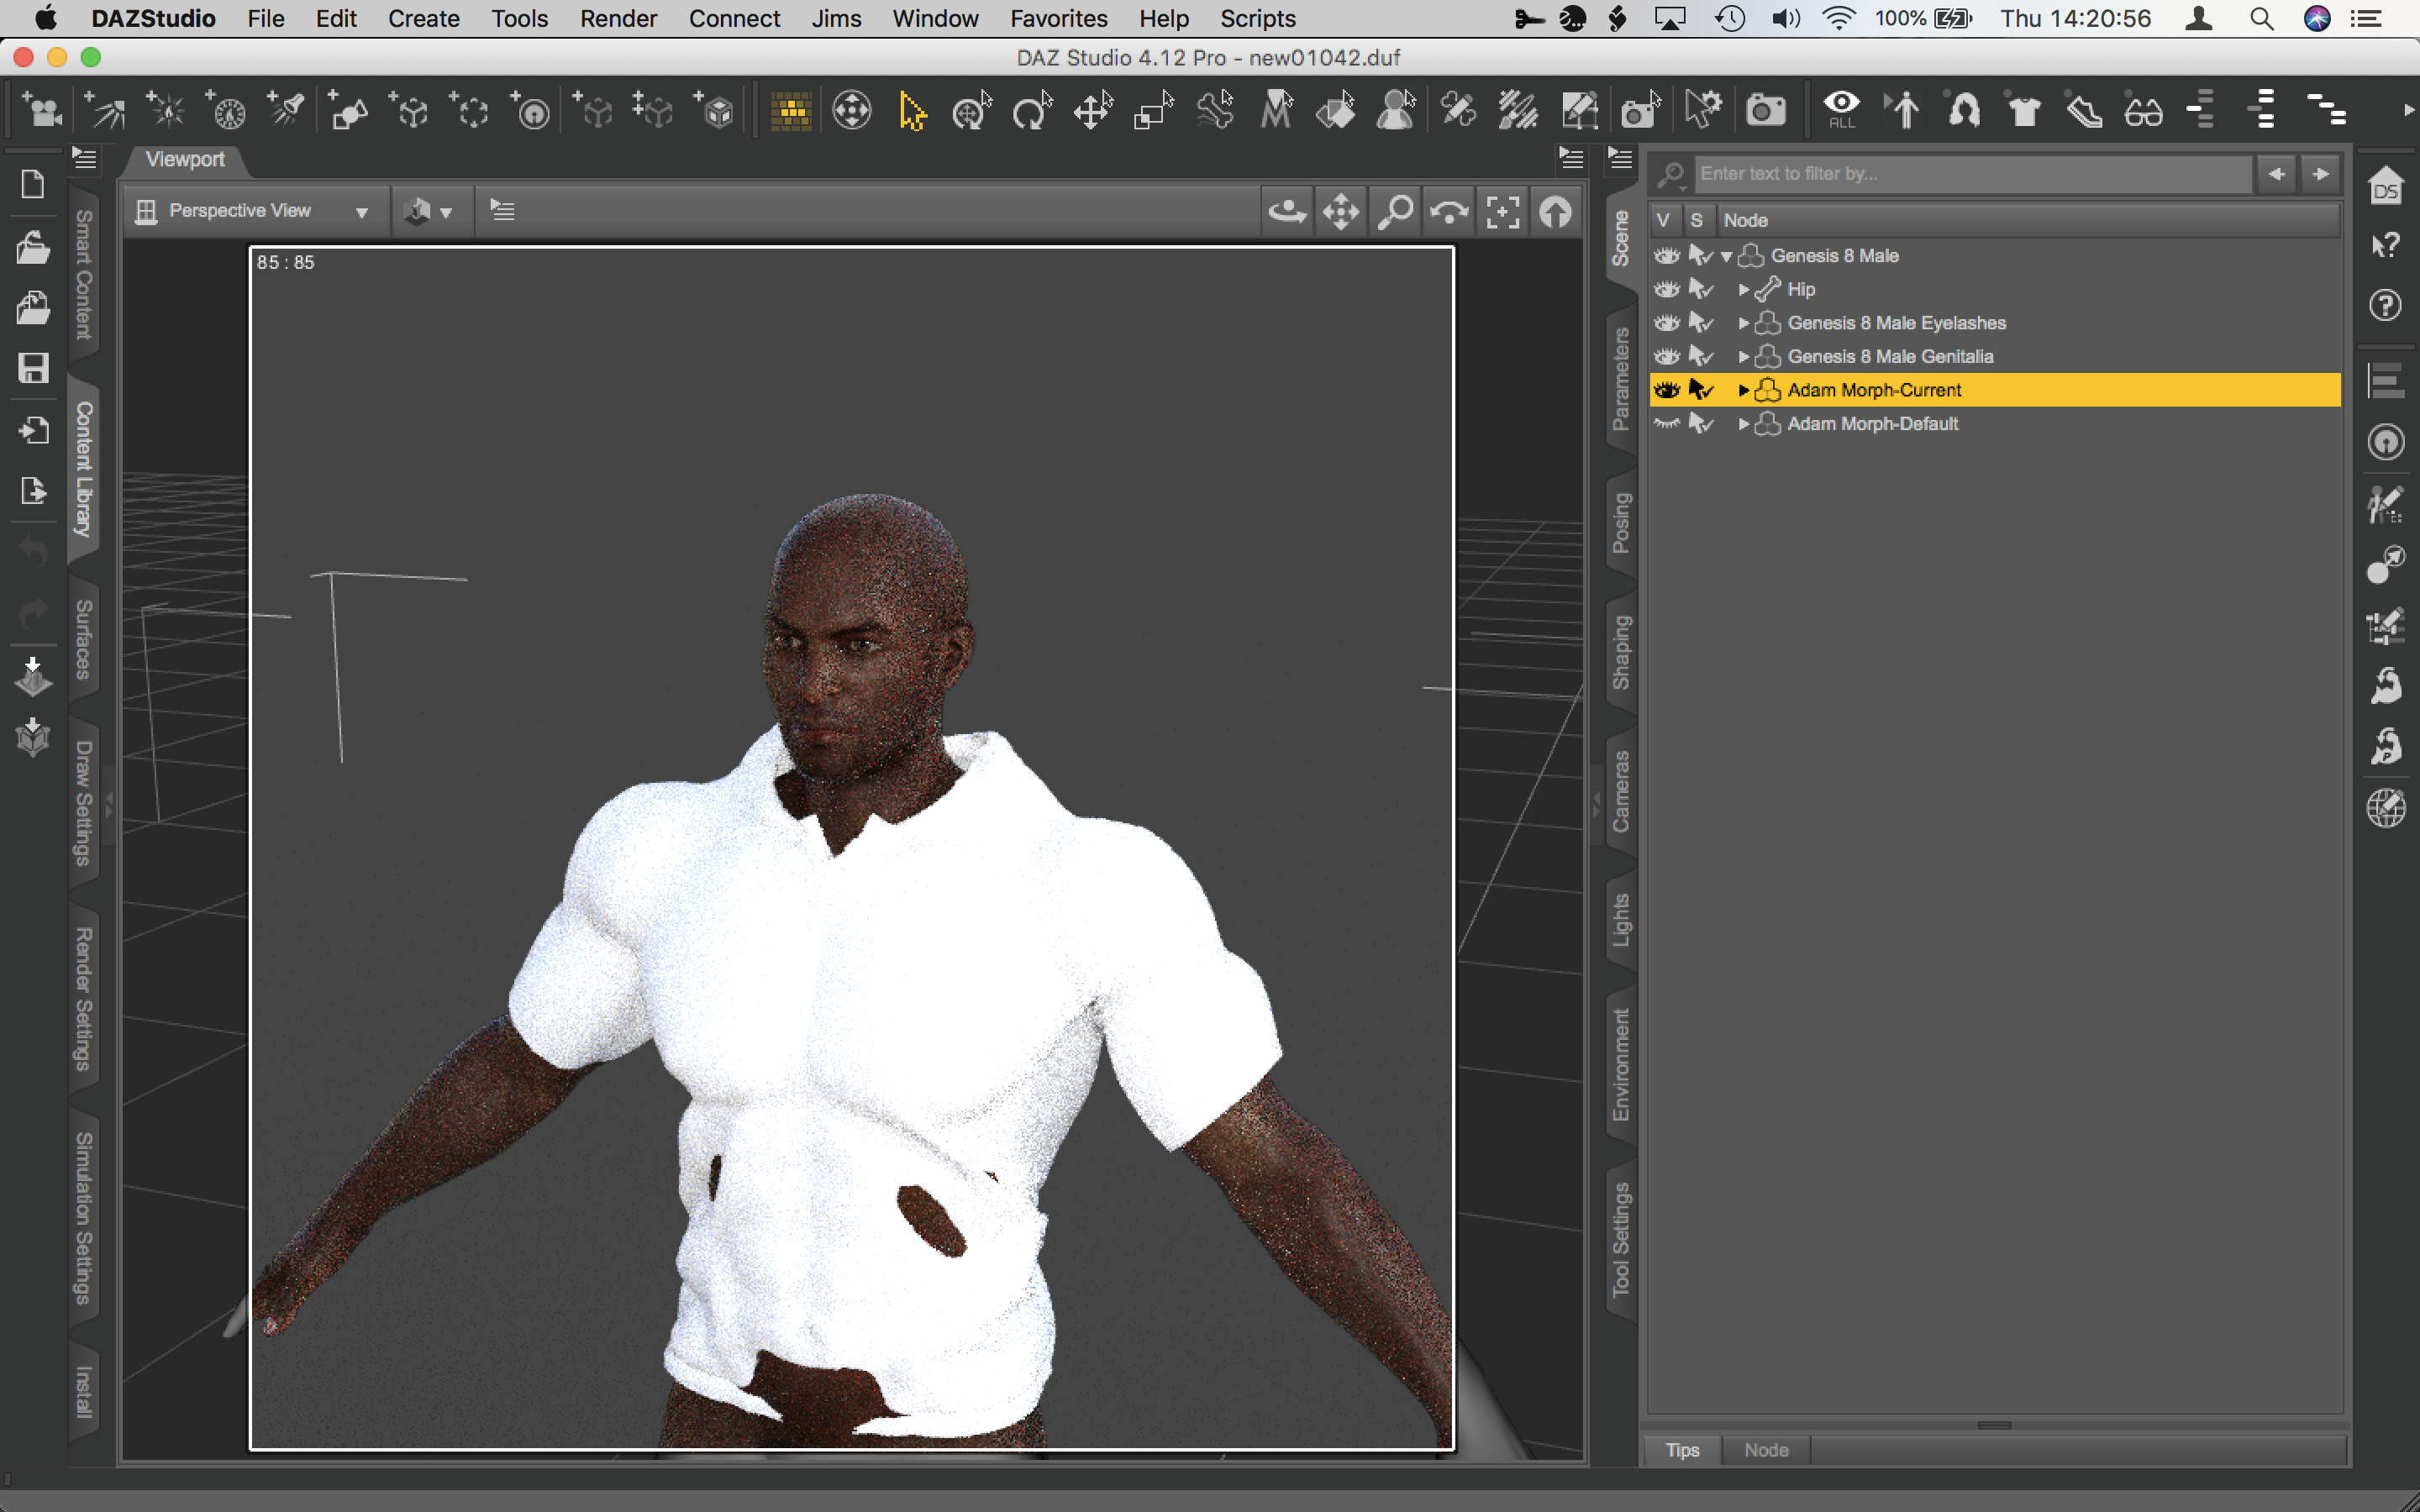
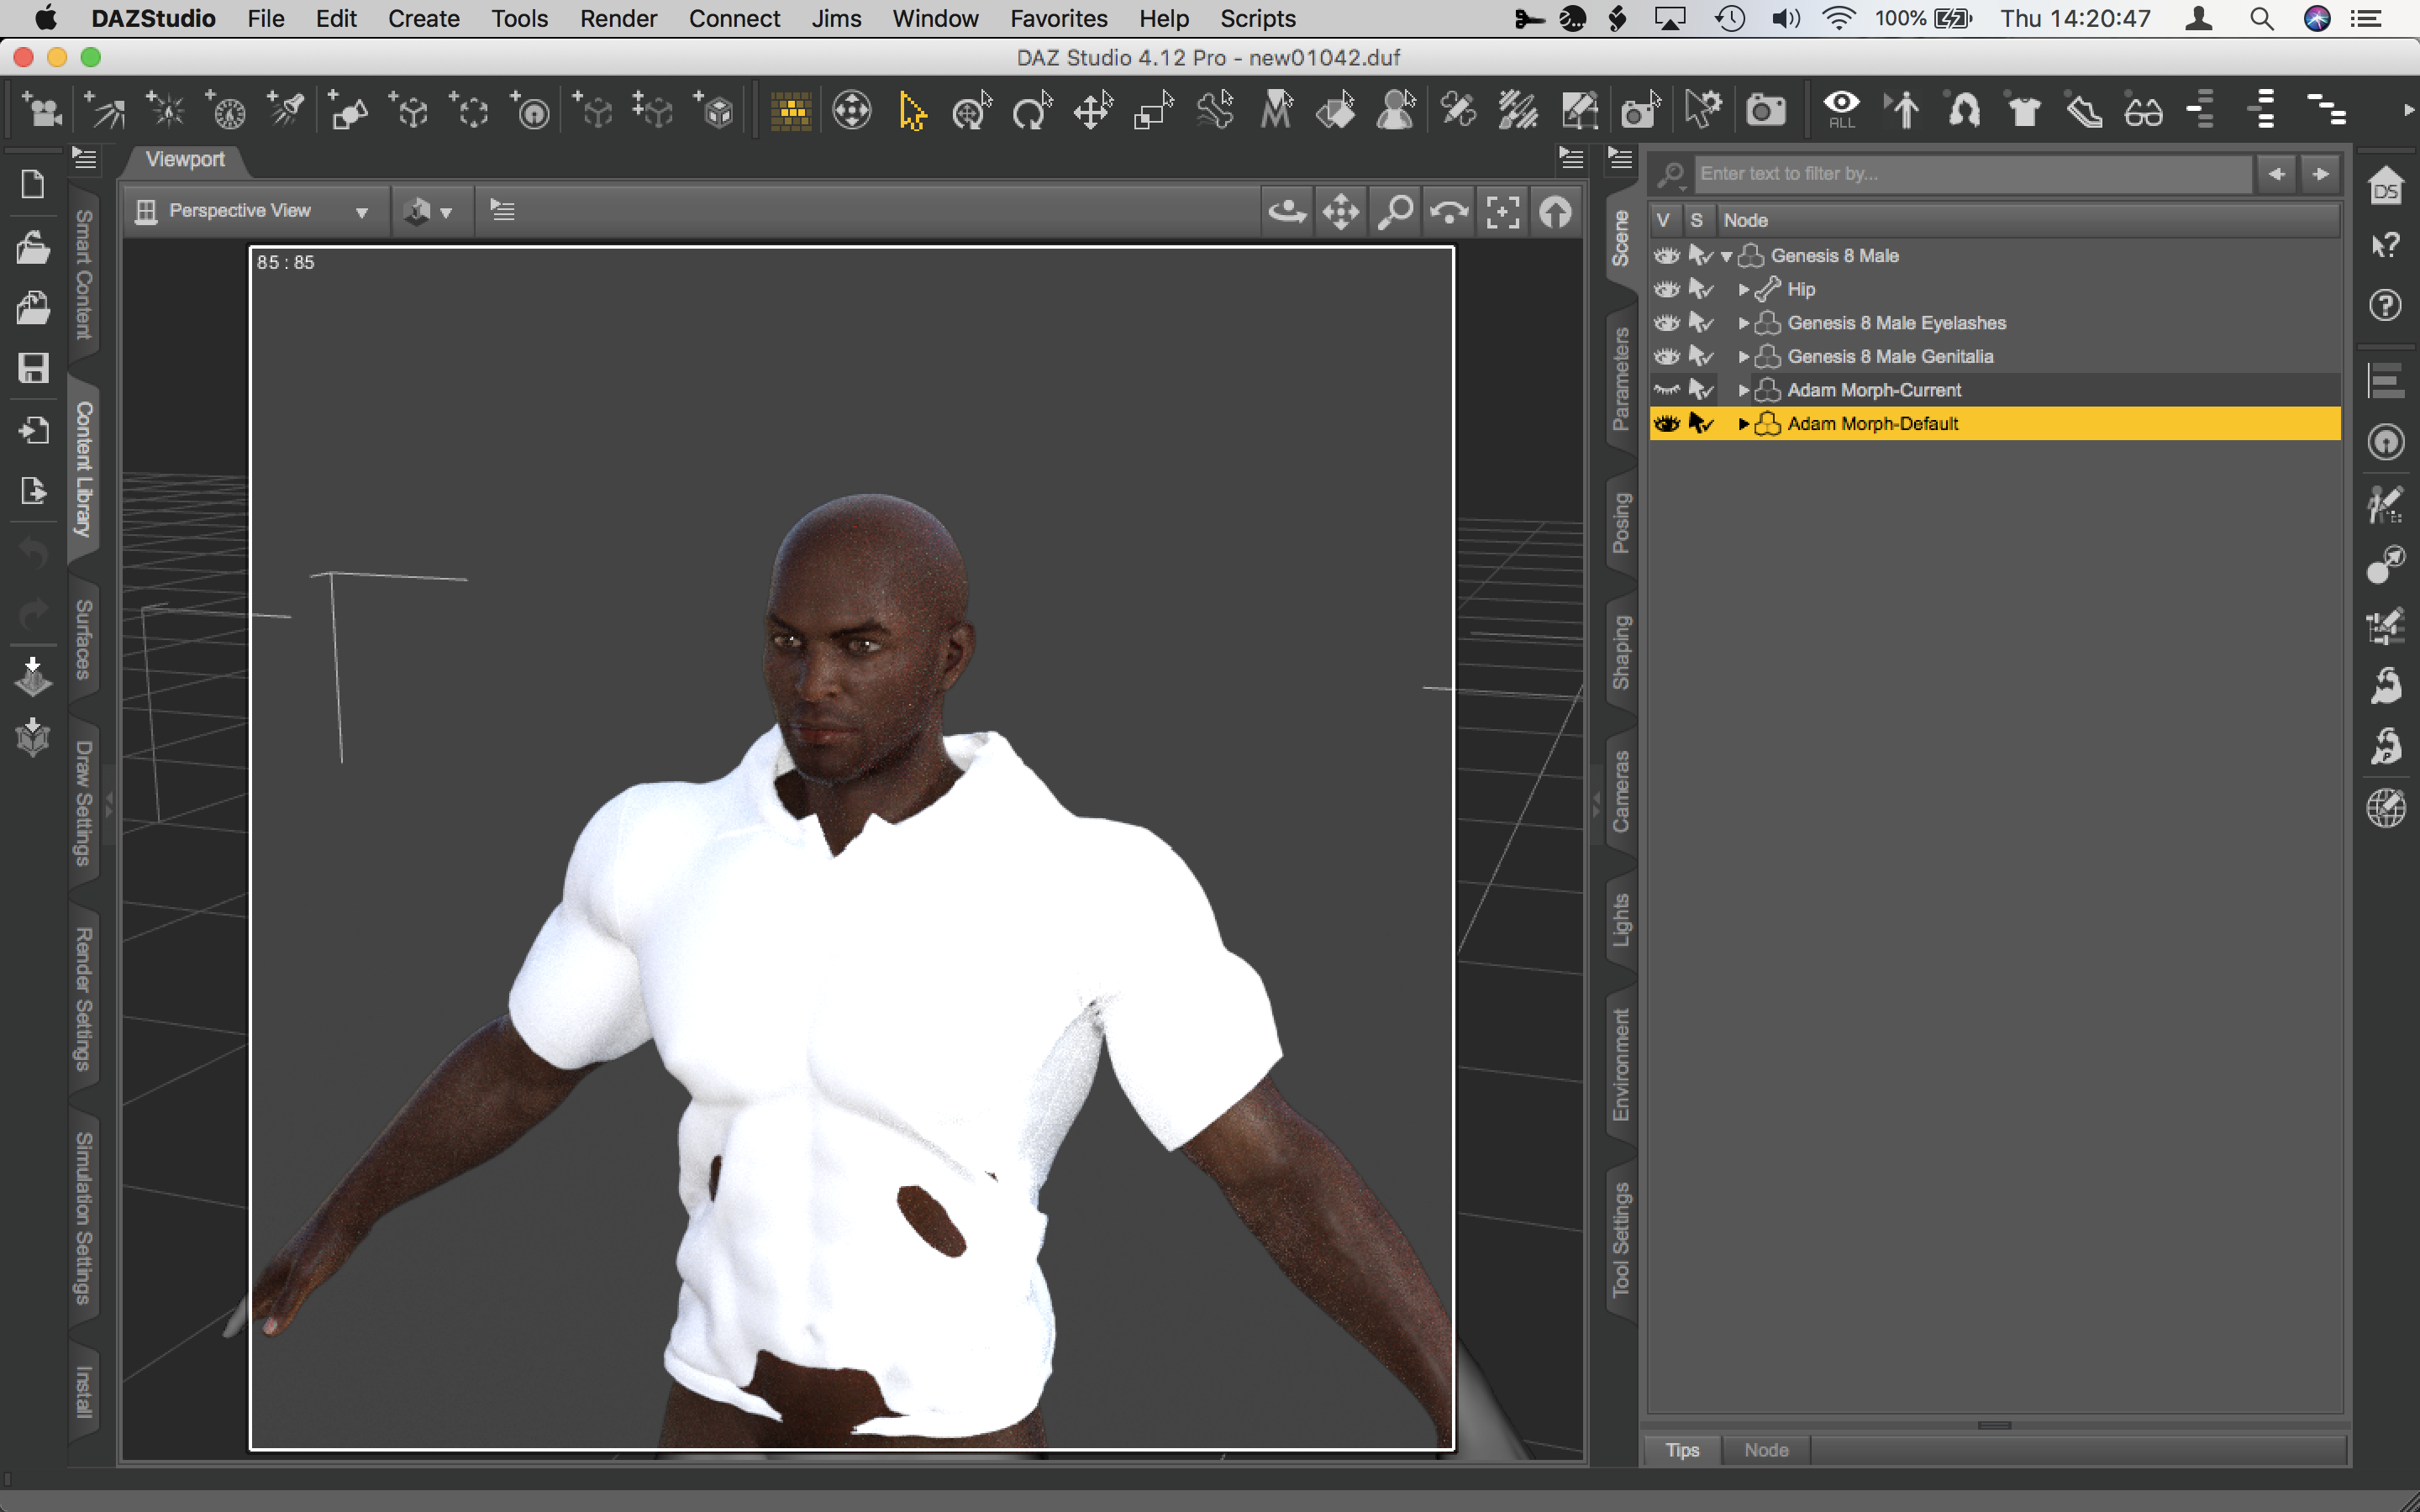
You just have to import the clothing as a morph with reverse def.

Just BTW, this was only for demonstration, this isn't my method but, ansering your question this is the best way I've found.
[Released] Character Converter from Genesis 2 Female to Genesis 8 Female [Commercial]I think I've identified the problem: I suspect the script is ignoring/skipping the RS Clone when the script tries to process the body morph, or otherwise processing it incorrectly. But only the body, the face works great. Found and checked the RSClone in /AppData/blahblahblah and it's perfect too. If I dial in the regular G2F Clone, the body is fixed, but the head looks terrible from being applied twice, so obviously that is not a solution.
Here are a couple images demonstrating the issue with a grey G2F Ninive in the same location and a similar pose as G8, overlayed with a blue transparent G8F Ninive, with and without the G2F clone. As you can see, without the G2F Clone dialed in, the breasts are too big, and everything but the face is off. Every character I've converted has this problem, so it's not specific to Ninive.
This is with the 2020 method on an up to date Windows 10 machine running an up to date Daz Studio, with similar results regardless of tolerance (several values between 0.2 and 0.005). Eyes checked/unchecked doesn't make a difference (just being thorough). Log doesn't indicate a failure at any point during the conversion, but based on these images, I don't think the G2F clone is influencing the converted body morph creation as intended. I haven't tried deleting the the RS Clone in app data and rerunning the script, but since that clone is a perfect match for G2F, I don't see the point in trying that. I don't know whether this problem is affecting everyone's conversion and but only @Sevrin and I noticed and commented on it, or if this is a glitch affecting only a subset of users.
I will try running the 2019 method on the body morphs, and see if it works properly. If it doesn't produce desirable results, I found a a tutorial on YouTube on how to separate full body G8 morphs into separate head and body morphs, which I'll use to create a separate body morph of the G2F clone, and use that to fix my converted G2F characters.
For the body, the script is using the 2019 method, which does not use the clone. It only uses the clone for the face as I was afraid of breaking something that already worked (and that portion of code is very complex and it would be easy to break stuff). As I try to push this back for easier generations (which is not going well), I may change it again and if so, it could be pushed into the G2-G8 conversion. For now though, I recommend using a breast morph if you are bothered by the discrepancy.
Single Dial Morph correcting. [Solved]Hi,
Yesterday I made a single dial morph [SDM] added the icon and saved it. Then this morning realised I'd forgotten the two things I nearly always forget, the navel and Adam's Apple. I have at least made a SDM for those items, but I thought it makes sense to have all in together. But, can you save over an SDM? I tried making a third one but, that just links to two previous SDM's. Then I thought, I'll try copying and pasting the shape but that also copied the SDM. I tried deleting the SDM's but that reset the figure to G8M basic. I read somewhere on the forum that it's best to use a Shaping preset which is what I'd done yesterday first before making the SDM. Only problem is, after deleting the SDM, the first thing I did was to try the Shaping Preset I'd made but that didn't work. I have no clue why it didn't work.
So, what is the best course of action? Is there a way to 'unpick' a SDM. Obviously I can see all the dials when I click on Currently Used in the parameters pane, but how to remove the SDM's without resetting the dials it links to?
Edit:
BTW, I'd forgotten, I'd also saved him out as an Actor, a character preset. I loaded that, thinking, I'd have a 'clean' figure to work with but, when I looked, the SDM, the basic one, without the navel and Adam's Apple, was loaded in. I know that I definitely saved that character preset first which, is why I'd forgotton. My Daz crashed so many times in the last 24 hours. The first time I'd not even saved the file with the character. Luckily I did remember what I'd dialled in. So, why don't I make it again? Welll, yes, I could but I'm after knoweldge more than a shortcut. There will be another character and my cack-handedness won't have got any better.
Thanks.
StrangeFate's stuff: Wild Kelpie Battle Outfit!Lilweep - I just often throw stuff at things until something sticks.
Came up with an alternate decoration for the skull, reusing a piece I had laying around from something else. A morph switches between the 2 variants.
Textures not final yet. Now that everything's textured we're finishing the rigging and after that, when everything's assembled properly I'll do a quick texture pass fixing some things I don't like and shifting some tones etc.
Some metals look too similar when they shouldn't and other things feel a bit off. Chevybabe's Dforce SBH Hair Thread
Fitted items are usually parented to the figure node, it makes them easier to find for morph adjustment etc.
Daz 3D is part of

Connect
DAZ Productions, Inc.
7533 S Center View Ct #4664
West Jordan, UT 84084Licensing Agreement | Terms of Service | Privacy Policy | EULA
© 2026 Daz Productions Inc. All Rights Reserved.