-
Sleeves Not lining up with Arms
Um... so what does the obj look like when you import it into Daz.
You're supposed to load it in at correct scale and in A pose, and then run the transfer utility. Otherwise the Daz transfer utility is not going to transfer rigging to the correct areas of the obj (it's not psychic). G8F in A pose is used as the donor shape for the transfer of the rigging.
Dforce settings like Marvelous designer?all of the cloth settings are under the surface pane, for stretch and expansion you unfortunately don't have it split into weft and warp like in marvelous but you have the contraction-expansion ratio setting
at 100% (default) there is no change, reducing it to 90-95% will make a tighter cling, while increasing it above 100% will make the fabric increase in size.
the one downside to dforce particularly with your example of removing bust cling is that the simulation uses the inital shape at start of sim (or at frame 0/ a morph) as the rest shape and will attempt to move back into that shape as best allowed by the settings, so you end up with often noticable crease where the bust cling was even though the fabric has moved away.
reducing the bend stiffness might help with that but I'm not sure.
if you do use the contraction ratio to shrink a baggy item you might want to also reduce the stretch stiffness on the same surface.
the settings for fabric in marvelous and surfaces in studio are similar but they don't cross over 100%
You just described one of the big detractors for dForce. That persisting deformation due to bust cling is a constant problem for non-standard G8F character .
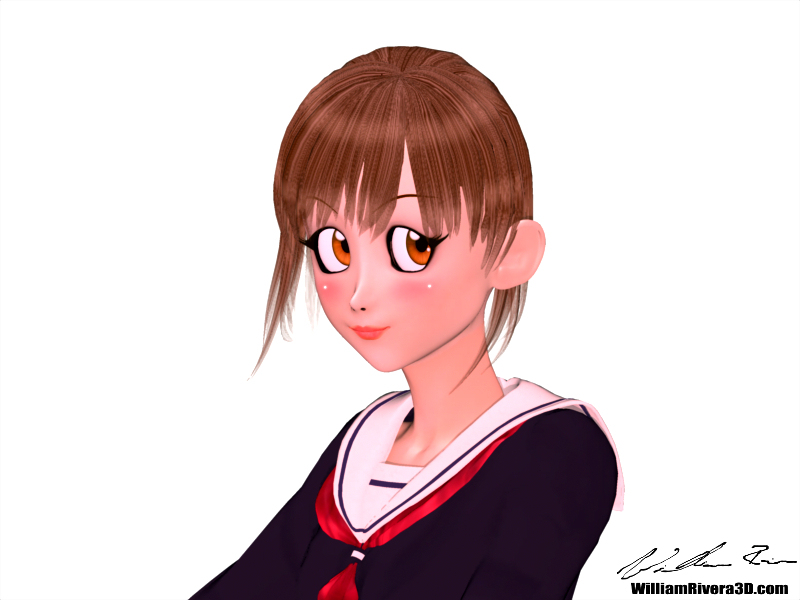
Welcome to Hatsune Miku Anime Manga Cafe ☕I'd like to share some skills I use to render anime characters, I flatten the character making it look 2D. I use carrara but it might be possible in Daz studios.
Please see the images below for better understanding.
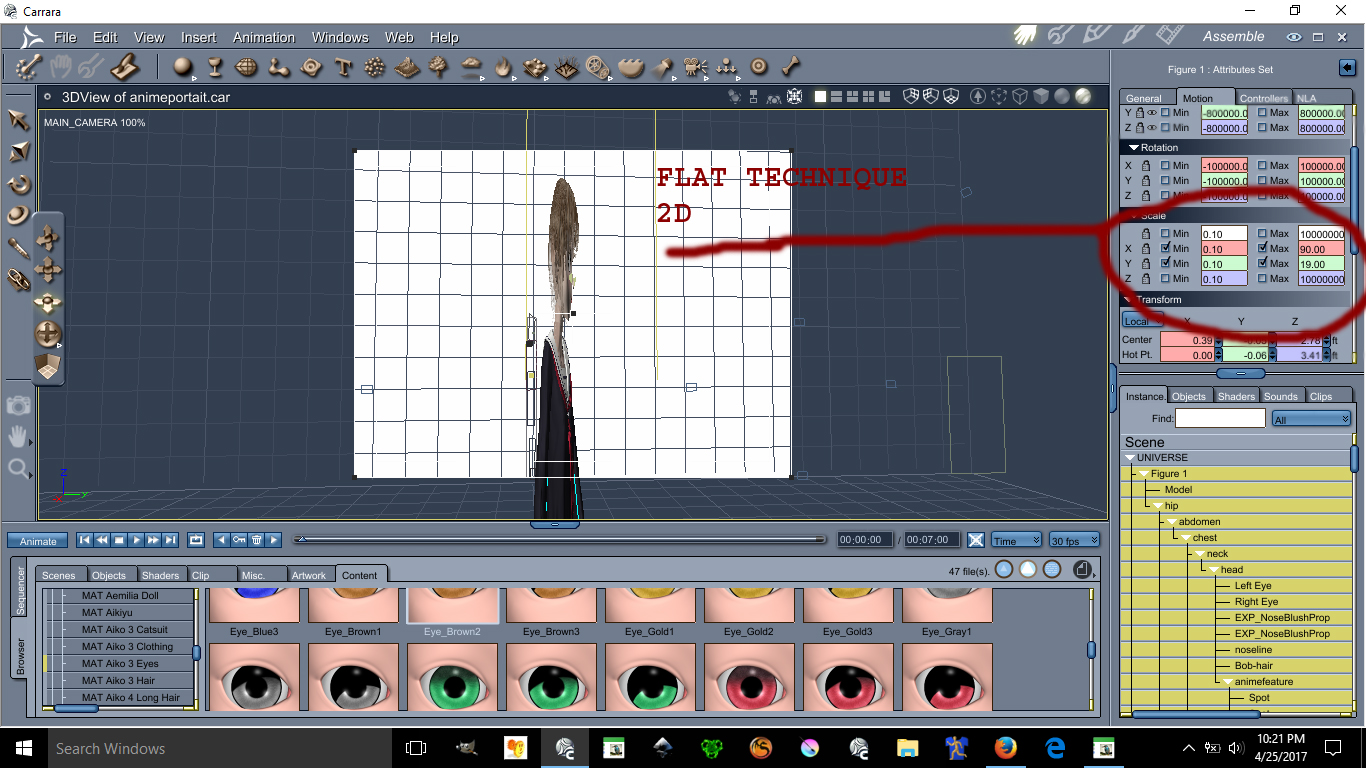
This image has been resized to fit in the page. Click to enlarge.
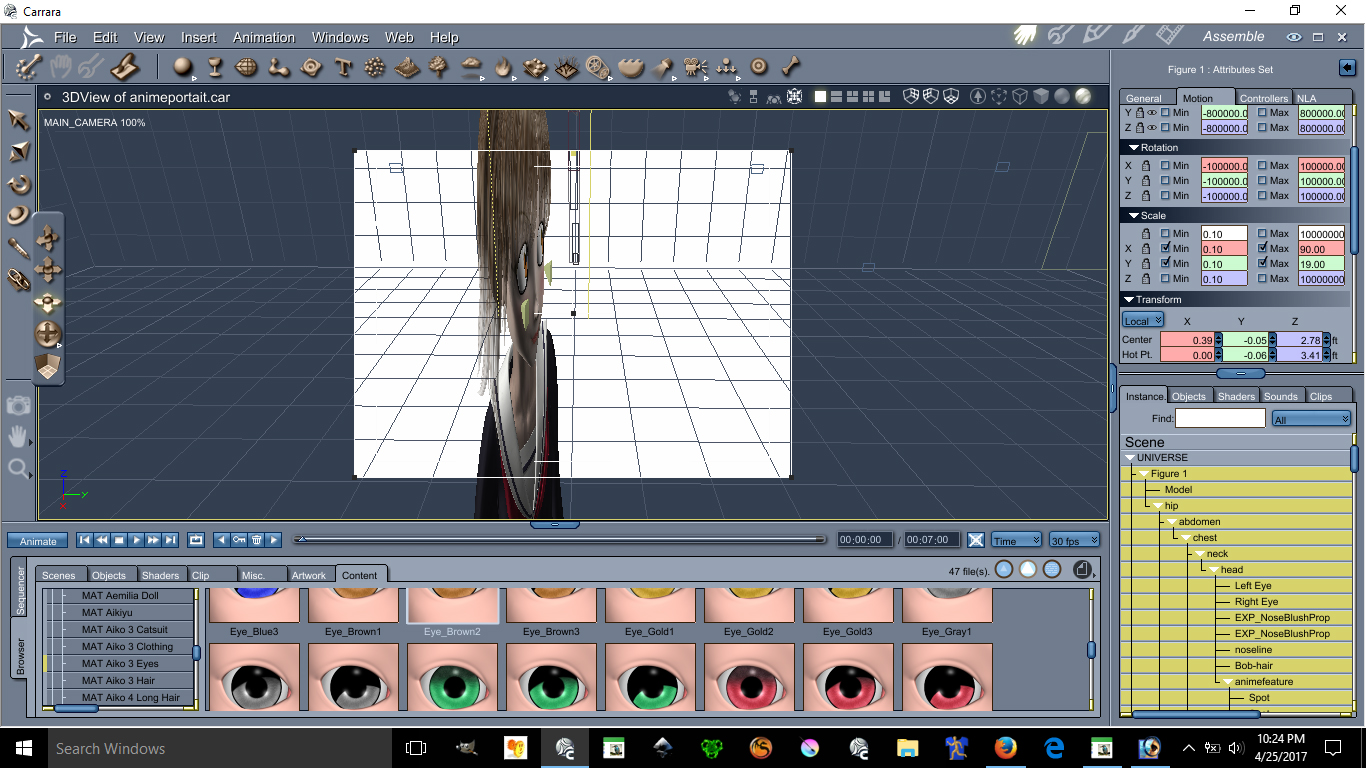
This image has been resized to fit in the page. Click to enlarge.
Using the scale X and Y can make possible the flatten of a character you can make her as flat as you want.
Ear Pulled, Square big eyes, small mouth, unrealistic skin and light bulbs on the cheek are all anime features.
Lets start with lightings
See images below please:
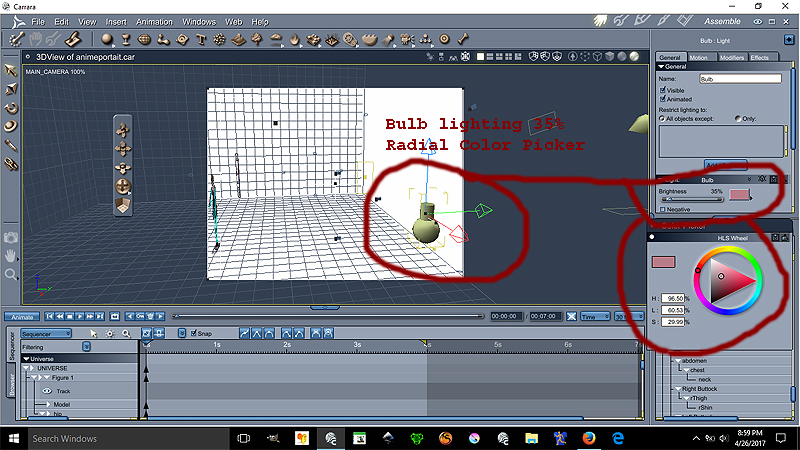
Ok the Bulb is at 35% lighting at the color on the radial is
H= 96.50%
L=60.53%
S=29.99%
This bulb gives proper anime skin lighting unrealistic notice that the bulb is over by the edge the character is centered
Now we go for the Distant light settings see image below please:
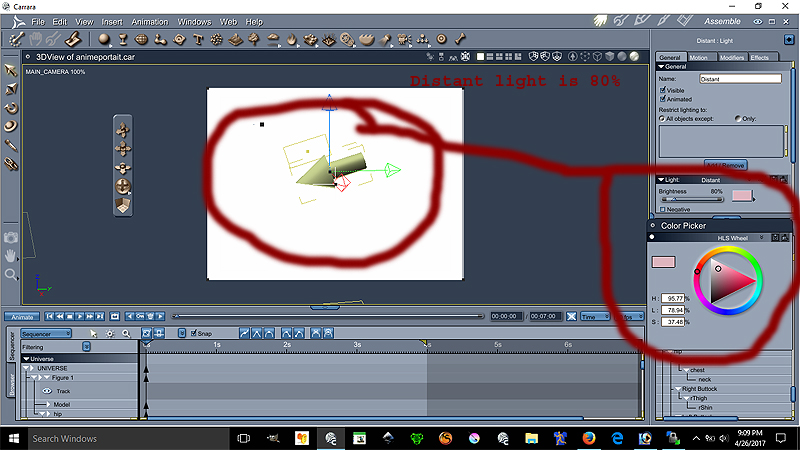
Ok the Distant light is at 80% lighting at the color on the radial is
H= 95.77%
L=78.94%
S=37.48%
The location of the distant light can be seen on image 1. Both lights are set to best settings - raytraced under the effect tab
This conclude the lesson on the environmental light settings is more of a pinkish lights.
The following lesson will focus on the Ear Pulled a very important anime feature disregarded by many :P
We will place our lovely model facing forward for better teaching.
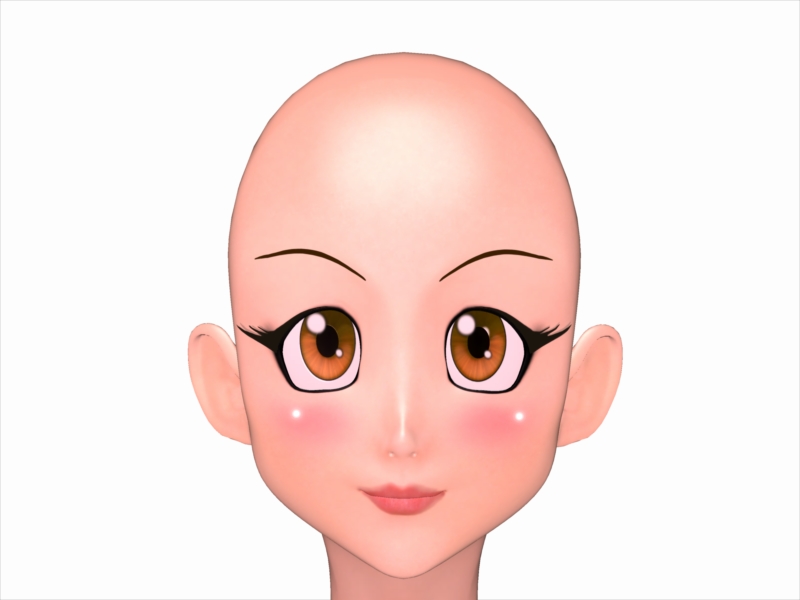
This model is Aiko 3 with kioki morph, This character has many morph and lots of clothes. Aiko 3 is widely supported in the Japanese Community including pixiv.net PoserClub.net.
In order to pull the ears on Aiko 3, see the images below:
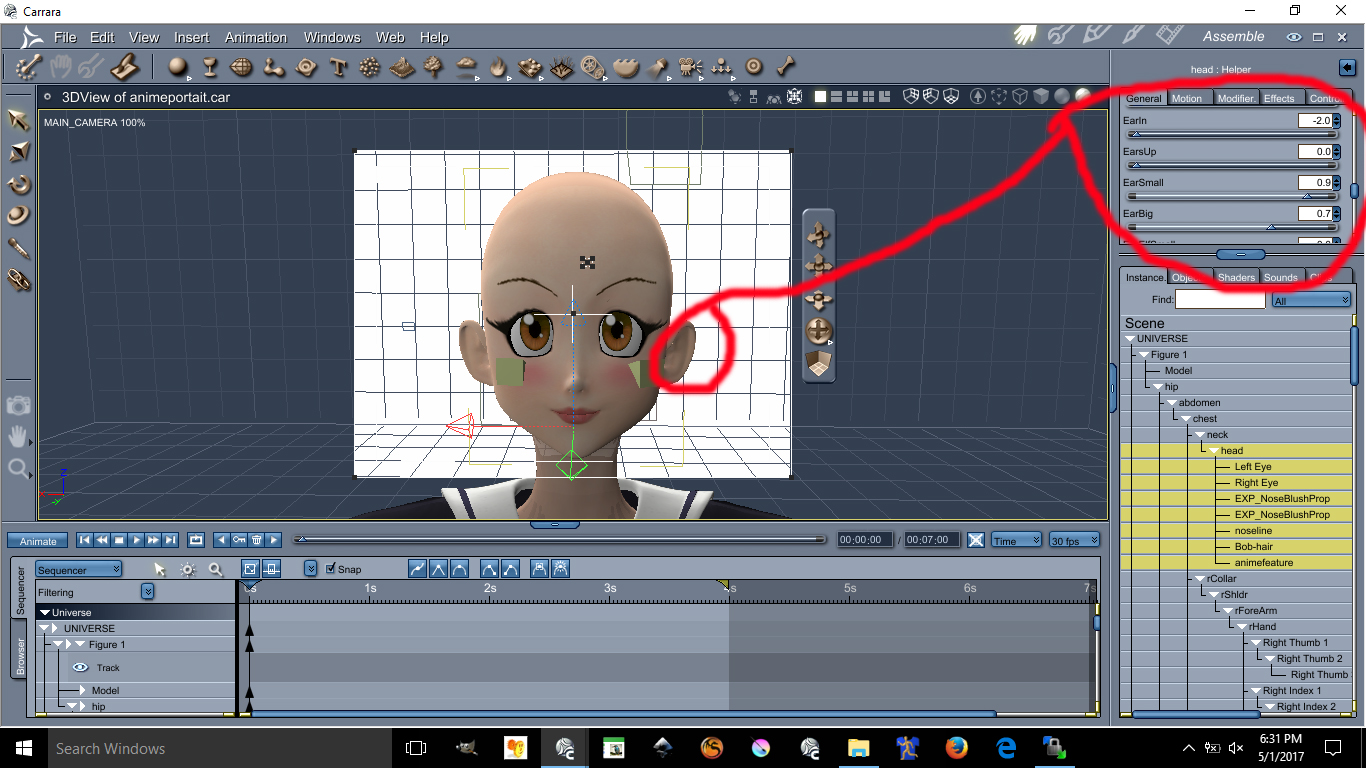
This image has been resized to fit in the page. Click to enlarge.
The values are as follow
Earin= -2.0 (thats minus 2.0)
EarBig= 0.7
EarSmall= 0.9
I doubt you can do these with Aiko 4 or up. I always recommened Aiko 3 for your anime needs.
Next Lesson we will talk about Triangular Chin
This next lesson focuses on her Triangular Chin. The triangular chin cannot be done using Aiko 3 alone. You need to have Kioki for Aiko 3 to make this triangular chin, without Kioki I do not think you can create such a perfected Anime Chin. Kioki by Capces can be purchased here at Daz. at https://www.daz3d.com/kioki and Kioki Requires Aiko 3 morph and map located here https://www.daz3d.com/aiko-3-0-morphs-and-maps now on to the lesson.
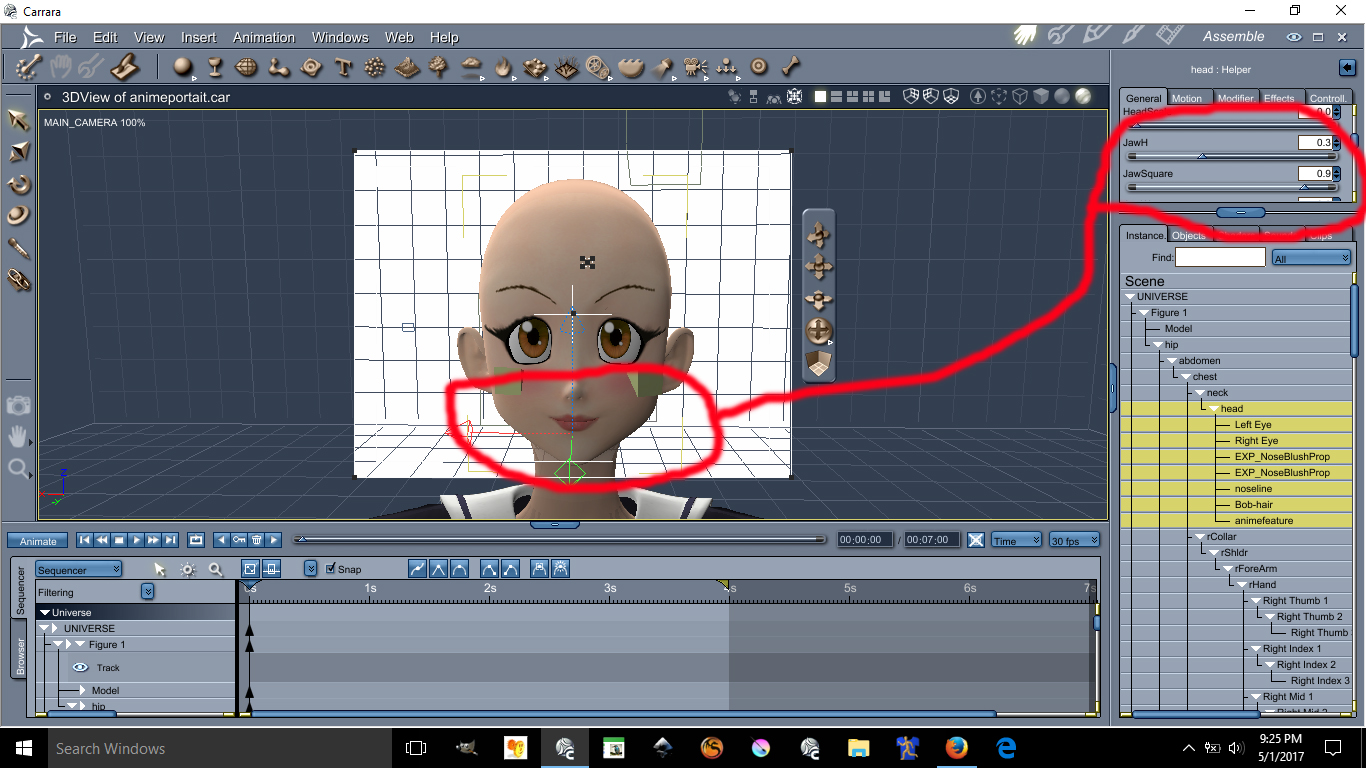
This image has been resized to fit in the page. Click to enlarge.
The values are as follow:
JawH=0.3
JawSquare= 0.9
Here are the eyes lesson, possibly the hardest and tedious part is morphing these eyes in an anime style shape. First you need to darken the eye socket materia, by making the eyes socket material dark it will create a dark outline all around the eyes. Again, the morph I used on these requires the Kioki Morph. Here are the values of the Anime Eyes Shapes along with links.
I recommend Dumb or Anime Eyes for Victoria 3 (Victoria 3 Eyes fits on Aiko 3) @ https://web.archive.org/web/20060925192216/http://jjdelpy.free.fr/Poser/doaeyes.html
The values for the eyes are as follow:
EyesScale 0.5
EyeSpace 0.5
EyeAngle Up 0.2
EyeGumDrop 0.3
EyeinSquare 0.3
Eyelwrflat 0.3
EyeOutDwn 0.4
EyeShape1 0.8
EyeUpFlat 0.1
EyeDepth -0.1
EyeHeight 0.1
EyeWidth 0.1
Eyelidshllw 0.1
Eyelidshvy 0.1
Lasheslong 1.0
Lashlofull -9.0
Headshape and nose is as follow:
HDstylized 0.8
ThroatThin 1.0
Nosepointed 0.4
MouthSmall 0.2
MouthNarrow 0.2
Doing the HDStylized will automatically make the nose small and will also give the head an anime style. This are the basics of making an anime head using Aiko 3 with Kioki morph in Daz Studios it may be possible to do all this but I am not 100% sure if Kioki will work in DazStudios, I assume it does because is sold here. The above was all done in Carrara Studios.
About the Cheek Lights and Skin will required some photoshop and some advance lighting in carrara. I am not going to discuss these here if you are still interested in those send me a email [email protected]
Novica & Forum Members Tips & Product Reviews Pt 13One quick thing I noticed as I looked through the products- I hate men's pants that don't come to the ankle, aka short. I think it looks dorky. Maybe that's the look they're going for, but it keeps me from buying if there's not a morph listed to increase the pant length. (And I didn't have time to look as pages load too slowly using my phone connection, which is weak.)
Sleeves Not lining up with ArmsFirst of all this has been giving me headaches for a while. I am seriously frustrated with this. I worked 6 hours last night to try and figure this out. EVERY TIME I attach an OBJ shirt that was made in 3DS Max or Blender it always comes out this way. I've tried modifying it in Blender and hexagon. No luck at all. I've done everything from converting prop to figure and fittig it on the G8 female. To using the transfer utility tool that doesn't work. I've even tried moving the sleeves but the whole shirt gets distorted. Pleas help this has been bothering me for days now and I'm fed up with it.
Weird figure inversion. [solved myself]That kind of problem usually happens when vertex order has changed, it has to be kept the same for the morph to work correctly.
Maybe you used a particular tool in Blender which altered vertex order for the one which didn't work?
Thanks, I wondered that too, but, I'm pretty sure I'd made sure that was right. In the example I've provided I moved no more than 9 vertices, just a chin dimple, so, I don't know how I've changed enough to cause it. I've since done another morph after starting again from scratch. New G8M, new file in Blender and it was fine. I'm prefect happy accepting I'm doing something stupid, but, I'd love to know what so next time it happens I can fix without having to start from scratch.
Weird figure inversion. [solved myself]That kind of problem usually happens when vertex order has changed, it has to be kept the same for the morph to work correctly.
Maybe you used a particular tool in Blender which altered vertex order for the one which didn't work?
[Commercial] dForce MI Autumn Outfit [Live]Love the sweater!! And the hiking shoes too. I would ask for the ability to roll the sleeves up a bit-if that's possible.
I see that you are going into my list of buy on sight PAs.
Yes! I was planning a rolled up sleeves morph for this attire, so you'll get mulitple styles out of it.
 Khemsit 'normal' G8 female with improvements?
so, in your opinion, there is no difference at all with any other G8 character?
Then why the much higher price tag?I have found Core Figures (Genesis 3 link) to be of a markedly higher skin and morph quality---in most cases---than PA characters, one consistent exception being bluejaunte (but his girls have to stick together or remain alone since they shame other skins that walk in). Though there are more than a couple of Core Figure skins that I wish they'd handed over to a master to finish---it's well-done specular maps that usually make the skins pop---I'm always excited to get another opportunity for closeup-ready skin.
I own them all, and they are my first stop when auditioning a character for a story, especially males. I change them so that they don't look the same, but I've found that the more extensively I morph, the less expressive I can make the character's face. Now that we have so many great Core Figures to work with, I no longer have to complain about a lack of multiple out-of-the-box top shelf skins, though I would still love some more male skins on the level of Dain, Dasan, Kwan, Nix, and Floyd (although Holt, Ashan, Jonathan, Valentino, and Vladimir are great too).
The G8 Female Core Figures cover a lot of bases, and there are almost twenty that I would rank as 5-star. Daz is giving us exactly what we asked for: non-idealised type diversity.
My understanding is that we're talking about how the morphs work, and the bends work, not how characters are but together. We all have those we prefer. All of them operate as a child of G8.
SereneNight's Sci-Fi Fun Thread 2Okay, so for the sake of round 2 I chose this Elios 8 poses and expressions StandC pose which is the most dforce friendly pose I could find on short notice. (Why don't pas number their poses, Why?) This is the outfit- without dForce. I used the waist tug down morph, and the morph to lower the ankles. I forgot to expand the watch band.

here's with dForce. I think the most noticible change is in the fit of the shirt. The pant fit changes with this pose are hard to detect. I fixed the watch band.
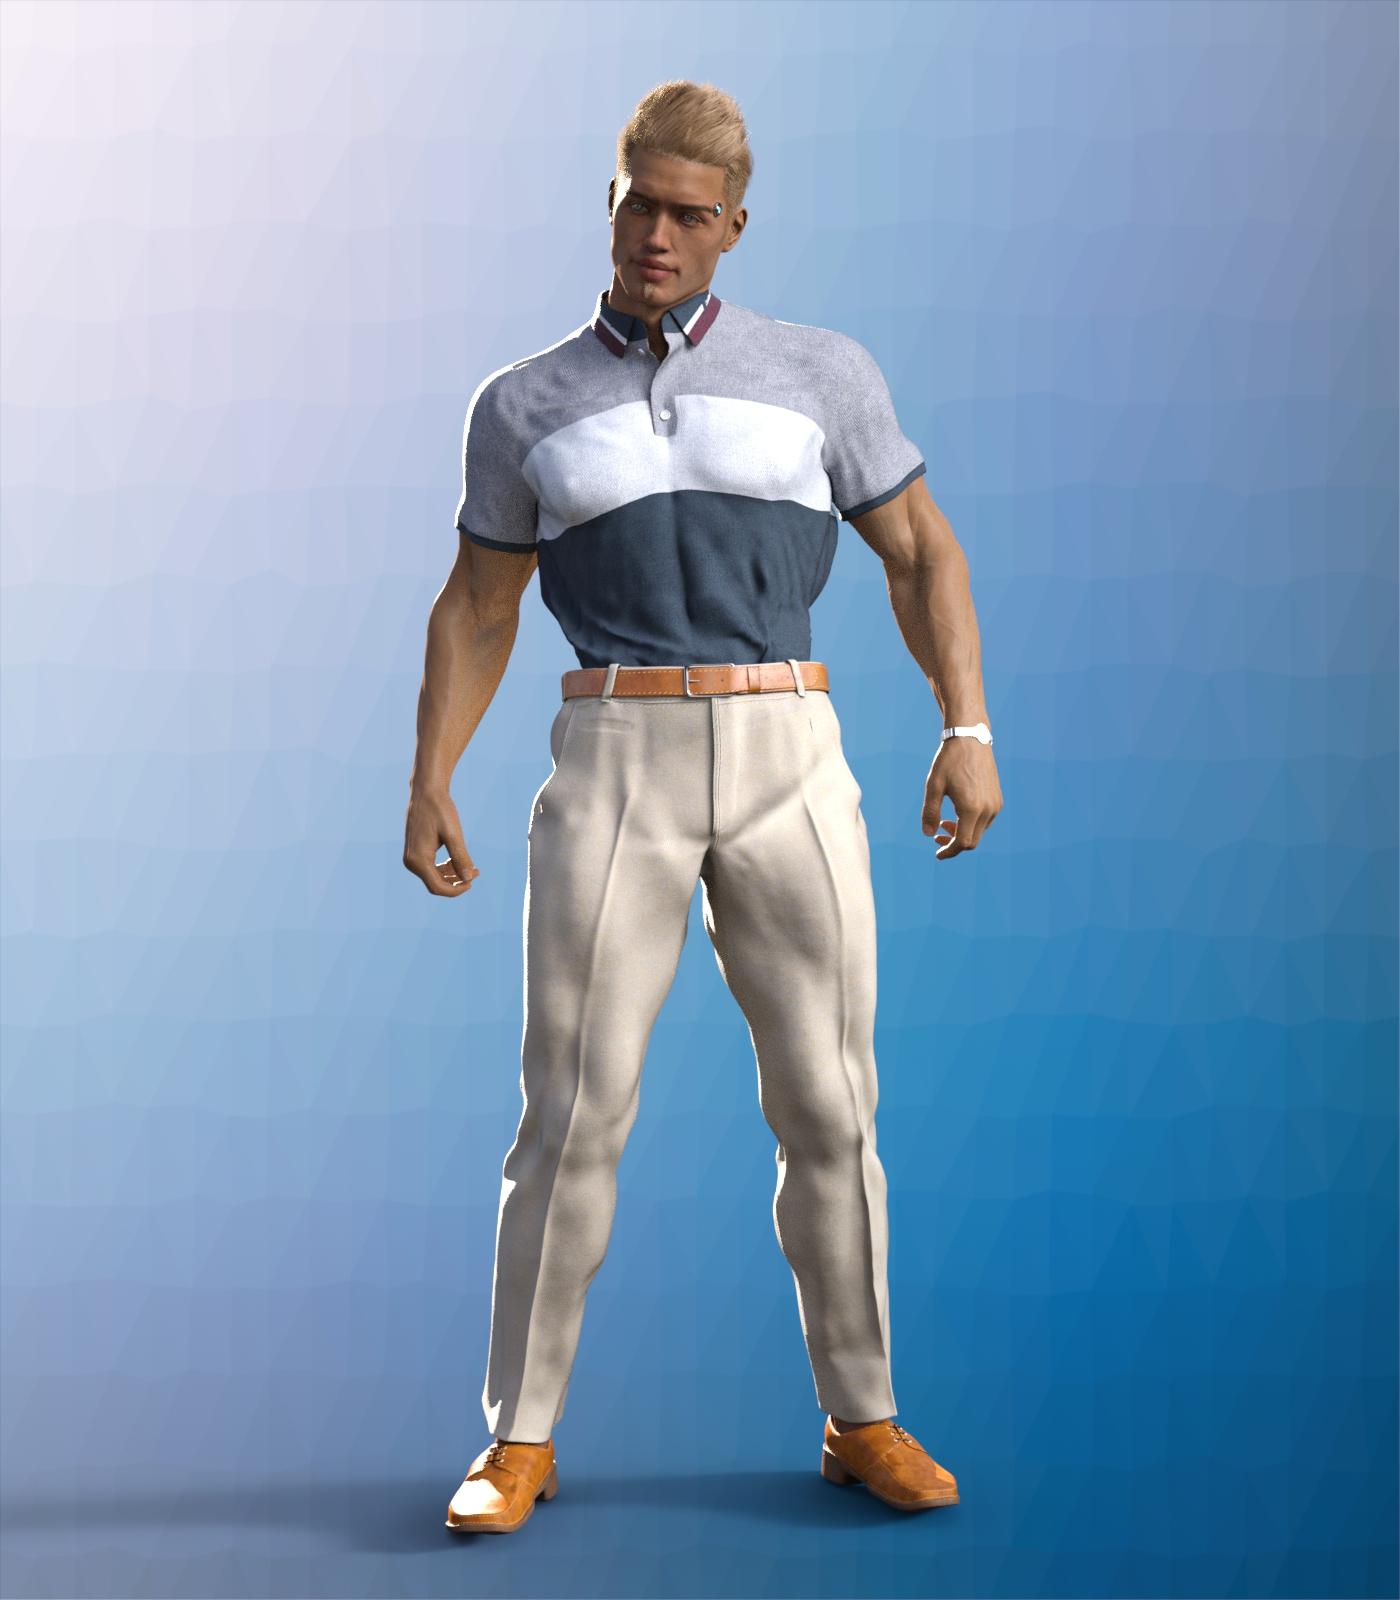
Finally, I used the pre-dforced version and reduced the scale of the pants 97 percent. There is pokethrough slighly with Boyd's HD morphs. I don't know of a way to avoid it, really, but the fit is better wtih the pants smaller.
 Khemsit 'normal' G8 female with improvements?
so, in your opinion, there is no difference at all with any other G8 character?
Then why the much higher price tag?I have found Core Figures (Genesis 3 link) to be of a markedly higher skin and morph quality---in most cases---than PA characters, one consistent exception being bluejaunte (but his girls have to stick together or remain alone since they shame other skins that walk in). Though there are more than a couple of Core Figure skins that I wish they'd handed over to a master to finish---it's well-done specular maps that usually make the skins pop---I'm always excited to get another opportunity for closeup-ready skin.
I own them all, and they are my first stop when auditioning a character for a story, especially males. I change them so that they don't look the same, but I've found that the more extensively I morph, the less expressive I can make the character's face. Now that we have so many great Core Figures to work with, I no longer have to complain about a lack of multiple out-of-the-box top shelf skins, though I would still love some more male skins on the level of Dain, Dasan, Kwan, Nix, and Floyd (although Holt, Ashan, Jonathan, Valentino, and Vladimir are great too).
The G8 Female Core Figures cover a lot of bases, and there are almost twenty that I would rank as 5-star. Daz is giving us exactly what we asked for: non-idealised type diversity.
Weird figure inversion. [solved myself]Hi, on occasions for reason i haven't been able to work out. Sometimes when I import a G8M from Blender after doing a morph the whole figures seams to be ripped apart. See the attachments. I did a morph this morning and it happened from Blender 2.79 so I switch to using 2.9 and did 6 morphs with no problems. Then the last one when crazy again. I changed nothing and was using the same file, deleting the morphed G8M and importing again or undoing if it was a simple morph. I've attached the various files.
 Dforce settings like Marvelous designer?
all of the cloth settings are under the surface pane, for stretch and expansion you unfortunately don't have it split into weft and warp like in marvelous but you have the contraction-expansion ratio setting
at 100% (default) there is no change, reducing it to 90-95% will make a tighter cling, while increasing it above 100% will make the fabric increase in size.
the one downside to dforce particularly with your example of removing bust cling is that the simulation uses the inital shape at start of sim (or at frame 0/ a morph) as the rest shape and will attempt to move back into that shape as best allowed by the settings, so you end up with often noticable crease where the bust cling was even though the fabric has moved away.
reducing the bend stiffness might help with that but I'm not sure.
if you do use the contraction ratio to shrink a baggy item you might want to also reduce the stretch stiffness on the same surface.
the settings for fabric in marvelous and surfaces in studio are similar but they don't cross over 100%
Khemsit 'normal' G8 female with improvements?While it's true that the maps can be painted onto the model with any UVs, if there is marked stretching of the surface due to the morph then the effectrive resolution of the map will be reduced in that area. Whether dealing with that via a new UV set, given that few people need the full resolution of the maps, is perhaps open to question.
Indeed, which perhaps explains why George came with 6k torso textures. It's a much larger skin area.
Anime and Manga with CarraraI'd like to share some skills I use to render anime characters, I flatten the character making it look 2D. I use carrara but it might be possible in Daz studios.
Please see the images below for better understanding.
This image has been resized to fit in the page. Click to enlarge.
This image has been resized to fit in the page. Click to enlarge.
Using the scale X and Y can make possible the flatten of a character you can make her as flat as you want.
Ear Pulled, Square big eyes, small mouth, unrealistic skin and light bulbs on the cheek are all anime features.
Lets start with lightings
See images below please:
Ok the Bulb is at 35% lighting at the color on the radial is
H= 96.50%
L=60.53%
S=29.99%
This bulb gives proper anime skin lighting unrealistic notice that the bulb is over by the edge the character is centered
Now we go for the Distant light settings see image below please:
Ok the Distant light is at 80% lighting at the color on the radial is
H= 95.77%
L=78.94%
S=37.48%
The location of the distant light can be seen on image 1. Both lights are set to best settings - raytraced under the effect tab
This conclude the lesson on the environmental light settings is more of a pinkish lights.
The following lesson will focus on the Ear Pulled a very important anime feature disregarded by many :P
We will place our lovely model facing forward for better teaching.
This model is Aiko 3 with kioki morph, This character has many morph and lots of clothes. Aiko 3 is widely supported in the Japanese Community including pixiv.net PoserClub.net.
In order to pull the ears on Aiko 3, see the images below:
This image has been resized to fit in the page. Click to enlarge.
The values are as follow
Earin= -2.0 (thats minus 2.0)
EarBig= 0.7
EarSmall= 0.9
I doubt you can do these with Aiko 4 or up. I always recommened Aiko 3 for your anime needs.
Next Lesson we will talk about Triangular Chin
This next lesson focuses on her Triangular Chin. The triangular chin cannot be done using Aiko 3 alone. You need to have Kioki for Aiko 3 to make this triangular chin, without Kioki I do not think you can create such a perfected Anime Chin. Kioki by Capces can be purchased here at Daz. at https://www.daz3d.com/kioki and Kioki Requires Aiko 3 morph and map located here https://www.daz3d.com/aiko-3-0-morphs-and-maps now on to the lesson.
This image has been resized to fit in the page. Click to enlarge.
The values are as follow:
JawH=0.3
JawSquare= 0.9
Here are the eyes lesson, possibly the hardest and tedious part is morphing these eyes in an anime style shape. First you need to darken the eye socket materia, by making the eyes socket material dark it will create a dark outline all around the eyes. Again, the morph I used on these requires the Kioki Morph. Here are the values of the Anime Eyes Shapes along with links.
I recommend Dumb or Anime Eyes for Victoria 3 (Victoria 3 Eyes fits on Aiko 3) @ https://web.archive.org/web/20060925192216/http://jjdelpy.free.fr/Poser/doaeyes.html
The values for the eyes are as follow:
EyesScale 0.5
EyeSpace 0.5
EyeAngle Up 0.2
EyeGumDrop 0.3
EyeinSquare 0.3
Eyelwrflat 0.3
EyeOutDwn 0.4
EyeShape1 0.8
EyeUpFlat 0.1
EyeDepth -0.1
EyeHeight 0.1
EyeWidth 0.1
Eyelidshllw 0.1
Eyelidshvy 0.1
Lasheslong 1.0
Lashlofull -9.0
Headshape and nose is as follow:
HDstylized 0.8
ThroatThin 1.0
Nosepointed 0.4
MouthSmall 0.2
MouthNarrow 0.2
Doing the HDStylized will automatically make the nose small and will also give the head an anime style. This are the basics of making an anime head using Aiko 3 with Kioki morph in Daz Studios it may be possible to do all this but I am not 100% sure if Kioki will work in DazStudios, I assume it does because is sold here. The above was all done in Carrara Studios.
About the Cheek Lights and Skin will required some photoshop and some advance lighting in carrara. I am not going to discuss these here if you are still interested in those send me a email w[email protected]
Face transfer questionFace transfer works great but there is one question I have about it. I transfer the face and then saved the face. Do not remember exactly where the
save file is right away. Is there a way that I can load another G8 figure and then use the file that I have saved to create another G8 exactly like my
first one. I was thinking of making twins. In ohter words, can I transfer the saved face onto another G8 figure or do I have to go thru the face transfer again?Thanks.
They are saved as scene subsets. Right-click on the loading icon and select "merge into scene" to load the 2nd figure.
Khemsit 'normal' G8 female with improvements?While it's true that the maps can be painted onto the model with any UVs, if there is marked stretching of the surface due to the morph then the effectrive resolution of the map will be reduced in that area. Whether dealing with that via a new UV set, given that few people need the full resolution of the maps, is perhaps open to question.
Anne for Caryn 8 (clothing costume added by elleque sep 27)I got Caryn just to be able to use your morph, she's so very, very cute! And thanks, Elleque, for the darling clothes :)
What's the one thing you've always wanted to see sold at daz but never have?3DClassics has a few 'Ordinary' cars. Not too many 'oridinary' ones from the current era, but they can be used. https://www.renderosity.com/mod/bcs/?uid=3DClassics
but the most have the Tag VUE, does Vue load in daz?
The Vue ones won't, but the Poser model is the 2CV I showed in the image above. Had to change the materials but it's rather a good model. Only problem for me is the left hand driving position. Fortunately the wheel, pedals and console are an easy translation morph in my own modeller, no mirroring needed. One other thing, the scale can be a bit strange at times, the 2CV is modelled over 5m long, but should be 3.68m.
Ah thanks for your feedback.
What's the one thing you've always wanted to see sold at daz but never have?3DClassics has a few 'Ordinary' cars. Not too many 'oridinary' ones from the current era, but they can be used. https://www.renderosity.com/mod/bcs/?uid=3DClassics
but the most have the Tag VUE, does Vue load in daz?
The Vue ones won't, but the Poser model is the 2CV I showed in the image above. Had to change the materials but it's rather a good model. Only problem for me is the left hand driving position. Fortunately the wheel, pedals and console are an easy translation morph in my own modeller, no mirroring needed. One other thing, the scale can be a bit strange at times, the 2CV is modelled over 5m long, but should be 3.68m.
Daz 3D is part of

Connect
DAZ Productions, Inc.
7533 S Center View Ct #4664
West Jordan, UT 84084Licensing Agreement | Terms of Service | Privacy Policy | EULA
© 2026 Daz Productions Inc. All Rights Reserved.