-
Face Transfer...could be worse
Ah ok. Thanks. A friend of mine used this, but i was not really convinced. I thought it's the same tool, but FaceTransfer is some kind of updaten.
But then: I think FaceGen does not really help, the Result with Face Transfer is so much better, blending it with somethin from FaceGen would make the result worser. ;)
Face Transfer...could be worseSpacious said:
Just curious, has anyone tried using both Face Transfer and Face Gen, and then blending the morphs from each one together? The example above gave me the idea. It seems that they might minimise the distortions in each other and get much closer to the original this way.
I'm at a loss, what is Face Gen - can't find it here?
10 poses for Mick Standalone FigureFaeryl Womyn said:
Mick is not a stand alone figure, he is a character morph of G8 & G8.1 Male
Sorry, but no. As mentioned on the product page, Mick is not a G8 character but an original figure.
The pack also includes a version of his accessories made for G8, but Mick himself is not G8.AIUTO...CHI CONOSCE L’ITALIANO? PARTE TREDICISilvhe said:
Raga ma si può sapere che stracavolo hanno fatto a capelli e cappelli vari? Ho l'uniforme da soldato americano della II guerra mondiale per G8m, quando faccio indossare l'elmetto con "fit to" a G8m senza morph funziona, se applico appena il morph della faccia l'elemtto esplode

Soluzioni?
L'unica è tornare a una release precedente di DAZ Studio.
 Io, come ripeto sempre, sono ancora sulla 4.12.0.86, ho provato l'ultima release (4.15.0.2) per un paio di giorni ma sono tornato indietro, troppi bug e troppe funzioni rotte.
Timeline, Puppeeteer, Autofit, Smart Content... Niente andava come doveva. le ho provate tutte anche io e l'unica soluzione valida è stata il rollback.AIUTO...CHI CONOSCE L’ITALIANO? PARTE TREDICIKainjy said:
insensibile said:
Ciao a tutti. Sto cercando di capire come funziona lo smart content dopo la manutenzione perché non risponde più come prima. Ieri ho disintallato e re-installato Daz Studio e DIM. Installando i Genesis 2 3 8 essential nessuno dei 3 compariva nello smart content quindi ho resettato il database e re-importato tutto quanto. Tutto quello che era nella cartella support è comparso nello smart content. Quando ho installato tramite DIM un altro paio di modelli, questi non sono comparsi nello smart content. Per vederli ho dovuto resettare di nuovo e reinportare tutto. Dato che la cosa non mi sembrava normale ho disintallato qualche modello per vedere come si sarebbe comportato lo smart content. I modelli disinstallati dal database (fisicamente non c'erano più nella libreria) ma nello smart content continuavano ad esserci senza foto, cliccabili e con i punti esclamativi. DIM e DAZ condividono lo stesso inndirizzo CMS e la stessa porta. DIM aggiornava il CMS prima della manutenzione del database e DAZ leggeva i cambiamenti aggiornando lo smart content mostrando i prodotti disintallati in grigio e non cliccabili. Ora sembra che DIM non aggiorni il CMS e che DAZ continua ad avere il prodotto nello smart content ma senza trovarlo nella libreria (perché giustamente è stato cancellato). Manutenzione, DIM e smart content non comunicano bene tra di loro o sto sbagliando qualcosa?
In DAZ per vedere un prodotto nella scheda Products deve essere installato nel tuo hard disk un file chiamato Manifest (*.dsx) che indica a DAZ che un insieme di file compongono un prodotto e vanno catalogati come prodotto X nella scheda Smart Content... c'è un file dsx per ogni prodotto che installi e sono contenuti nella cartella Manifest del tuo PC. Per trovarla spulcia nelle opzioni del DIM e troverai la directory in cui il DIM le salva.
I file di morph/character/ecc.. sono invece caricati sempre da DAZ (anche senza Manifest) purchè si trovino in una delle cartelle del tuo PC presenti nell'elenco del Content Library. Ad esempio se prendi qualcosa da ShareCG (che non ha files con manifest) per farlo funzionare basta copiarlo in una delle cartelle indicate in Content Library (DAZ Studio Formats se sono file DAZ, Poser Formats se invece sono files anche per Poser). Copi il file nelle cartelle e riavvi DAZ (perchè DAZ li riconosce e carica solo all'avvio).
Nel tuo caso avendo disinstallato e reinstallato DAZ potresti aver fatto casino con queste cartelle.. per cui ti consiglio di:
- fare pulizia di tutti gli archivi
- Installare tutto dal DIM e verificare dove sono installati gli archivi e dove i Manifest
- Aprire DAZ e verificare che i percorsi del Content Library siano gli stessi di dove hai installato i file
- Aggiornare i metadata (devi essere loggato in DAZ Studio)
Gli archivi erano vuoti. Il 99% degli assets che uso sono custom (tutti fatti in Blender) e le strutture ad albero degli assets sono tutti corretti (hanno sempre funzionato e funzionano tutt'ora). Sono tutti istallati tramite DIM perché mi sono fatto un BAT per compilare i Manifest e i Supplement. I metadata li ho creati io tramite il Metadata Editor così come le categorie. Nei files ZIP ho aggiornato le cartelle support con i DSA e DSX così come le stringhe nei file Manifest DIM li vede, li installa e disinstalla senza problemi. Il problema non risiede in questa fase.
Lo smart content è fatto a modo suo (e questo si sa, come del resto l'intero software che, se paragonato a Blender o a Maya, sembra un giocattolo made in China).
Il PROBLEMA sta negli aggiornamenti dello smart content dopo aver fatto il reset e il reinstall del database tramite DB Mantainance. Se DIM installa o disintalla lo smart content non viene aggiornato correttamente: lascia "orfani" (riferimenti vuoti con punto esclamativo che non hanno corrispondenza nell'archivio fisico perché, giustamente, appena disinstallati con DIM) che devono essere cancellati manualmente nel CONTENT LIBRARY -> PRODUCT. Ripeto: Questo non succede se dopo un'istallazione pulita di DS vengono fatte le operazioni tramite DIM di disinstallazione. Succede SOLO dopo operazioni di DB Mantainace. Spero di essere stato più chiaro nella spiegazione e ubicazione del problema.10 poses for Mick Standalone FigureMick is not a stand alone figure, he is a character morph of G8 & G8.1 Male and your poses are compatible with the G8 models.
Thank you for your poses.
Humanoid animation on genesis figures?Physics, IK and collision detection is very convenient to have.
I like all those tools, when one can easily make pile of things or drop props on each other and then physics and collision detection make them looks natural.
Splines are another feature, that I like to use and of course different type of generators.
There are so many features to discover in Unity and having Daz bridge to Unity is making so much easier to transfer items.
FBX exporter - https://docs.unity3d.com/Packages/[email protected]/manual/index.html - allows bringing items from Unity to Daz Studio.
AIUTO...CHI CONOSCE L’ITALIANO? PARTE TREDICIinsensibile said:
Ciao a tutti. Sto cercando di capire come funziona lo smart content dopo la manutenzione perché non risponde più come prima. Ieri ho disintallato e re-installato Daz Studio e DIM. Installando i Genesis 2 3 8 essential nessuno dei 3 compariva nello smart content quindi ho resettato il database e re-importato tutto quanto. Tutto quello che era nella cartella support è comparso nello smart content. Quando ho installato tramite DIM un altro paio di modelli, questi non sono comparsi nello smart content. Per vederli ho dovuto resettare di nuovo e reinportare tutto. Dato che la cosa non mi sembrava normale ho disintallato qualche modello per vedere come si sarebbe comportato lo smart content. I modelli disinstallati dal database (fisicamente non c'erano più nella libreria) ma nello smart content continuavano ad esserci senza foto, cliccabili e con i punti esclamativi. DIM e DAZ condividono lo stesso inndirizzo CMS e la stessa porta. DIM aggiornava il CMS prima della manutenzione del database e DAZ leggeva i cambiamenti aggiornando lo smart content mostrando i prodotti disintallati in grigio e non cliccabili. Ora sembra che DIM non aggiorni il CMS e che DAZ continua ad avere il prodotto nello smart content ma senza trovarlo nella libreria (perché giustamente è stato cancellato). Manutenzione, DIM e smart content non comunicano bene tra di loro o sto sbagliando qualcosa?
In DAZ per vedere un prodotto nella scheda Products deve essere installato nel tuo hard disk un file chiamato Manifest (*.dsx) che indica a DAZ che un insieme di file compongono un prodotto e vanno catalogati come prodotto X nella scheda Smart Content... c'è un file dsx per ogni prodotto che installi e sono contenuti nella cartella Manifest del tuo PC. Per trovarla spulcia nelle opzioni del DIM e troverai la directory in cui il DIM le salva.
I file di morph/character/ecc.. sono invece caricati sempre da DAZ (anche senza Manifest) purchè si trovino in una delle cartelle del tuo PC presenti nell'elenco del Content Library. Ad esempio se prendi qualcosa da ShareCG (che non ha files con manifest) per farlo funzionare basta copiarlo in una delle cartelle indicate in Content Library (DAZ Studio Formats se sono file DAZ, Poser Formats se invece sono files anche per Poser). Copi il file nelle cartelle e riavvi DAZ (perchè DAZ li riconosce e carica solo all'avvio).
Nel tuo caso avendo disinstallato e reinstallato DAZ potresti aver fatto casino con queste cartelle.. per cui ti consiglio di:
- fare pulizia di tutti gli archivi
- Installare tutto dal DIM e verificare dove sono installati gli archivi e dove i Manifest
- Aprire DAZ e verificare che i percorsi del Content Library siano gli stessi di dove hai installato i file
- Aggiornare i metadata (devi essere loggato in DAZ Studio)
AIUTO...CHI CONOSCE L’ITALIANO? PARTE TREDICISilvhe said:
Raga ma si può sapere che stracavolo hanno fatto a capelli e cappelli vari? Ho l'uniforme da soldato americano della II guerra mondiale per G8m, quando faccio indossare l'elmetto con "fit to" a G8m senza morph funziona, se applico appena il morph della faccia l'elemtto esplode
Soluzioni?
Le cause possono essere 2:
- il morph è particolare (tipo corna che sbucano dalla testa o applichi la faccia di un mostro/alieno) e allora il cappello non riesce a seguire bene la superficie della testa perchè pensato per avere una testa simile a quella base del G8M
- il cappello ha dei morph che magari prima non aveva (alcuni prodotti vengono aggiornati dagli autori stessi che fanno variazioni/correzioni e magari hanno scazzato qualcosa)
La soluzione migliore è quella di
- prendere il tuo cappello quando hai il tuo G8M privo di morph,
- esportare il cappello (da solo)
- applicare il morph al tuo G8M
- reimportare il cappello come mesh
- Imparentarlo al joint della testa
- Salvare il tuo cappello come nuovo asset (senza usare il Transfer Utility)
Così avrai un nuovo cappello che non si deforma con la faccia... discorso analogo per i capelli. Ovviamente usa i parametri di scala per ingrandire/ridurre il cappello a seconda della forma della testa.
Superheroes Rebooted - Renders AssembleGeoffreyHawkins said:
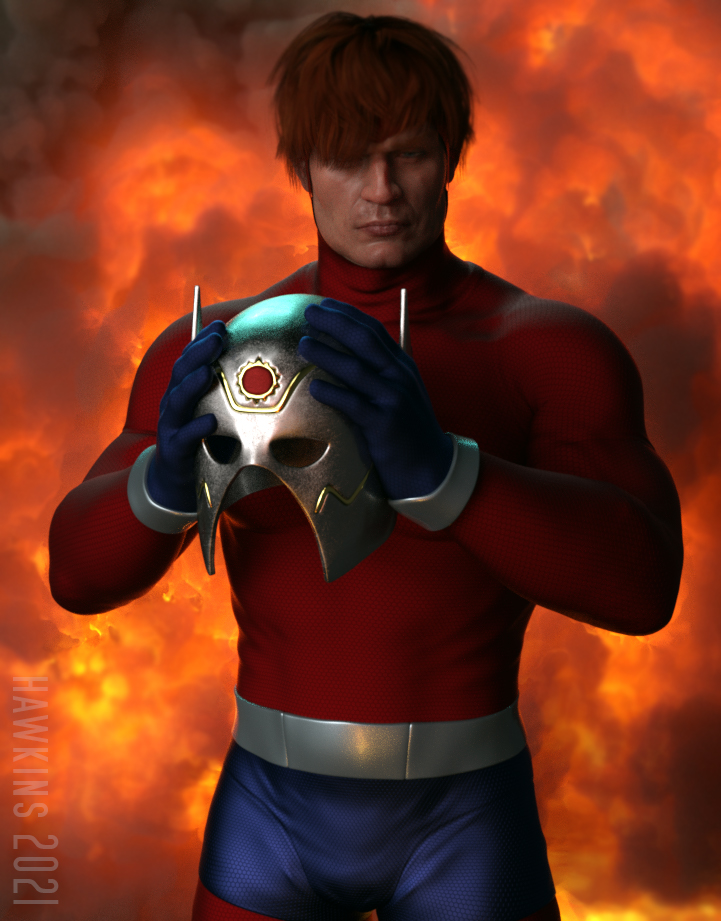
Orion of the New Gods.
This is amazing: it's Jack Kirby's creation come to life!


Is this a custom morph?
Daz Bridge Support Is Here!Using the latest version of Daz to 3DS Max Bridge to transfer Genesis 8 and 8.1 characters from Daz Studio 4.15 Pro into 3DS Max 2020. Here are some questions regarding errors:
Any props (e.g. Clothing such as Basic Wear) that use 3Delight materials will cause an error when importing into 3DS Max (see image) but iRay materials work fine.
*** Morphs for Facial Expressions do not translate into Max. Most of the body morphs do, with some exceptions.
Also, when will the 3DS Max Bridge have support for tranferring Poses or Animation, as the Blender Bridge already has?
Thanks,Pete
Face Transfer...could be worsenonesuch00 said:
You can see how the process whittles down and makes smaller the original geometry of the artwork on the left in your example.
did it? Ich saved it as an morph an loaded it to a new figuren. You think it's reduced?
[tutorial] how to "work around" fix the double down export issue of geografity stuffshello guys, i'm making this topic for peoples like me which are tired of a really ugly bug in daz when comes to "export stuffs", if you never experiencied this bug then be happy you are the "choosen one" or maybe i'm just bad lucky or the end of the stick anyways let's go.
first the geografity stuffs are the "addons" which you add to a character which add some new parts the genesis body character, stuffs like wings, centaur horse body, gens, minotaur or reptilian parts, tails those "extra limbs" the majority are geografity stuffs and while they work very well in daz when you try to export then outside daz a really uggly bug can happens and this bug "duplicate the mesh creating a "second/extra geografity mesh" being exported to the character which increas the poly count and also create a ugly extra face to the mesh which would need to be fixed or create a "invisible material or go a extra step to edit the mesh inside others tools like maya to remove this "extra mesh, well after so many time having this issue i've finally was able to find a "work around" or way to temporary fix, while it's not the right way, because the right way would be "not generating the extra mesh" at last it indeed prevent daz from "create the extra mesh
here a picture of the issue:

this happens aswell with gens but for obvious reasons i can't post the pictures, to be fair it's seens which some "geografity in some cases don't have this issue but a lot of then have, if you just export the geografity alone the bug don't happen it don't get duplicated here a image:

let's start the fix, we gonna use the reptilian 6 hd because he is less "problematic to post naked

as we see he have 2 geografity, wich are the legs and the tail, and it get duplicated the leg is more bisible now look in the uper bar of daz and look for the tools

click on it then select geometry editor, then it will change to the geometry edit mode on this mode click on the character main mesh on other side of the daz program or where you placed the scene panel

now with this selected go to main scen where the character is being rendered and right click on any place a menu will appear for selections, you will choose: geometry selection--> select by-->follower auto hidden faces--> then it will appear for you to chosoe either legs or tails then do it for both tail and legs, after that both zones will get highlighted/selected

now you gonna again right click in any zone in the render and ope again this window, but instead of selection this time you will go for: geometry visibility -->hide selected polygons, and click on it, it will make those "extra polygons really disappear and prevent daz from "duplicate the geografity mesh", in some cases really rare cases(centaur) you can need do a extra step which is: go again on the scene panel and you gonna click on the geografity then do the same select process but instead of the option follower auto hidden the option will be rigidity participants then a option will appear where you gonna mark the geografity, in the lizard case it not gonna work and is not needed but in the case of centaur you need to that because the "centaur body is actually a "full body with the human torso not just the horse part then you need to take out the "human part" then it will appear to choose the centaur when you mark it in the render it only gonna mark the "lower body or horse body, the human body will be unselected.
then after that you will again right click but this time in the geometry selection you will be choosen the invert selection(this is when the centaur mesh is being selected in the scene menu) then when you click on it it "unmark the horse body and mark the human body then just "hidden it" in the geometry visibility and only the horse part will be there then you are ready to send to daz the character without the "extra mesh".
a alternative step if you want to furter reduce the number of stuffs being exported, you can instead of "go to the geometry visibility, you can go to the geometry editing and choose delete selected polygons, becarefull sometimes using this option can crash the daz or take a lot of time to process and have a little chance to break any needed morph then take care when using it, then after that you go again to the menu in the top of the daz and in the tools choose joint editor, again this is even more carefull, to delete but it can reduce the number of bones and remove unused bones like the "normal legs" bones which are not being used anymore and are just making the mesh "bigger" or more processing consuming, use it only if you really know what you are doing, then you gonna go one by one deleting each of the bones which are no more being used since the meshes they influenced where deleted, only delete the ones which where being used for the invisible or deleted mesh(yeah it also can be done if you choose just to hidden but again be really carefull when doing that, do go crazy deleting joints if you not sure, to delete joints with the main mesh character selected in the scene menu, o the character render main panel click on the bone/joint you want to delete(i don't know if you can delete more than one bone per time) the right click then choose "delet-->delete bone), it will remove the bone again really attention when doing this step because while it's can be good reduce the number of polygons and bones before export making it more optmized, make it without some level of knowledge can be dangerous then start by practicing in dumy characters then when you feel confindent you can do that on the final character you want to export
here the final character

well it's seens which reptilian have some transition issues which maybe you have to do some extra work but basically this is the best solution so far, it will work with any geografity you add to the character in case you get issue with it, hope it help peoples like me with the same issue.
here a image of when you just use the tool or export the character without do anything:

this is a really crazy issue.
AIUTO...CHI CONOSCE L’ITALIANO? PARTE TREDICIRaga ma si può sapere che stracavolo hanno fatto a capelli e cappelli vari? Ho l'uniforme da soldato americano della II guerra mondiale per G8m, quando faccio indossare l'elmetto con "fit to" a G8m senza morph funziona, se applico appena il morph della faccia l'elemtto esplode
Soluzioni?
Face Transfer...could be worseJust curious, has anyone tried using both Face Transfer and Face Gen, and then blending the morphs from each one together? The example above gave me the idea. It seems that they might minimise the distortions in each other and get much closer to the original this way.
Help with Hair ID - SolvedIt looks like the Poppy hair which is listed under "Additional products used in promo images", it has a Crown Size morph.
Buy Something That Doesn't Work in Carrara? Post your Questions and Workarounds here. (please)I'm a sucker for rabbits!
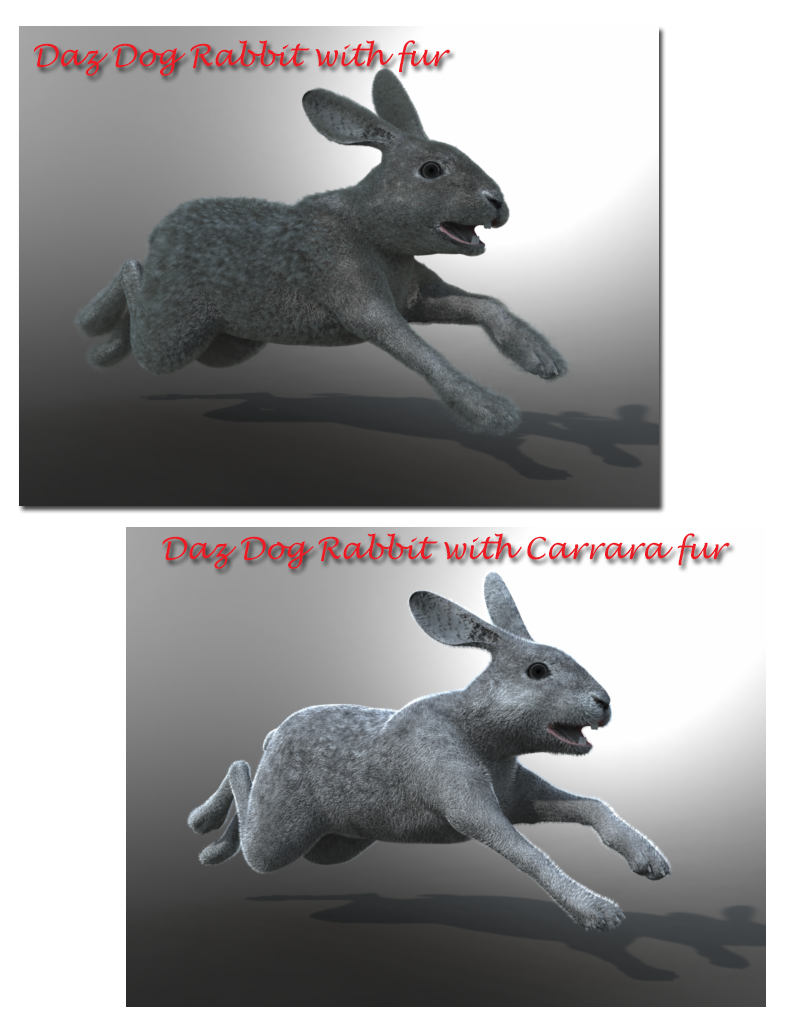
Bought the Daz Dog/Rabbit morph today.. which includes fur as well
Start off with changing rabbit and fur to blended weight.
Rabbit loads ok and poses fine.. the textures need adjusting with normal maps and eye adjustments.. the fur also needs adjusting with alpha maps needed to be applied and the usual untick uvwrap.
The fur loads quick enough but then applying to the dog take s a long time and rendering takes a while
Here is a render using the supplied fur and then one using Carrara hair.. I prefer the Carrara hair

The render was quick using Carrara hair.
 AIUTO...CHI CONOSCE L’ITALIANO? PARTE TREDICI
Imago said:
Muscleman said:
menghienrico said:
Ciao a tutti!
Secondo voi su Daz è possibile eseguire il morphing/shaping del volto o del corpo, agendo direttamente con il mouse sulla mesh e senza quindi utilizzare gli appositi cursori?
Se ho capito bene...Dentro DS no.
Certo che puo!

Basta usare il Mesh Grabber con tutti i plugin, può perfino spawnare i morph una volta finito.

Lo può fare perfino con il semplice DFormer e i Weight Mapping e poi esportare in OBJ per reimpotare come morph.

Gente, bisogna leggere le istruzioni ogni tanto!

Esatto, devi usare il Mesh Grabber, ma dentro DS di default no :)
MF Content Bookmarks forgets recent entriesFrom what I gather the Bookmarks are saved in AppData\Roaming\DAZ 3D\Studio4\customactions.dsx , at least there I find the existing ones and in the temp dir there there is one other customactions.dsx which has some of the entries I created today, so for some reason Daz seems not to transfer them from temp.
Some questions about teeth morphsIf those are Daz sets please report them to support if they show up on a default figure. The jaw shift does illustreate the potential issue with stripping the teeth from a morph.
Daz 3D is part of

Connect
DAZ Productions, Inc.
7533 S Center View Ct #4664
West Jordan, UT 84084Licensing Agreement | Terms of Service | Privacy Policy | EULA
© 2026 Daz Productions Inc. All Rights Reserved.