-
dForce Brookes Autumn Outfit for Genesis 8 Females weird boob shapes
Sevrin said:
That kind of thing is one of my primary reasons for using the Fit Control products. With some vendors' characters, it's almost guaranteed to happen.
That's why I tend to use body shapes not far from the base figure. I know it's not a good answer, but it helps to alleviate odd stretching and distortions on armor, etc.
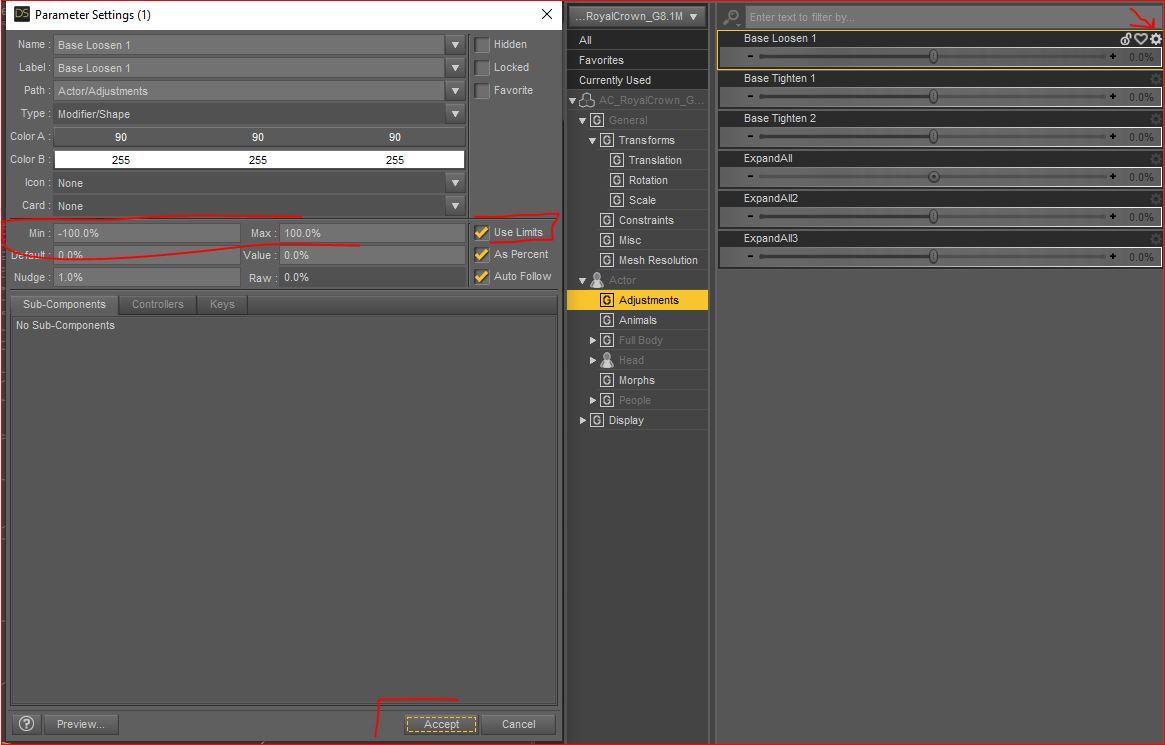
Another tactic is to select the clothing object and check the 'currently used' parameters...dialing out the figure's morph from the clothing quite often helps, especially when coupled with dForce. I also use this tactic to fix necklace wonk, as that's another culprit for uber distortion with figures morphed away from base.
[Released] Beverly HD for Brooke 8.1 (Commercial)Pantros2 said:
I love the character but I need to know.
Does this character's material cover gens? Or is this an incomplete character (Barbie Doll)?
I don't see gen mats listed but sometimes the character's "full" base mat covers gens.
Yes, in this case the character includes both maps and shape for that. Once you added the "Genesis 8 Female Genitalia" on you character you just need to load the "Beverly All Maps" on it.
I also suggest you to use her proper shape. There are 2 morphs that you should use at the same time: the first one is on the character (it's needed to shape her pelvis), the second one is on the anatomical element (it's needed to give it the special Beverly's gens shape). You can find the first morph in: "Parameters/Actor/Hip/Beverly Pelvis for Genital". The second one is located in:"Parameters/Actor/Beverly Genital Shape". No matter the order you trigger them. Just remeber: be always sure to use the same HD level for character and anatomical elements, whatever your character.[Released] Beverly HD for Brooke 8.1 (Commercial)As some of you are demanding, here’s two test pictures about using Beverly shapes without the required Brooke 8.1 morphs. Beverly needs the same percentage of Brooke 8.1 morphs because Brooke 8.1 is the first layer of mass on which Beverly character has been designed. As you can see from these pictures Beverly Body with 0% of Brooke 8.1 Body morph is definitely an unnatural shape. Maybe you’ll still be able to use Beverly Head morph as a new head shape, but that’s not the Beverly face you are seeing in the promos.
dForce Brookes Autumn Outfit for Genesis 8 Females weird boob shapesThis is... unfortunately pretty standard if the creator doesn't add rigidity maps to the area. While it's a problem that can be fixed by morph by morph correctives (and many outfits have fixes for the standard Daz Original body morphs), that approach immediately falls apart any time if other morphs are used - basically any body shape that includes its own breast shaping. Submit a ticket about it, because it's not particularly easy to fix if you're not already familiar with rigidity mapping.
~~~~~
As is, I'm not seeing any difference between your images, so you may have mistakenly uploaded the same image twice. (Or that part of the outfit is not dynamic, but unless there were something to sim, dForce shouldn't've run). That said, in clothing items that are fully dynamic, it can potentially be handled by doing a timeline simulation that fades the bodyshape in over time - on the left, autofollow. On the right, a dForce fitting:
 Morphs on Geografts... how?
I'm using Blender and ex- and import as an OBJ. I make sure vertex order is kept intact.
My problem was trying to apply the morph to a fitted geograft. Works fine now with unfitting it first, applying the morph, then refitting it.
[Released] Beverly HD for Brooke 8.1 (Commercial)I still would like to see her head morph without Brooke...[Released] Beverly HD for Brooke 8.1 (Commercial)Mechasar said:
As JamesJAB said, Beverly uses Brooke morphs at 100%. The result without Brooke is an unnatural body. Even if you want to mix the Beverly body shape with your other characters, she needs the Brooke body morph in the same percentage.
Congrats on the release. You are one of my favorite artists. Fantastic work on her.
[Released] Beverly HD for Brooke 8.1 (Commercial)As JamesJAB said, Beverly uses Brooke morphs at 100%. The result without Brooke is an unnatural body. Even if you want to mix the Beverly body shape with your other characters, she needs the Brooke body morph in the same percentage.
[Released] Beverly HD for Brooke 8.1 (Commercial)JamesJAB said:
Nope... I dialed out Brooke, and will not spent the time to do a render.
Beverly uses Brooke dialed at 100%, so without the Brooke morph active the result is less than ideal.
On a side note, here is a quick render of this wonderful new character!

Well, I am sure she looks best with Brooke dialed in. Nevetheless I don't own Brooke yet. Will probably get her once she's out of new and getting a higher discount but would therefore like to know how Beverly looks without her for the moment.
[Released] Beverly HD for Brooke 8.1 (Commercial)Nope... I dialed out Brooke, and will not spent the time to do a render.
Beverly uses Brooke dialed at 100%, so without the Brooke morph active the result is less than ideal.
On a side note, here is a quick render of this wonderful new character!
ERC Freezecerealpirate said:
I am working on ERC a model and when I freeze it all of my joints I set using the joint editor is lost. is there a way to keep all of the joints ??
Are you losing the original joints. not adjusted for the morph? If so you need to memorise the figure's rigging in the base state, fright-click>memorise>Memorise Figure Rigging, before you do any morph freezing - Adjust Rigging to shape makes chnages from the memorised state, and ERC Freeze links those differences and then sets the rigging back to its memorised state.
Morphs on Geografts... how?Catherine3678ab said:
charles said:
Sure, but I've had it with Hex crashing, Blender is the way to go.
Yes Blender has improved its interface a lot and certainly has a lot to offer. However, what Hexagon has with D/S is called a working bridge. If you have mastered the export settings for an .obj export to import into Blender; and back out from Blender to import into D/S, wonderful.
Depending upon the edition, and the settings used, .obj files exported from D/S have some terrible things happen to them going by the readings in Hexagon. {Generally speaking with regard to the surfaces} The figure bridged over to Hexagon will be one mesh and have all the surfaces reading correctly. Tip: For cases wherein an .obj export and import into another program is not working well, one can bridge the figure into Hexagon, then export out the .obj from Hexagon. Import that .obj into the other modeller {i.e. Sculptris or whatever} to mold a morph, export that out as .obj. Import that into Hexagon. Then [careful that the names match] bridge that morphed mesh back into D/S to create the morph.
Yep, that kind of bridge to Blender for sculpting morphs would be very welcome and, as it happens, someone is working on one (it has been mentioned in the Blender forum here).
May 2021 - Daz 3D New User Challenge - Using Props and Push Modifiers/DeformersOriginalSamhain said:
davidjones8418 said:
OriginalSamhain, I am struggling myself to work out what to do here. I spend so much of my time trying to work around tricky stuff like this!
You could use a dformer to pull down the skin under the fingers. Apply the d-former to the body part, manouver the field into the right spot, fiddle with the x/y/z scale of the field and then use the d-former control to push/pull the skin. It's time consuming and I was doing this for everything nefore I discovered clothing helper etc. What was I thinking!?
Not sure how much it should dig in anyway. Real shoulders just aren't very fleshy. Compared to other squishier body parts. Maybe move the arm up so the wrist is bending higher?
That's basically what I did, I think. I essentially just followed the video tutorial in the first post and it was just a matter of setting the brush to a very narrow size, then looking at where his finger was clipping, bending that finger back and painting in the dip - super tedious and probably completely the wrong way of doing it!
If you get the intended result then it is never the wrong way. That said, the look of that would be subtle (it wouldnt be very pronounced or firm - to know you could always stand in a mirror and grab your own shoulder as sometimes that helps to see what you need) Personally I think it looks really good and nicely done. If you wanted it more pronounced you could try taking limits off the dial for that perticular morph. To do that, go to the dial you made (like the KickRipple dial in the video) and then click on the little cog wheel on the right hand side of that dial and then see what limits are set on your dial. You can uncheck limits and completely shut them off to get more depth or you can change the minimum and maximum numbers. That said, occasionally as you make the morph/depth more pronounced it can start to look odd so you want to strike a balance between accentuating the look and going "too far". Hope that helps

Face Mojo [Commercial]his x said:
I too am now a happy camper. My experiments aen't finished yet, but I've succeeded in superimposing my own facial movements onto one of my characters, and the results are what I'm looking for. It was simple enough to do, too. I used the Face Mojo iOS capture program. I recomment it, even though there are other ways to get the data into DAZ.
Now I'm going to see how easy it is to tweak the facial expressions in DAZ. My original video recording is much more expressive than the result in DAZ, so if I can, I'm going to bring them more into line with one another. I'm a bit concerned that there are many new morph controls with inscrutable names, and nothing more than YT videos as a guide. In fairness, it's a sign of the times.
Even if I totally fail at the tweaking part, the results just as they are are good enough that I would use them as is. Mocap rules. I'm sold.
Hi! Thanks for sharing your experience!
I find the easiest way to adjust the animation is using the Strength Modifiers found in 'Actor/Face Mojo' and 'Pose Controls/Face Mojo.' They can be animated and it's easier to set them where and when needed vs. trying adjust the keyframes created on the morphs themselves during the baking process.
I will give the documentation a look over and see if I can make it more comprehensive as well as make a new video showing what I'm describing with the Stength Modifiers.
Face Mojo [Commercial]charles.conyers_5a1dbe4d8c said:
This is a FANTASTIC app-- works exactly as advertised in Daz Studio. I'd LOVE to be able to use it in Unreal Engine, but I am absolutely stumped as to how to make this happen. I tried exporting from Daz, but that only seems to work with animations as keyframes on the timeline. Unreal DOES read blend shapes and morph targets, but I'm not really sure how to get that information into Unreal.
I've also experimented using Live Link Face with Genesis 8 models in Unreal, and I hate it. It's just not as articulate as Face Mojo is, but I simply CANNOT GET IT OUT OF DAZ! I love the results of Face Mojo, and I love the speed and efficiency of Unreal Engine. How the heck can I get these two things to work together?!Hi! Thanks, and thanks for sharing your experience!
I'm not sure of the best way to try and get the best of both worlds, so to speak.
I have this video that shows how to export the Face Mojo animation on a character out of Daz Studio via FBX:
Does that process work to then take to UE for rendering?
Tongue Deform Glitch, Spiky (Lickalicious)felis said:
My guess is that it is an unwanted morph kicking in.
Do you have any morphs packs for the tongue?
If you do not pose it, is there then also deformation?
My suggestion is to load it on a default G8F, and then get the problem to kick in, and then look in parameters under currently used, with show hidden enabled, for the tongue, and then I would assume you can find the morph causing the problem.
Thank you very much for responding!
Thanks to you I learned you can delete parameters without having to dig around in my library!
Yes I have a few morph packs like easy tongue, i tried deleting them but the issue persisted, but I could try to be more thorough.
Solution: It's fixed.. mostly. I'm pretty sure it was TMC (Teeth master control) that was causing the biggest conflict.
Thanks again!
SereneNight’s Sci-Fi Fun Thread 3Here's more legacy of the 3DU infant morph. It seems to interfere with expressions. Brow Outer Down and Brow Outer Down Right for infant are dialed in hidden and are affecting expressions on G8M
 How to fit cloth with other other meshes to charactor?
Dforce will most likely screw it up because I will bet it has submeshes for the loops and things. it'll look goofy. Your best bet is to export the belt as an obj (base resolution) by itself and bring it into blender, then use the sculpting option and either nudge or pose (or both) to realign the belt like you want (use mask to block off sections like holster or whatever you don't want to effect). Export that (keep verts order) from blender as an OBJ and use Daz's Morph Loader Pro and reimport that as a morph on the belt.
Face Transfer Squash FacesLike you said they are using the 3rd party tool Zbrush, not a photo transfer add on. I've been using FaceBuilder combined with Blender for great results.
Morphs on Geografts... how?charles said:
Sure, but I've had it with Hex crashing, Blender is the way to go.
Yes Blender has improved its interface a lot and certainly has a lot to offer. However, what Hexagon has with D/S is called a working bridge. If you have mastered the export settings for an .obj export to import into Blender; and back out from Blender to import into D/S, wonderful.
Depending upon the edition, and the settings used, .obj files exported from D/S have some terrible things happen to them going by the readings in Hexagon. {Generally speaking with regard to the surfaces} The figure bridged over to Hexagon will be one mesh and have all the surfaces reading correctly. Tip: For cases wherein an .obj export and import into another program is not working well, one can bridge the figure into Hexagon, then export out the .obj from Hexagon. Import that .obj into the other modeller {i.e. Sculptris or whatever} to mold a morph, export that out as .obj. Import that into Hexagon. Then [careful that the names match] bridge that morphed mesh back into D/S to create the morph.
Daz 3D is part of

Connect
DAZ Productions, Inc.
7533 S Center View Ct #4664
West Jordan, UT 84084Licensing Agreement | Terms of Service | Privacy Policy | EULA
© 2026 Daz Productions Inc. All Rights Reserved.