-
[Released] Blender to Daz Studio Plugin released!!! Official support thread [Commercial]
UncannyValet said:
reitaku said:
However, the issue is that editing the hair (curves?) exported in OBJ format is difficult, and I'm stuck.
As you have discovered, your order of operations might not be the best workflow as you cannot easily re-style the curves in Blender once they are like this.
I am not at a computer right now so cannot refresh my mind as to a good workflow, but I believe you can right click on imported polyline mesh in Blender and go to Convert to -> Curve then right click and Convert to -> Curves, which makes the hair into Blender's new Geometry Node hair. Then you need to update Hair's surface to be your Genesis Figure or haircap. At this point, I beleive you can use the Sculpt mode to style the hair curves in Blender's Hair Curves system. But I am doubtful that is going to preserve the vertex order. If vertex order is not preserved, morph loader will not work.
To ensure vertex index is preserved, it is probably best to go back a few steps and make all the morphs for the hair before doing the conversion/export. I believe I might have mentioned that in the link you posted, but I also cannot access deviantart on my current ISP so cannot remind myself what I wrote.
Thank you very much!
Following the steps, I was able to convert the object into a curve and then sculpt the Hair. After sculpting, I converted the curve back into a mesh and loaded it into Morph.
Morph works fine when set to 100%, but the appearance becomes poor when set between 0 and 100%. What could be causing this?


 G9 Woes
Transfer your G8 shape to G9 (manually*). Add any native G9 content to the G9. Hide the G9 but not the G9 content you added. Render your G8 with the G9 content.
I do it all the time in both directions. I personally prefer G9, but I use that technique all in the time all manner of directions.
Only a chore when first setting up. I spent time setting up scene subsets for conversions between various bases. Now I can use those with a quick export and morph import whenever I change a shape or pose. Takes me 30 seconds. This post took me a few minutes to write.
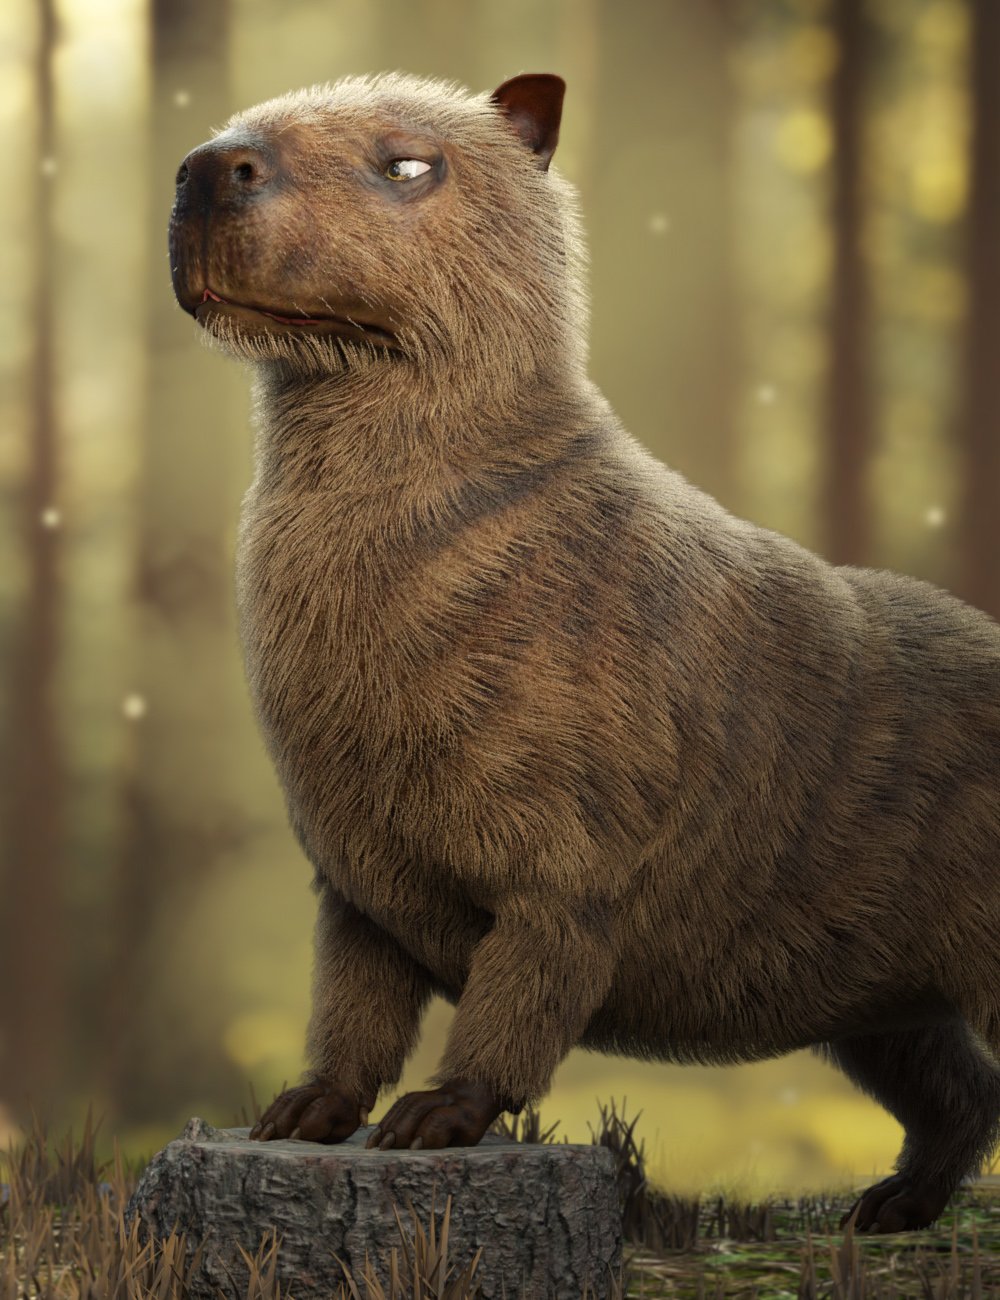
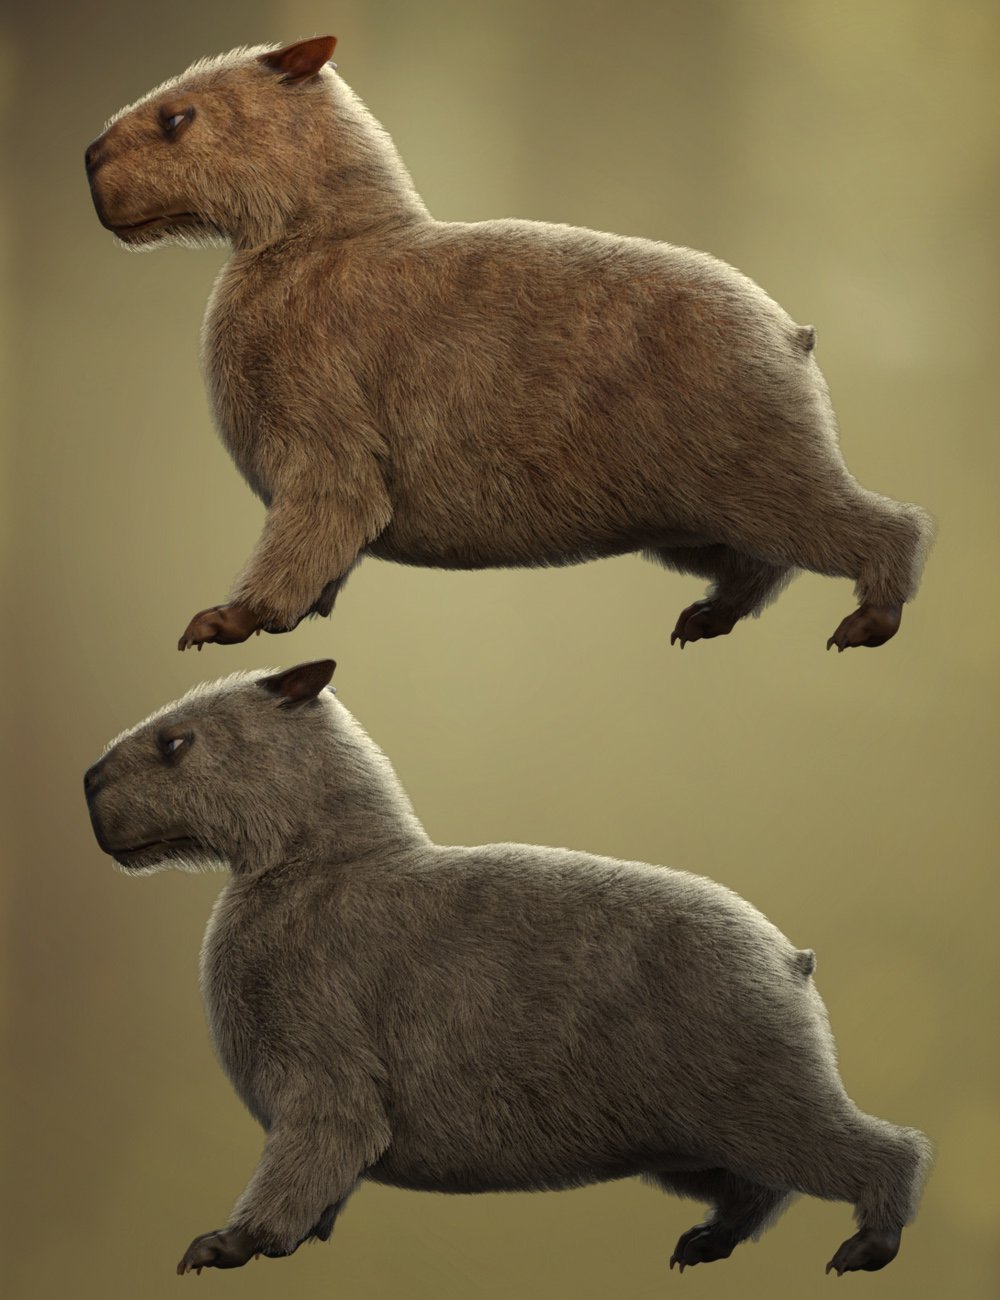
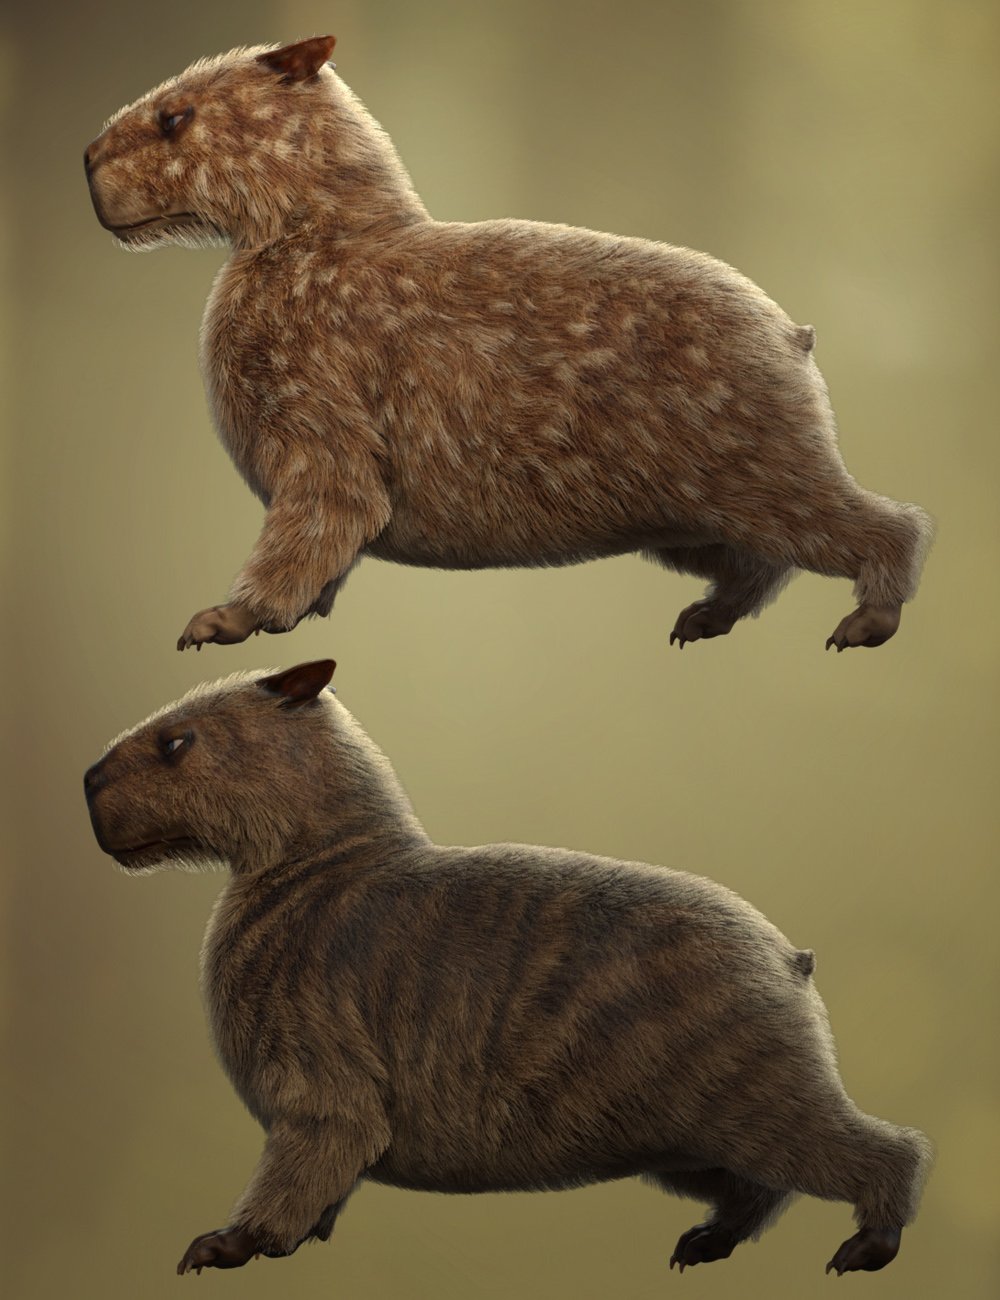
Capybara for Daz Dog 8 [commercial]Raw Capybara for Daz Dog 8
https://www.daz3d.com/raw-capybara-for-daz-dog-8
Turn your DAZ Dog 8 into the world’s chillest and most majestic rodent with this detailed Capybara morph and texture set.
Native to the wetlands of South America, the Capybara is known for its calm demeanor and social charm, and now it can take center stage in your renders, whether it's lounging by the riverbank or leading an animal council deep in the forest.
This set includes five unique fur styles: natural Classic Brown and Black, wild Fantasy Striped and Spotted, and a surreal Green Alien variant for sci-fi or whimsical scenes. Mix and match with five expressive eye color options to create your perfect capy companion.
High Definition morphs, Ultra Realistic textures, and dForce fur included to enhance the reality of this character.What's Included and Features
- Raw Capybara for Dog 8 : (.DUF)
- One CapybaraCharacter Preset
- One CapybaraShaping Preset
- Material Options:
- Five CapybaraFull Skin Material Presets
- Five Eye Material Presets
- Textures Include:
- 15 Textures for Diffuse, Transparency, Normal, Specular, and Transparency Maps
- Addons:
- One dHair Fur Attachment
 Smooth Out Imperfections in Clothing When Posed?
n.aspros123 said:
crosswind said:
n.aspros123 said:
crosswind said:
Okay, but they're different in terms of design ~ It's tight under figure's breasts on the one you're using while that Rendo's one is obviously with a looser design. If the figure has larger breasts, you won't get the expected result with that Shrug Style Top... no matter you simulate in whatever way.
I suggest another way around since I ever mentioned that the initial shape of the cloting is important before simulation. You can make a morph with Blender to give the top a "looser style". (screenshot 1)
Then you'll get the expected result afer simulation and you won't have to tweak it each time after simulation. (screenshot 2)
Which tools did you use in Blender to make the morph?
As usual, Draw brush and Smooth brush in Sculpt mode.
I don't know what's going on with Blender. When scuplting the top using the draw and smooth brushes, it looks okay. See Top Blender 1 and Top Blender 2. When I change back to Object mode the top doesn't look as smooth while in sculpt mode. Top Blender 3. I've tried more smoothing and drawing sculpting. Best I can without someone having a look for me.
Did I have the Draw and Smooth brushes Radius and Strength set correctly?
When I dForce the top with the Blender Morph, it doesn't look smooth under the breasts. See Top After Blender 1 and Top Blender 4 p. I also have the use Mesh Grabber to pull the bottom of the top out as it clips with the skirt.
I can share any files if needed to be troubleshooted.
Can I try your top morph.obj ? @crosswind . I think the mesh in yours might be better than mine possibly. When the silk shader is applied, the imperfections standout more possibly?
Is your figure the base figure or a character morph?
There is one big annoying issue in DS, that is a downer.
When you make changes in body proportions of your character, as part of a full body morph, you will get those ugly creases all the time.
It happens on clothes and also on hair.
I have not yet found a solution to avoid this. I have fixed it in zbrush and saved it as a character morph on the cloth set, but when loading the clothing the next time the same ugly creases are back.
It might go away with a dforce simulation, but not permanently.
Problems with geograft morph mergingI think crosswind is right, as far as I can tell.
Morph your character with its geograft as you like it.
Export BOTH as obj at base resolution
Set those morphs in question (Character AND geograft) to Zero now.
Use Morph loader Pro and have "Primary figure from Graft" in the top down menue activated on your MAIN character.
Just in case have "Reverse Deformation" set to "YES"
If you are happy with the resulting morph, place it in your prefered parameter hirachy.
Do not forget to save your new morph asset.
Now repeat the process, but THIS TIME, you have the geograft selected.
Now place your morph for the geograft in the same hirachy order as your main character morph before.
Example:
Main Character:
Actor:
My morphs:
coolmorph
Geograft:
Actor
My morphs:
coolmorph
Don't get confused, if you don't see your "coolmorph" on your geograft, because it is hidden.
Save your morph, if you are happy with it as a morph asset.
You can see this morph, if you check "Show hidden Properties" in your Parameter tab.
For using your "coolmorph", you will only need to use the "coolmorph" dial on your main character, the morph on the geograft with the same name and position will automaticly follow.
Close your project, but DON'T save the scene, in order to avoid the risk of dublicate formulas.
Reopen your character with its geograft and it should work fine. You can save the scene from now on.
Is that model comes from a product ?Fabiana said:
Hello @sioc :)
The morph is a mix, I am positive that Chrryt Shara is there, maybe 50 or 60% and a bit of Tauriel. Skin is full Tauriel as I can remember.Hope this helps!
I am always happy to give more info!
Thanks a lot!
here my try render
Smooth Out Imperfections in Clothing When Posed?n.aspros123 said:
crosswind said:
Oh, you just didn't draw / smooth the top enough... Suggest you turn on symmetry on X axis as well as Wireframe to checking the mesh change while sculpting.
You can try with the morph of initial shape I made but since you shaped your figure with different body morph, my morph may not really work well on it ~~
(extract the data folder in the attached ZIP to the root directory of your Daz Library. Reload the top and dial the morph: Initial Shape)
I'll try again with sculpting the top. @crosswind
When sculpting with Draw and Smoothing brushes:
- What do you set your Radius and Strength at?
There's no absolute rule... Setting Radius depends on the size of target mesh, if using symmetry, about 1/2 of this Top's width. Strength can be both set as 0.3 ~ 0.4 in this case if without a tablet.
- Do you Draw first then Smooth the areas?
Smooth the crease first (esp. on the area of cleavage and under breasts...) so that you can Draw, then Draw and Smooth.
- What areas of the top do you concentrate on?
Upper line, cleavage, under breasts and ribs... just with an aim to make it looser.
- How much do you Draw out and Smooth in, this top by?
Make 0.5 ~ 1 cm in between figure's body and Top so as to assure a better simulation result in DS.
If I cannot succeed with it, maybe Hot Coffee time if you know what I mean?
And there's no other special tricks.... Don't expect you can make perfect result at the beginning, you just need more practice. The more you practice, the more you'll be proficient in it.
 G9 Woes
Gordig said:
Masterstroke said:
BTW:
What are the significant G9 advantages of G8 again?
Why has there been a need for G9? I just can't see any reason.You say that as if many, many people haven't explained it to you already. You can find the argument unpersuasive, but you don't get to act like nobody is making the argument.
I am just not convinced. Everything, that as been introduced with G9, is possible with G8 as well. So why again, please?
8k texture - check
better expressions G8.1 started it. - check
(BTW: Standard expressions doesn't really work on heavy customized characters anyway)
Unisex, for better vendors' support. Give a male base morph to G8F - check
Renaming groups for industrial standards - just call it G8.2 - well kinda check
So, what do we need G9 for?
(Just on a side note:
To answer the elephant in the room, why I am so upset with the G9 release:
Improvements on assets are focussing on G9 and cut me off from benefitting from those.
I see the DAZ marketplace sailing away without me, being potentially left with outdated content.
Most annoying example is Strand base dforce Hair for G9 only, unsuable with previous G8.)
Smooth Out Imperfections in Clothing When Posed?crosswind said:
Oh, you just didn't draw / smooth the top enough... Suggest you turn on symmetry on X axis as well as Wireframe to checking the mesh change while sculpting.
You can try with the morph of initial shape I made but since you shaped your figure with different body morph, my morph may not really work well on it ~~
(extract the data folder in the attached ZIP to the root directory of your Daz Library. Reload the top and dial the morph: Initial Shape)
I'll try again with sculpting the top. @crosswind
When sculpting with Draw and Smoothing brushes:
- What do you set your Radius and Strength at?
- Do you Draw first then Smooth the areas?
- What areas of the top do you concentrate on?
- How much do you Draw out and Smooth in, this top by?
If I cannot succeed with it, maybe Hot Coffee time if you know what I mean?
[Released] Blender to Daz Studio Plugin released!!! Official support thread [Commercial]reitaku said:
However, the issue is that editing the hair (curves?) exported in OBJ format is difficult, and I'm stuck.
As you have discovered, your order of operations might not be the best workflow as you cannot easily re-style the curves in Blender once they are like this.
I am not at a computer right now so cannot refresh my mind as to a good workflow, but I believe you can right click on imported polyline mesh in Blender and go to Convert to -> Curve then right click and Convert to -> Curves, which makes the hair into Blender's new Geometry Node hair. Then you need to update Hair's surface to be your Genesis Figure or haircap. At this point, I beleive you can use the Sculpt mode to style the hair curves in Blender's Hair Curves system. But I am doubtful that is going to preserve the vertex order. If vertex order is not preserved, morph loader will not work.
To ensure vertex index is preserved, it is probably best to go back a few steps and make all the morphs for the hair before doing the conversion/export. I believe I might have mentioned that in the link you posted, but I also cannot access deviantart on my current ISP so cannot remind myself what I wrote.
[Released] Blender to Daz Studio Plugin released!!! Official support thread [Commercial]Thanks for the advice!
According to this article(https://www.deviantart.com/uncannyvalet/journal/Blender-Hair-in-Daz-Studio-Making-Polyline-Hair-1088126863),
I should be able to create morphs by importing them using the “Morph Loader Pro”, so I gave it a try and was able to create morphs.
(Procedure)
After importing hair into DAZ using the plugin, export it in OBJ format and import it into “Morph Loader Pro” to create morphs.However, the issue is that editing the hair (curves?) exported in OBJ format is difficult, and I'm stuck.
Problems with geograft morph mergingFirst, when exporting, you don't have to hide stuff at all, in OBJ Export Options dialogue, tick Filter by Objects, choose Selected Roots in Objects dropdown list.
Then I don't quite understand what you really want, so let's confirm first: You want to make a single morph on G8F, when it's dialed, the shape of 17 morphs on the geo-graft plus 4 morphs on G8F will be in place, is that correct ? And you don't want to keep 17 + 4 morph properties any more, right ?
Will DAZ ever improve animating?wolf359 said:
learn how to get their content out of DS. It's easier and easier all the time.
Diffeo/Auto rig pro with quick rig extension is all you need.
once you transfer your FACS & phonemes to blender shape keys ,via diffeo ,you have a Daz figure with a professional HIK control rig but can still accept facial animation from the many Daz sources such as Anilip3 or 32 bit mimic etc.
I do animation completely in DAZ Studio everyday. Of course the IK (especially on later bases, like G8 and G9) are a nightmare (that's why I'm still using G1 which got way better IKs) but once you grasp how it woks, it's not that hard make animations. All in a single software without the need of jumping here and there to make things like lipsynch, walk cycles or just a char getting up from a chair.How are you creating lipsynch for the G1 figures?
The only 64 bit option
for lipsynch (such as Anilip3 or face mojo etc) are all third party
& made for G8-9 and will need updating for DS6 (2025) ,along with Animate 2If you are using the default mimic in DS you are restricted to using not only an older version of DS but a 32 bit version that has limited RAM addressing
I understand all of that may be fine for you but to be fair many DS users would likely prefer to use G8-9 in a 64bit version of DS.I have both 64 and 32 bit versions installed, when I need to make a lipsynch, I simply start another session with the 32bit version, load G1 (or any other figure I need), select the audio file and input the text for a more precise result.
it seems We cross posted
So you are having to jump “here and there" for your lipsinc?
again which is fine for you ,but I imagine Alot of DS users have moved beyond G1 and 32 bit software many years agoDAZ Studio already got all it needs to compete with any other 3D software.
I have Autodesk Maya indie, Maxon C4DR25 perpetual, Blender and and older Reallusion Iclone7&CC3.
Even with my older Iclone 7& CC3
I am not having to use figure rigs from13 years ago (as you are with G1)what is your actual experience with other non Daz software that forms your comparative opinion?
Wolf brings The Truth(tm), as usual. I'd add Animation Layers to the list of "must haves".
And I think we must also qualify our claims. I don't think anyone can say that one cannot animate in DS. Since 2018, I've seen exactly 2 examples of what I would consider high-quality animations done with it. So the correct thing to ask is not can you animate in DS, but rather should you animate in DAZ Studio.
And to answer that, I cite that I still have never heard a person who has used any of the apps we both cited say that DS is anything but deplorable at animation. It doesn't prove anyone's point to say "I animate in DAZ Studio all the time" because the easy counter is "Yes, but it would have been better and faster if you had used the modern tools of which other packages avail you." How are we still tolerating and even defending rigs with bad, feature poor, or unreliable IK in 2025? There is no way that the defenders have every used a real rig, is all I can think of... I would find another hobby before going back to life-before-ARP.
Smooth Out Imperfections in Clothing When Posed?Oh, you just didn't draw / smooth the top enough... Suggest you turn on symmetry on X axis as well as Wireframe to checking the mesh change while sculpting.
You can try with the morph of initial shape I made but since you shaped your figure with different body morph, my morph may not really work well on it ~~
(extract the data folder in the attached ZIP to the root directory of your Daz Library. Reload the top and dial the morph: Initial Shape)
[Released] Blender to Daz Studio Plugin released!!! Official support thread [Commercial]reitaku said:
Hello! I was able to import hair into Daz using polylines, but how do I add morphs? It doesn't seem to be possible to edit in GoZ. Any advice would be greatly appreciated!
ZBrush is not able to import polylines no matter with GoZ or OBJ.
You can further sculpt the hair curves your created in Blender, export curves to DS as polylines again with this BTD add-on. Then create the morph by using the sculpted polyline object in DS, i.e. export it to OBJ, import OBJ as a morph with Morph Loader Pro. More steps but it should be a quicker way.
Problems with geograft morph mergingI'll try to explain this as clear as i can. its basically about combining/merging multiple morphs into a single slider, everything works fine, i do the export at base resolution, i hide the unnecessary stuff, then importing with morph loader pro and so on all of that works fine. but now i have a specific problem when using both g8f and geograft morphs.
So basically there are 17 morphs that im combining, all which are morphs from the GEOGRAFT, but then there are another 4 morphs which are from the GENESIS 8 FEAMLE FIGURE itself, in the morphs section of that figure. Making it a total of 21 morphs having to be turned into a single morph for the geograft. However, when I'm exporting, only the 17 morphs from the geograft are merged into one, those 4 ones from the figure are completely skipped. I'm trying to find a way to merge all the 21 morphs, so the 17 morphs are already merged no issue but i need to also merge them with the other 4 ones from the G8F morphs (which are not directly geograft morphs).
I believe it could be because when i did the obj export I only selected the geograft, but if I select both the geograft and the figure I believe it wouldn't work
So, is there any fix for this or any alternative? I do use blender in case I can do something with it, I just can't figure out what to do. Or maybe could I possibly convert the G8F morphs into geograft morphs somehow?
Smooth Out Imperfections in Clothing When Posed?crosswind said:
n.aspros123 said:
crosswind said:
Okay, but they're different in terms of design ~ It's tight under figure's breasts on the one you're using while that Rendo's one is obviously with a looser design. If the figure has larger breasts, you won't get the expected result with that Shrug Style Top... no matter you simulate in whatever way.
I suggest another way around since I ever mentioned that the initial shape of the cloting is important before simulation. You can make a morph with Blender to give the top a "looser style". (screenshot 1)
Then you'll get the expected result afer simulation and you won't have to tweak it each time after simulation. (screenshot 2)
Which tools did you use in Blender to make the morph?
As usual, Draw brush and Smooth brush in Sculpt mode.
I don't know what's going on with Blender. When scuplting the top using the draw and smooth brushes, it looks okay. See Top Blender 1 and Top Blender 2. When I change back to Object mode the top doesn't look as smooth while in sculpt mode. Top Blender 3. I've tried more smoothing and drawing sculpting. Best I can without someone having a look for me.
Did I have the Draw and Smooth brushes Radius and Strength set correctly?
When I dForce the top with the Blender Morph, it doesn't look smooth under the breasts. See Top After Blender 1 and Top Blender 4 p. I also have the use Mesh Grabber to pull the bottom of the top out as it clips with the skirt.
I can share any files if needed to be troubleshooted.
Can I try your top morph.obj ? @crosswind . I think the mesh in yours might be better than mine possibly. When the silk shader is applied, the imperfections standout more possibly?
Freebie Challenge July 2025 - "Design a Book Cover" - Entries ThreadGrimm’s Fairy Tales
A classic among the classics! So many of our familiar children’s stories (though sometimes not so safe for kids) came from this collection. It, however, is not even the original source. Most of the stories told here were learned and collected from oral tales that have been told across Europe for centuries!

Freebies:
Real Book - https://www.renderosity.com/freestuff/items/73987/real-book
Pd-Soft Leather Daz Studio Shaders for Iray (book, RRH) - https://www.renderosity.com/freestuff/items/75152/pd-soft-leather-daz-studio-shaders-for-iray
Chameleon ROse 2 for Genesis 8 Female (Snow White, nails and lashes) - https://www.renderosity.com/mod/freestuff/chameleon-rose2-for-genesis-8-female/85859
Genesis 8 Female Christmas Dress 2 - (Snow White) - https://www.most-digital-creations.com/g8f_christmas_dress_2.php
KT Child G9 (RRH 100%) - https://www.renderosity.com/freestuff/items/98181/kt-child-g9
Cute Kay Toddler Morph for G9 (RRH, 10%) - https://www.renderhub.com/undeadcrabb/cute-kay-toddle-morph-for-g9
Eyes by Sir Maverick (no way to know which pack it was, link to freebies profile, RRH) - https://www.renderosity.com/users/SirMaverick/freestuff
Dress A for G9 (RRH) - https://www.renderosity.com/freestuff/items/98972/dress-a-for-g9
Sailor3HSa for G9 (Shoes RRH) - https://www.renderosity.com/freestuff/items/98454/sailor3hsa-for-g9
Basket - https://www.renderosity.com/freestuff/items/88982/basket
Hair Starter Pack (Update 1.1) (RRH) - https://www.renderosity.com/freestuff/items/98247/hair-starter-pack-update-11
Capes and Cloaks dForce G8F (RRH) - https://www.renderosity.com/freestuff/items/98539/capes-and-cloaks-dforce-g8f
SY 200 Free Morphs Genesis 8 (Snow White, RRH) - https://www.deviantart.com/sickleyield/art/SY-200-Free-Morphs-Genesis-8-756465264
Rooster - https://www.renderosity.com/freestuff/items/91408/rooster
Mossy Forest HDRI - https://polyhaven.com/a/mossy_forest
Fantasy House 1 - https://www.renderosity.com/freestuff/items/66847/fantasy-house-1
Fairy Tree 3D Model - https://www.renderhub.com/shredder/fairy-tree
CRP Standing Cute Poses 13-20 - https://www.renderosity.com/freestuff/items/97778/crp-standing-cute-poses-13-20
Toon Food Apple - trumarcar.francemi.net/foodprops_tc.htm
Yellow Bird - https://www.cgtrader.com/free-3d-models/animal/bird/low-poly-yellow-bird
Freebie Zeus Morphs (Chonk) - https://www.deviantart.com/christine13black/art/Freebie-Zeus-Morphs-1148068111
Multiple Photoshop Brushes (used in postwork, just thought I’d share since it’s a really cool resource) - https://resourceboy.com/
No Count:
Genesis 9 Essential Shapes Bundle - https://www.daz3d.com/genesis-9-essential-shapes-bundle (not really sure I even used these, but just in case)
Universal Hair Baseline 001 (Snow White) - ??? (Freebie, I think I got it from ShareCG)
Ruffle Tutu (Scaled) (Snow White) - ??? (Freebie, I think I got it from ShareCG)
Leather Outfit for Genesis 8 Female (Snow White) - ??? (Freebie, Made by RhondaR, got it from ShareCG)
SY Super Hoodie Genesis (RRH) - ??? (Freebie, Made by Sickleyield, got it from ShareCG)
Shimmery Sheer II Shaders (RRH) - ??? (Freebie, Made by AllenArt, got it from ShareCG)
Realistic Dog - ??? (Freebie, got it from CGTrader, can't find it now)
Paid:
Mesh Grabber (Mac) - https://www.daz3d.com/mesh-grabber-mac
3D Donkey - https://www.daz3d.com/3d-donkey
SY Invisilights Iray - https://www.daz3d.com/sy-invisilights-iray
Cat Zeus - https://renderhub.com/vyusur/cat-zeus
3DL Destiny For Genesis 8 Females - www.renderosity.com/marketplace/products/165290/3dl-destiny-for-genesis-8-females
I did some major reworking of the materials, the poses and even the geometry. I recently learned how to use Geometry Editor, and I also used Mesh Grabber to make some adjustments. Set up and rendered within Daz Studio Iray. Postwork in Pixelmator. No AI used.
I’ve attached the before post render (the one that says Raw Render) and the finished image file.
Space Crimes - Cover ideas(RAW Render with 1 Edit) Madeline 4.0

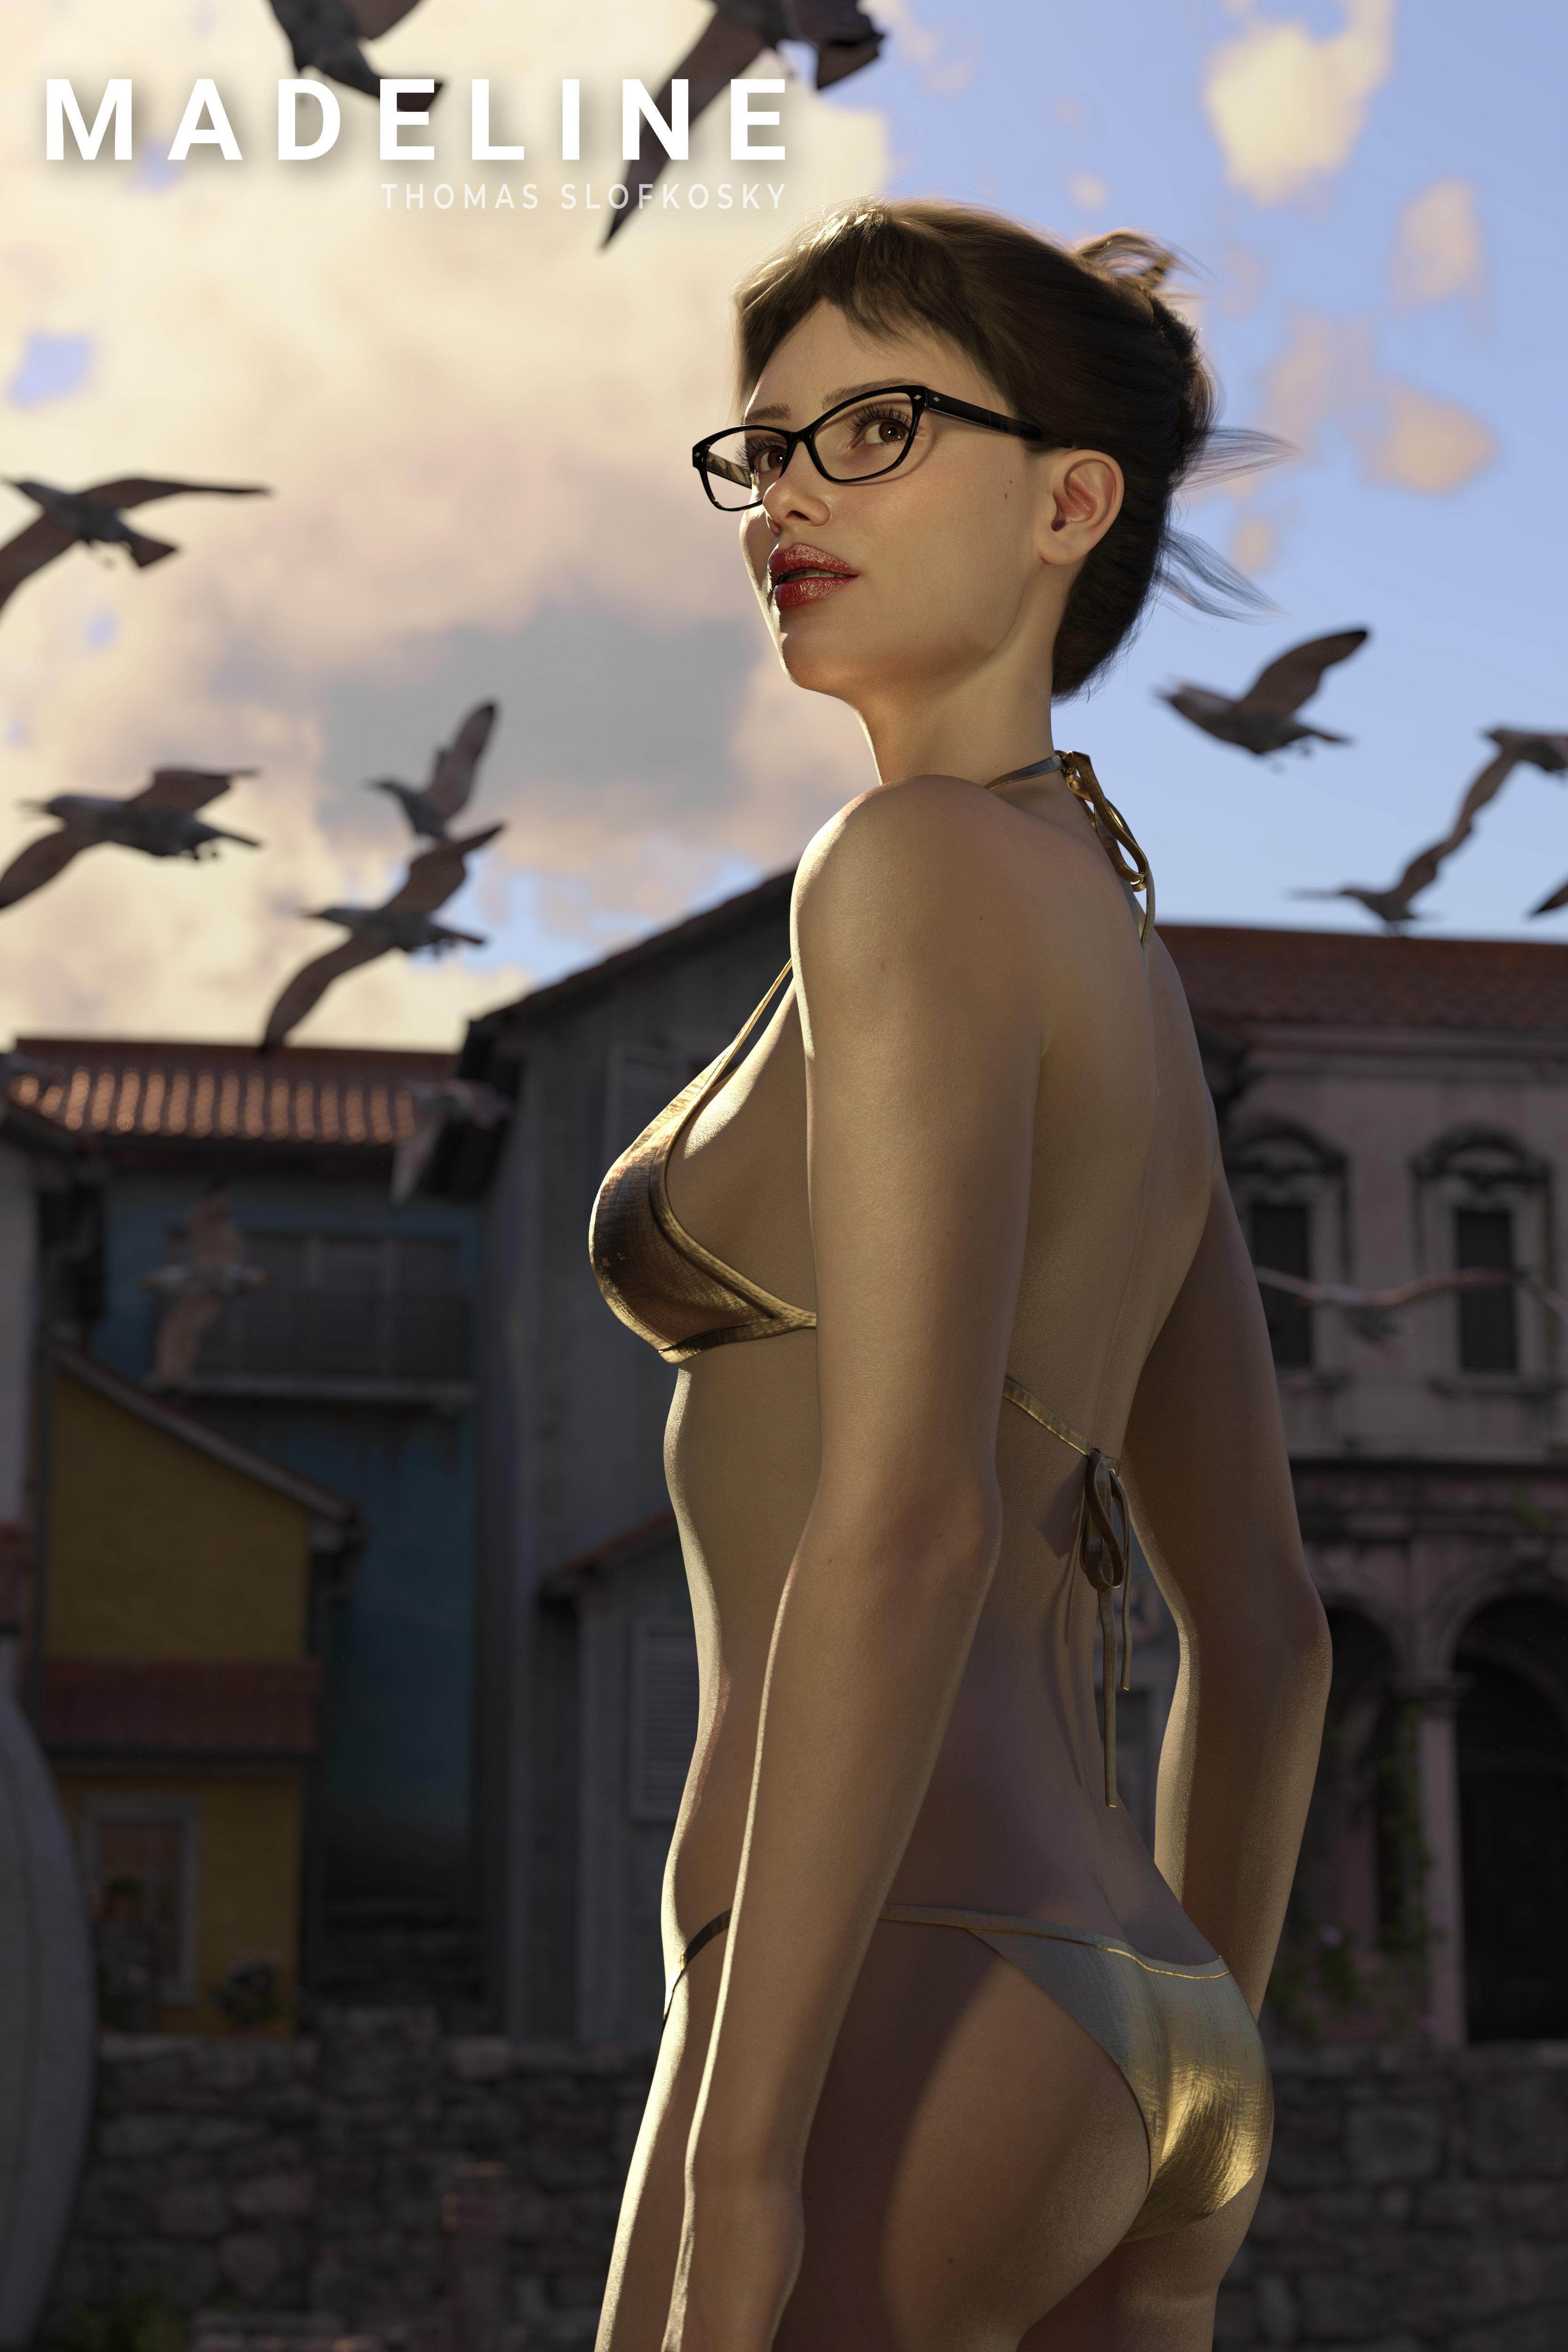
The last couple of renders of Space Crimes included edits to Madeline. I've just been so unhappy with how AI images of the duo, or any output for that matter, look so realistic and my output from Daz Studio has been sorely lacking. Then factor in my frustration of taking Madeline from G8 to G8.1 to G9 utilizing graphs and legacy MAT's has been frustrating to say the least. Try applying lipstick and it ends up on her nose. FRUSTRATING!!!
Fast forward to the last couple of weeks. I created Mads from a default G9, tried using Face Transfer, edited the skin materials and just threw that all out. Utilizing 8K Mat skin from the Snow Queen HD character.
I'm torn, is this an improvement? Is this too different a look for Madeline? I'll try some "regular" renders with this version as a test run before I work on the re-work of John.
Any thoughts?Handbag or tote bag that opensVery rare in this store... there used to be one from EJ: http://docs.daz3d.com/doku.php/public/read_me/index/57555/start ; But they moved to their Gumroad store, you can find and get it in there.
There're some on Rendo that I could find in my lib:
https://www.renderosity.com/marketplace/products/151399
https://www.renderosity.com/marketplace/products/104544Edit: Non G8F one can be easily set as a Smart Prop. Besides, you also can rig any bag to have Open morph only that'll take some time.
Daz 3D is part of

Connect
DAZ Productions, Inc.
7533 S Center View Ct #4664
West Jordan, UT 84084Licensing Agreement | Terms of Service | Privacy Policy | EULA
© 2026 Daz Productions Inc. All Rights Reserved.