Cute Bob Hair Strange Behavior
 DarkRepast
Posts: 221
DarkRepast
Posts: 221
I'm working with this asset: https://www.daz3d.com/cute-bob-hair-for-genesis-3-and-8-females
And I've found some unusual behavior. Please see the screen shots.
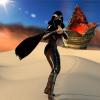
When I first apply the air to the model, the hairs themselves aren't out of place but it isn't fitted properly. So I go to change that (mess with Cranium size) and I can get that to work. But then, there are rogue hairs sticking straight out (see screenshots).
Any thoughts?
Daz 3D is part of 
Connect
DAZ Productions, Inc.
224 S 200 W, Suite #250
Salt Lake City, UT 84101
Licensing Agreement | Terms of Service | Privacy Policy | EULA
© 2024 Daz Productions Inc. All Rights Reserved.
Comments
So I reinstalled. Applied the hair. The hair does the weird 'throw out pieces in all directions' totally at random. I wasn't even moving the camera. Just started scrolling through some assets and boom, the hair went crazy.
I tried it on multiple characters however, the one in the screen shot is Audrey:
https://www.daz3d.com/audrey-hd-for-bridget-8
Having the same problem, this is on Aiko 8. Hair applies fine, do anything with the scene and it loses its form.
Hi Darkrepast. Sorry you’re having issues with the hair. I’ve had a look and it’s an errant rigidity group that is clashing with some head morphs and causing this problem. I have no clue how this happened or how it escaped my attention, but I do know how to fix it. A product update may take some time, so if you prefer a DIY fix, I can give you a guide to explain how to delete the rigidity group. With the hairs (not the cap) selected in the scene tab, go to Tool Settings - Geometry Editor and choose Vertex Selection from the options near the top of the geometry editor pane. You will see a list of rigidity groups. Right click on the bottom group, named R7, and choose remove the selected group. If you already have your character morph applied then you will need to perform one more step before you see the fix. With the hair still selected in the scene tab, go to the dropdown menu at the top right of the scene tab and choose Assets - Clear Generated Morphs. Hopefully your hair will now play nice with the character morph.
Video of fix
Thanks for the workaround! Worked for me!
Thank you so much!! This is amazing!
Thanks, I was having this issue as well. Very curious about why this happened